- 1. Record your computer screen and webcam simultaneously.
- 2. Allow you to customize screen capture and frame rate .
- 3. Powerful editing tools and effects to enrich your video clips.

How to Record a PowerPoint Presentation with Audio and Video?

The slides in presentations often contain just the most important bits of information related to the topics presentations cover. They serve as talking points the presenter uses to make an argument or start a discussion, but the implications of different points can be unclear without an in-depth explanation.
However, attending a presentation you are supposed to give is not always possible, which makes it difficult to elaborate on each point you would like to make. Recording a PowerPoint presentation is a simple solution to this problem, as you can take your audience through each slide without having to leave your home. So, in this article, we are going to show you how to record a PowerPoint presentation with audio and video.
Part 1: How to Record a PowerPoint Presentation with Audio and Video for Free?
The Record Slide Show feature is available on PowerPoint 2016, PowerPoint 2019, and PowerPoint 365. In case you have either version of PowerPoint, you can record presentations that contain both audio and video.
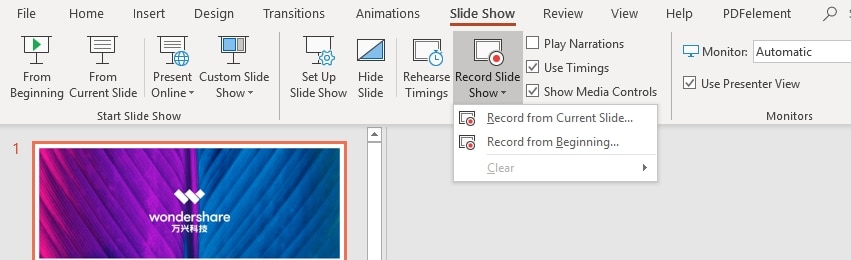
Once you have the entire presentation ready, you should go to the Slide Show tab and click on the Record Slide Show button. You should then head over the Settings drop-down menu that is located in the Presenter window and select the microphone and camera you want to use to record your slideshow. The window containing the camera feed will pop up in the lower right corner of the screen. Directly below, you can find the icon that enables you to switch off the camera feed preview, although you shouldn’t switch off this feature, as it allows you to see how you look while you’re presenting.
The Record button is located in the upper left corner of the window, so simply click on it to start recording a presentation. PowerPoint will then record the presentation that is displayed on the screen as well as the video and audio that is picked by the microphone and camera that are connected to your computer.
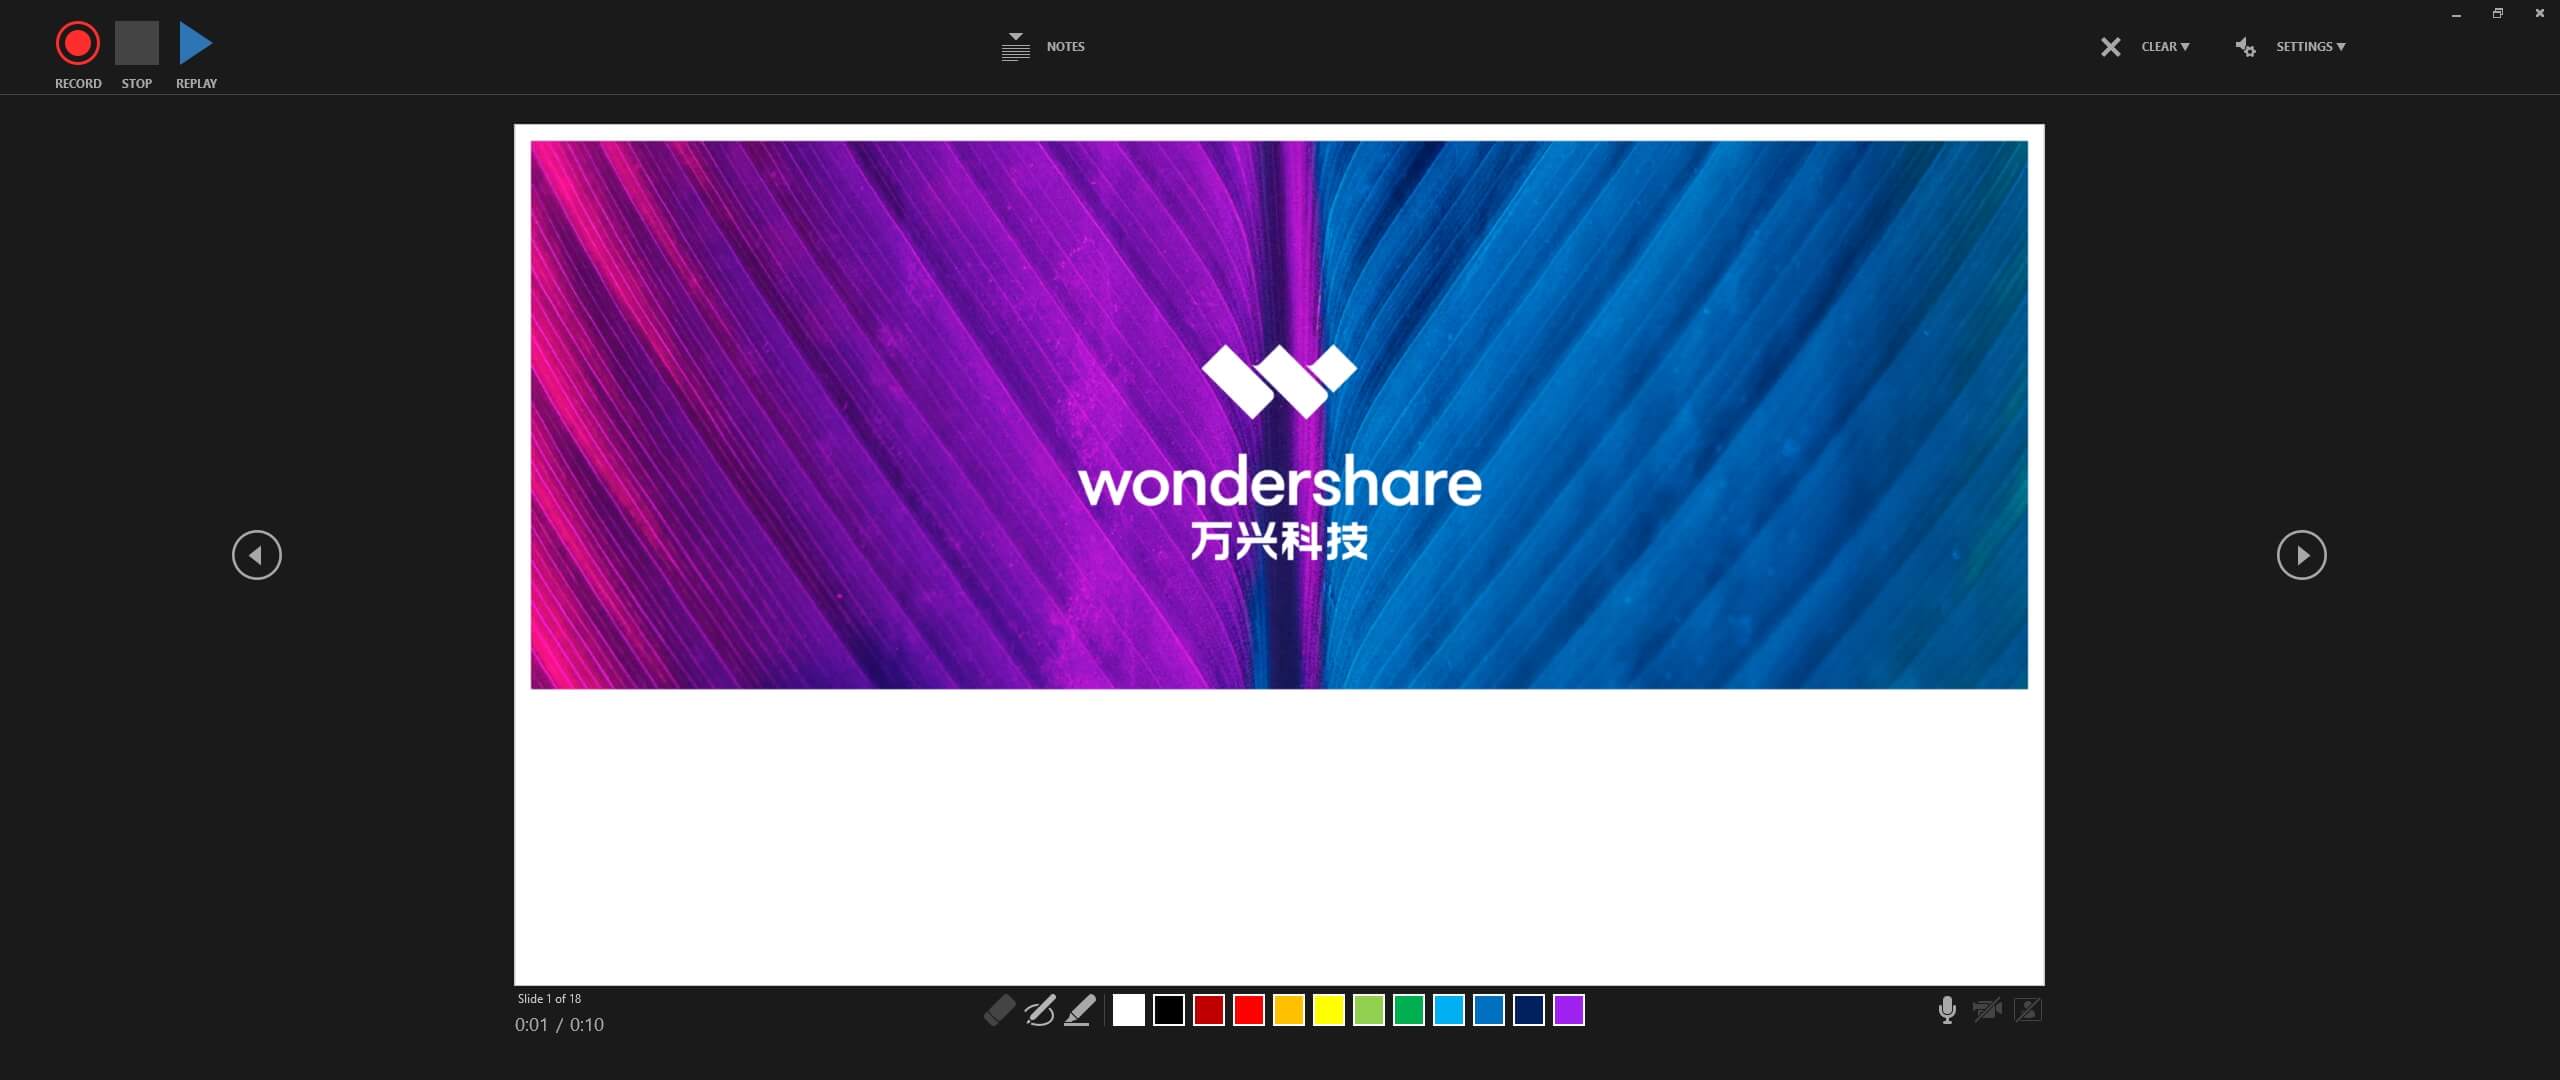
You can find annotation tools below each slide, which enables you to draw the viewer’s attention to a particular segment of the slide. Use the arrows on the left and right sides of the presentation to switch between the slides or choose a different color for the annotation tools. Click on the Stop button when you are done presenting and head back to the PowerPoint’s main window.
The videos you recorded are going to be embedded in all slides you opened during the recording session. You can reposition the video window freely within each slide by just dragging and dropping it from one position to another.
Head over to the Video Format tab, click on the Crop icon if you want to remove a part of the shot or use the Video Shape features to make the video’s edges rounded. The Format Painter option allows you to apply the changes you’ve made to the video in one slide to all other slides in the presentation.
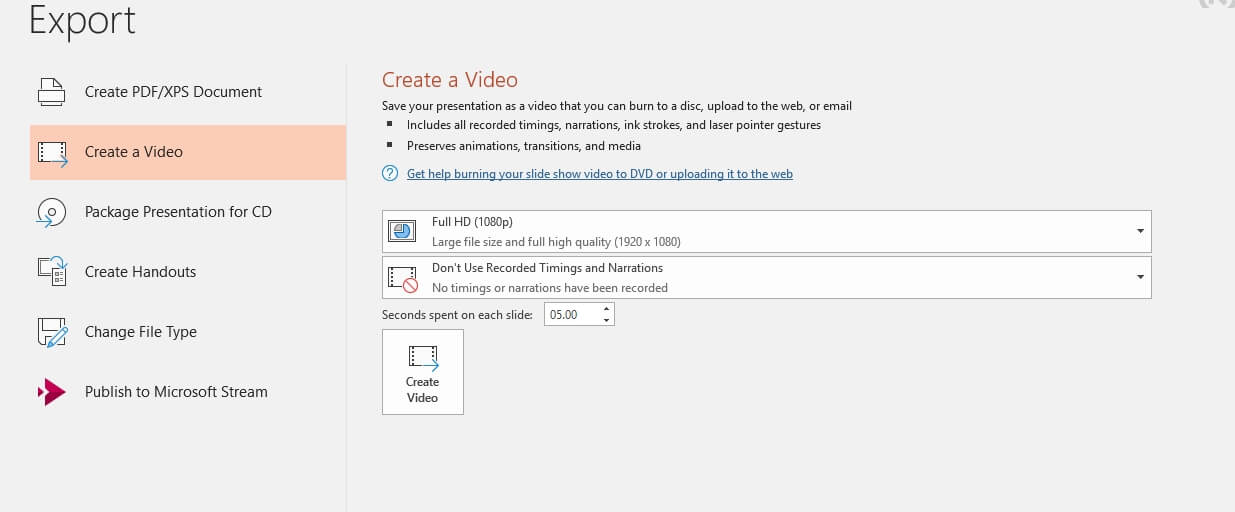
Select the Export option from the File menu and then click on the Create a Video option to save the presentation you recorded. Click on the Create Video icon in the Create a Video menu and then specify the location on the hard drive where the file is going to be saved.
Part 2: 6 Best Screen Recorder you Can Use to Record PowerPoint Presentations with Audio and Video
The PowerPoint’s Record Slide Show feature isn’t available on all versions of the software, while users have also reported that this feature isn’t available even on the versions of the software that support it. For that reason, using a third-party app is the safest option if you want to record a PowerPoint presentation that contains both audio and video. Here are the five best screen recorders you can use for this purpose:
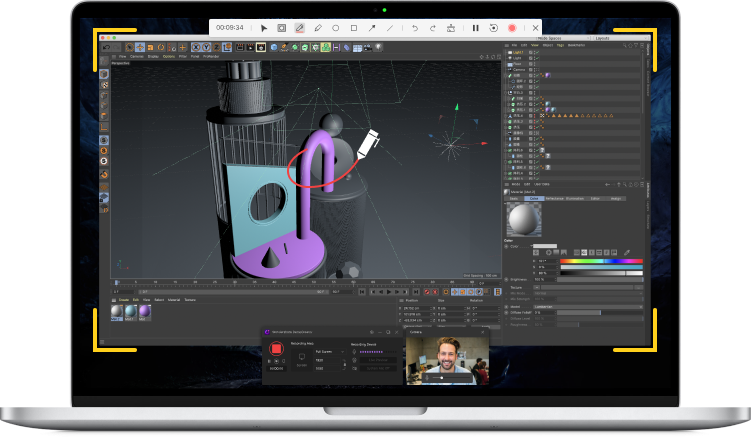
1. DemoCreator Screen Recorder
Besides editing videos you can also use the DemoCreator to capture all of your on-screen activities. The Record PC Screen option can be accessed from the Record menu that is located in the video editor’s Media tab.
DemoCreator lets you capture the entire screen, select the area of the screen you want to capture or choose the window you want to record. You can use either of these options to record a PowerPoint presentation, so you should choose the one that bests fits your needs. You should also make sure that the camera and microphone you are going to use during the screen recording session are selected, and that the Record Camera Stream option is enabled.
You can change the size of the camera window by clicking on one of the window’s corners and dragging it in the inward or outward direction and you can just click on the camera window if you want to reposition it.
Open the PowerPoint presentation and navigate to the slide from which you want the video to start before clicking on the Record button and then start presenting. When done, you should click on the stop button and head over to Filmora editing mode where you can polish your recording before exporting it.
 Secure DownloadSecure Download
Pros
- Quick and easy screen recording session setup
- Equipped with a broad range of video editing tools
- Excellent video quality
- Annotations can only be added after a screen capturing session
Cons
- All videos exported from the free version of DemoCreator are watermarked
2. Presentory
Presentory is a game-changing presentation maker and recorder that offers a host of innovative features to elevate your presentation experience. Whether you're in the realm of education, business, or any other occasion, Presentory has you covered with its cutting-edge capabilities.

Compatibility: Windows, online
Incorporate Presentory into your presentation arsenal and experience the future of presenting. With AI-powered content generation, a vast resource library, captivating animations, effortless recording and streaming, and seamless integration with your preferred platforms, Presentory empowers you to deliver outstanding presentations with ease.
Pros
- AI-Generated Presentation Assistance: Presentory harnesses the power of artificial intelligence to help you effortlessly generate presentation outlines and contents.
- Extensive Resource Library: With over 2000 resources tailored for various contexts, Presentory ensures that you have access to a wealth of materials to enhance your presentations.
- Dynamic Animations and Transitions: Bring your presentations to life with Presentory's rich collection of animations and transition effects.
- Effortless Recording and Streaming: Presentory simplifies the process of recording and streaming your presentations.
- Seamless Integration: Presentory is designed to seamlessly connect with the most popular streaming and team platforms.
AI Presentation Maker
3. Camtasia
Price: Free trial available, $249 one-time fee
Compatibility: Windows, macOS
You can record a computer screen with Camtasia in just a few simple steps. All you have to do is customize the settings, select the area of the screen you want to capture, and hit the Record button. What’s more, you can also install the PowerPoint Add-In Toolbar if you are planning on recording your PowerPoint presentations frequently.
The add-in can be accessed directly from PowerPoint, so you just have to click on the Add-ins tab, locate the Camtasia Add-in, and enable it. Afterward, you can choose the microphone you will be using to record narration or whether or not you want to display the camera preview. Optionally, you can change the frame rate of the video recording or choose the preferred video quality.
Once you’re done presenting, you should click on the Stop button and choose if you want to produce a video or continue editing the footage in Camtasia. Applying visual effects and transitions, adding textboxes or annotations are some of the options you are going to have at your disposal if you decide to edit the screen recording in Camtasia. However, you won’t be able to use any of the advanced video editing options.
Pros
- Offers the PowerPoint Add-In Toolbar
- Easy to use
- Offers a good selection of visual effects
- Lets users choose the file format for the output video
Cons
- Expensive
- Limited file sharing options
4. ScreenFlow
Price: Free trial, pricing options start at $129
Compatibility: macOS
Educators, digital marketers, or video content creators can use ScreenFlow equally efficiently. This screen recording and video editing software offer all the tools you are going to need to record a PowerPoint presentation.
You can record the computer’s screen and webcam stream simultaneously, which enables you to take your viewers through the entire presentation. Furthermore, you can connect any microphone you want to your computer and use it to record narration for the video you’re making. In addition, ScreenFlow grants you complete control over the screen recording settings, so that you can choose which area of the screen you are going to record, adjust the frame rate or increase the image quality.
After the screen capturing session, you can use ScreenFlow’s video editing tools to remove parts of the recording you don’t want to share with your viewers, apply transitions between cuts or add overlays to the video. This screen recording and video editing software offer excellent file-sharing options since you can export your projects to Facebook, YouTube, Google Drive, or Wistia. What’s more ScreenFlow also has the batch exporting capacity which allows you to export multiple video files at the same time.
Pros
- Offers standard screen recording features
- ScreenFlow allows you to choose which area of the screen you want to record
- Excellent video quality
- The effortless file sharing process
Cons
- The list of available features depends on the license you purchase
- Only available to Mac users
5. Bandicam
Price: Free, pricing options start at $39
Compatibility: Windows
Even though Bandicam is commonly used for game recording, you can still record PowerPoint presentations that contain both video and audio. You can easily add a webcam overlay to each presentation you record or even decide to mix computer sounds with the audio you capture through an external microphone.
In addition, this screen recorder is also equipped with the Chroma Key effect for the webcam which enables you to use different backgrounds in your videos. You can also draw over different parts of slides while the recording session is still in progress or outline the most important information in the presentation in real-time.
Before you start recording a PowerPoint presentation with Bandicam you can select the recording mode and choose the resolution at which your video is going to be recorded. Even though you can record videos in 4K resolution at 480fps you can only save your video files in AVI or MP4 file formats.
Moreover, you won’t be able to edit the screen recordings you make with Bandicam, because the software doesn’t have a video editing mode. You can upload your videos directly to YouTube from Bandicam, but you cannot share them on any cloud storage services or social media platforms.
Pros
- Supports screen capturing at high frame rates
- Offers a variety of screen recording modes
- Equipped with the Scheduled Recording feature
- Chroma Key effect enables users to change backgrounds easily
Cons
- No video editing options
- Support only two output video file formats
6. ShareX
Price: Free
Compatibility: Windows
This is an open-source screen recorder that allows you to start a new recording session with a single push of a button. You can decide if you want to record the PowerPoint window, specify the region of the screen you want to capture, or simply record the entire screen.
You just have to connect your microphone and camera to your PC before you start recording a PowerPoint presentation. Simply click on the Record button when you are ready to start presenting and hit the Stop button once you covered the entire presentation. Annotate Image, Add Image Effects / Watermark or Upload Image to Host are just a few among numerous automatic tasks ShareX can perform after you stop recording.
The presentations you record with ShareX can be uploaded to Google Drive, Dropbox, and countless other destinations, although you should keep in mind that this screen recorder offers only basic video editing options and that you may need a third-party video editing software if you want to remove parts of the recording or add transitions. However, ShareX is still a reliable option if you just need a tool that allows you to capture a computer’s screen and webcam footage at the same time.
Pros
- Free and open-source screen recorder
- Versatile screen capturing options
- Excellent file sharing features
- Offers a broad range of automatic after capture tasks
Cons
- Equipped with only basic image editing tools
- ShareX is not compatible with macOS
Frequently Asked Questions about PowerPoint Presentation Recording
1. Why Can’t I See the Recording Option in my PowerPoint 365?
In case you cannot see the Recording tab in PowerPoint 365, you should check if this option is enabled. You can do so by heading over to the File tab and clicking on the Options icon. Once the Options dialogue box pops up on the screen, you should locate the Customize Ribbon tab and then click on the checkbox next to the Recording tab. Afterward, just click on the OK button to confirm the changes, and you should be able to see the Recording tab in PowerPoint 365’s ribbon.
2. Why Can’t I Record Video with PowerPoint?
In case the Record Slide Show icon isn’t displayed within the Recording tab, you should use the Microsoft Office Configuration Analyzer Tool in order to check if the version of PowerPoint you are using has missing or corrupted files. If the issue persists, you should contact Microsoft’s Answer Desk.
Conclusion
Recording a presentation directly from PowerPoint is easy, but this feature isn’t available on all versions of the software. In case you don’t have a version of PowerPoint that supports this option, but you still want to record PowerPoint presentations, then you should consider using a screen recording software like Filmora or Camtasia. Besides recording a presentation, you will also be able to edit it before presenting it to viewers. Which screen recording software do you use to record PowerPoint presentations? Leave a comment and let us know.
The All-in-One Screen Recorder & Video Editor
- Record desktop screen,audio and webcam simultaneously
- Edit videos quickly with a wide range of professional tools
- Built-in plentiful video effects
- Export to MP4, MOV, MKV, GIF and multiple formats

Other Popular Articles From Wondershare