
![[2024] How to Record Minecraft – Top Tips and Tricks](https://images.wondershare.com/democreator/article/how-to-record-minecraft-1.jpg)
If you want to make it as a gaming content creator, there's one game that never fails to attract audiences and mesmerize viewers-Minecraft. With millions of monthly active players, it continually tops the charts as one of the most popular games to play, but it also tops the charts as one of the most popular titles to watch.
So, if you know the ins and outs of this game and want to share your experiences, knowledge, and unique insights with others, what better way to do it than with Minecraft content on platforms like YouTube or Twitch?
But how do you record Minecraft gameplay? How do you prepare for your videos? Is there a specific tool you should use? Let's see.
In this article

How to Record Minecraft on PC
To record Minecraft on PC, it's not enough to take any random screen capture tool, launch your game, and start to play. Though no one's stopping you from doing just that, it's not a great approach if you want to attract higher viewership.
Here's how to record Minecraft the right way.
Find a Reliable Game Recording Software
The recording software you use can make all the difference for your Minecraft videos. When you first start looking into your potential options, you'll encounter hundreds of different recording tools. To ensure you choose the right tool, you'll want to consider a few things:
- 😄 How user-friendly it is - a tool that's user-friendly and easy to get used to will allow you to start recording and sharing your gameplay videos ASAP;
- 💲 How expensive it is - if you're just starting out, you don't want a tool that will eat away at your budget within a couple of months;
- 🎬 What its FPS is - screen recorders with higher FPS (frames per second) can capture more details and make your videos smoother, which is especially useful for your action shots or slow-mo recordings you want to share;
- 🌟 What video quality it can produce - the higher your video quality, the more viewers you'll attract, so go for tools that can record up to 4k;
- 📌 Whether it has any lag - especially if you're live-streaming, you'll want to go for tools that don't lag and can keep your audio, video, and gameplay synchronized.
As a rule, you should get all the necessary insight into these factors from user comments, testimonials, and reviews. However, it's usually best to test different tools and experience them first-hand before deciding.
Adjust the Recording Configurations
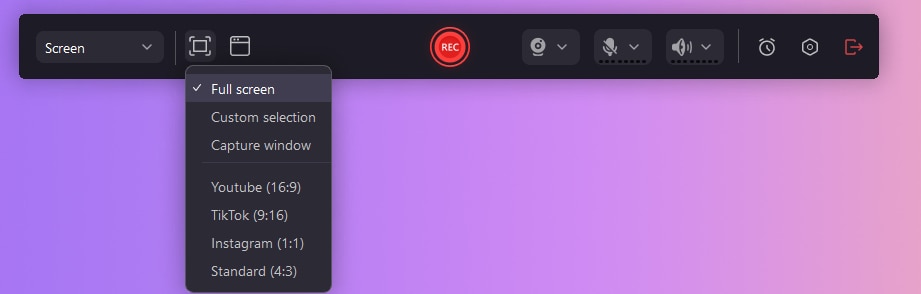
Once you've found the perfect tool, it's time to adjust the specific recording configurations you need. Though every tool is different, most will enable you to customize the settings.
You'll usually be able to choose precisely what window or area you want to record on your screen and whether you want to record your webcam and microphone audio. Some tools will also allow you to automatically adjust screen size based on the platform you want to publish on - such as YouTube, Instagram, TikTok, etc.
Upgrade Your PC if Needed
Minecraft isn't the most resource-intensive game, so you can usually play it on any run-of-the-mill PC you have (as long as it meets the minimum system requirements). Moreover, most screen recording tools also don't tend to affect your computer performance much.
That said, when you're running both simultaneously, they could quickly start eating away at your CPU.
If you want to become a professional gaming content creator, upgrading your PC is vital. You'll need a powerful PC to create content your audience will enjoy.
Consider Using a Capture Card

If you plan to live-stream regularly, you'll need the help of a capture card. Most commonly a simple external device, a capture card can be connected to your gaming PC or favorite console, allowing you to record all audiovisual content and immediately upload it to your platform of choice.
While not all streamers need a capture card (especially if they have a high-performance gaming PC), it's a valuable tool you'll likely want to look into.
Though they might be confusing at first glance, capture cards are incredibly easy to use. Check out this tutorial on YouTube to learn more.
Consider Using the High-Resolution Texture Pack

It's no secret that Minecraft doesn't have the most realistic textures and visuals - it's what makes this game so unique. However, you've likely noticed that the game looks better for some gamers than others. You've also likely noticed that gamers with seemingly better visuals tend to attract a wider audience.
That's all thanks to the high-resolution texture packs available for this game.
Though there are many fan-made texture packs, it's usually in your best interest to get them directly from Minecraft.
Best Tools for Recording Minecraft - Wondershare DemoCreator
You need the right tools to simplify the whole process and screen record like a pro. The following are the top gaming screen recorders that can make your videos look perfect.
Wondershare Democreator

Wondershare DemoCreator has everything you need in a Minecraft screen recorder. Its customizable recording tool enables you to select precisely the area of your screen you want to capture, add webcam videos and microphone audio, and instantaneously share all your content on platforms like YouTube and TikTok.
It also comes with a comprehensive editor for both video and audio.
Key features:
- Record videos up to 4k
- 120 FPS
- Built-in editor
- 10+ AI tools for recording and editing
- Virtual backgrounds
Once you've signed up, you can start using Wondershare DemoCreator for your videos. Here's how to record a Minecraft video with this tool:
Step 1: Launch Wondershare DemoCreator Recorder panel;
Step 2: From the available recording modes, select Game;

Step 3: Start the game;
Step 4: Select Minecraft as the game to record and customize recording settings;
Step 5: Click Rec to start recording (alternatively, press the F9 key).
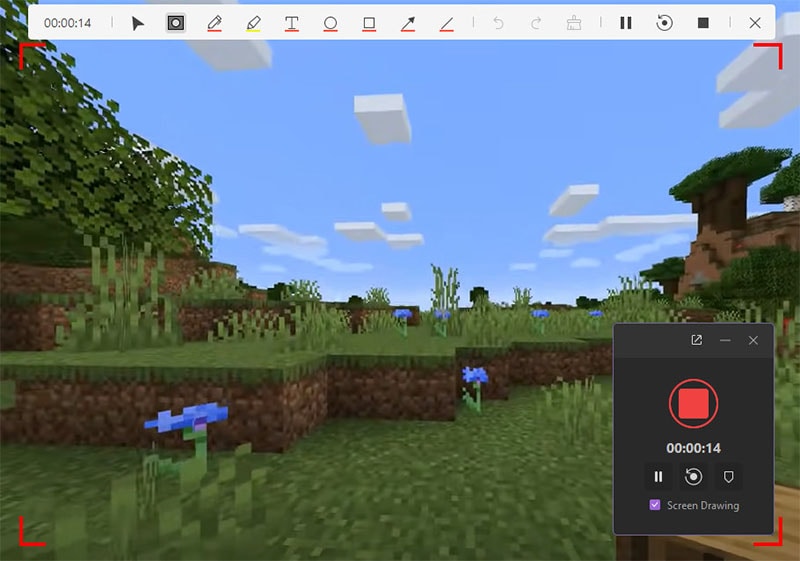
Step 6: Click the end recording button to finish your recording.
If it's more convenient, you can simply press the F10 key to finish your recording. Wondershare DemoCreator also comes with full video and audio editing capabilities, so you can use it to perfect your videos before publishing on any platform.
Camtasia

Camtasia is another great option for recording your Minecraft gameplay. Compatible with Mac and Windows, it's easy to use and has an excellent editor that can help you get your videos out quickly.
It keeps your camera, microphone, system audio, and cursor data separate, so you can easily edit them separately if needed.
Unfortunately, since it's a solution primarily designed for businesses, it can get a bit expensive.
Key features:
- Separate editing of camera, mike, system audio, and cursor data
- Drag-and-drop video assets
- Text animations
- Cursor path smoothing
- Automatically remove filler words
To use Camtasia for your Minecraft recording, follow these steps:
- Launch Camtasia;
- Select your recording area;
- Toggle your webcam, microphone, and system audio on or off;
- Click Record to start recording;
- Click Stop to stop recording.
Afterwards, you can use Camtasia to edit your video if needed.
Bandicam

Bandicam is the ultimate cross-device screen recorder. You can use it to record Minecraft gameplay on your PC, console, smartphone, or even IPTV. Moreover, you can use it to record two monitors simultaneously, making it a solid choice for gaming tutorials and explained videos.
While it's not quite as feature-packed as Wondershare DemoCreator, for example, it has all the basic functionality - audio input and output recording, scheduled recording, mouse click effects, and more.
Key features:
- Dual monitor recording
- Text/image/logo insertion
- Keyboard input display
- 24-hour recording
- Fullscreen webcam
To record your Minecraft gameplay with Bandicam, follow these steps:
- Launch Bandicam and select Game Recording mode;
- Start Minecraft;
- Press the F12 key to start/stop recording.
To play, edit, or upload your video to a platform of your choosing, simply click on your video icon.
OBS: Open Broadcaster

OBS can be an excellent option if you're on a tight budget and don't want to spend extra money recording your Minecraft gameplay. Being free and open source, it gives you access to various features without requiring you to spend any money (though you can always contribute any amount you want to the project).
Compatible with Windows, Mac, and Linux, OBS allows you to capture high-quality videos, enrich them with custom transitions, and make them more engaging with its intuitive audio mixer.
Key features:
- Unlimited scenes with custom transitions
- Audio mixer
- Modular dock UI
- Comprehensive settings panel
- VST plugin support
To record your Minecraft gameplay with OBS, follow these steps:
- Launch OBS and go to Sources > +;
- Select Game Capture;
- Name your new source and click OK;
- Go to Mode, select Minecraft, and click Start Recording.
If you want to stream directly on Discord instead of just recording your gameplay, you can click Start Streaming instead of Start Recording.
How to Prepare the Minecraft Recording Environment
Once you have your screen recorder, your texture packs, capture cards, and more, it's time to start preparing your recording environment. There are three main things you'll want to pay close attention to - the green screen, the lighting, and the microphone.
Use a Green Screen

Though it's not an absolute necessity, having a green screen for your Minecraft recording is always beneficial. It allows you to record your webcam in any environment without forcing you to give much thought to the state of your background. It makes your videos look more professional and gives you more versatility.
You can set your background to anything you want, ensuring it matches your video theme or overall branding.
Adjust Lighting

Good lighting can make your webcam footage appear more appealing and professional. It's vital if you tend to make your webcam recording full-screen for parts of your Minecraft video.
While you can always invest in expensive lighting if you want, a nice ring light can finish the job without affecting your budget much.
Set up Your Microphone
Finally, you'll want to ensure that your microphone is nicely set up. Make sure that it's not placed anywhere where you're likely to bump or drop it. Additionally, get it in a position from which you won't have to move it much.
After all, any microphone movement while you're recording your video could create unnecessary noise or even disconnect the mike altogether.
- Record customized screens with audio and edit them in different tracks.
- Capture gaming videos, tutorials, and presentations and then edit them in one tool.
- Built-in unlimited editing templates, special effects, and other sources.
- Supported export to MP4, MOV, MKV, GIF, and other formats.

Conclusion
Though becoming a gaming content creator seems easy enough, a lot goes into it. You need to have the right gaming equipment, carefully plan your videos, and have the right tools on hand to ensure that your videos are nothing short of perfect.
Fortunately, there are plenty of excellent tools for recording your Minecraft gameplay. From Wondershare DemoCreator to Camtasia, Bandicam, and OBS, you have access to a wide variety of solutions that will help you wow your audiences with your content.
FAQ
-
How do you record Minecraft on PC?
You need a compatible screen recording tool to record this game on a PC. Wondershare DemoCreator, for instance, is compatible with Mac and Windows devices and enables you to record any custom area of your screen that you want. -
What are the best tools for recording Minecraft?
The best tools for the job include Wondershare DemoCreator, Camtasia, Bandicam, and OBS. They all give you access to excellent features and enable you to capture great action shots and make your videos stand out. -
Why should I record Minecraft?
Most people like to record their gameplay and share it with their YouTube or Twitch audiences. By creating and sharing these videos, they can accumulate a wider viewership and increase their follower count.
