Note: This video tutorial is compatible with Filmora V11, V12 and V13 versions.
How to Fix Video (Lens Correction, Stabilize, Auto-Enhance)
If you are a videography professional, just shooting the video is not the only task; editing it correctly is also equally important. That's why Filmora gives you the tools to enhance your video quality, making it look a lot more professional.
You can use auto enhancement, lens correction, and stability tools from FILMORA to make sure your video looks as good as it possibly can.
The auto enhancement feature of Filmora is a great way to get started with editing your video, especially if you're not sure what kind of look you want. It will adjust the aspects of the video like brightness, contrast, and saturation automatically, according to what may best suit your video for a more vivid and clearer view.
The Lens correction tool helps remove any distortion caused by the lens used to capture footage—so if we have a fish-eye lens or a wide-angle lens and want it corrected, this feature does that for you automatically!
The stabilize tool helps remove all those shakes from handheld shots or shaky camera work. It is perfect for making sure no one sees any bumps or jitters in your footage!
Here is a quick guide on video enhancement using Filmora tools.
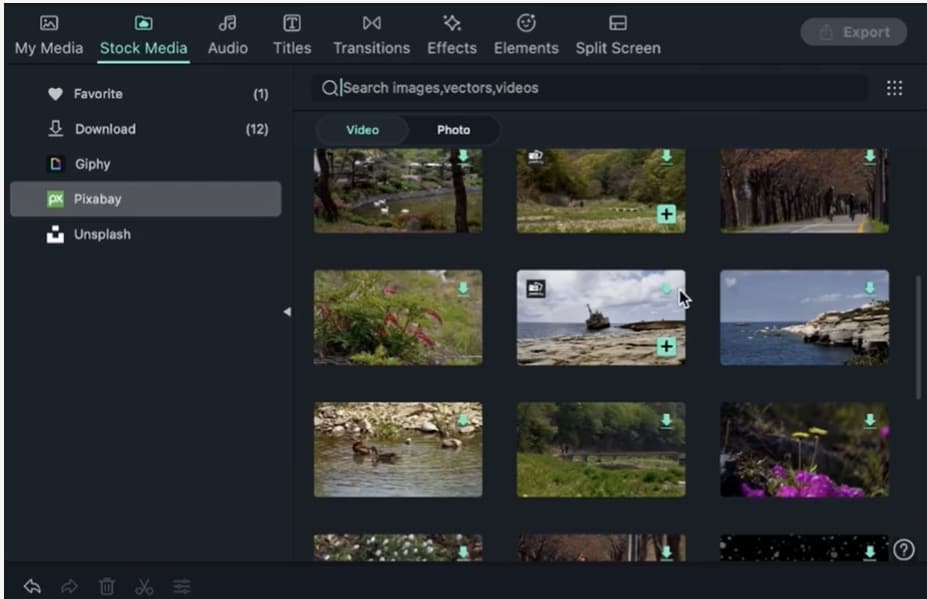
We need to get started by firstly importing your footage. We can import video from your storage, or we can use one from the stock media. We can choose some high-quality videos using "Pixaby".
Select the video of your choice. Click the download option. Hit the "plus" icon and then choose the "match to media" option to keep the quality of the video intact.
 Click on Add button to add button
Double-click on the videos to get the properties tab. We have to select the video tab, which showcases the video properties of the footage. Now, we will choose the auto enhancement option. Turn it on, and we will see that the Filmora auto-enhances the video quality, and adds some saturation and definition to the video.
In order to increase the level of enhancement, we can move the slider in front of the amount, under the auto-enhance option, to the right to increase the enhancement of the video. Moving the slider to the left will decrease the enhancement level and give us a more natural and raw look. We are provided with a switch to turn on or turn off the auto enhancement feature so that we can undo any changes to our video if we are not satisfied with our results.
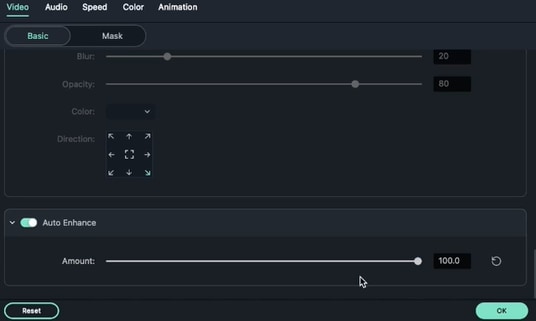 Auto Enhancement preset for auto enhancing video
We can also add stabilization to your video using the stabilization option from Filmora. This feature smooths downs the video that has been recorded with shaky hands.
For using this feature, we will have to double-click the video that needs to be corrected. Under the video properties panel, we will go to the video panel. Under the video panel, we will choose the basic option and select the stabilization option.
VIDEO> BASIC > STABILIZATION
 Stabilization Preset
We will turn on the stabilization option. Filmora will auto processes the video and sets an auto stabilization percentage that best suits the video. An important point that needs attention here is that the stabilization tool corrects the smoothness of the video and not the smoothness of the object that is being captured. In the sense that it minimizes the shaking of the video that arises as a result of how the video has been shooted. It has no role to play in terms of a shaky subject.
We can move the slider in front of the smooth level option to increase video stability. Increasing the smoothness level generally zooms in the video to erase the shaky camera movement.
Under the video stabilization, we can also select edge processing. This option gives us 4 choices in terms of edges we want to use in our video. These options are the reflect, tile, extend, and none.
 Edge processing for video stabilization
We will click on the "OK" button to publish the changes that we made to our original video
If we choose a video that has a shaky subject and uses the video stabilization tool, we will not see any difference in terms of video stabilization. The main use of this tool is to bring stabilization to the video frame and not the subject, as mentioned above.
Filmora has the ultimate tool for lens correction as well.
We can use the Lens correction option to correct the errors caused by the lens of the camera. If you have used GoPros before you know they tend to distort your video and that is why most video editors have to run their footage into post-production. Filmora does that for you at home, easily.
In order to use the lens correction tool, we start by selecting our video and double-clicking on it. The video properties window pops up.
 Lens Correction Preset
We scroll down to lens correction in the video properties panel. When we switch on the effect, we are offered a variety of options to choose the camera we have used to shoot the video. We also need to select the resolution we are looking for in the "SELECT RESOLUTION" column. Selecting this column gives us a variety of resolution options to choose from.
 Camera Model selection
If we don't know which resolution settings were selected while shooting the video, we will be trying to work with each of the resolutions till we find the one which suits our video and our requirement.
 Camera Resolution selection
Next, we will have to choose the " ADJUSTMENT LEVEL" that will work best for our video. The adjustment level is 0 by default. We are offered a slider to work on our adjustment level. Increasing the level of adjustment gives us a zoomed-out effect. We can move the slider up and down till the time we get the best-fitted adjustment level for our video.
After we are done making the necessary edits using the above-mentioned tools, we click on the "OK" button to publish all the edits we just made.