Transcript
In this video, let’s make a visual effect on the dancing creature. First, shoot a video in which you’re throwing an apple toward your partner. Once she catches it, tell your partner to move out from the camera.
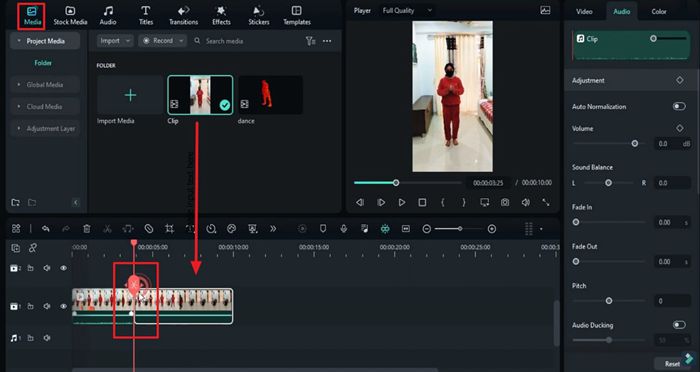
Then drop your video clip on track 1, identify the point to start the effect, and split the clip after five frames of the effect start point. Select the first split part, click this stopwatch icon, and choose "Freeze Frame."
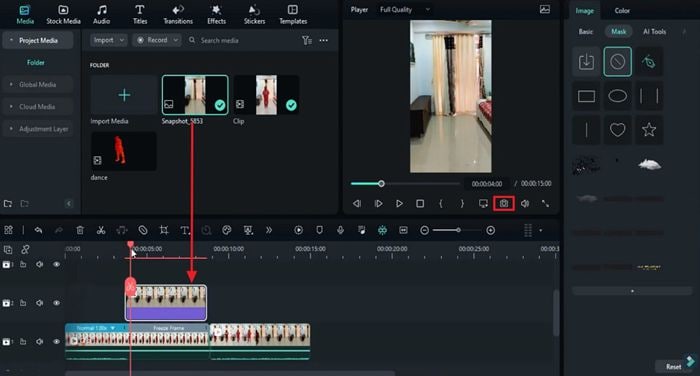
Now, take a snapshot of the blank shot. Drop a snapshot at the effects start point on track 2 and keep it for 10 frames. You can keep it till 15 frames. Fit the clip to the timeline. Again, go to the effects start point and drop this Dancing Beast clip on track 3, which you can download from our artlist.com.
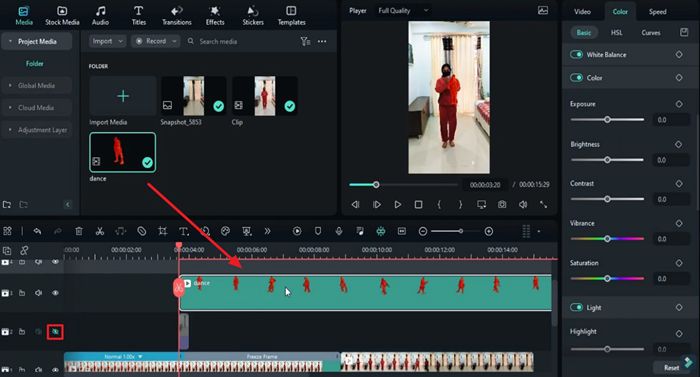
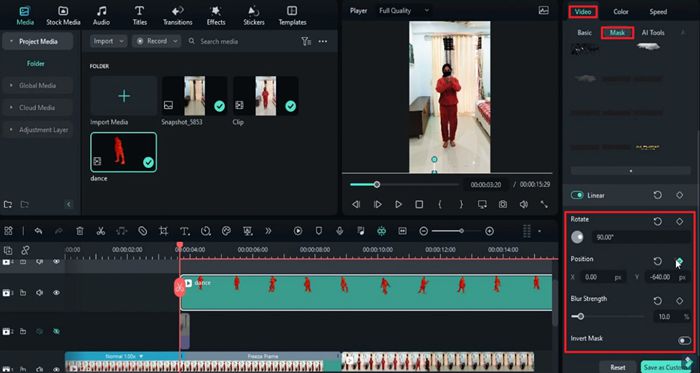
Now, hide track 2, go to the "Video," and increase the "Scale" of the Beast to match the subject. Put it in the front of the subject, then go to the "Mask" and select a "Linear Mask." "Rotate" it by 90 degrees, set "Blur Strength" to 10, then change the Y "position" of the "Mask" and set it at the bottom of the clip. Turn on the position keyframe, and reveal the Beast after 10 frames.
Now, unhide the track 2 clip, locate it at the start, and select "Linear Mask." Now, you can see the color difference in both clips. We can fix it by doing some color correction to match it with the clip. Then go to the "Mask” set "Rotation" to 90 degrees, "Blur Strength" to 10, and move the "Mask" at the bottom of the clip. At the endpoint, it matches its position with the Beast to reveal. Delete the rest of the split clip and shrink the frozen part to the playhead position.
Next, drop the snapshot on track 1 copy effect from track 2 snapshot and paste it on the track 1 snapshot. Then remove "Mask" on track 1 snapshot. Now, add some "Position" keyframes to keep the Dancing Beast in the middle. Split at 11 seconds and remove the rest of the part.
Then “Export” it at a higher rate. Delete all these clips from the timeline and import the clips which we have created on the timeline. Again, place it on the same track and reverse it.
Now, identify a point at which you want to use a camera movement point. Turn on "Transform" keyframes and increase the scale to 120 and 2 seconds further. Now, on the reverse clip, set "Scale" to the same scale as the first clip and adjust the keyframes at the same duration on both clips. Moving further between these keyframes, you can create a fake camera movement. Now, let’s see the final preview.
Guide on How to Add Dancing Creature Visual Effect using Filmora
What you need to prepare:
- A computer (Windows or macOS)
- Your video materials.
- Filmora video editor
Import and Split Files in the Timeline
Launch Filmora on your device and click the "New Project" option in the main interface. This will take you to the main editing interface, where you can import your files by going to the "Media" tab from the toolbar. Following this, add your media file to the timeline and identify the point on the clip at which you want to start the effect. Split the clip across the particular frame where you want to start the effect.
Freeze the Frame and Add its Snapshot
Click on the first half of the clip and tap on the "Speed" icon from the timeline toolbar. On setting the speed, choose the "Freeze Frame" option from the menu across the toolbar. After this, place the playhead on the second clip and take a snapshot. It will appear in the media library, where you can drag and drop it in the timeline at the desired location.
Add the Desired Effect to the Timeline
After this, click on the "Zoom to Fit Timeline" button to adjust the clip on the timeline. Following this, import any dancing effect of your choice to Filmora, which you have downloaded from the internet. Add it to the timeline and hide the snapshot in the second track.
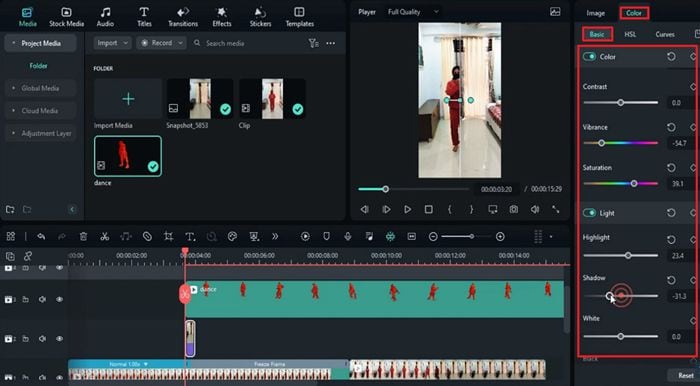
Apply Linear Mask and Adjust its Settings
Now click on the effect added in the next track and go to the "Video" tab in the right-side tool panel. Under the "Basic" option, adjust the values of "Scale" and "Position" according to your requirements. To add transition, go to the "Mask" tab and select a "Linear" mask. Following this, adjust the "Rotate," "Position," and "Blur Strength" of the mask. Enable the position keyframe and reveal the beast after some keyframes.
Adjust the Color of the Clips
Unhide the snapshot of the second track and place the playhead at the start of this clip. Again, select the “Linear Mask” and continue the object masking. If you notice any color difference between the clips, you will need to fix it.
For this, click on the "Color" tab, select the "Basic" option, and adjust the required settings like brightness, contrast, and more. In addition to this, go back to the "Mask" tab and choose a linear mask to adjust its settings as per your need.
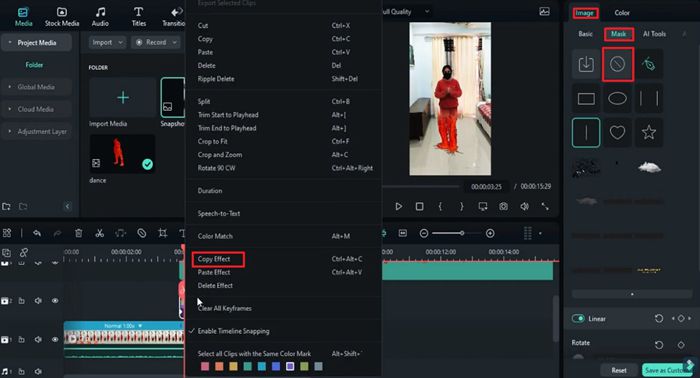
Copy and Paste the Same Effect on the Clips
Once the mask settings are done, delete the second half of the split clip and shrink the first clip. Next, drop the snapshot in the first track adjacent to the split clip. Right-click on the snapshot, select the "Copy Effect," and paste its effect on the new snapshot. From the side panel, remove the mask on the snapshot in the first track.
Add some position keyframes in track 3 at different points in the video to maintain the position of Beast. Set the duration of the track at the required seconds and remove the rest of the clip. Next, export this video at a higher rate.
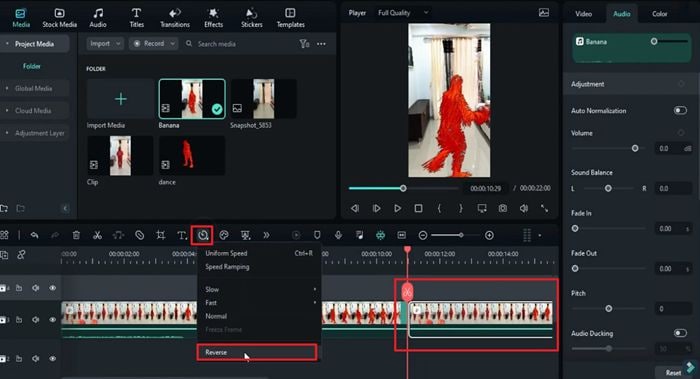
Duplicate and Reverse Final Clips
Remove the rest of the clips and snapshots from the timeline after successfully extracting the clip. Moving forward, import the clip you've just exported and drop it into the timeline. Duplicate this clip and place it again on the same track. Click the 2nd clip and tap the "Reverse" option from the "Speed" icon in the timeline toolbar.
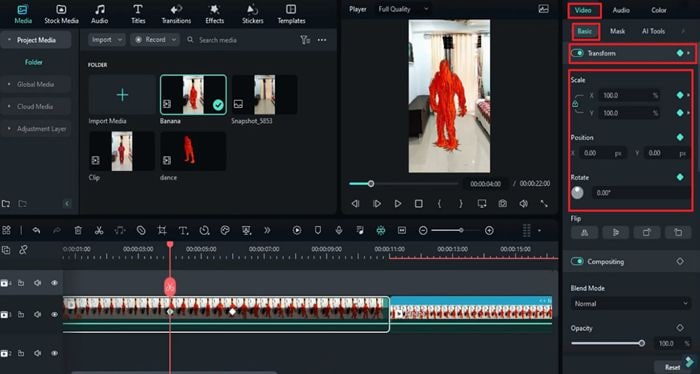
Next, identify the point at which you want the camera movement and start adding keyframes in both clips. Following this, adjust the "Scale" and “Position” of the keyframes to create fake camera movement. After this, click on the “Render Preview” to see the final results of your edited video.
People can easily get bored of seeing the same type of content or faces. Therefore, it is crucial to present a variety in your content to engage your audience. With Filmora, you can add multiple effects to your videos to make engaging content. In scenarios of creating dancing creature effect videos, employ the best effects and tools with Filmora.


Speak Your Mind