Transcript
In this video, we will create this fictional scene of a UFO coming up in Wondershare Filmora. First, open the track manager and add 10 more tracks. Then, drop your footage on track 8.
Take a snapshot of the last frame, identify the start point of effect, and split the footage. Then, split it at the endpoint and click "Zoom" to fit. Select the split part, and change the "Zoom" level to 50% at the beginning.
Adjust screen size, then go to the "Mask" and select "Pen Tool" to brush the upper part of the building. Turn on the keyframe for "Draw Mask." Adjust the mask to fit the building in the few frames further. Repeat the same process until you get the desired result. Then copy the split part and paste it above.
Select the original footage and "Invert Mask." Then select "Duplicate Clip," and turn on "Transform" keyframes. Change Y to negative 15 and 5 frames forward, then go 18 frames forward and set Y value to 125. It will create this effect. Go to 7 seconds and 18 frames, click on the "Transform" keyframe, then set Y to 0 in 5 frames forward. Next, drop this pillar PNG at 4 seconds and the 17th frame on track 7. Go further and change the pillar scale to 15.
Set the Y and X positions towards the left side and adjust the color of the pillar to match the building color. To fill the black part, drop the building snapshot on track 1.
Increase the scale to 178 and adjust the Y-axis and X-axis to get the sky in the background. Go further and check if you are required to change position and scale accordingly. Select the pillar, turn on the "Transform" keyframes, and adjust the "Position" and "Scale" according to the movement of the background.
Then duplicate it on track 7. Click on the 2nd keyframe, move it to the left side, and flip it. Now, check out every keyframe to make sure it looks right on the building.
Then drop the pillar on track 4, change "Scale" to 10, and go forward. Now, set its "Scale" and "Position." "Rotate" it by negative 2 and do the "Color" adjustment. Turn on "Transform" keyframes, go forward, and adjust the pillar position. Duplicate it on track 3 and adjust its "Position."
Drop the spaceship PNG on track 5 and make a start from the 5-second and 10th frames. Reduce "Scale" to fit in between the right and left pillars. Go 5 frames forward and make the spaceship now show between the pillars. Let's add keyframes, go 7 frames forward, change the Y position, and "Rotate" it by 11 degrees. Set the X-axis position, go 2 frames forward, and make changes in its "Position" to create the movement of a spaceship.
In the same way, create further movements and increase the scale to 17.8. Set X to negative 14 and "Rotation" to 8. Split it at this point and shift it to track 10. Now you can see the spaceship is out, and we can create further movement by increasing the spaceship's "Scale." Go forward to increase "Scale" and adjust X and Y position along with rotation.
Change the "Zoom" level to fit and change the spaceship "Scale," "Position," and "Rotation." At this point, change "Scale" to 1000, set X at negative 3000, and drag the spaceship out of the screen. And set "Rotation" to 26 degrees, then stop when the building is about to close. Here, change "Scale" to 300, X value to 2700, and "Rotation" to 20 degrees. This will create a “Fly Pass" effect. Split the spaceship and delete it. Adjust the color of the main clip to match the background.
In the effects category, under "Boris FX," find "BCC Directional Blur" on a spaceship. Then go to the effect settings and change the "Blur" amount to 3. Do the same with track 5 spaceship PNG.
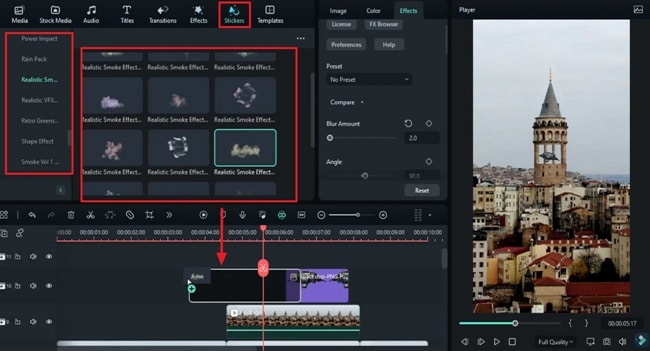
Now, go to the stickers and drop the "Smoke" clip on track 10. Reduce its duration, then go to color and choose the "BMW Film" preset. Adjust "Scale" and set it at the opening point of the building. Then, duplicate it at the closing point.
Now, do some color adjustments. Apply the "Auto Enhance" effect and make some adjustments. Then, render it to see the final preview.
Guide on How to Add Fictional Effect with Filmora 12
What you need to prepare:
- A computer (Windows or macOS)
- Your video materials.
- Filmora video editor
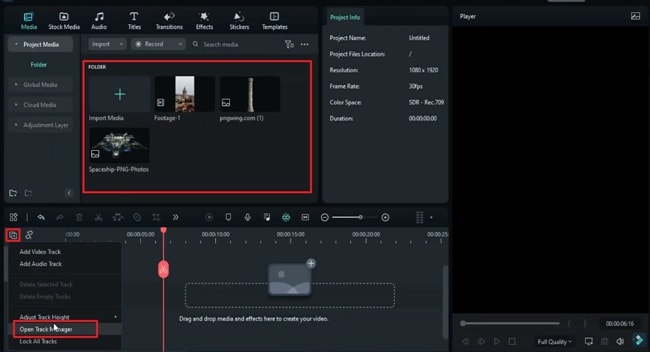
Launch Filmora and Add New Tracks
Download and launch the latest version of Filmora on your computer and import your files into the "Media Library.” Following this, head toward the "Manage Tracks" option on the left side of the timeline track and click on it. This will open up a drop-down menu from which you need to select "Open Track Manager." A small popup window will appear from which you need to add 10 more tracks in the timeline.
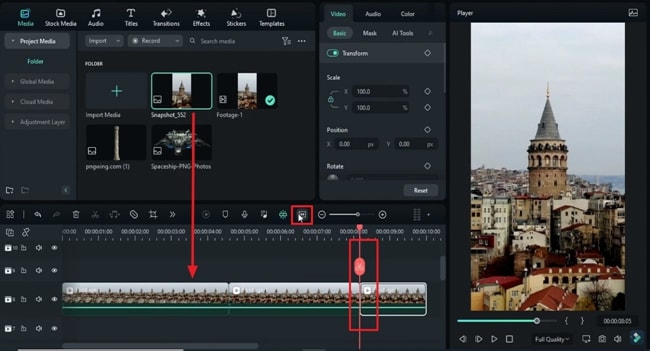
Take Snapshot and Zoom-In Video in Timeline
Once all the 10 tracks are added, drop your video on the 8th track. Move the playhead to the end of this clip and take a snapshot. Now, move the playhead to the point where you want to add the effect and split the video clip at that point. Following this, split the endpoint of the clip and tap on the “Zoom to Fit Timeline” option to adjust the size of the clips.
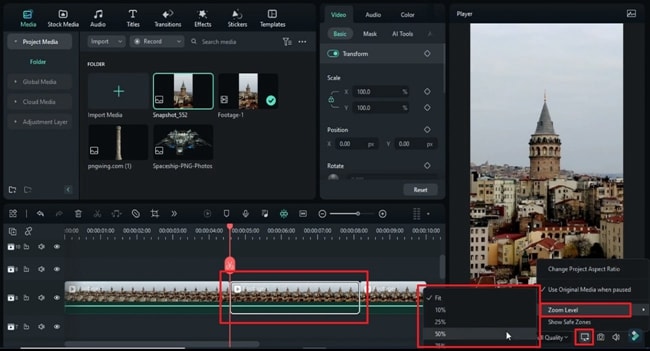
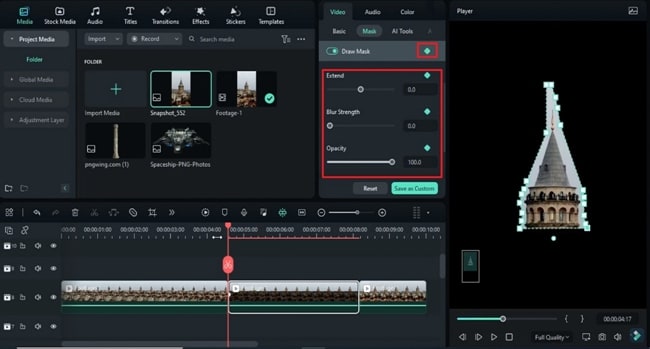
Draw a Mask on the Desired Object
Make changes in the split part of the video where the effect will occur. This is done by changing its "Zoom" level per the requirement. For this, click the “Preview Quality and Display Settings” icon to change the zoom level and adjust the screen size per the requirement.
Click the "Video" tab on the right-side panel and select the "Mask" option. This will show you a list of options for choosing the "Draw Mask." A pen tool will appear on the screen. Using this pen, you can cut out the desired part of your video to create effect.
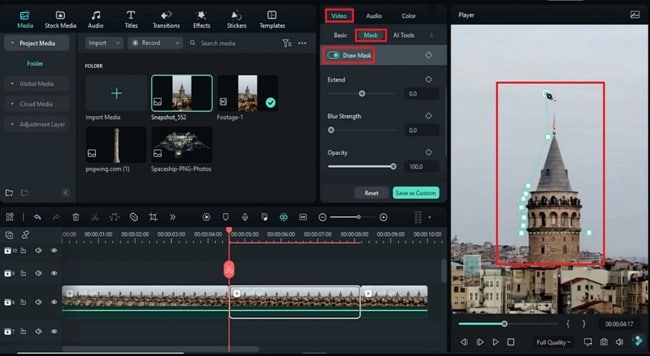
Adjusting the Keyframes and Other Settings
Turn on the "Draw Mask" keyframes from the icon adjacent to the option. Make other mask adjustments in a few frames according to the necessity. Copy this part of the clip, which we have edited, and paste it on the above track.
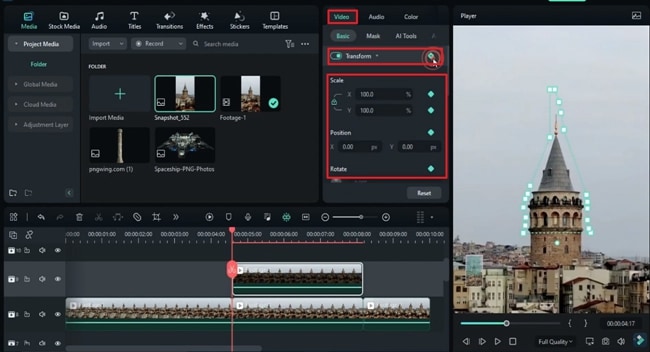
Select the clip in the 8th track, and from the "Mask" options in the "Video" tab, enable the "Invert Mask" option. Select the clip in the 9th track, and from the "Basic" option in the "Video" tab of the right-side panel, enable "Transform" along with the keyframe. Adjust other settings like “Scale” and “Position” accordingly.
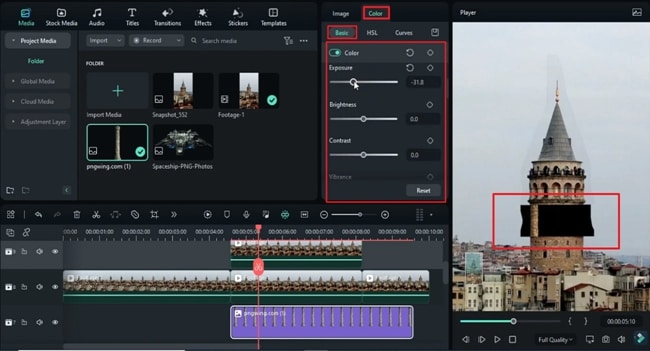
Set the Color and Position of the Clips
Drop the snapshot of your object on track 7 and make further adjustments to "Scale" and "Position." After this, select the "Color" tab to change the coloring for this snapshot on the right-side panel. Place another snapshot on the timeline at the desired track to fill the black color part on the screen. Adjust its “Position” and “Scale” according to the background and make a copy of it on track 7, which needs to undergo similar adjustments at this point.
Make Final Adjustments for all the Clips
Moving on, drop another file on the track and amend the settings of "Position," "Scale," and "Color," as we have done with the above clips. Enable “Transform” keyframes for this track and duplicate it on track 3 to repeat the adjustment process. Follow this process for all your remaining clips.

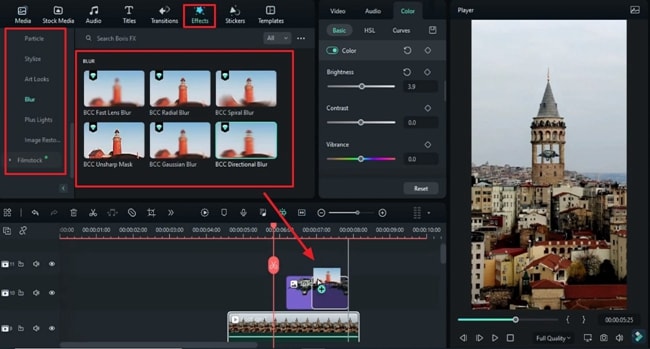
Apply the Desired Effects and Stickers to the Clips
After adding all clips to the timeline and making suitable adjustments, it is time to add the proper effects to these clips. For this, click on the “Effects” tab and drag and drop the desired effect on the clips.
Select the "Stickers" tab to add the respective stickers to your clip. Make the final changes and click the "Render Preview" option to see the final results.
Owning a video with fictional effects like Marvel or DC is fantastic. Besides, such effects and editing are beneficial in capturing the audience's attention. Only some people are doing this because the editing process takes a while to understand, but it is worth it. Along with Wondershare Filmora's guidance, creating some amazing fictional scenes is now easier.


Speak Your Mind