Transcript
In this video, we will figure out how to raise money like magic in Wondershare Filmora. First, you need to shoot a video in front of the green screen, pretending to be like someone coming in front of you. Then you take out a piece of paper from your pocket, show it on the screen, and then hide it in your palm of hand palm. Your partner replaces it with real money, then takes out the money and pretends like you're dropping it in the box. Let's see the whole tutorial.
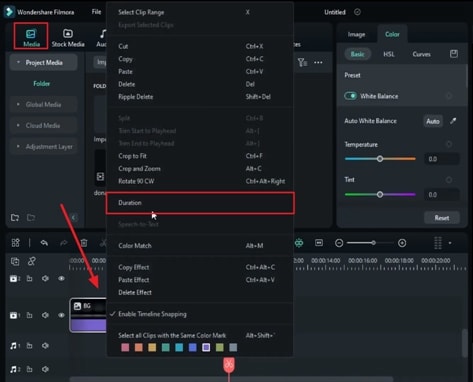
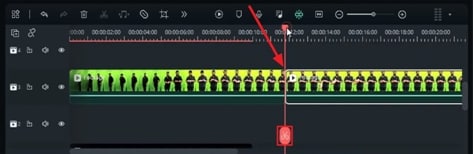
Drop your background clip on track 1 and make it 10 seconds long. Then drop your main footage on track 3 and split the clip at a point when you hide the piece of paper in your palm. Then, split the clip when you're about to take out the money. Delete this part, then go forward and shrink the clip when you finish dropping money.
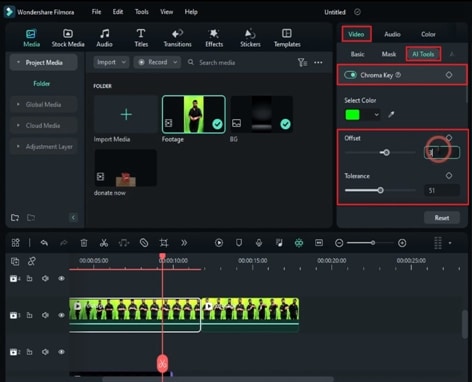
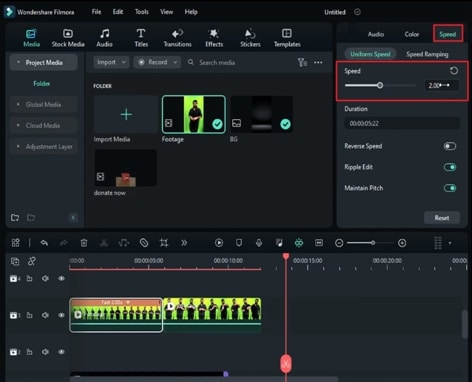
Then select the first split part, go to "AI Tools," and turn on "Chroma Key." Adjust the "Offset" and "Tolerance" as required. Next, duplicate the effect on the second split part, again select the first split part, and increase "Speed" to 2x. For the second part, set "Speed" at 1.50x.
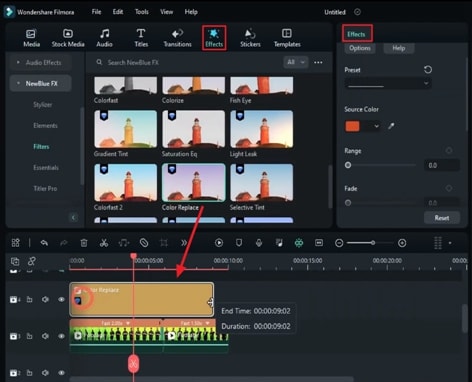
Now go to the effect and apply the "Color Replace" effect on track 4. Change "Source Color" to green, and set the "Range" according to your footage. If you increase it more, it will take out all the green color. Replace it with "Swap" color, change "Swap" color to skin color, set "Feather" at 100, and "Fade" to 21.7. When you increase the "Range," you see the difference.
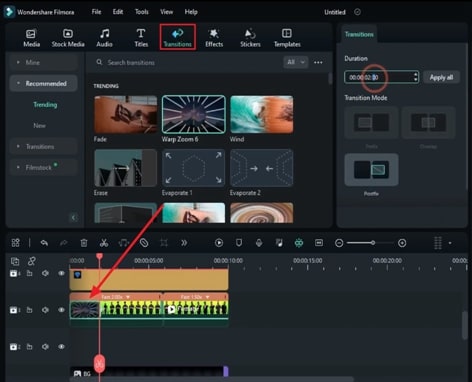
To create a "Slide-in" effect, let's go to the "Transitions" and apply the "Warp Zoom 6" transition at the start of the clip and change the transition "Duration" to 1 second. Now go to the "Stickers," apply this "Electricity" effect at the 13th frame on track 2, change "Rotation" to 75, and X to 450. Now, when you go forward, you will see this effect right behind the subject. You can increase its "Scale" to 150, making it more dynamic.
Now go to my "Media" and drop this donate box clip on track 5. Shrink it by 1 frame, and adjust its "Position." Next, add "Freeze Frame" at 2 seconds and 3rd frame. Keep "Freeze Frame" till 6 seconds. Match all clips and effects duration to track 5 clips; set the main clip "Scale" to 89.
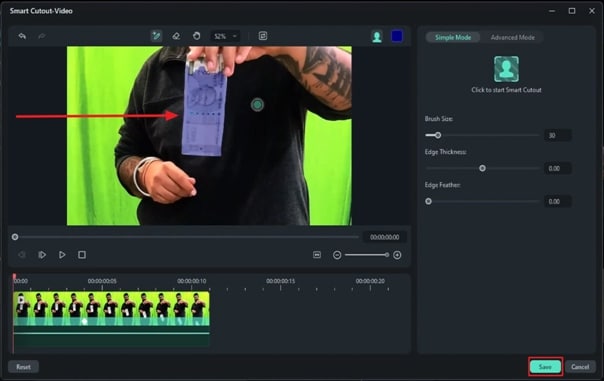
To keep the proportion between the box and the subject, let's split the clip when the subject is about to drop the money. Duplicate it on track 6. Now, identify the point when the money disappeared from the screen. Shrink the clip, go to the "AI Tools," and turn on "Smart Cut." Cover the money and start "Smart Cut." Now check your clip and do manual masking for the required frames.
To make money disappear in the box, go to "Mask" and select draw tool, create a mask of box shape on track 6, and invert the mask. Now, when you can see it creates an illusion of money dropping in the box, then go to the "Color" and do some color adjustments for the box clip. Let's add a sound effect to it. Further, if you want, you can add an "Unsharp Mask" effect and a "Film Grain" effect to make it more effective.
Step-By-Step Instructions to Create Money Raise Effect
What you need to prepare:
- A computer (Windows or macOS)
- Your video materials.
- Filmora video editor
Create a New Project
Record your footage against the screen where you hold and drop paper cash according to your requirements. Open Wondershare Filmora and click "New Project" to create a new project. Import all your video footage into the tool by dragging and dropping them in the "Project Media" panel. Bring your background clip on the timeline track and adjust its length according to your preference.
Arrange and Adjust your Clips
Drop your main footage on one track above the background clip and split the main clip at the point when you hide the piece of paper in your palm using the "Scissor" icon. Split the clip when you're about to take out the money. Delete this part, proceed, and shrink the clip when you finish dropping money.
Apply Chroma Key and Change its Settings
Select the first split part, go to "Video," navigate to "AI Tools," and turn on "Chroma Key." Adjust the "Offset" and "Tolerance" as required. Duplicate the effect on the second split part.
Adjust Speed and Apply Effects
Increase the speed for the first split part to your liking. Do the same for the second split part.
Go to the "Effects" tab and apply any color-replacing effect on a new track. Match the length to the previous layer. Next, change the "Source Color" to green and set the "Range" according to your footage. Click on "Swap" to replace it with the skin color. Increase "Feather" and "Fade" from the same panel according to your preference and increase the "Range" as required.
Add Transition and Effects
Apply the "Warp Zoom" transition at the clip's start to create a "Slide-in" effect. Go to the "Stickers" section and apply any electricity effect on a suitable track. Change the "Rotate" and "Position" values of the X-axis. Continue to increase the "Scale" of the Y-axis.
Make Other Adjustments and Enable AI Smart Cutout
After that, import your donate box video layer on another track and adjust its "Size" and "Position." Set the duration of all clips according to the main clips and make position and scale settings. Add a "Freeze Frame" after a few frames and match the duration to the donate box's clip.
Split the clip when the subject is about to drop the money and duplicate it on a new track. Shrink the clip when the money disappears from the screen. Then, go to "Video" and continue to "AI Tools" to use the "Smart Cut" tool to cover the money.
Do Manual Masking and Color Grading
Create a mask of a box shape present on the separate track using the "Draw Mask" tool and enable "Invert Mask."
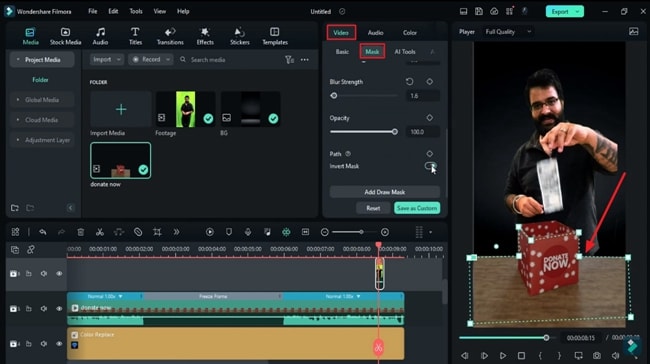
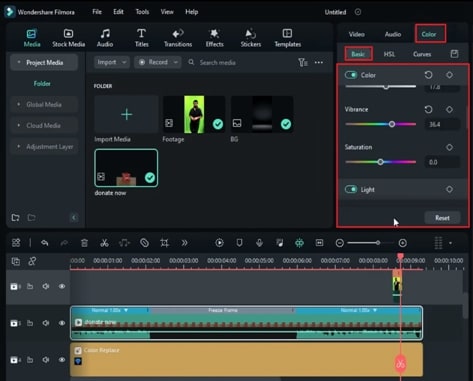
Adjust the colors according to your liking in the "Color" section. Add a sound effect if desired. Optionally, you can add an "Unsharp Mask" effect and other grain effects from the "Effects" panel. In this way, you can easily create the money-raise effect using Wondershare Filmora.
If you think you can be a magician, this is your best chance. Try this money-raise effect, which will turn you into the magician you've always wanted. You can impress your friends and families with this money raise effect. So, turn a simple paper into real money with this effect.


Speak Your Mind