
 100% Security Verified | No Subscription Required | No Malware

Adding video distortion effects is one of the fastest ways to make your content look cooler and stand out. The problem is, many creators try to distort video and end up with something that looks chaotic or unwatchable.
But the truth is, it’s much easier than it seems once you understand which distortion effect fits your style. That's why we're here to guide you through how to distort a video using the right tools, from glitchy chaos to smooth VHS vibes, so your clips instantly grab attention and keep people watching.
Part 1. Different Ways to Distort a Video
Distortion isn’t all the same. Every type gives your video a different vibe: some look wild and broken, while others feel smooth and trippy.
To figure out what matches your project best, here’s a quick rundown of the most popular types of video distortions and when to use them for maximum impact.
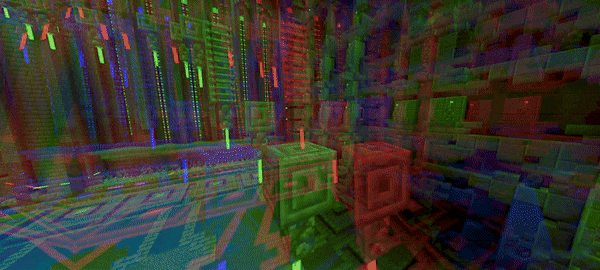
1. Glitch Distortion

This distortion breaks your footage into colorful pixels, flickers, and quick jumps that feel like a system glitching out. Use this video distortion effect when you want your edit to look energetic and intense, perfect for music videos or tech-inspired scenes.
2. VHS Distortion

Nothing beats the nostalgia of old VHS tapes. The VHS distortion effect adds grain, static lines, and that warm color bleed that instantly feels vintage. It’s perfect for projects that need a nostalgic or lo-fi touch.
3. Wave Distortion

If you want something smoother, go for a wave or warp distortion. It bends and ripples your footage as if it’s floating underwater or seen through heat. It’s ideal for dream sequences, transitions, or chill edits.
4. Time Distortion

If you want to play with time, this video distortion effect lets you freeze, echo, or stutter frames for dramatic motion effects. It’s perfect when you want your video to feel cinematic or otherworldly, like time just glitched for a second.
5. Chromatic Distortion
Sometimes all you need is a little color chaos. Chromatic aberration splits your red, green, and blue channels, making the edges of your video glow and vibrate. It gives a modern, edgy touch that fits gaming edits or futuristic themes.
Part 2. Editing Magic: How to Distort Video with a Powerful Editor
Now that you’ve seen how different distortion styles can change the mood of a clip, it’s time to bring those ideas into your edit! And if you’re serious about crafting a video that looks intentionally chaotic but still clean, you need a distorted video maker that gives you full creative control.
Thankfully, you don't need to look for long because Wondershare Filmora makes that possible. It’s one of the easiest and most powerful ways to distort video, giving you all the creative effects in one place.

Why Filmora is the best choice for video distortion

- A Library Full Of Ready-To-Use Distortion Presets: Filmora makes it easy to go wild with your edits. It comes packed with glitch, shake, warp, and VHS distortion effects that you can drag straight onto your clips.
- Instant Preview While You Edit: Waiting for a render can kill your creative flow. With Filmora, you can see your video distortion effect in real time as you adjust intensity, direction, or speed. It keeps you in the zone while you fine-tune every frame.
- Blend Effects For Cinematic Chaos: If you like mixing things up, Filmora’s blend modes let you combine RGB splits, wave warps, and overlays into one smooth look. The result feels layered and professional, like something straight out of a music video or motion graphic.
- Smart AI Tools That Keep Things Clean: Even after adding heavy glitch or VHS distortion, Filmora’s AI-powered features like AI Video Enhancer and Video Denoiser make sure your footage stays sharp. It keeps the chaos stylish, not messy.
- Works Everywhere You Create: Whether you’re editing on a laptop, tablet, or phone, Filmora fits your setup. It runs on Windows, macOS, Android, and iOS, letting you distort video anytime inspiration hits.
All these features truly make Filmora stand out as the best video distorter you can use right now. With it, you can easily learn how to make glitch videos and explore all kinds of creative styles that use distortion, from subtle warps to full-on chaotic effects that give your edits a striking look.


How to distort video in Filmora
Now, it’s time to dive in and see how to distort video right inside Filmora. As mentioned, this editor gives you tons of room to play, from dreamy wave effects to full-on digital chaos.
Step1Launch Filmora and start a new project
Double-check that you’re using the latest version of Filmora on your computer. Once everything’s up to date, open the program and select "New Project" to start editing on a clean timeline.

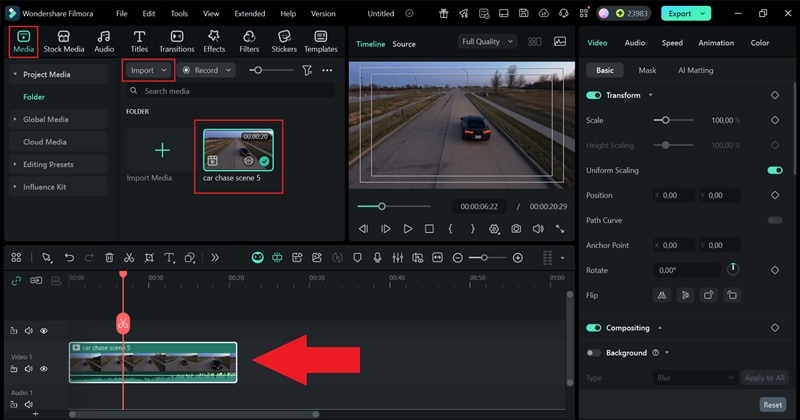
Step2Bring your clips into Filmora
In the main editing window, open the "Media" tab and hit "Import" to upload your video files. Once they show up in your media library, simply drag them down onto the timeline to begin your edit.
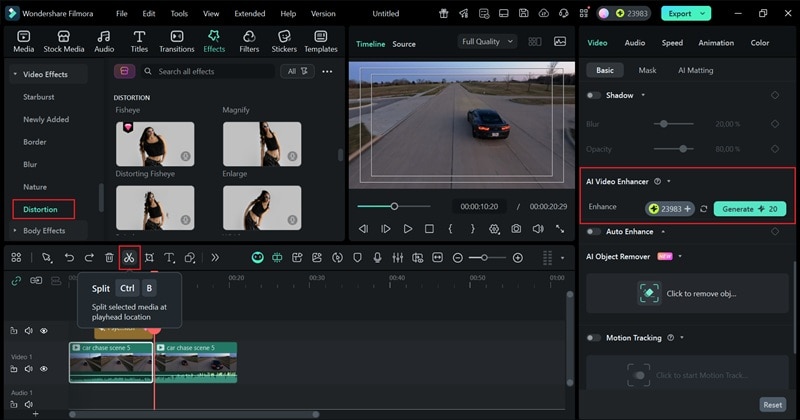
Step3Insert the Glitch effect
Now move to the "Effects" tab and open the "Glitch" section to explore the presets available. You can keep it minimal with a light signal flicker or go bold with a full-on psychedelic glitch.
Once you find the one that fits your vibe, drag it onto the timeline and adjust how strong it looks from the control panel. To change how long it plays, stretch or shorten the effect track on the timeline.

Step4Make other edits if necessary
Now that you learn how to add a glitch effect to a video, you can try other distortion effects to make your video even more interesting. Use the search bar or open the "Distortion" section under "Effects" to find more options. You can also trim parts of your clip, use the AI Video Enhancer to boost quality, and make other small tweaks until it looks just right.
Step5Export and save your video
When you’re happy with the final result, hit "Export". Choose "Local" to save it on your device or pick "Social Media" to post it directly from Filmora. Add a title, select your preferred format and resolution, choose where to save the file, then click "Export" again to finish.

And that’s it! In just a few clicks, you’ve learned how to make a video glitch using Filmora distortion effects. The whole process is quick, simple, and gives your footage that bold, broken look that instantly grabs attention. Go ahead and check out the awesome result you just created!

Part 3. How to Distort Video Online
After seeing how simple it is to distort video in Filmora, you might want something even quicker for small edits. Thankfully, there are plenty of video distorter online tools like Media.io that let you add glitch and warp effects without downloading anything. Everything runs smoothly in your browser, and the results look surprisingly good.

If you want to learn how to use this online video distorter, check out the simple steps below.
Step1Visit Media.io online video editor and click "Edit Videos Now" to launch the workspace.
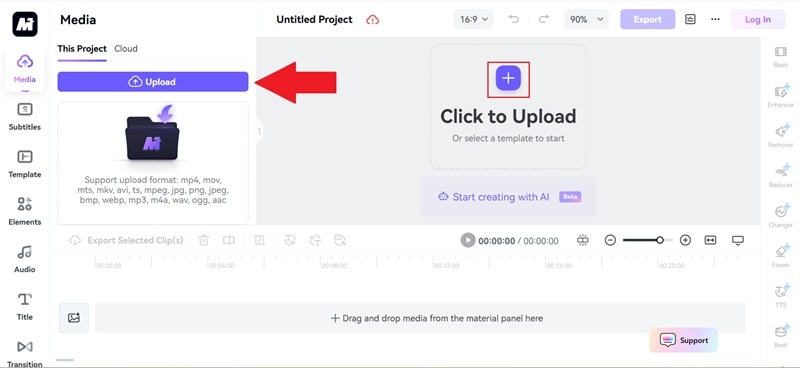
Step2Start a new project, and upload your video by clicking "Upload" or the plus icon.
Step3Drag your video onto the timeline, then open the "Effects" tab. Use the search bar to find a VHS distortion effect and drop it onto your clip to apply it.
Step4If you don’t want to make other edits, you can click "Export" and save your video to your device. However, you'll need to log in to your account first, or create one if you don’t have it yet, before downloading your finished project.

Adding Distortion Effects with Filmora vs Online Editors
Now that you’ve tried applying a video distortion effect online, you’ve probably noticed it feels a little different from using Filmora. Online editors are quick and simple, which makes them handy for light edits. But once you start experimenting more, you’ll see that many effects are limited to premium plans and the distortion itself doesn’t hit quite as strong.
Filmora, on the other hand, gives you more creative power and flexibility to play with. To see how both compare, take a look at the table below.
| Category | Filmora | Media.io (Online Editor) |
| Effect Variety | Offers many distortion types like glitch, VHS, wave, and warp, all neatly organized. | Only a few basic distortion styles are available. |
| Effect Strength | Strong, detailed, and easy to control. | Softer distortion with limited adjustments. |
| Preview Experience | Smooth real-time preview while editing. | Preview may lag or lose clarity online. |
| Performance | Runs fast and stable on desktop and mobile. | Depends on internet speed and browser performance. |
| Export Quality | High-quality export up to 4K with flexible settings. | Limited formats and lower export quality. |
Part 4. Pro Tips for Better Distortion Results
Now that you’ve seen how Filmora and online tools handle distortion differently, it’s time to make your edits shine. Whether you’re using Filmora or trying to distort video online, a few smart tricks can take your results from basic to professional.
These simple adjustments will help your distorted video look stylish and well-crafted instead of messy or overdone.

- Keep It Simple And Balanced: When you distort video, less is often more. Stick to one or two main effects like a wave and a glitch so the scene still feels clean and easy on the eyes.
- Match The Beat For More Impact: Sync your distortion with the sound. Let the glitch flicker or RGB split hit right on the beat to make the video distortion effect feel alive and in rhythm.
- Add A Touch Of Motion Blur: A little motion blur goes a long way. It smooths out those harsh glitch jumps and makes the whole thing flow better.
- Play With Colors: Don’t be afraid to tweak hues or add a soft chromatic split. It gives your distorted video a realistic digital vibe without feeling overdone.
- Always Preview Before Exporting: What looks fine in the editor can sometimes be too strong after rendering. Watch your video in full screen before exporting to make sure the distortion feels balanced and natural.
Conclusion
This guide has shown how each video distortion effect creates a different mood and how to achieve them using the right video distorter. Among all the options, Wondershare Filmora stands out as the strongest choice. It gives you everything you need, from powerful glitch and wave effects to classic VHS distortion, all ready to use in just a few clicks.
While there are online tools that can also distort a video, Filmora delivers a level of creativity, control, and smooth performance that’s hard to match. It’s simply the best place to turn your videos into bold, eye-catching edits that truly stand out.
FAQs About Distorting Videos
-
What’s the difference between glitch and VHS distortion effects?
Glitch effects create digital errors with pixel breaks and color shifts, while VHS distortion effects bring that old tape look with grain, static lines, and faded colors. Glitch feels modern and edgy, VHS feels nostalgic and retro. -
How can I make a glitch video on my phone?
You can easily learn how to make a glitch video using mobile editors like Filmora Mobile. This version also has built-in glitch presets that you can apply with a single tap and adjust however you like. -
Why does my distorted video lose quality after export?
A distorted video can lose sharpness when exported with low settings. Always choose high bitrate and resolution options, like 1080p or 4K, to keep the effect clear and detailed. -
Can I combine multiple distortion styles in one video?
Yes, you can. Mixing glitch and wave or adding a light VHS layer on top gives your video distortion effect more depth, as long as it still feels balanced and smooth. -
What’s the best format to share a distorted video online?
For social media or web uploads, MP4 works best. It keeps your video distortion effects looking sharp while keeping file sizes small enough for quick sharing.
