The ways to transfer older iPhoto libraries to new iPhone/Mac
Apple discontinued iPhoto in 2015, so you have no choice but to transfer older iPhoto libraries to a different device. Did you spend a lot of time organizing your iPhoto libraries and want to keep them that way? What do you do when you’ve bought a new Apple device and you want to transfer your iPhoto libraries to the new device? Is there any software that can help you do that? It’s fairly easy to transfer your iPhoto library to a new Apple device and there are free storage tools available online.
Part1. Moving iPhoto Library on Mac
Part2. Moving iPhoto Library on iPhone
Part3. Storage tools for iPhone and Mac
Part1. Moving iPhoto Library on Mac
Let's look at how you can transfer older iPhoto libraries on a Mac. If you have a Mac that has a more recent iOS, then iPhoto won't work on it. You’ll have to import the iPhoto library to Photos.
The switch from iPhoto to Photos came as a surprise to many Apple users because the former had been in use since 2002. A lot of things had changed since then so Apple finally decided to let it go. Photo is a much superior app.
You get the option to import the iPhoto library to Photos when you're setting up your device, but many people tend to skip that step. You might have accidentally skipped it, too, but that's okay!
Here is what you need to do in order to move your iPhoto library to the new Photos app:
The first thing you need to do is look for your older iPhoto libraries on your Mac. If you’ve already opened Photos, close it and then relaunch it.
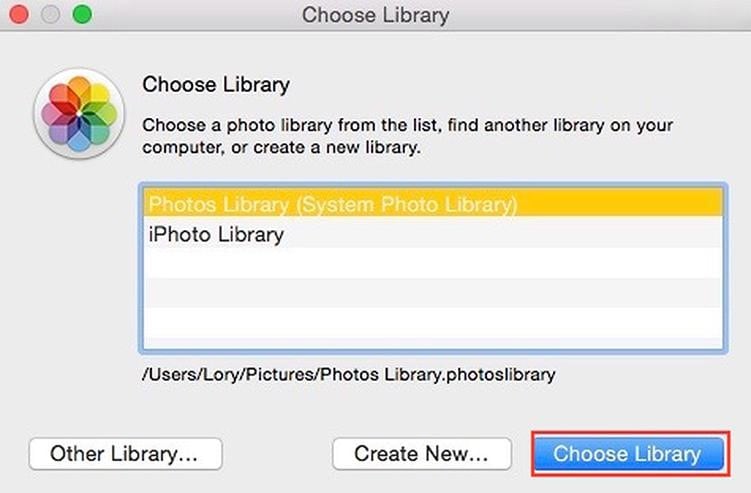
- As soon as it opens, hold the Option key on your keyboard and the Choose Library window will pop up.
- The Photos app will have automatically detected your older iPhoto library and you'll be able to see it in the Choose Library window.
- Select your iPhoto library and click on the Choose Library button. Photos will automatically end up merging iPhoto libraries if you have more than one.
- If your iPhoto library isn't too large, it won't take a lot of time for the Photos app to import it.
- In case you don't see your iPhoto library, don't panic. Simply click on the Other Library button and a new window will pop up.
- In the new window, locate the iPhoto library you want to import and click on Open. The Photos app will start importing it.

That's how you do it on Mac. It's simple and takes only a few minutes. You should, however, keep in mind that your photos might not be organized the way they were before because of Photos merging iPhoto libraries. It's a shame, but hey, at least you didn't lose your photos, right?
Part2. Moving iPhoto Library on iPhone
Transferring your older iPhoto libraries to the Photos app on an iPhone is even easier. When you open the Photos app on your iPhone, it'll automatically add pictures from your iPhoto library to your Photos app. If it doesn't, you have to sync iPhone to Mac and transfer iPhone photos from iTunes. Here's how you can do that:
- First, connect iPhone to Mac and start up iTunes.
- Click on the Phone icon in iTunes and it'll take you to a window that shows your iPhone's stats.
- Click on Photos in the sidebar.
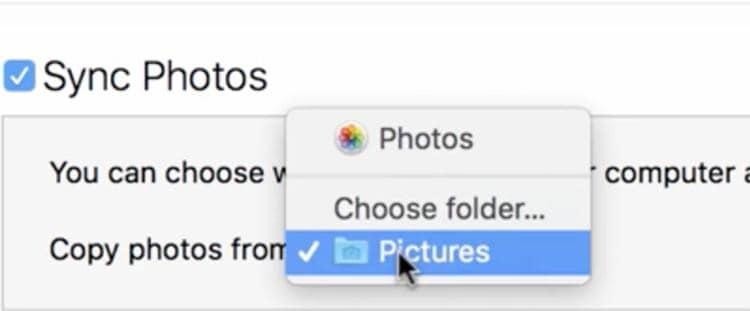
- Check the Sync Photos button and then you'll be asked where to sync photos from.
If you've already imported the iPhoto library to Photos on your Mac, you can click on Photos and it'll automatically update your library on your iPhone.
If you haven't updated your library on your Mac, then click on Choose folder, navigate to the older iPhoto library you want to import, and click on Open. iTunes will start syncing your library to your iPhone in the new Photos app.

As you can see, it's pretty simple to import iPhoto libraries to Photos on the iPhone as well. It takes more time because you have to connect iPhone to Mac and sync it with iTunes, but it works and you can take your photos with you everywhere you go!
Part3. Storage tools for iPhone and Mac
If you’re tired of Apple constantly introducing changes you don’t want, then you can use a Mac or iPhone photo storage software to manage and store your photos on your devices. There are lots of storage tools available online that you can use to keep your photos safe.
Here are the best three Mac and iPhone photo storage tools that will make it easier for you to manage your photos on both devices:
- Wondershare Dr.Fone – Dr.Fone makes it easy to transfer all of your live photos and albums from your iPhone to other devices. It also lets you convert HEIC photos to JPG. It lets you sync iPhone to Mac so your devices remain connected.
- iMazing – iMazing is a tool that lets you transfer iPhone photos and videos to Mac without iCloud or iTunes. It is free and easy to use. All you have to do is download it on your Mac and you can start transferring your photos from your iPhone to the software. You can also transfer your photos wirelessly from your Mac to your iPhone using iMazing.
- Mylio – Mylio is a great option for those who have organized their photos into different albums. It allows you to import entire folders without changing their structure. Mylio also lets you sync iPhone to Mac so whatever changes you make on one device happen on the other device, too.
You can download these three tools for free. They’re all safe and they’ll make the whole photo storage process less confusing.
Conclusion
When you look at the replied photos and videos, are you suddenly wrapped in memories?
Believe me, using the iOS version of the mobile video editing app, you can annotate text and add animation to the video, so that memories of the past will come alive today.
Download Filmora for iPhone/Mac (formerly FilmoraGo) now and you will edit the funny videos with one tap.
You May Like Top 10 iPhoto Alternatives


