Blue Screen VS Green Screen: All You Need to Know

Jan 06, 2026• Proven solutions
 TL;DR:
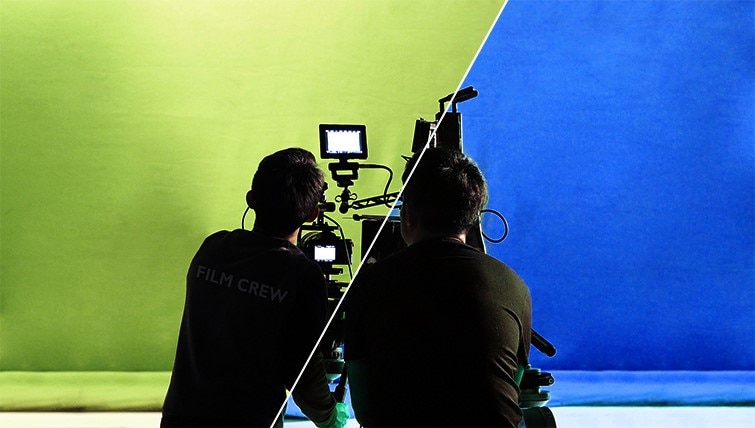
Choose a green screen for brightly lit daytime scenes shot with digital cameras due to its high luminosity, and opt for a blue screen when shooting darker, low-light scenes to significantly minimize color spill.
● Digital camera sensors process the brighter green color with less visual noise, but green backgrounds cause higher color spill on subjects, requiring maximum physical distance and perfectly even lighting to prevent key-ruining shadows.
● Blue screens possess substantially lower luminosity and require double the lighting if used for daytime setups, making them strictly advantageous for night shoots that demand cleaner edge isolation with minimal color bleeding.
● To edit the footage in Wondershare Filmora, position the chroma key clip on the video track directly above the replacement background, select the Chroma Key eyedropper tool, and use the Alpha Channel to fine-tune transparency until the background area is pure black and the subject is solid white.
Ask AI for a summary
 ChatGPT
 Perplexity
 Gemini
 Claude
 Grok
Grok
You’re probably wondering how these blockbuster action movies show unrealistic places and backgrounds. Well, the answer is simple, they use chroma keying.
Chroma Keying is a post-production video editing process of turning the background into whatever the video editors want it to be. It is done with the help of a blue and green background.
Now the question arises what’s the difference between blue screen and green screen, how do they work and which one is better for video production.
Well, fear not we have developed this complete beginner’s guide to help you figure out when to use green screen vs blue screen just for you.
You will learn :
- Overview of Chroma Keying
- Why the Color Green or Blue Is Used for Chroma Keying?
- Which Came First – Green Screen or Blue Screen?
- Differences Between the Green Screen and Blue Screen
- When to Use Green Screen?
- When to Use Blue Screen?
- Tips for Shooting with a Green Screen
- Best Green Screen Video Editor
So, without further ado, let’s get started.
Overview of Chroma Keying
In simple words, Chroma Keying is the process of removing the green or blue screen and putting up a background of your choice in a video. A specific color which is mostly green and blue is referred to as Chroma. That specific color background keyed or replaced with a static image or any other footage.
This technique is often used by video production in the film industry to display unique extravagant scenes in their movies. The first part of this process includes shooting footage with the actors in front of the blue or green screen. While the second part of the process is to swap the background during post-production and editing.
Now that you know what actually is Chroma Keying, let’s get onto explaining blue screen and green screen, which came first and the difference between them.
Why the Color Green or Blue Is Used for Chroma Keying?
The use of blue and green screens was invented in the 1940s and since then it has become common in the video production industry. The main reason for using the color blue and green is because they are unique and do not clash with the colors of skin, unlike other colors.
This is important for chroma keying to work as it identifies the green or blue color background and replaces it with a different background. Although, any color can be used green and blue are the most preferred colors as they encode the visible light spectrum.
Which Came First – Green Screen or Blue Screen?
Initially, the film industry used a blue screen for chroma keying special effects but with the passage of time, green screens became common as they are easier to work on post-production. Digital Camera sensors are better at sensing green color pixels because it is brighter and more vibrant.
Differences Between the Green Screen and Blue Screen
Apart from the apparent difference in the color of Green Screen and Blue Screen, following are some differences why video producers prefer to use Green screen over Blue Screen for their videos:
1. Lighting Difference:
Green Screens have higher Luminosity as opposed to Blue screens, which results in better footage. This makes it easier to shoot large scenes on Green Screen rather than Blue screen which has lower luminosity.
2. Shooting with Digital Cameras:
Nowadays, more and more videos are shot with digital cameras instead of film. Digital Cameras work better with green screens as they can sense it clearly. The green screen also prevents noise and enables clearer luminous shots.
3. The Difference in Color Spill:
During Chroma Keying, colors tend to spill around the edges which makes the subjects appear odd. Blue Screens tend to have less color spill than green screens. The lower the color spill degree, the easier it is to edit the shoot.
4. The Color Blue is More Common:
The color blue is more common and prevalent in objects than the color green. That’s why green screens are most often preferred during video shoots that need chroma keying.
5. The Key Factor is Contrast:
The biggest factor that needs to be taken care of when choosing is contrast. The background color must be distinct from the subject for it to isolate from the rest during editing. The color Green is less often worn than blue, therefore it is most commonly used.
When to Use Green Screen?
If your video is based on a daylight scene then you need to use a green screen as it has higher luminosity and is more vibrant. This makes it easier to edit post-production and makes leftover edges that are impossible to key far less noticeable.
Other than that, digital cameras work better on green screens than blue as they process clear and vibrant videos with higher luminance.
It also results in less noise but it can lead to color spills due to its brightness which can be reduced by keeping enough distance between the subject and background while shooting.
When to Use Blue Screen?
Blue Screens are less luminous than green screens and require double the light to work if shooting a daytime scene. Therefore, blue screens are great for shooting night scenes that require less lighting and makes it easier to edit because of less color spill.
Darker scenes can easily be shot with the blue screen and composited due to its lack of brightness. It also results in less noise as compared to darker scenes shot with a green screen.
Tips for Shooting with a Green Screen
Using green screens for video production isn’t as complicated as it seems but it does have some factors that need to be taken care of and understood before diving into actual production.
The shooting part is the most important as the post-production element is based on the perfect footage with the green screen. Problems in this could result in you doing the whole process all over again.
Therefore, we have compiled some tips for you to perfectly shoot using a green screen:
1. Even Lighting and Exposure:
Even lightning and exposure is the key to working with a green screen. You need to be careful of any light flares that can mess up your shot. Use a matte box to deal with light flares and make sure the light falls on the green screen rather than the object.
2. No Shadows:
Shadows can ruin your shot and result in a bad key. Therefore, you have to make sure there are no shadows lurking around your green screen. Avoid shadows by having a decent lighting setup and sufficient distance between the object and background.
3. Distance Between Subject and Background:
Keep as much distance between the subject and the green screen as you can. This matters because it reduces the chances of shadows, evens out the lighting and ultimately results in a good key.
4. Type of Green Screen:
You have to select the type of green screen you will be using for your video. It can be a painted wall, green paper, fabric, or portable green screens. Make sure to keep your green screen smooth and flat for a perfect key.
5. Check the Color of Your Objects:
This is essential for avoiding color spills in your video. Be sure to check the colors and reflectiveness of your wardrobe and props that will be shown in the video. If it matches the green screen, you will get a bad key and will have to start over with shooting the footage.
6. Review As You Shoot:
Reviewing your shots as you shoot them reduces the chances of a bad key afterward. You can make sure nothing is getting in the footage that might make your key bad post-production.
7. Choose the Right Software for Editing:
Last but not least, you have to choose the right software to edit your green screen footage. There are many video editing software out there, but we recommend Filmora because it is easy for beginners and results in professional videos. Plus there are a ton of free resources and tools for creatively editing your videos.
Best Green Screen Video Editor – Wondershare Filmora
One of the best Green Screen Video Editors is Filmora by Wondershare. It is affordable, user-friendly, and easy to learn even for beginners. It makes it easy and simple for everyone to use green screens in their videos like a professional.
Following are the reasons why Filmora by Wondershare is the best green screen video editor for you:
1. Green Screen Background Resources:
Filmora comes with tons of green screen background resources that you can use to make your videos stand out from the rest. They can be used and downloaded for free on any video project.
2. Hollywood Style Effects:
Wondershare Filmora has a lot of Hollywood style effects that can be applied to the videos you edit. You can use these effects creatively with your green screen video and impress your audience.
3. Chroma Key to Make Green Screen:
On Filmora, making a green screen is simple and easy. You just have to click the chroma key, use the eyedropper tool to pick the background color and adjust your background accordingly.
4. Even out Edges:
Chroma Keying sometimes results in color spills and uneven edges of subjects which can be easily adjusted by Filmora. You can feather the edges, adjust offset, tolerance and Chroma UV Blur to make your videos exceptional.
5. Spill Removal:
Filmora has the option to remove spills after removing a green screen. Color spills are the slight fringing out of color from the edges which can be removed while editing.
6. Color Correction:
You can correct colors with the color difference key in Filmora. It helps remove the red/green/blue colors from the video. You can also view the changes with the view matte option while dragging the sliders.
7. Exclusive Filters and Overlays:
Filmora has over 300 exclusive filters, overlays, music, text and transition effects that you can apply to your green screen video project to make it more appealing.
10. Export and Share with the World:
Once you’re done with the post-production of your video, the last thing is to export and share your creation with the world. Filmora supports formats such as WMW, MP4 or MOV for exporting and also direct sharing on YouTube and Vimeo.
How to Use Filmora to Edit Blue/Green Screen Background Videos?
Now that you know how to shoot for your green screen video, the next part is to edit the background using a powerful video editing tool Filmora.
The following steps clearly define how you can edit your video’s background easily:
Step 1: Import your Video Clips:
The first step is to import your green screen footage and the background video you need to edit on Filmora. Drag the videos onto the video track, making sure the green screen footage is above the background video.
Step 2: Open the Editing Panel:
After arranging the video clips, you need to double click it to open the editing panel. Also, make sure the chroma key in the video tab is checked.
Step 3: Select Color to Remove Background:
Thirds step is to select the color of your background screen to make it disappear. Use the Select color dropdown menu or the eyedropper tool for this.
Step 4: Adjust Transparency:
You will need to adjust the transparency of the background. You can do this by using tolerance, offset, edge feather and edge thickness sliders in the editing panel.
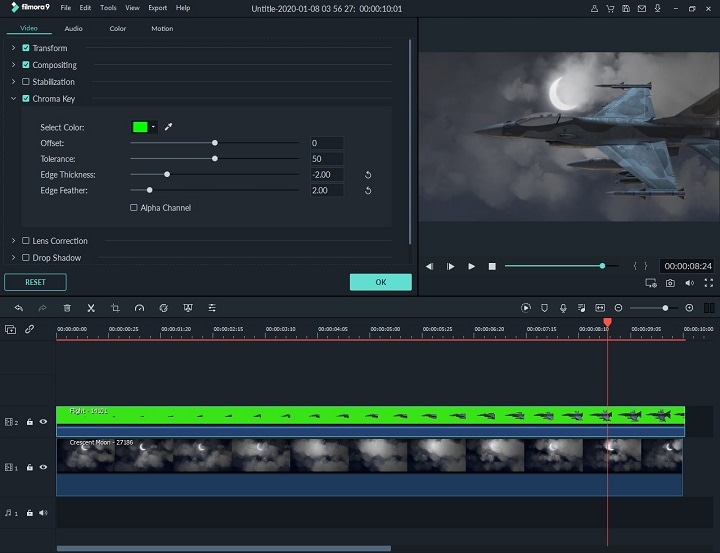
Step 5: Fine-Tune with the Help of Alpha Channel:
You can also fine-tune with the help of using the Alpha Channel. This will make your image black and white. The black part will be transparent in your video while the white will remain solid. You can identify the grey spots with the Alpha channel and fine-tune them.
Step 6: Export and Share Final Video:
Once you’re satisfied with how your video looks on screen, export it in the format of your choice and share it with the world. You can also directly share on Youtube and Vimeo using Filmor9 after you’re done editing your video.
Conclusion:
Chromakeying allows video producers and editors to take their subjects out of the real world and display a whole new world with them in it using blue and green screens.
Now you know how Hollywood develops movies with unreal worlds and scenes. We hope this article helped you figure out the use of blue vs green screens and when to use blue vs green screen for shooting.
Do let us know in the comments below your thoughts on green screen vs blue screen and if it helped you understand the concept of them.
We would love to hear from you. If you found this article useful do share it with your friends and family too.
This is the complete guide of how green screens work. Here you will also know how to set up a green screen in only 5 steps and equipment, programs you'll need.
by Liza Brown Jan 06, 2026 11:37 AM
Liza Brown
chief Editor
