Transcript
What's happening, guys? Today, we will learn how to do newscasting with all the professional tools, graphics, and editing. With no budget and no hiring professionals, you can create a professional-looking News Channel with minimum effort using AI tools in the WonderShare Filmora 13 video editor.
It's straightforward. Let me show you. Let's first create an intro for the news channel. So go to the titles tab and search for news broadcast intro. You have lots of results to choose from. It can be a very nice intro for your news channel. Here is another one. So, give your channel a professional look with these readymade intro videos. All of these are customizable.
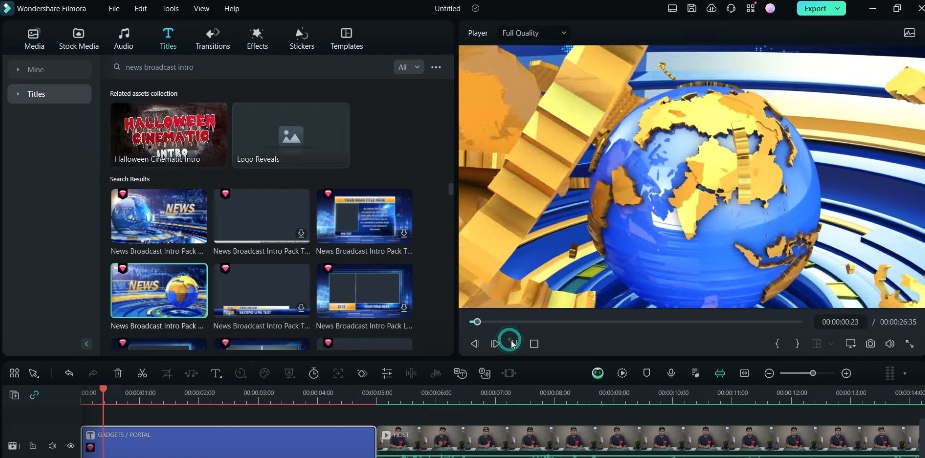
Let me show you a few more. You get intro videos for different kinds of news, like weather, sports, and news. Let's settle for this one. Drag and drop to the timeline, then double-click and edit the text. Your intro video is ready now.
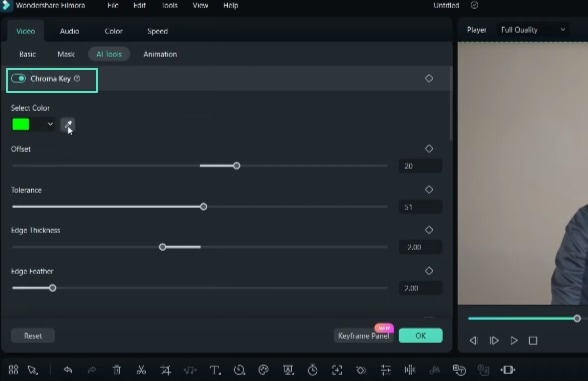
When recording the news, sit in front of a solid color wall or a green screen, if you have any, so the background can be easily replaced. We will use some AI tools in the Filmora 13. Firstly, you can try "Chroma Key" for green screens. But there are other very nice tools, like AI portrait, which can remove the background with a single click.
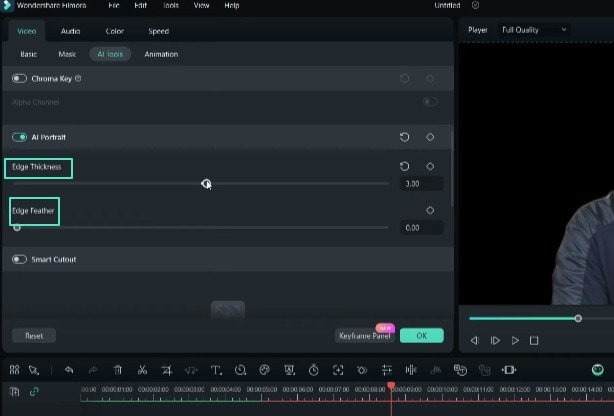
It can detect human figures and remove background information. The "Edge thickness" and "Edge Feather" can be adjusted. For more precise cutouts, we can also use the "smart cutout," where you can define the object you want to cut in the video. So I can select the person and then analyze it.
It's primarily applicable when the background is busy. Let's now find some background. So, from the stickers menu, we can search for news backgrounds. There, you have lots of results to choose from. Before applying these backgrounds, move your video one level up. Drag and drop the background, and the background has been used. It looks so lovely and so professional.
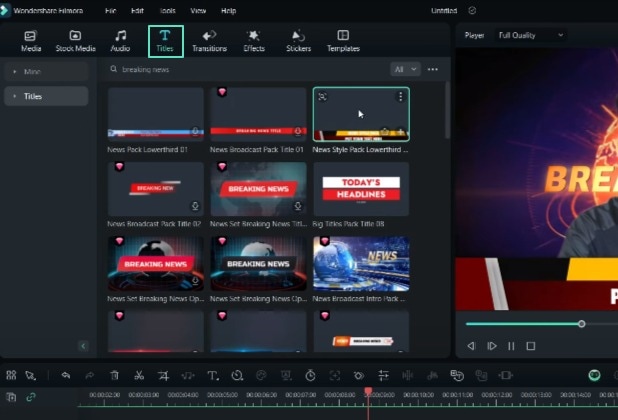
Now, for the headings and titles, you can search for news titles. These are excellent samples. Very high graphics! Perfect look! So you can drag and drop any and change the titles.
So your breaking news for today is ready, guys. You can also use PIP, which is a picture-in-picture. Drag and drop any video, crop it, resize it, and place it in the corner.
You can also use the masking tool, which can be rectangular, circular, or parallel lines. It is perfect here. So you can show the reporter or news footage in the corner of your videos.
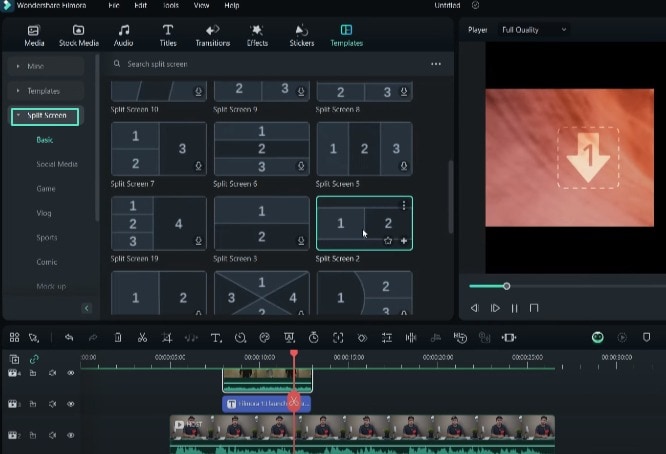
Another way to do it is using a split screen, which can be found in the templates menu. So we can use this one. Drag and drop the footage and edit the clippings. It can be used to show debates, the newsreader, and the reporter on the field.
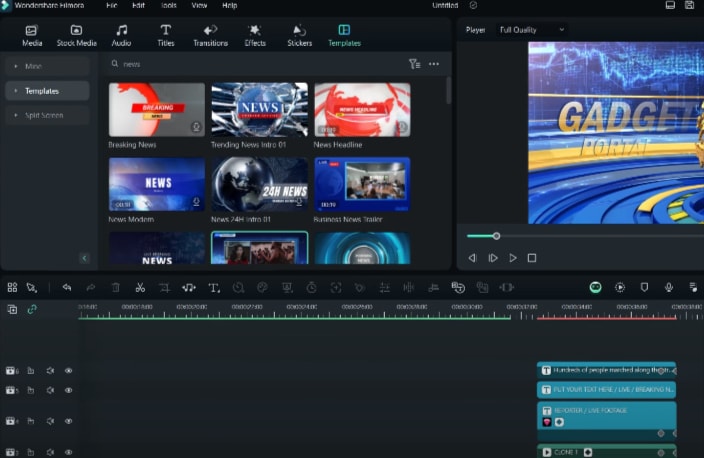
Last but not least, there are lots of templates ready on the Filmora 13. You can use any of these templates. It saves a lot of editing time, and you get many ideas. Replace the footage and titles with your own; your video is ready.
Once again, drag and drop to the timeline. Edit, replace the footage with your own, and edit the titles. Your news report is ready with great graphics and great animations. The template can be expanded here, and the titles, the background music, and everything can be edited here.
So, indeed, Filmora 13 is a very resourceful software. You can do your video editing and all of these for your news channel. Use this software for your news channel. It's highly recommended. That's all for today, guys. I hope that it was helpful. You are watching the gadgets portal. Thank you for watching.
Advanced Techniques for News Channel Animations
What you need to prepare:
- A computer (Windows or macOS)
- Your video materials.
- Filmora video editor
Choose a Professional News Broadcast Intro
You should navigate to the "Titles" tab in Filmora and search for "news broadcast intro." Explore the various results showcasing professional-looking intros explicitly designed for news channels. Select an intro video that aligns with the desired aesthetic for your news channel.
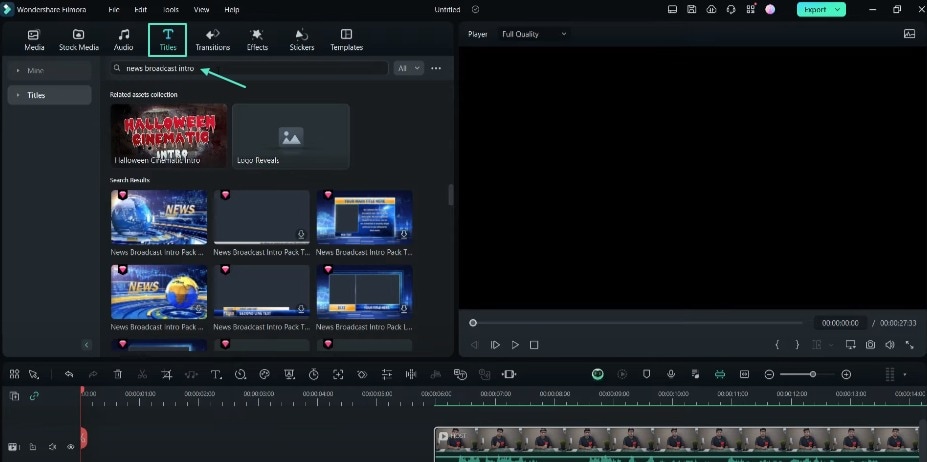
Once chosen, drag and drop the intro video onto the timeline. Double-click on the intro to customize the text and tailor it to your news channel's branding.
Record Your Newscast in Front of a Solid or Green Screen Background
Start by recording your newscast footage. Position yourself in front of a solid-colored wall or a green screen, if available. It will allow for seamless background removal and replacement during the editing process. It gives a polished, professional appearance for your news segment.
Use AI Tools for Background Removal
Filmora offers several AI-powered tools to facilitate background removal from your recorded footage. The "Chroma Key" tool is ideal for green screen footage. Likewise, the "AI Portrait" feature can automatically detect and remove backgrounds with a single click.
Adjust the "Edge Thickness" and "Edge Feather" settings as needed for a precise cutout. Additionally, you can also use the Smart Cutout tool. It enables you to define the object or person you wish to isolate manually. This feature is handy for crowded or complex backgrounds.
Select a News Background
Access the "Stickers" menu in Filmora and search for "news backgrounds." Browse through the extensive collection of professional news backgrounds. You can select one that complements your desired news style. Drag and drop the selected background onto your timeline. Position it beneath your recorded footage and integrate it into your news segment.

Add News Titles and Graphics
Search for "news titles" to access various high-quality title graphics and animations. Drag and drop the desired title graphics onto the timeline. You can personalize the text to suit your news segment's content. These titles and graphics can elevate the visual appeal of your news video.
Incorporate Picture-in-Picture (PIP) or Split-Screen Elements
Enhance your news segment by incorporating picture-in-picture (PIP) or split-screen elements. For PIP, drag and drop a video clip onto the timeline, crop and resize it, and position it in a corner or desired location.

Alternatively, you can access the "Templates" menu and select a split-screen template. It can be used to showcase debates or interviews. It also works well in simultaneous footage of the newsreader and field reporter.
Explore Ready-to-Use News Templates
Filmora offers a vast collection of pre-designed news templates. They can save you significant editing time. Browse through the available templates in Filmora and select one that suits your needs. Drag and drop the chosen template onto the timeline. Replace the placeholder footage and titles with your content. It will integrate your news segment into the professional-looking template.

Customize and Finalize Your News Production
You have assembled all the necessary elements so far. It includes your recorded footage, backgrounds, titles, graphics, and any additional elements. So, take the time to review and fine-tune your news production. Adjust the timing, transitions, and overall flow to ensure a polished final product. You can also try additional features, such as background music or sound effects. It can further enhance the overall viewing experience of your news video.
Pre-designed templates and intuitive editing features can bring your news stories to life. Thus, Filmora is the best editing software for news videos. It equips you with the tools necessary to create professional-quality news channels. You can create polished graphics, seamless backgrounds, and attention-grabbing intros. Find out more such tutorials at Filmora Creator Hub.


