Transcript
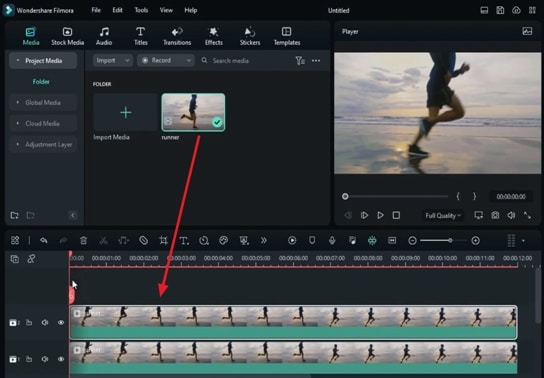
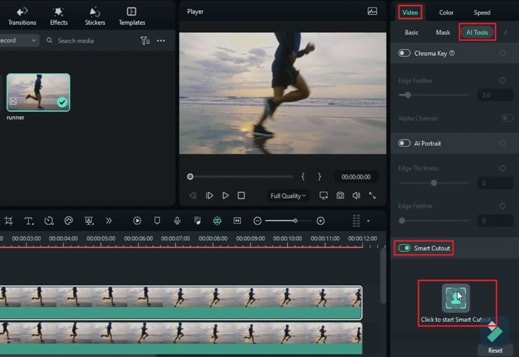
In this video, we will show you how to create this running effect in Wondershare Filmora. First, drop your footage on track 1 and track 2. Select track 2 footage, choose "AI Tools," turn on "Smart Cutout," and stop at the frame in which the subject is fully shown.
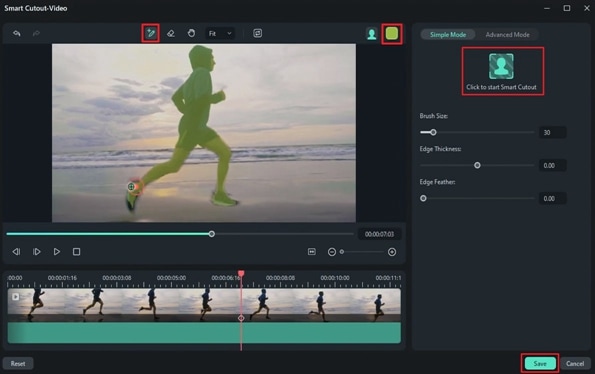
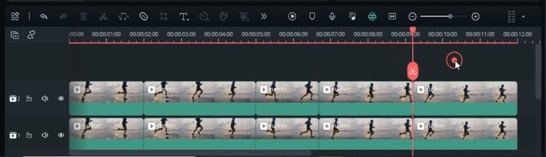
Here, we use the "Brush" tool to cover the subject. Then click on "Start Smart Cutout". Then, it will automatically be chosen on each frame forward and backward, and click on "Save." Now, pick the parts you would like to show the effect and split both clips. Repeat the same step for the rest of the part.
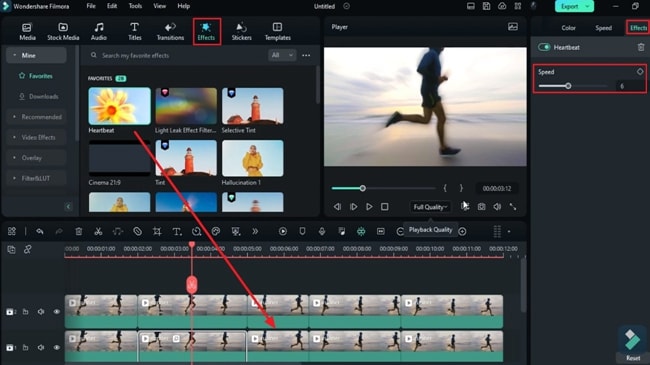
Then go to the "Effects" search for the "Heartbeat" effect and apply it on split parts on track 1. Under the "Effect" tab, we change "Speed" to 5. Here, you can see the background becomes blurry. Let's drop the "Heartbeat" effect on the next split clip. Then, apply the "Hallucination 1" effect on both affected parts.
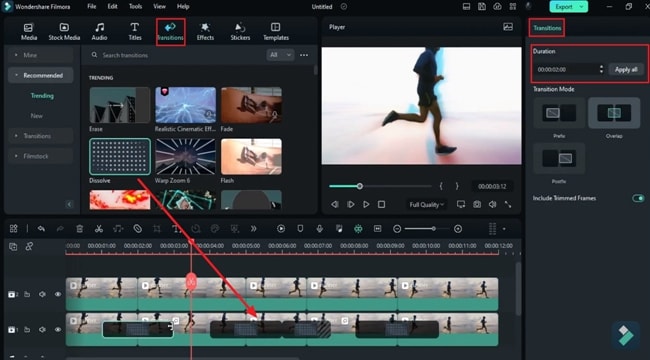
Go to the "Transitions" and apply the "Dissolve" transition on track 1 on all split parts and increase its "Duration." Now, to amplify the effect, go to the “Effects” and apply the “Leak Light Effect” on track 3. Stretch it to 12 seconds, change the “Opacity” to 35.
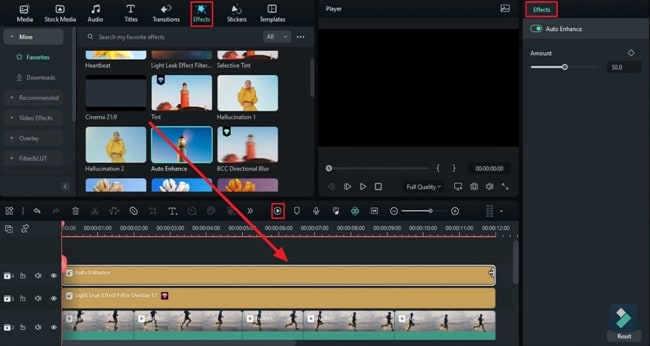
Then, finally, apply the "Auto Enhance" effect on track 4 and stretch it to 12 seconds. Change "Amount" to a 100. Now, let's "Render" it to see the final preview.
Tutorial to Apply the Running Effect by Using Filmora
What you need to prepare:
- A computer (Windows or macOS)
- Your video materials.
- Filmora video editor
Launch the New Project
To start the project, import your video in the media panel, drag it from your system, and drop it on the timeline. Copy this video from the first track of the timeline and paste it on the above track. You'll get two videos on two different tracks of the timeline.
Undergo Smart Cutout on the Object
Select the above video layer and head to the settings panel on the right. Choose the "Video" tab; under this tab, select "AI Tools." As you enter the "AI Tools," scroll down to find the "Smart Cutout" button. Enable this button and hit the "Click to Start Smart Cutout" button to track your moving object.
Track the Moving Object
You'll end up entering the newly opened window. Move your playhead forward to analyze your video and place it where you can see your object. Highlight your object by selecting the "Overlay Color" from the top right corner of the new window with the "Smart Brush" tool.
After highlighting the object, choose "Click to Start Smart Cutout" from the right panel to track your object throughout your video. Wait until the "Tracking Processing" bar is completed and hit "Save" to keep this tracking saved.
Split the Video Layers
Now, go to the timeline and select the video. By moving the playhead towards the right, you can choose the points of your video where you want to apply the effect. Now, split both of your video clips at those points.
Change the Background Effects
Furthermore, select the first video from the timeline, which is your background, and head to the "Effects" tab. Choose any desired effect that suits your video and drag it on your video on a timeline to change the effect of your background. You can choose as many effects as you require.
Select the edited video layer on the timeline to see the results clearly and head to the right panel. Here, you can reduce the "Speed" of the effect under the "Effects" tab.
Apply Transitions on the Split Ends
Move ahead by navigating to the "Transitions" tab, select your desired transition, and apply it to all the video clips of your first video layer. You can adjust its "Duration" from the right panel.
Enhance the Video Visuals with More Effects
If you want to enhance your applied effects, move to the "Effects" tab to choose your effects, and you can apply multiple effects to your videos. Place them on the above tracks and adjust their duration by simply dragging them towards the right, with respect to the video tracks.
If you want to customize the settings, you can do so from the right available window. When you are done applying the effects, hit the "Render Preview" from the timeline toolbar to see the final results.
In this article, you have learned how to use Filmora to apply the running effect in your video. Wondershare Filmora has many preset options that can enhance the visuals of your content with just a single click. Now, you can easily apply the effects on any moving or static object for creating running effect videos by using this tool.


