Transcript
Today, we will teach you how to create this fireball visual effect in Wondershare Filmora. First of all, you need to film footage with your hand. Pretend like holding a ball and throwing it towards the wall. Then, drop your main raw footage on the timeline. Keep the project at 25 frames per second.
Now, we will add some effect to it. Split the footage at 12 frames. Then we will split it at where we're throwing it towards the wall. Let's download the “Superpower FX Effect” Pack from “Filmstock.”
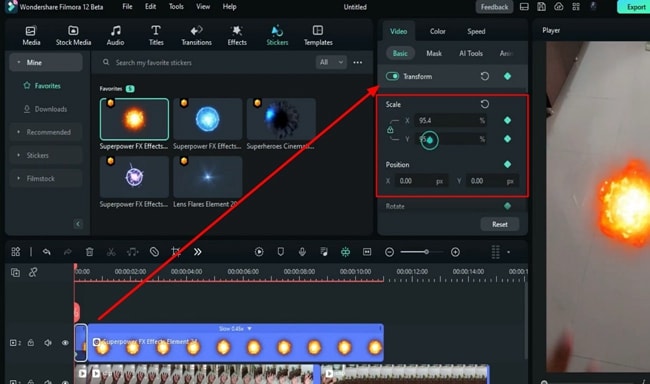
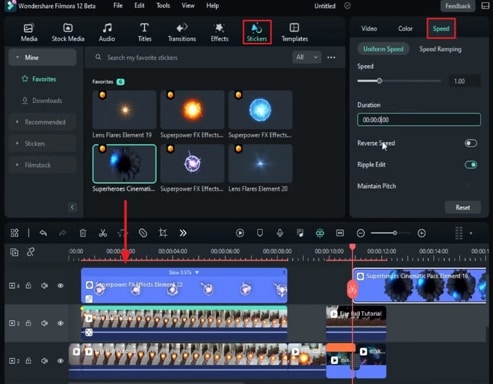
Go to the "Stickers." Here, you can find many fire and ice balls. Drop a fireball on track 2. Go to "Speed" and change the duration to 11 seconds. Then, split the fireball at the 12th frame. Here, we will create a fireball-catching effect. Go to "Basic" keyframes for "Transform." Lock X and Y "Scale." In the beginning, we reduce the fireball "Scale" and take it out of the screen. Move a few frames forward. Bring a fireball in the frame.
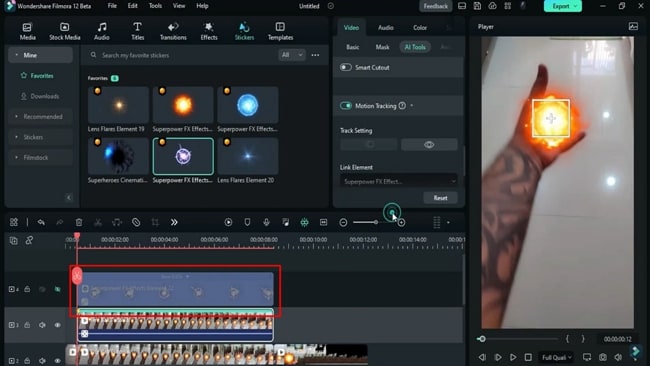
At the end of the split clip, change the fireball "Position" just above the palm and increase the "Scale" of the ball. Now select the middle part of the main clip, go to "AI Tools," and turn on "Motion Tracking," you will see this rectangle on your preview screen. Select it, change its shape to a square, and assign it to the palm. Start the motion track; once it's done, unhide track 2 and select "Fireball Motion Graphic" under "Link Element." Here, the fireball is linked to the hand movement. Go to the "Basic" on keyframes for "Transform."
Increase the "Scale" in Preview Screen. If you increase it in transform, it will increase the "Scale" for that particular keyframe. Go a few frames forward if required. Increase the "Scale" a bit. Now, you can see we got the effect of catching the fireball.
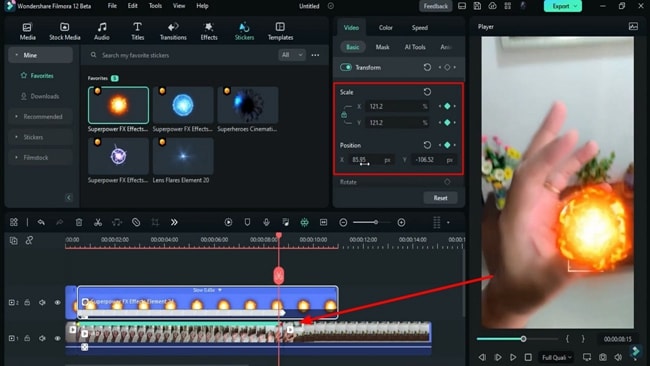
Next, go to the point where the hand is going to throw the ball. Now you can see the hand is near the camera with a fireball, but the size of the ball is the same. To fix this, we now need to increase the “Scale” manually for each keyframe. Split the fireball clip after the last keyframe, and for the split clip, set the "Scale" value of the first ball the same as the last keyframe and adjust its “Position.”
On “Transform” keyframes, here, we need to do the manual keyframing for the rest of the clip while doing manual keyframing. Keep in mind to adjust the “Position” of the fireball and the size of the fire. When the hand is away from the camera, decrease the size of the fireball in order to make it more realistic.
Once the fireball is released from the hand, you can define its path. You can throw it directly in a straight line, or you can create a bit of left-right movement of fireball. Make the ball travel toward the wall by decreasing the “Scale” of every keyframe.
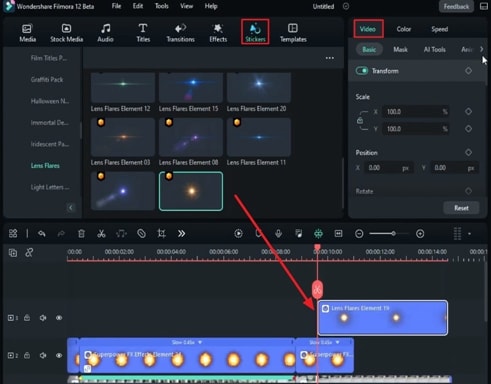
Then go to the film stock, and under “Lens Flare,” drop this orange flare on track 3. On Transform Keyframes, you change "Blending Mode" to the best "Blending Mode" for this screen.
Lock the "Scale" Ratio, decrease its "Scale," and adjust it in the center of the fireball. Go two frames forward. Here, we decrease the "Scale" of the fireball and change the "Position." Place the flare in the center of the fireball and increase the flare size to 160 degrees. Go two frames forward and decrease the size to zero. Shrink the fireball clip and flare clip. Now, let's check it and adjust the position if required.
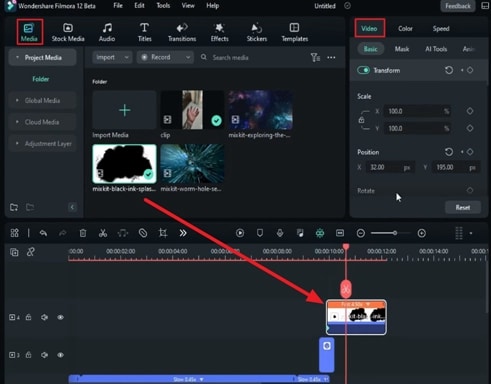
Go to the “Media,” drop this ink clip on the timeline. By the way, you can download it from Mixkit.co. On the keyframes for “Transform,” change “Blending Mode” to “Multiply.” Increase “Speed” by 4.5, shrink the clip to the start point of Ink Drop, go to the Transform, and set it above the flare.
Go a few frames forward and increase the X and Y axis of "Scale" to cover the wall with an ink clip. Again, increase the X and Y axis after a few frames and bring it towards the downside. Now, shrink the main clip to the ink clip. Export this clip at a higher rate.
Delete all the files from the timeline and bring the clip we created. Drop it on the timeline. Split it at the 12th frame. Go forward and split it at where the hand is coming up. Copy the middle part and paste it on track 2.
Go to the effect and drop this electric ball on the track. Go to the "Speed" and increase the duration time to match the track 3 clip. Select track 3 clip, go to "AI Tools," and on "Motion Tracking," hide the electric ball clip. And follow the same steps to track the fireball.
Once tracking is done, link the electric ball to it and unhide the electric ball clip. Go to the "Basic" and increase the size of the electric ball, and place it inside the square. Change the "Blending Mode" to "Screen" to blend it with the fireball. Now we have a nice fireball with some electric movement.
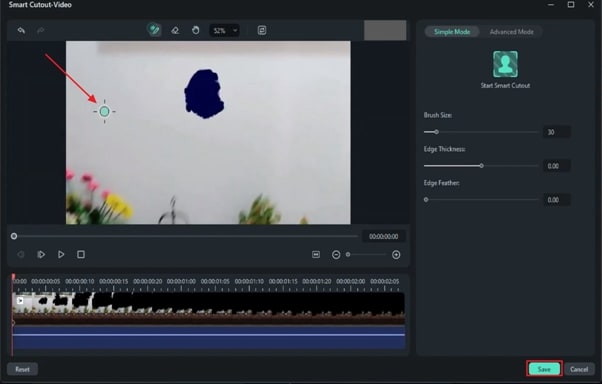
Now, split the main clip at the ink drop point. Shift it to track 2. Go to the "AI Tools," start the "Smart Cutout," and select the black ink part using the brush tool; you can zoom into your clip to get a closer look. Go one frame forward, again select the black ink, and repeat it for a few more frames. We're doing it manually because we don't want to miss any part of the ink. Once full ink is revealed, click on "Start Smart Cutout," and this AI feature automatically selects the ink. Click on the "Invert Mask" option and close it.
Apply the "Dissolve” transition and keep the transition for 10 frames. Split the clip at the end. Now change the “Color” of both clips to “Fantasy.” You can see we have nice crisp and bright colors.
Go to the "Stickers," drop the Superheroes portal clip on track 4 right before the end of the Wormhole clip. Go to "Speed" and change the duration to 2 seconds. Under the "Basic" tag, we reduce the "Scale" and adjust it on the black hole of the Wormhole clip. Now, after 15 frames, drop the fireball on track 5.
On "Transform Keyframe," we lock the "Scale" ratio. Decrease its "Scale" to 6, adjust the "Position" in the center of the black hole portal, and reduce the size to 0. Next, go 15 frames forward, increasing the size of the fireball. Go 5 frames forward and change "Scale" to around 300. It will create a fireball shooting back from the portal. Now start at where we're catching the fireball, drop the lens flare clip, and change "Blending Mode" to "Screen."
On the "Transform" keyframes, place it in the middle of the fireball and reduce the "Scale" to zero. Then, after one to two frames, increase the "Scale" of the flare and adjust its "Position." Then, go three frames forward and reduce the "Scale" to zero. Split the clip at the point and copy the flare clip. Now paste it where we're throwing a fireball toward the wall and adjust its "Position" on keyframes. Again, paste it and adjust the "Position".
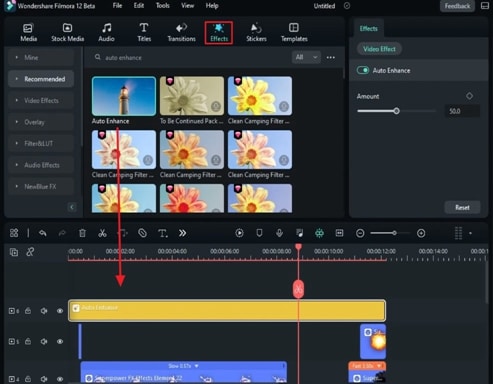
Now go to "Effects" and search for the "Auto Enhance" effect. Apply it on the top track and increase its duration. Now, let us see the final preview.
Guide on How to Create Fire Ball Effect in Filmora
What you need to prepare:
- A computer (Windows or macOS)
- Your video materials.
- Filmora video editor
Initiate Filmora and Drop Media to Timeline
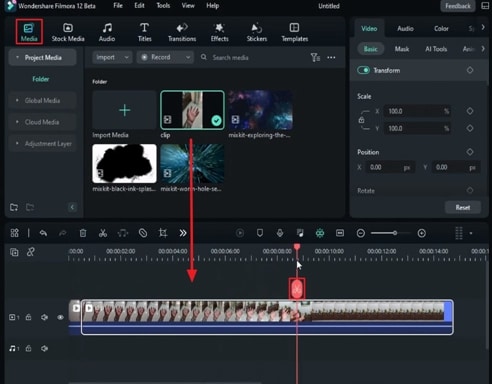
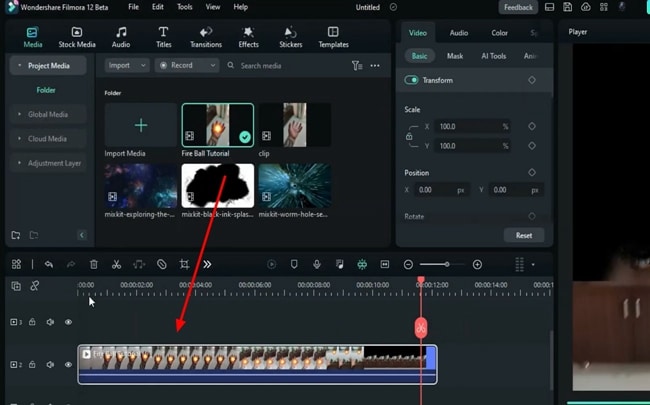
To start the editing process, first, you need to launch Filmora on your PC. After that, initiate a "New Project," and you'll reach its main editing interface. Click the "Media" tab and import your files into the platform. To create a video like this, you need to record a video with right-hand movements.
Click on your main media clip, drag it, and place it on the timeline track. Place the playhead at the point where you are going to make a fireball with your hand and split the clip from there. Then go further in that track and place the playhead where you're throwing that ball towards the wall. Trim from there as well.
Add Fireball and Make Adjustments
First, download the “Superpower FX Effect” from Filmora's Filmstock to create this superpower effect. Go to "Stickers" and select a fireball of your choice. After selection, drag this fireball and drop it on the timeline track as well. To match the duration of the fireball with the main clip, go to the tool panel on the right. Then go to the "Speed" tab, and under "Uniform Speed," change its "Duration" according to your video.
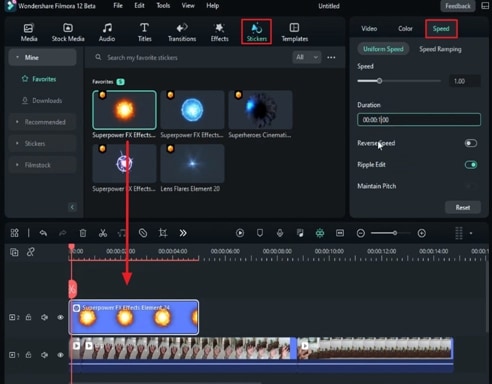
Now, make some changes in the "Position" of the fireball to fit your hand throughout the video. Following this, go to the fireball clip in the timeline, place the playhead at the point where you split the first clip, and trim it. Then, from the right tool panel, under the "Basic" tab, enable the "Transform" keyframes for this split clip and adjust its "Scale" and "Position" values accordingly.

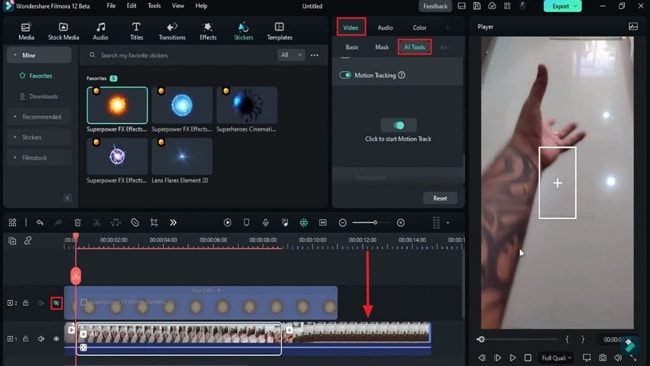
Enable Motion Tracking
Now place the playhead in the middle of the fire ball split clip. Go to the right-side panel, select the "Video" tab, and under the "AI Tools" section, enable "Motion Tracking" and hide the other track from the left side of the timeline. Place the motion tracking detector on your hand and adjust its position per the fireball. Tap the "Click to start Motion Track" button once completed; click "OK" and unhide the hidden track.
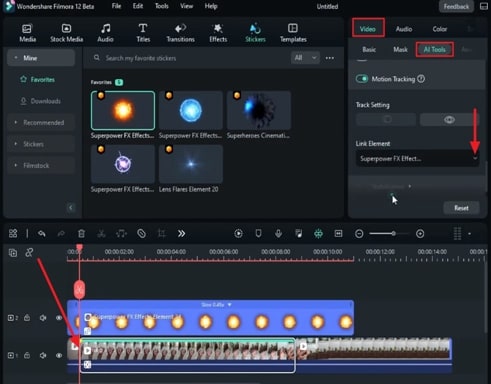
Link Both Clips in the Timeline
To link the fireball with hand movements throughout the video, first, click the original clip. Then, go below the "Motion Track" button and choose "Superpower FX Effect" under “Link Elements.” This will link both the original clip and the fireball.
Adjust the Fire Ball on the Palm accurately
To adjust the fireball on your palm, click the fireball clip and enable "Transform" keyframes. Then, adjust the "Scale" and "Position" of the fireball as per the motion track detector. Repeat this process at different timeframes to ensure accurate coordination between palm movements and fireballs.
Edit Another Clip With Similar Flow
Go to another split part, where you are throwing the ball toward the wall. Turn on the "Transform" keyframes and adjust the "Position" of the fireball according to the movements of the hand. When the hand is closer to the screen, increase the "Scale" of the fireball. Repeat this same process at different timeframes. Then, when the hand throws the ball, decrease the "Scale" of the fireball and adjust its "Position" to give it a more realistic look.
Add Effects to Enhance Fire Ball Effect
Once the fire ball's "Scale" is at its lowest but closest to the wall, it's time to add some effects to give a realistic touch. Go to "Stickers" on the custom toolbar and add any glow effect in the track above. Place this effect above the fireball split clip because we need glow at the ending points.
Turn on "Transform" keyframes for it and choose a "Blending Mode" that matches your video best. Adjust the "Position" and "Scale" for this glow effect at different points to match the size and position of the fireball. Once you're done adjusting, check if both glow and fireball align.
Drop the Ink Clip on the Timeline
From your import media, drop the ink clip on the next available time track. To adjust this clip, go to the "Video" settings, turn on the "Transform" keyframes for it, and change its "Blending Mode" as well. Change the "Scale" and "Position" of Ink on glow.
Keep moving further in the timeframe and adjust these elements till the whole wall is covered. Export this video and import it back into Filmora; meanwhile, delete all the other media on the timeline panel and drop it on the first track.
Add Another Superpower Effect on the Fire Ball
Bring this video to the first track and split it the same way you split the other clips before the clip. Then, bring another split clip to track and add any other superpower effect, such as the electric ball. Repeat the same process of enabling "Transform" keyframes and "Motion Tracking" for this effect. Similarly, do "Scale" and "Position" adjustments to ensure that they align with the fireball.
Enable AI Smart Cutout for Ink Clip
Trim the ink drop clip and drop it to a track above. Enable "Smart Cutout" under "AI Tools," and with the help of the brush tool, select the ink part manually. To get precise results, you can zoom in on the preview screen. You’ll have to repeat the process of selecting the Ink part many times till the end of the clip. Enable the "Invert Mask" option on the preview panel and return to the main editing window.
Create a Wormhole Effect
You'll have to drop the wormhole clip on the first track to create the wormhole illustration in your video. Turn on "Transform" keyframes for it and adjust its "Size" and "Position" to fit the frame perfectly. Make these adjustments on different timeframes. You can change the "Duration" of this wormhole under the "Speed" tab.
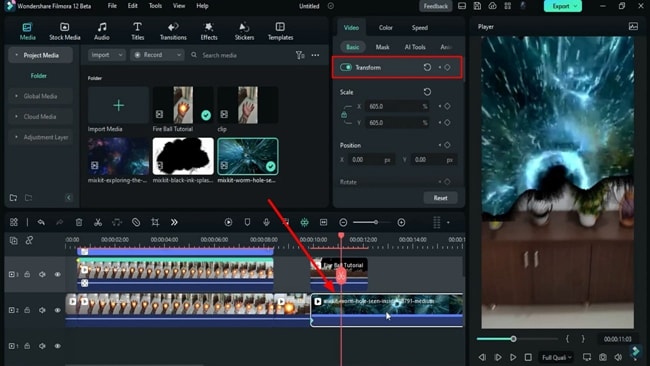
Add Space Effect & Other Effects
After the wormhole, you'll have to add a space effect as well to enhance the overall animation. Following that, drop the space clip media in the main track next to the wormhole clip and make similar adjustments. You can make color enhancements under the "Color" tab from the right-side panel.
You're now aware of the adjustments and settings related to superhero effects. If you want to add more effects to your video, you can find them under "Sticker" in the "Filmstock" category.
Final Enhancement & Export
To give your video an even look, select the "Auto Enhancement" effect under the "Effects" tab on the custom toolbar and add it to the latest free track. From the timeline toolbar, find and click the "Render Preview" button and see the final creation. If the results amaze you, press the "Export" button and finalize your results.
After reading this step-by-step guide, making fire ball effect videos may be convenient. It is just a game of finding and adjusting the right effects at the right time. With Wondershare Filmora, you can make creative transitions and intros, including fireball effect videos.


