- Home
- DIY Special Effects
- Tutorial to Create Moving at Lightspeed Effect in Filmora
Transcript
In this video, we will create the moving at lightspeed effect in Wondershare Filmora. First, shoot a stable video, something similar to this video, in which you are moving to different locations. Then, drop your raw footage on track 1. Plus, download these fresh VFX clips from footagecreate.coclipserve for free.
Split at which you want to create the effect. Now, to create this kind of trial effect. Select the first split part and change "Speed" to 35. Just make sure your speed clip should be 10 to 12 frames long. Then zoom in on the timeline and duplicate the split part on track 2. Shift back and shrink by one frame.
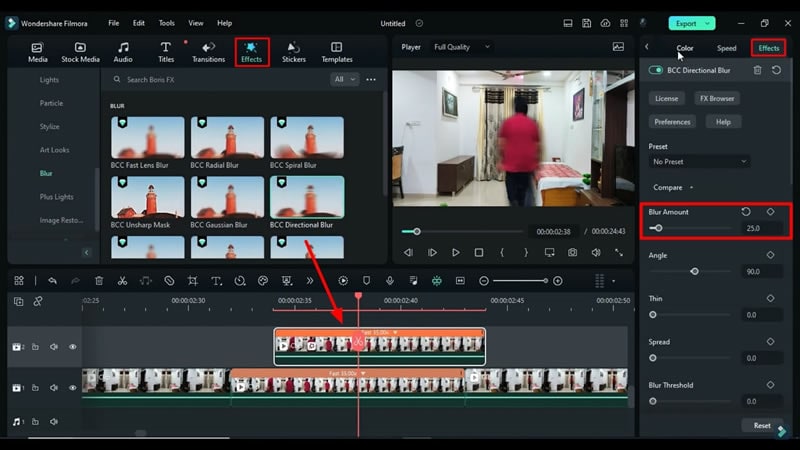
Then go to "Video," "AI Tools," turn on "Smart Cut," and make a cutout of the subject. Check out and fix if some part is missing in some frames. Now hide track 1, then we will see only the subject on track 2. Go to “Effects” and under "Boris FX," "Blur," apply this "Directional Blur" on the duplicated clip and change "Blur Amount" to 25 and "Opacity" to 80.
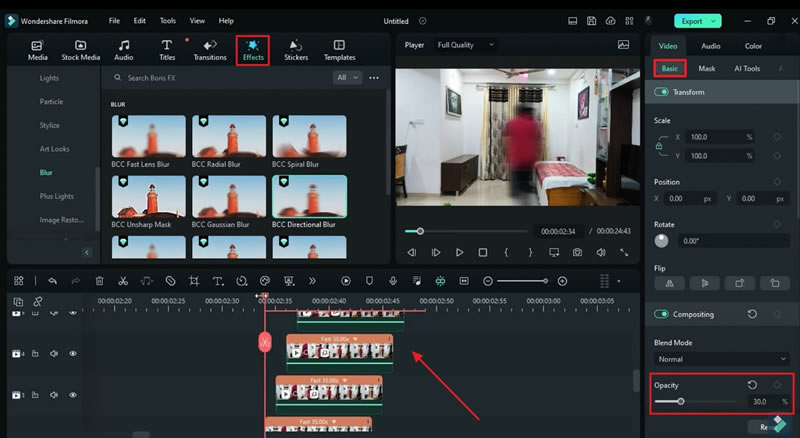
Then duplicate it on the frame back on track 3 and change the "Opacity" to 70. Then again, duplicate on track 4, change "Opacity" to 60. Repeat the same step till track 7. You can use more tracks to create a long trail effect. Just keep reducing "Opacity" by 10. Now, you can see the trail and repeat the same process on the rest of the split parts.
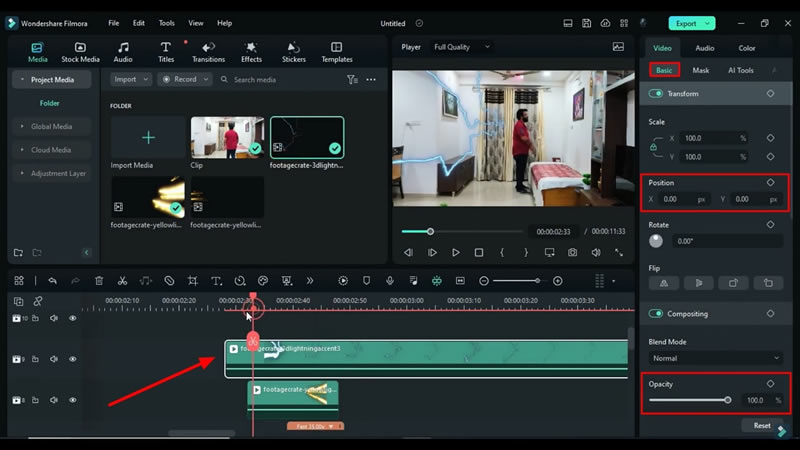
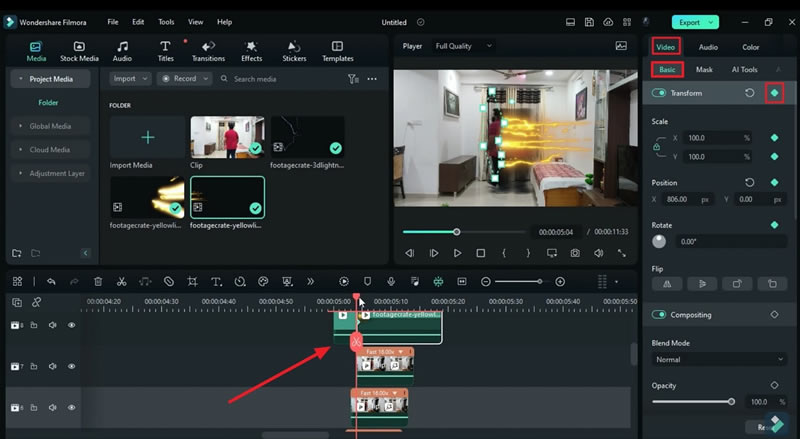
Once you are done with all the split parts, go back to the first split part. Go to the start of the split part, drop this yellow flashlight clip on track 8, adjust it according to the subject's movement, and make this flashlight follow the subject. Then, drop the blue electric clip at track 9, "Flip" it, and adjust its starting point and position to make it follow the subject. Split it and add the "Opacity" keyframe to make a fade-out effect on the electric clip.
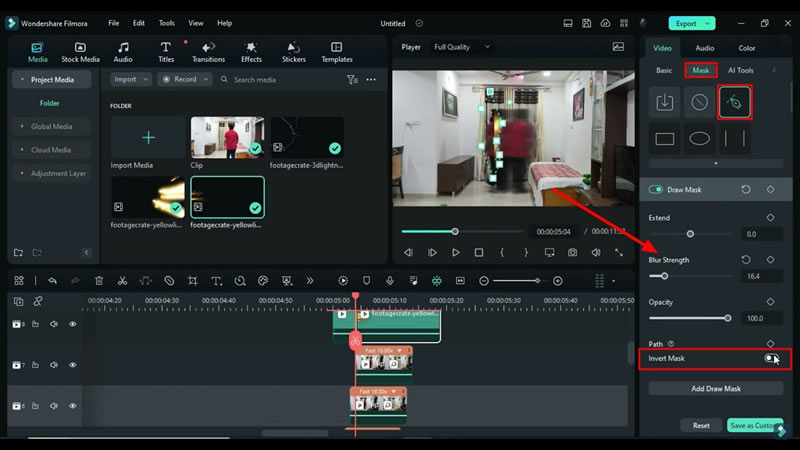
Then, go to the second split part. We will use horizontal flash VFX light rays to split it at this point. Change the second part, "Position," and place it on the subject. Go to the "Mask" and select the pen tool to create a mask around the flash yellow light. To blend the edges with the subject, increase "Blur Strength” and select the “Invert Mask.”
Turn on the mask keyframes, go to the "Basic," and add "Transform" keyframes. Then go to the "Speed" and change the speed to 0.5X. Now, go forward and make a yellow light to travel along with the subject. Now, follow the same process and create the same effect on leftover split parts. In the last split part, we will use all three flashlight clips. Just make sure the light should travel with the subject.
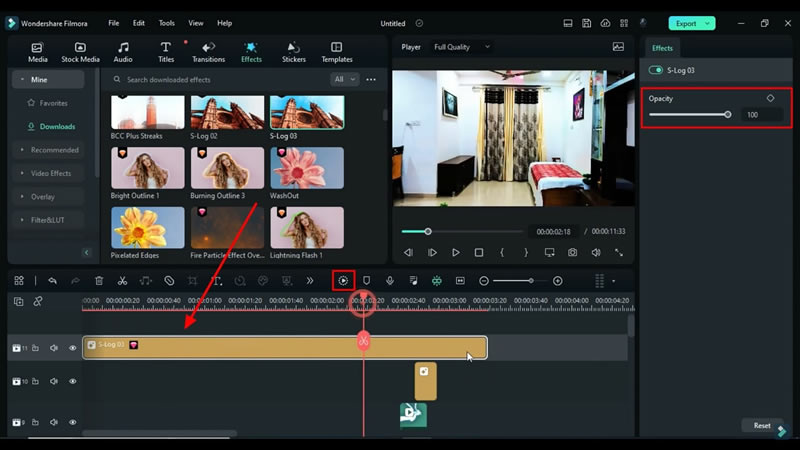
Now, to create a shake effect when the subject passes by the camera. Here, we need to search for “Extreme” under “Effects” and apply it on the top track, keeping it for 11 frames. Go to the end split clip, duplicate the “Extreme” effect at a suitable position, and change the duration to 15 frames. Now again, go to the "Effects" and apply the "S-Log03” effect to enhance the colors and change the effect "Opacity" to 30. Now, let's see the final preview.
How To Create Moving at Lightspeed Effect in Wondershare Filmora
What you need to prepare:
- A computer (Windows or macOS)
- Your video materials.
- Filmora video editor
Launch the Tool and Import Media
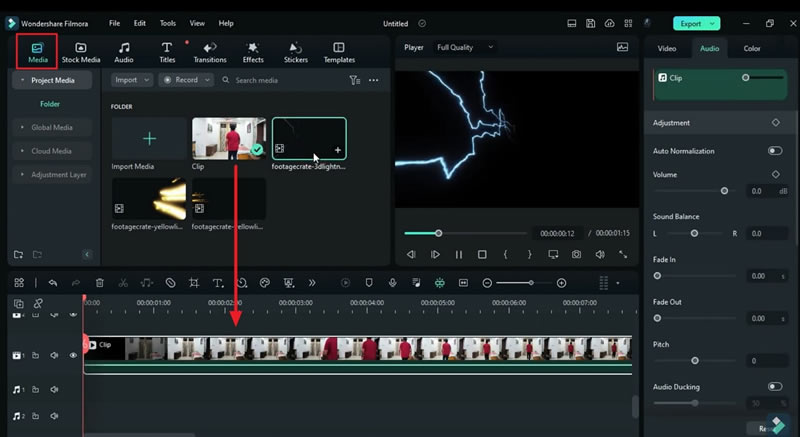
Begin the editing process by opening Wondershare Filmora. Here, you can start the new project by hitting the "New Project" button on the main interface. Afterward, click the “Media” tab and import your videos and effects into the media panel. Select your video and drag it to the timeline to process a video layer. Now, analyze your video and identify the points where you want to apply the effect.
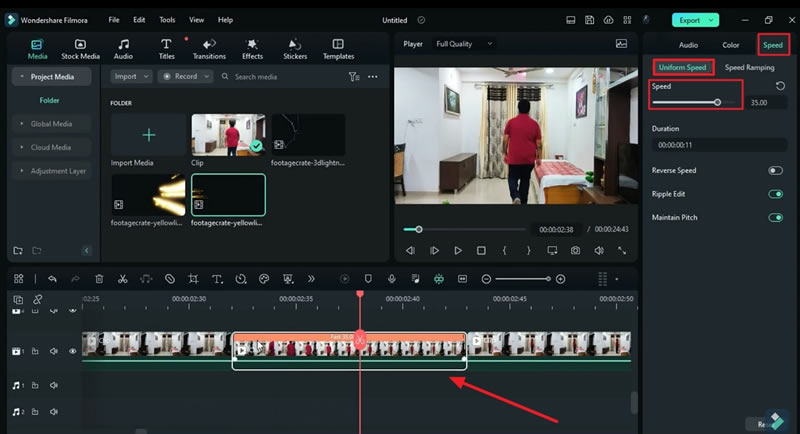
Adjust the Uniform Speed of Split Part
To create the effect, split your clip at the required timeframe and head to the right-side panel to access the "Speed" tab. After that, click on the "Uniform Speed" section and adjust the “Speed” accordingly. To have a closer look at the object, you can zoom in on your video from the timeline panel with the help of your mouse slider.
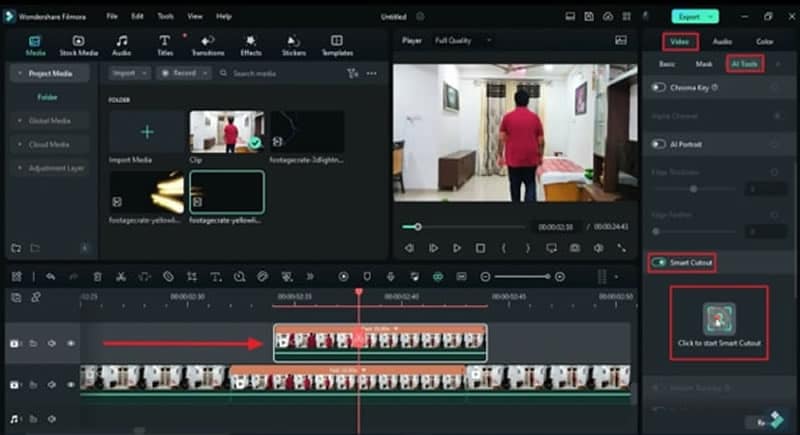
Duplicate the Clip and Apply Smart Cutout
Now copy the adjusted clip on the above track to create another video layer. Here, you can also track the motion of your object. To do so, select the duplicated video layer, look for the "Video" tab, and enter its "AI Tools" section.
Enable the "Smart Cutout" button by scrolling down and making a smart cutout of the object using the appropriate options. On selecting the “Click to start Smart Cutout” option, wait until the tracking is complete.
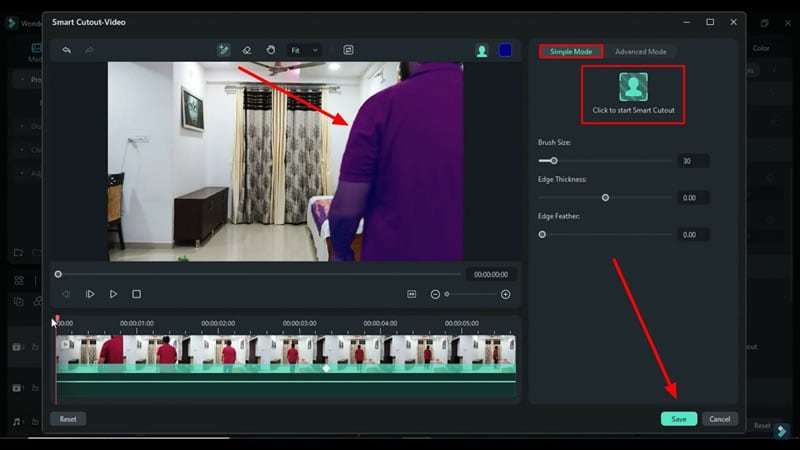
In the “Smart Cutout-Video” window, check videos multiple times and make a cutout of the subject under the "Simple Mode" tab. There, press the "Click to Start Smart Cutout" option and check thoroughly if any parts are not covered. Consequently, press the “Save” button to apply the changes in the video.
Furthermore, head back to the timeline panel and hide your original clip with the “Eye” icon. You will see the results of the tracking that only the object is left in the video.
Adjust the Opacity and Blur Amount for Applied Effect
Next, head towards the "Effects" menu and choose the suitable effect for your object from the left-side panel. However, to apply the fast-moving effect, double-click the effect that you dropped on the timeline panel and shift toward the right-side section. Then, under the "Effects" tab, adjust its "Blur Amount," and from the “Video” tab, adjust its “Opacity.”
Drag and Drop Multiple Clips and Set the Position and Opacity
Now, keep duplicating tracks to create a few more video layers. Do this for all the split parts and apply the “Effects” on all your video layers. Drag and drop the desired effects on the timeline panel after selecting them from the "Effects" tab. Adjust their “Opacity” under the “Basic” tab to apply the fade-out effect.
You will need to drop some other clips from the media panel. Once you drag and drop them on the timeline panel, select those clips, split at required timeframes, add the "Opacity" keyframe, and adjust it. Also, change the "Position" for those clips where needed under the "Basic" tab.
Apply Draw Mask on Effect and Invert Mask
Make your effects follow your object by selecting the effect from the timeline and heading to the right-side panel. Select the "Mask" tab and choose the "Draw Mask" option. Draw the mask manually around your effect in the preview panel and adjust its "Blur Strength" to blend the edges of the effect with the object. After this, toggle the “Invert Mask” option to enable it and add “Draw Mask” keyframes if needed.
Adjust the Speed for Effects After Adding Keyframes
To make effects move with the object, go to the "Basic" option under the "Video" tab and add the "Transform" keyframe. Here, you can add multiple keyframes at different points for the effect. Do the same for the rest of the effects and the video clips if needed. Then, keep adjusting the "Speed" after heading to the "Speed" tab and selecting the "Uniform Speed" section.
Apply Final Effects and Render Preview Video
However, to make it look super-fast, apply the shaking effects on your object by selecting it from the “Effects” tab. You can drag and drop them on the timeline panel and adjust the “Opacity” and duration for these shake effects. Now, look for the "Render Preview" button in the timeline toolbar to see the final results.
Creative video editing has now become very convenient due to the availability of AI editing tools. Wondershare Filmora has smart AI tools specially for this purpose. You can do any type of editing and create any desired effect, such as the lightspeed effect, by editing your videos in Filmora without compromising on the quality of the video.


