Transcript
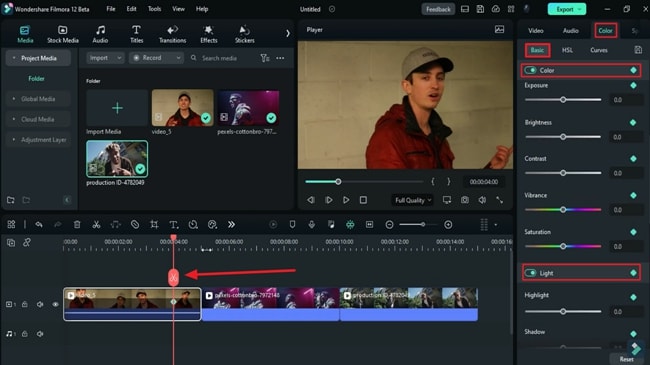
In this video will teach you how to create the strobe transition in Wondershare Filmora. First, drop all the footage on the timeline and split where you want to create the strobe transition. Then, go to 1 second before the end of the footage, and turn on the keyframes under the "Color" section for "Color" and "Light." Zoom in on the timeline and increase "Exposure" to 100 percent in seven frames further.
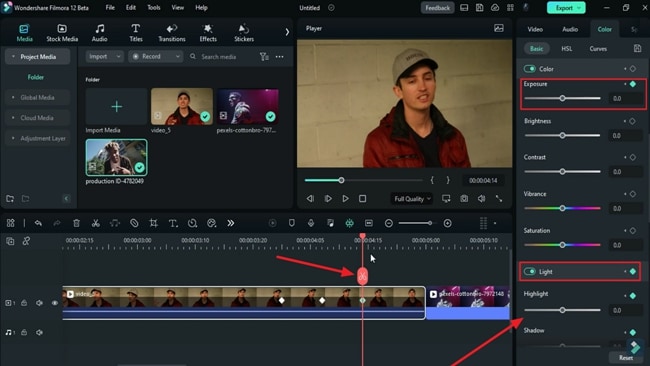
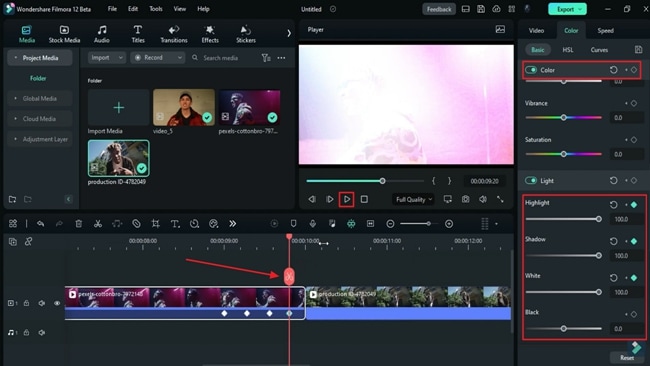
These settings depend on your footage because the combination of lights and color makes a big difference. Then change "Exposure" to 0 percent in 7 frames further. Add a blank keyframe for "Light," then change the "Exposure," "Brightness," "Highlight," and "Shadow" to a 100 percent and "White" to a 100 in seven frames further.
Move to the second clip, go to 9 seconds, and turn on keyframes for "Light" and "Color," increase "Exposure" after 7 frames. Here, we need to increase "Exposure" and "Brightness" to 100 percent because of the color and lights and the footage. Go 7 frames further and set all values to default.
Again increase "Exposure," "Brightness," "Highlight," "Shadow," and "White" to 100 percent after seven frames. Now zoom in on the timeline and let’s see the final preview.
Guide on How to Create Strobe Transition in Filmora
What you need to prepare:
- A computer (Windows or macOS)
- Your video materials.
- Filmora video editor
Launch Filmora and Import Clips
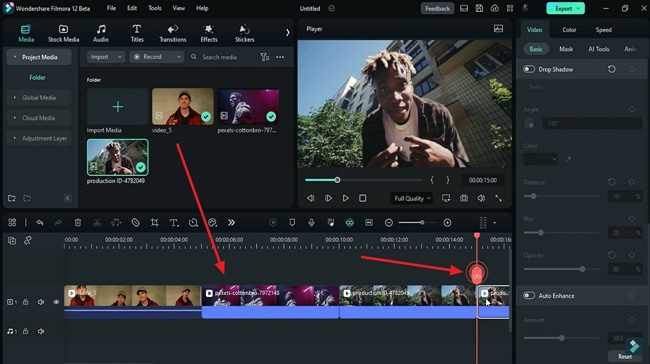
Launch Filmora, and after creating a new project, import the videos you want to add the strobe transitions in. Drag and drop all the clips on the timeline panel and place the playhead where you want to add a transition and split the clips and delete the rest of the part. Repeat this process for every clip you have imported.
Turn on Keyframes and Increase Light and Color
In the next step, go to the first track on the timeline and place the playhead on 1 second before the first video ends. Move towards the right side panel and select the "Color" tab. Under the "Basic" sub-tab, enable the "Color" and "Light" keyframes. From the timeline toolbar, zoom in on the timeline and place the playhead 7 frames further from where it was before. At that point, increase the "Exposure" according to your Video.
Place the playhead again 7 frames further than the last and increase the “Exposure” again. Repeat the process but this time decrease the “Exposure” and add a “Light” keyframe. Place the playhead 7 frames further and increase the “Exposure,” “Brightness,” “Highlight,” “White,” and “Shadow.”
Edit the second Video in a Similar Way
Place the playhead a few frames forward and repeat the same process. However, adjust the "Color" and "Light" elements according to the colors of your video. Once you are done, zoom out of the timeline and hover towards the timeline toolbar. Find the “Play” icon in the preview panel to watch the results.
If you want, you can also add light effects on the transition points. Once satisfied with your creation, click the "Export" button at the top right and export the data.
Now that you've read the guide, you know making a strobe transition using Filmora takes barely a few minutes. It allows you to experiment with different colors and light elements; you can add music as well. Such types of transitions are especially useful in creating music and rap videos in Wondershare Filmora.
