Transcript
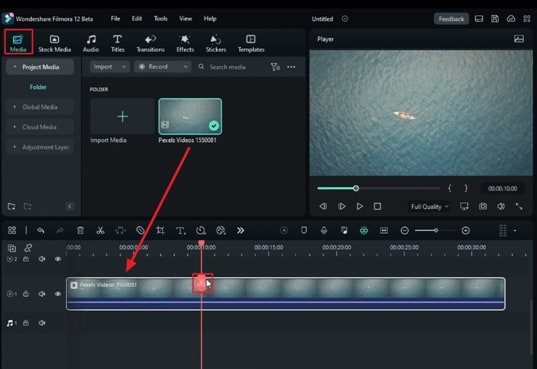
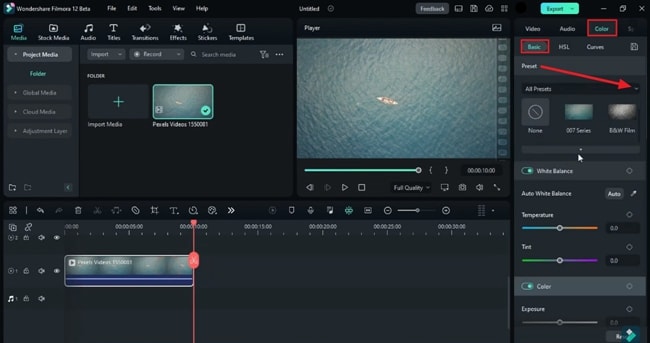
In this video, we will teach you how to create this underwater title in Wondershare Filmora. First, drop your water footage on the timeline and keep it 10 seconds long. Select “Cool Film” preset under the “Color” tab. Then we got some nice blue water.
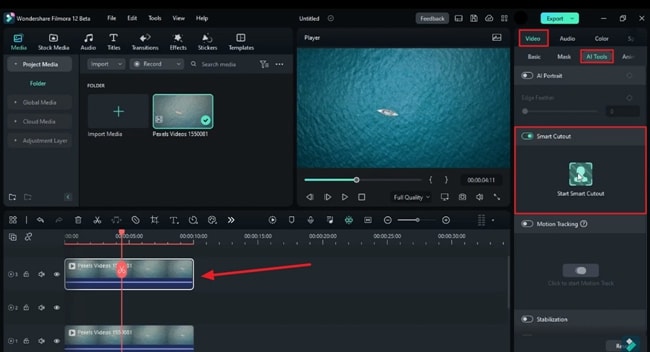
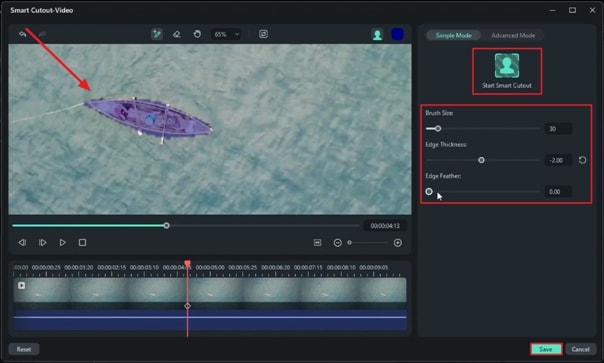
Again, copy-paste it, shift the duplicate clip to track 3, and select it. Go to the video and select “Smart Cut” under “AI Tools,” start it. Now zoom in on your clip and make a selection around the boat. Reduce the “Edge Thickness” to negative 2 and “Edge Feather” to three. Now, click on “Start Smart Cutout.” This AI feature will automatically mask and save the selected object on your clip and save it. Now, you can see we have our boat without background.
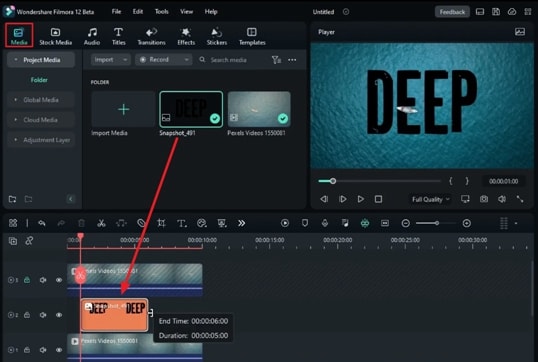
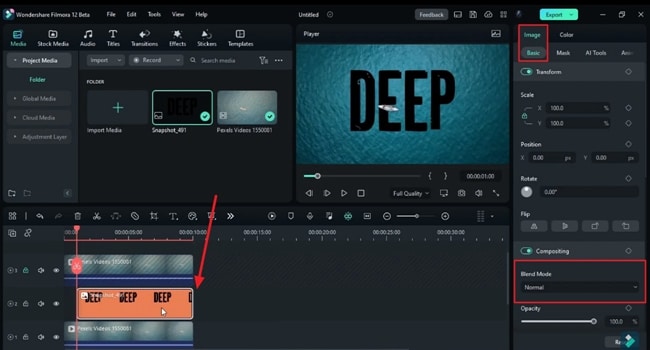
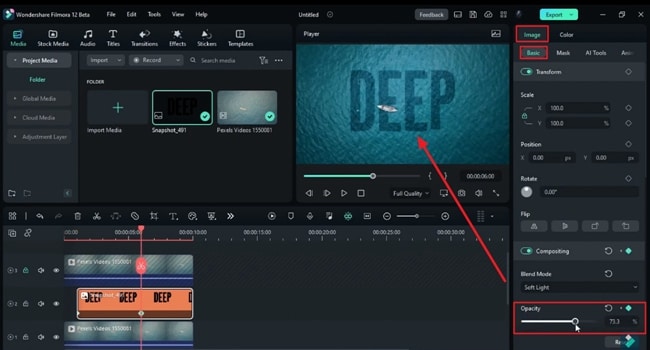
Next, drop the “Default Title” on the timeline, type your word, and change font to any cinematic bold font. Increase the size of the word, lock track 3, and adjust its position. Slide the default title outside. Change the font color to Black and take a snapshot. Now, delete the default title and drop the snapshot on track 2. Identify the starting point and place this snapshot on that point. Extend its duration and change “Blending Mode” to “Soft Light.” Add an opacity keyframe and set the “Opacity” to 0% at the starting point. Then, go five seconds further and set the “Opacity” at 70.5%.
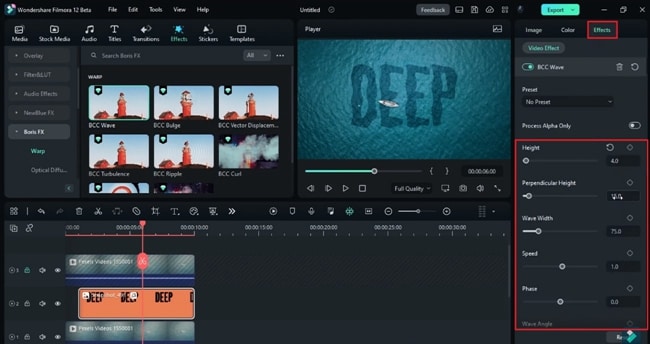
Now, we will make the text perfectly blend with water. So, we add a “Boris FX” “BBC Wave” effect on the snapshot. Then go to the “Effects,” set the height at 4, “Perpendicular Height” to 0.1. “Wave Width” to 400, “Speed” to 0.6, and “Wave Angle” to negative 45. Now, under “Chaos,” you can change “Waveform” if you wish. Now, let’s render it and have a look at it.
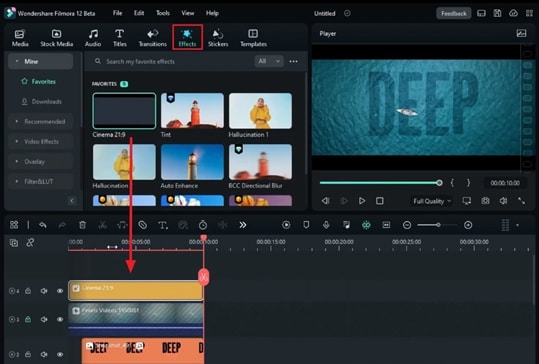
If you feel waving is too much, change the “Wave Height” to negative 4 for more smooth waves. Now, let’s drop the cinematic bar and make it more cinematic. Now, let's see the final preview./p>
Guide on How to Create an Underwater Reveal Intro in Filmora
What you need to prepare:
- A computer (Windows or macOS)
- Your video materials.
- Filmora video editor
Import Your Clip and Adjust Its Duration
To incorporate an Underwater Reveal Intro, initiate Filmora on your device and tap on the “New Project” button. Import your clip through the “Project Media” category in the editing window. Afterward, drag and drop your imported clip in the timeline track and adjust its duration according to your ideal intro duration.
Enhance the Ocean Color from Preset
From the timeline toolbar, tap the “Zoom to Fit Timeline” icon, trim your clip from 10 seconds onward, and delete it. To add more blue to ocean water, go to the right tool panel and click the “Color” tab. In the “Basic” sub-tab, go to the “All Presets” option and choose the preset that suits your clip the best.
Duplicate the Clip and Initiate Smart Cutout
Now, move towards the timeline clip and duplicate it by clicking right on it with your cursor. Select the "Copy" option from the options menu and paste it. Once you're done, drag the duplicated clip to another timeline track, click on it, and go to the "Video" tab on the right tool panel. Click on the "AI Tools" sub-tab and click on the "Start Smart Cutout" icon.
Next, zoom in on the clip and mark the circumstance of your object with the help of a cursor. Once you've done it, manually adjust the “Edge Thickness” and “Edge Feather” of the object and tap the “Start Smart Cutout” button once again. Select the “Save” button after AI tracking is done. You'll notice that the ocean background will be removed.
Add Intro Theme/Title
It is time to add your brand or page's name to the video. Go to the “Titles” tab in the upper toolbar and drop your desired title into the timeline track. Experiment with title settings from the “Titles” tab on the right-side panel, which covers editing the text, font style, and size. Adjust the position of your text on the video and change the position of the title in the track as well.
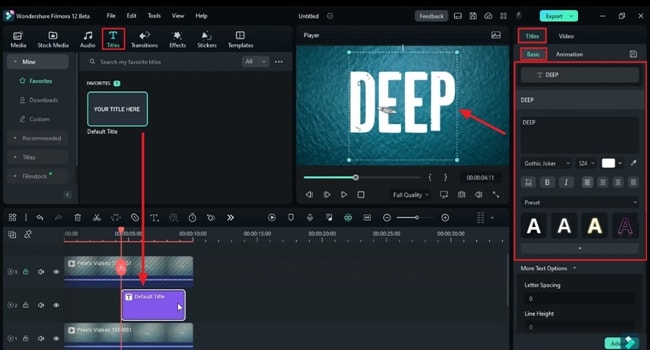
Next, change the color of the text to black and take a snapshot of it. You'll find the snapshot icon below the video preview screen. Afterward, delete the title from the timeline track and replace it with the snapshot you just took. Decide the starting point of your video where you desire to show your Intro Theme and adjust the snapshot's position there.
Blend In the Intro Theme/Title
Once the position of the snapshot is set, equalize its duration according to the rest of the files in the tracks. Click on the snapshot in the timeline and select the “Image” tab at the right-side panel. In the “Basics” sub-tab, find the “Blend Mode” option and set it as per your preference.
Add the opacity keyframe from the same window and set “Opacity” to zero at the start of the video. Next, place the playhead forward in the timeline, add opacity keyframes, and increase the “Opacity” value. This will smoothly show the text.
Add Effects to Enhance the Blending
You'll need to add some effects to blend in the text/title more with the ocean. For this, go to the “Effects” tab on the toolbar and select the “Boris FX” category. You'll find the “BCC” effects there; select the effect you prefer and drop it into the timeline track with your snapshot.
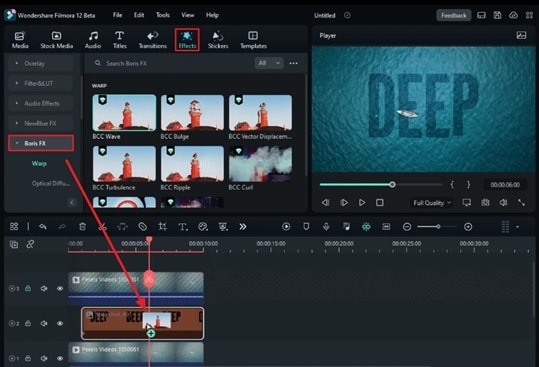
You’ll see that because of the wavy effect, the height and position of the text have been disturbed. To adjust this, go to the right tool panel and, under the “Effects” tab, make adjustments to metrics like “Height,” “Perpendicular Height,” and “Wave Width.” You can also adjust these waves' “Speed” and “Wave Angle”. If you want to change the form of a wave, adjust the value under “Chaos.”
Dropping Cinematic Bar and Finalization
You can make further adjustments if you're not satisfied with the results. For a final touch, search and drop a cinematic effect on a new track in the timeline once and for all. If you're content with the results, go to the "Export" button and download the final clip.
Everyone knows that your intro video is the building block of your brand’s identity. Attractive video intros are especially important because videos have become a popular medium for all digital businesses, creators, and marketers. By adding underwater reveal intros using Filmora, you can make outstanding first impressions on your audience.


