Transcript
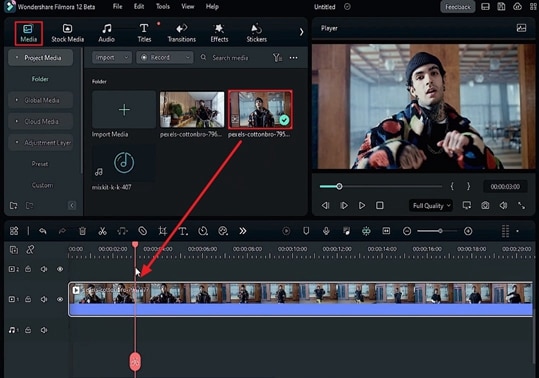
In this video, we will teach you how to create the shake blur transition in Wondershare Filmora. First, drop your footage on track 1. Now, identify where to apply the shake blur transition.
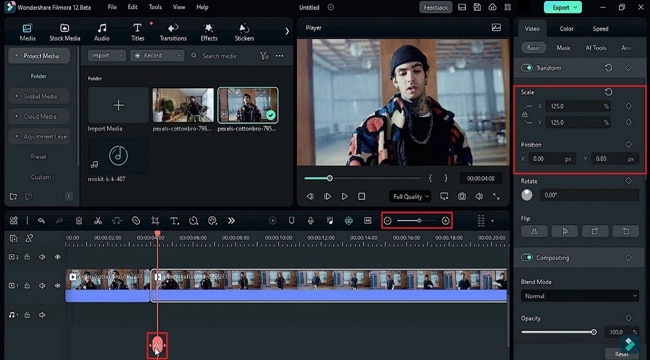
Under the setting panel, we lock the “Scale” rate and change “Scale” to 125. You can also increase the scale to produce more shakes; the best is 120 or 125.
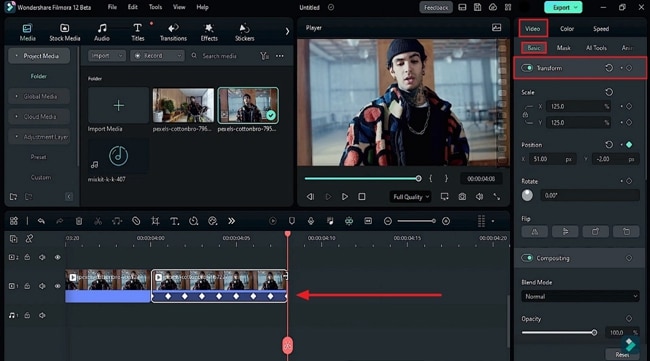
Then split the clip, go 8 frames further, and delete the rest of the footage. Now, zoom in on the timeline so we can see all the frames of the footage. Add a keyframe at the beginning of the second clip, and turn on keyframes for “Transform.” Slide your footage towards the right side, then slide it towards the downside, and go 1 frame forward.
If you don't want more shake on your footage, you can use the second keyframe on the second frame, but we want our footage to be shakier. For that, we go frame by frame.
Now, slide the footage toward the left upward. Go to the next keyframe and move the footage anywhere on each frame to make a customized shake transition. In the same way, place the keyframe of the next frame and move your footage. Now, for the last keyframe, extend the clip by one frame, place your keyframe ad, move the footage, and adjust its position. Delete this frame once you're done.
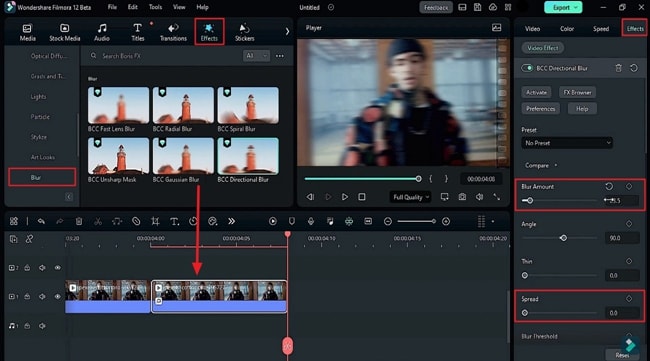
Now, to make it more dynamic, we can apply the blur effect. Go to “Effects,” and in “Boris FX,” you will find out blur. Here, you'll get lots of blur options. You can use “Gaussian Blur,” “Fast Lens Blur,” or “Directional Blur.” Here, we drop “Directional Blur” on the split part. Go to the “Effects” and set the “Blur” amount to 23.5; it may vary according to the footage quality. Then, go down and change the “Spread” to 8.6.
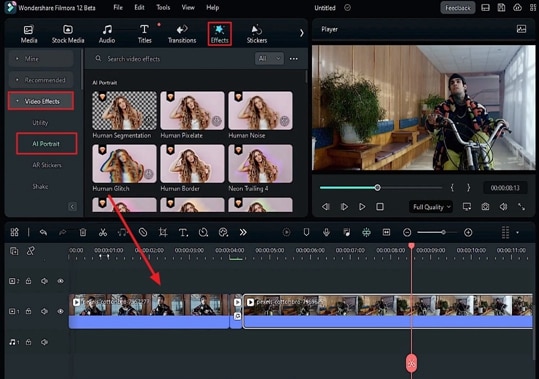
Now, let’s render it; zoom out of the timeline. So, now our Shake Blur transition is ready. Just place your second footage right after the Transition. Further, you can add some AI by using AI Portrait under video effects to make your video more attractive. Just check out these amazing effects by yourself.
Guide on How to Create Shake Blur Transition using Filmora
What you need to prepare:
- A computer (Windows or macOS)
- Your video materials.
- Filmora video editor
Import Your Clips and Start Editing
After launching Filmora on your device, select the “Media” tab from the custom toolbar and import your clips. For this transition, you'll need two video files, which include clips of before and after the transition. After importing, drop the first clip in the timeline. Place the playhead where you want to apply the transition, and then make some edits.
For editing, select the “Video” tab from the right-side panel, and under the “Basic” category, lock the “Scale” and change its X and Y values. Split this clip, after which there will be two clips in the timeline track. Go to the second clip and trim it further. Delete the extra clips, and from the timeline toolbar, increase the zoom level of the short track for better editing.
Create the Shake Effect by Adding Keyframes
Now, add keyframes at the beginning of the second clip by enabling the “Transform” keyframe under the “Basic” sub-tab. To create the blur effect, change the X and Y values of “Position.” Following that, place the playhead at different frames and repeat the settings.
Add the Blur Effect
To make the transition more smooth and catchier, add a blur effect. From the “Effects” tab on the custom toolbar, go to the “Boris FX” category, and under its “Blur” sub-category, select a blur effect you like. After selecting this effect, drag and drop it to the timeline. From the “Effects” sub-tab on the side panel, increase the “Blur” level and “Spread” of blur.
Add AI Effects & Finalize the Transition
Now that the transition is complete drop the second clip on the timeline track. To make your transition more creative, add some AI effects. From the “Effects” tab, go to the “Video Effects” category and further tap on “AI Portrait.” Add different effects at different points in your video. Now, see the final preview of your video, and if you are satisfied with the overall transition video, “Export” it.
Someone is always online, and people admire content that they find unique and creative. You can use different types of transitions for types of content, such as fashion, promotion, cooking, and more. With Filmora, you cannot only create such transitions but can add AI effects to generate special videos with shake blur transitions.


