How to Quickly Change the Aspect Ratio of a Video on Mac?

Apr 14, 2026• Proven solutions
 TL;DR:
You can instantly change a video's aspect ratio on a Mac by using the Auto Reframe tool in Wondershare Filmora to automatically detect the focal point and crop the footage to fit your target platform.
● The Auto Reframe feature is currently exclusive to the Mac version of Wondershare Filmora, with a Windows release planned for the future.
● Users can override the automatic focal point detection by enabling the Adjust Frame feature to manually move the crop box, assign primary or secondary tracking subjects, and modify tracking speed.
● Ensure you select the correct target ratio before exporting, utilizing 16:9 for YouTube and Twitter, 9:16 for vertical platforms like TikTok and Instagram Reels, or 1:1 for square social media posts.
Ask AI for a summary
 ChatGPT
 Perplexity
 Gemini
 Claude
 Grok
Grok
If you are a content creator, then you might already know that the aspect ratio of various platforms and devices might vary a lot. For instance, compared to YouTube videos that are horizontal, Instagram Reels or Snapchat Stories are mostly vertical. Click to learn how to make your videos vertical.
That’s why we have to change the aspect ratio of a video before uploading it on a preferred platform. In this guide, I will let you know the common aspect ratios for various platforms and how to change aspect ratios of videos on a Mac easily.
Part 1: The 5 Most Popular Aspect Ratios for Video
While there are all kinds of aspect ratios for videos, these 5 options are majorly used in media streaming and sharing.
Widescreen (16:9): In this aspect ratio, the width of the screen is almost twice as big as its height. The ratio is mostly used for uploading videos to YouTube or to watch them on a PC’s monitor.
Standard (4:3): This has been the standard aspect ratio for videos for a while now. In this, the width of the video is slightly more than its height and is used to watch videos on television and monitors.
Square (1:1): In this new aspect ratio, both the width and height of the video are of the same dimensions. It is mostly used to upload videos as an Instagram Post.
Vertical (9:16): The aspect ratio of these videos is just the opposite of the widescreen. They are mostly used for streaming videos on a mobile screen without tilting it (like Instagram Reels or Snapshot Stories).
Cinema (21:9): This is a dedicated aspect ratio for watching videos on a cinema-like screen. That’s why it has the width of the video more than twice its height.

Part 2: How to Choose the Best Aspect Ratio for Your Video?
Before you change the aspect ratio of a video, consider the following things in mind to get the best results:
-
Consider the target publishing platform
As you know, the desired aspect ratio for a video to be posted on YouTube would be different from Instagram. Therefore, you should first decide where the video would be posted so that you can get ideal results. Here are the preferred aspect ratio options for various popular social platforms.
YouTube: 16:9
Facebook Stories: 9:16
Facebook Post: 1:1 or 4:3
Instagram Post: 1:1
Instagram Reels: 9:16
Snapchat: 9:16
Twitter: 16:9
TikTok: 9:16

-
Check how the video was shot
Ideally, the way we have shot the video can also play a vital role. For instance, if you have shot the video vertically, then flipping it horizontally might take away its essence. To retain it, you can consider using a video editing application.
-
The quality of the video
Lastly, check the overall quality and resolution of your video to make sure it won’t be affected while changing its aspect ratio.
Part 3: How to Quickly Change the Aspect Ratio of a Video on Mac?
The best way to change the aspect ratio of a video on Mac is by using a professional Mac video editor like Wondershare Filmora. With the new update for Mac, Filmora has come up with an Auto Reframe option that can instantly alter the overall aspect ratio of your video. While the Auto Reframe is recently added to Filmora for Mac, it will soon be implemented in its Windows version too.
- The Auto Reframe option in Filmora can automatically detect the focal point for a video and crop it accordingly.
- There are already dedicated aspect ratio options like 16:9, 9:16, 1:1, 4:3, and more that you can select in Filmora.
- If users want, they can also manually adjust the frame according to the subject’s position.
- There are also advanced options to change the tracking subject and tracking speed in the video.
- Besides that, Filmora also offers a wide range of other editing options like pan-and-zoom, motion tracking, keyframing, color grading, speed control, and more.


If you want to change the aspect ratio of a video on Mac with Filmora, then just go through these basic steps:
Step 1: Access the Auto Reframe Option in Filmora
To start with, you can just launch Filmora on your Mac and go to its More Tools to select the “Auto Reframe” option.

Now, you can click on the “Import” button or drag-and-drop your video that you want to alter.

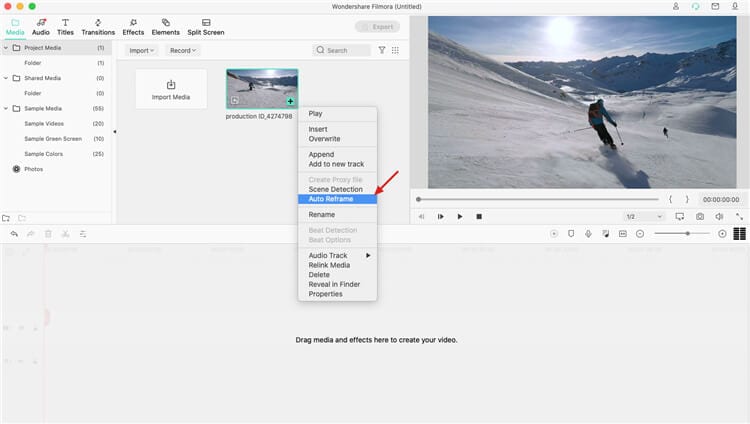
Besides that, you can also create a new project and simply import your video to Filmora. Afterward, you can right-click the video and go to the “Auto Reframe” feature.
Step 2: Select a Preferred Aspect Ratio and Preview the Video
Once the Auto Reframe window is opened, you can check the video on the right and various aspect ratio options on the sidebar. From here, you can switch between different popular aspect ratios like 1:1 (square), 16:9 (widescreen), 9:16 (vertical), 4:3 (standard), and 21:9 (cinema).

As you would click on the aspect ratio option, the overall view of the video would automatically be changed. The application will intelligently detect the focal point while changing the aspect ratio of the video. If you want, you can also click on the eye icon from the top to get a preview of the video on Filmora.

Step 3: Manually Adjust the Frame
Apart from its automatic option, you can further adjust the frame manually. To do this, just go to the sidebar and toggle on the “Adjust Frame” feature. Now, you can manually move the highlighted box to adjust the desired frame for the video.

Step 4: Alter the Tracking Subject and Speed (Optional)
Besides that, you can also change the tracking subject and its speed in the video. To do this, just go to the sidebar and expand the “Advanced” settings for Auto Reframe.
Here, you can change the tracking subject as primary or secondary and even alter the tracking speed. You can further drag the selection box in the preview window to change the subject.

Step 5: Export Your Video to Filmora
That’s it! Once you have changed the aspect ratio of the video, you can click on the “Export” button. This will let you save the edited video to Filmora for further editing.

That’s a wrap, everyone! I’m sure that after following this guide, you would be able to change the aspect ratio of a video easily. As you can see, with the help of a tool like Filmora, anyone can alter the aspect ratio of a video on Mac. Just make sure that you note the target platform where you want to upload the video so that you would get the best results while changing the aspect ratio of your video.
If this failed to solve your problem, try this:
How to Change the Aspect Ratio with FCPX?

Liza Brown
chief Editor