To ensure that your footage looks great across multiple platforms, the best way is to adjust the aspect ratio accordingly. Whether it is for social media or streaming platforms, adjusting the aspect ratio is essential for all visual content. However, most of the individuals do not have the skills to make changes to the size.
For this, tools like Final Cut Pro help to customize the sizing and position. This article discusses the method to change the aspect ratio on Final Cut Pro and its most reliable alternative.

In this article
Part 1. How to change the aspect ratio in the Final Cut Pro?
When editing videos, adjusting the size and aspect ratio is a common requirement, especially when preparing content for different platforms. Final Cut Pro offers powerful tools that allow you to easily change the aspect ratio, whether you're converting from 16:9 to 1:1 or resizing from 4:3 to fit social media standards. With these flexible options, Final Cut Pro helps creators quickly adapt their videos to various screen sizes and display needs, ensuring the best visual impact. In this part, we'll explore how to change the aspect ratio in Final Cut Pro and achieve the perfect video size.
Step-by-Step Guide to Changing Aspect Ratio in Final Cut Pro
Step1Install the application
Download the Final Cut Pro app and install it on your system. Then, launch the tool and upload the desired video that requires the resize operation. Place the video on the timeline and move the pointer to any area on the video to work on its aspect ratio values.

Step2Modify the values
At the right top of the screen, you will find the property window. Tap the ‘Modify' option to alter the aspect ratio values according to your needs. In the pop-up window change the Video format to ‘Custom' and alter the resolution values based on the required video size. To convert the shape to 16:9, enter the values like 1920 and 1080. For a square type frame, type in the values like 1080 and 1080. Ensure that both the values are the same for a square type video size.

The values you enter near the ‘Video' label carry the size of the video image. Based on the requirements, you can alter them optimally.

Finally, save the changes and witness the resize operation on the video. You can further modify the values if you are not convinced with the acquired shape.
The aspect ratio establishes complete control of the video size. Alter the video size and use the files on any platform without any hesitation on its compatibility.
Part 2. Wondershare Filmora: A Simpler Way to Adjust Aspect Ratios
Final Cut Pro offers effective video resizing options, but it lacks accessibility. This tool is only compatible with Apple devices and cannot be accessed by Windows users. Alternatively, you need a versatile editor that can be used across multiple devices and allows users to freely manage the aspect ratio as required. Therefore, Wondershare Filmora offers video editing customization and is available on Windows, macOS, iOS, and Android devices.
This Final Cut Pro aspect ratio alternative lets you adjust the aspect ratio depending on your intended video-sharing platform to prevent video size issues while sharing. Additionally, the versatile Filmora allows you to change the size manually or automatically.
- Auto reframe video in 16:9, 1:1, 9:16, 4:3 or 21:9.
- Offers cool video effects and filters to make your video become professional.
- Cross-platform supported - (Windows, Mac, iOS, Android)
- Resize Your Videos Without Quality Lose

Automatically Adjusting With the Auto Reframe Feature Using Filmora
If you are looking for smart video resizing, this tool has a helpful feature. Explore the following guide to using the Auto Reframe feature using this aspect ratio FCPX alternative:
Step1Access the Auto Reframe Feature for Auto-Resizing
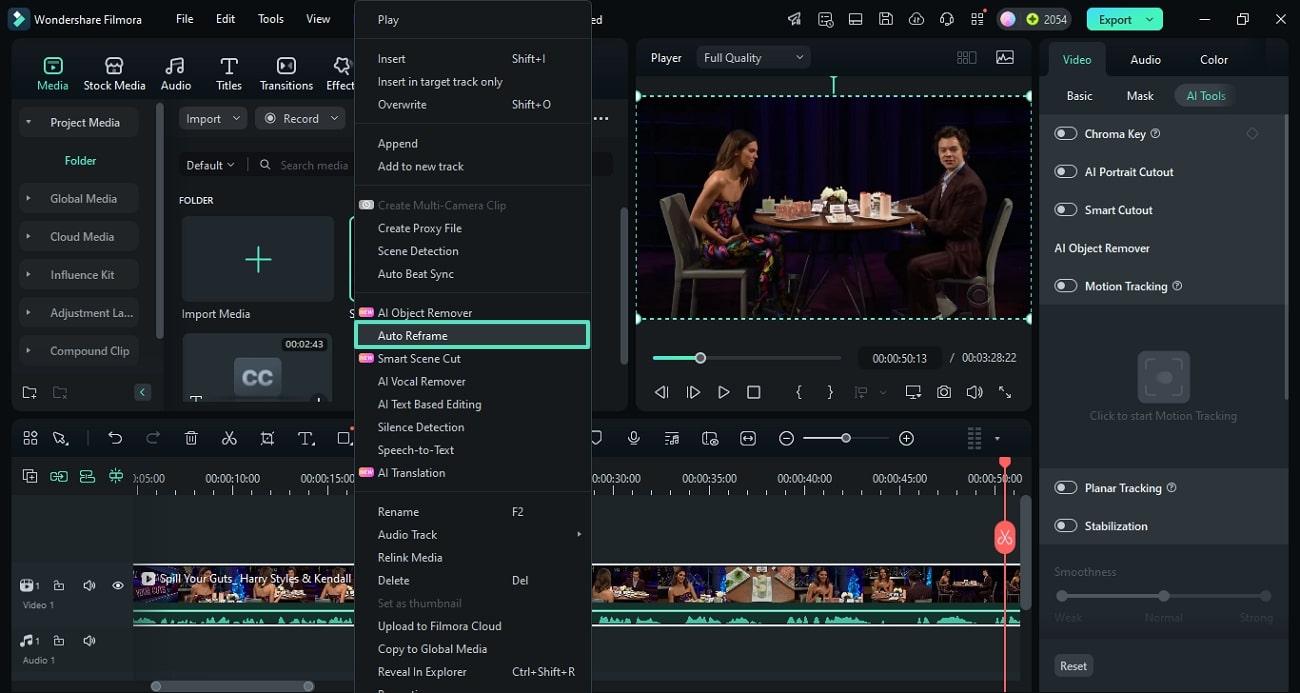
In addition, Filmora gives you the option to resize videos automatically. To do this, right-click on the uploaded video from the media window to unfold a menu. Now, find and click the "Auto Reframe" button to open a new window.
Step2Analyze the Video For Resizing With Auto Reframe
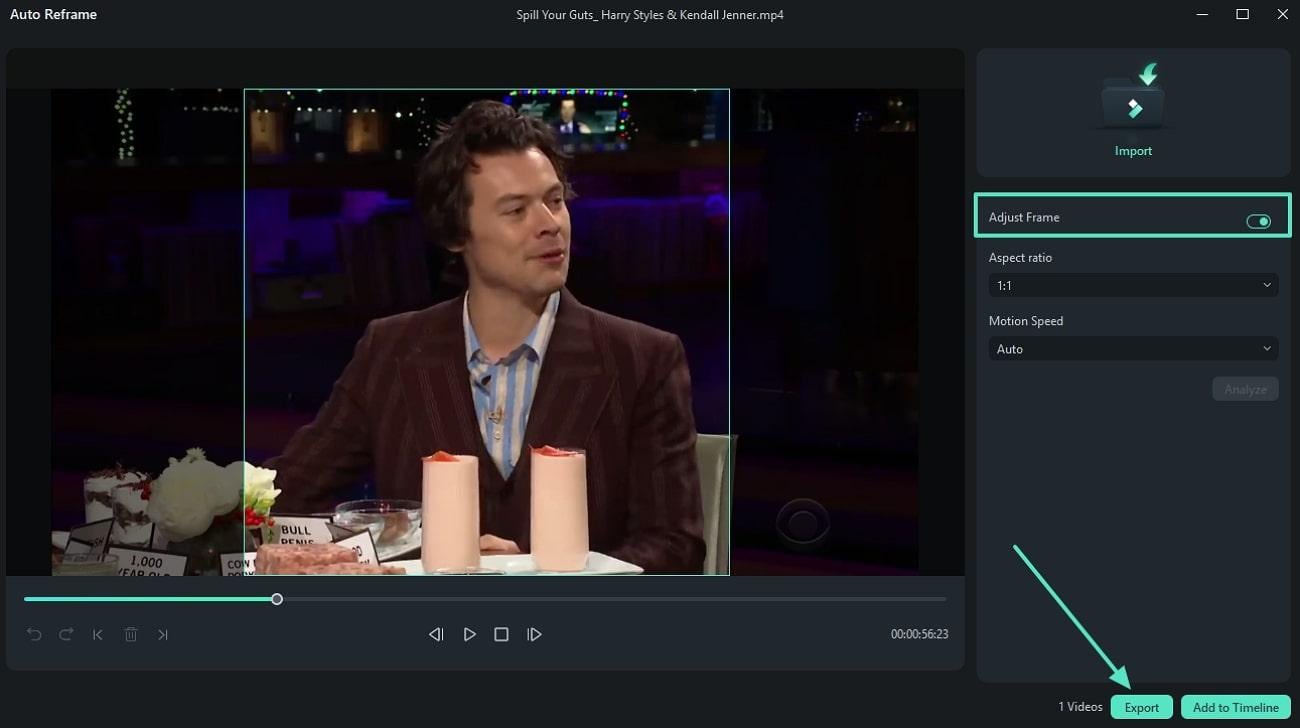
When the new window opens, use the right-side panel to click "Analyze." Now wait as the AI automatically detects the key objects of your video and suggests a size accordingly.

Step2Export the Video After the Size is Auto-Selected
As you play the video, the frame changes with the moving objects. When you achieve your desired frame, turn off the "Adjust Frame" option and click "Export" at the bottom.
Manually Adjusting Aspect Ratios to Enhance Video Shareability Using Filmora
Wondershare Filmora offers you an opportunity to personalize content. Follow the guide below to learn how to manually resize footage with different methods using this aspect ratio Final Cut alternative:
Method 1: Accessing Basic Project Aspect Ratio Settings
Step1Start a New Project to Import a Video
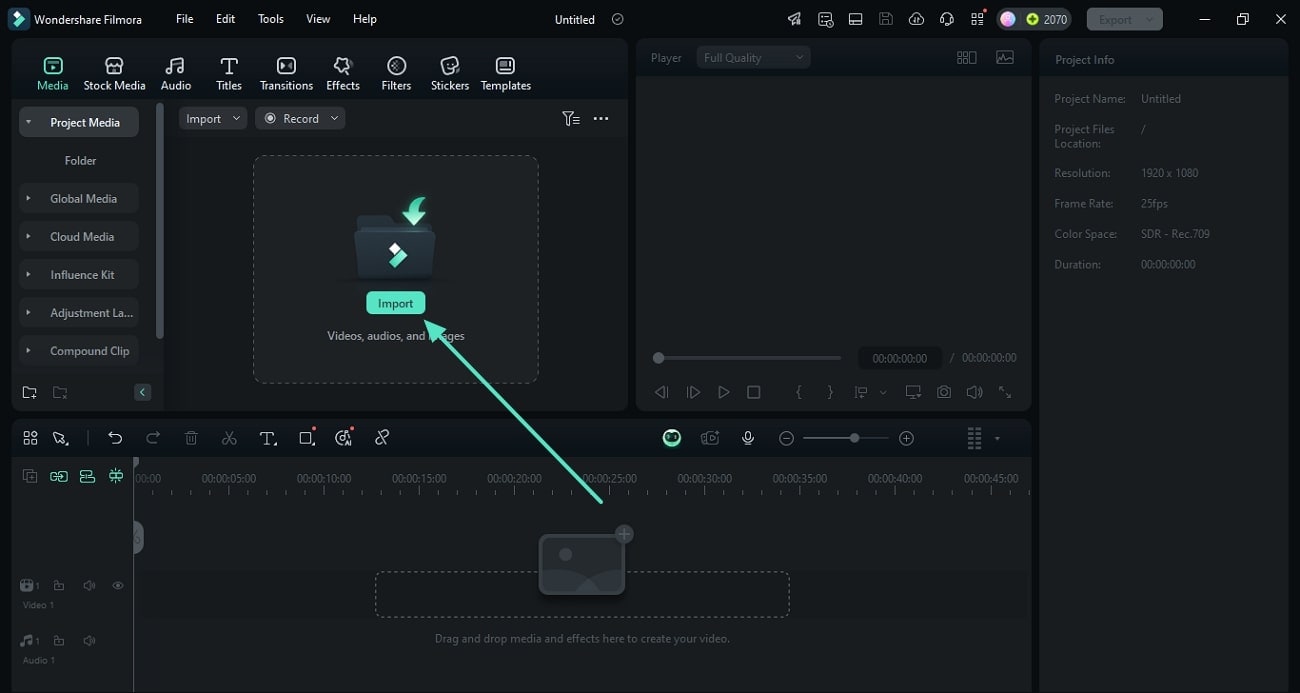
As you launch the main interface of Filmora, use the "New Project" button to enter the editing window. Click "Import" to select and import a video from your device.
Step2Change Project Aspect Ratio
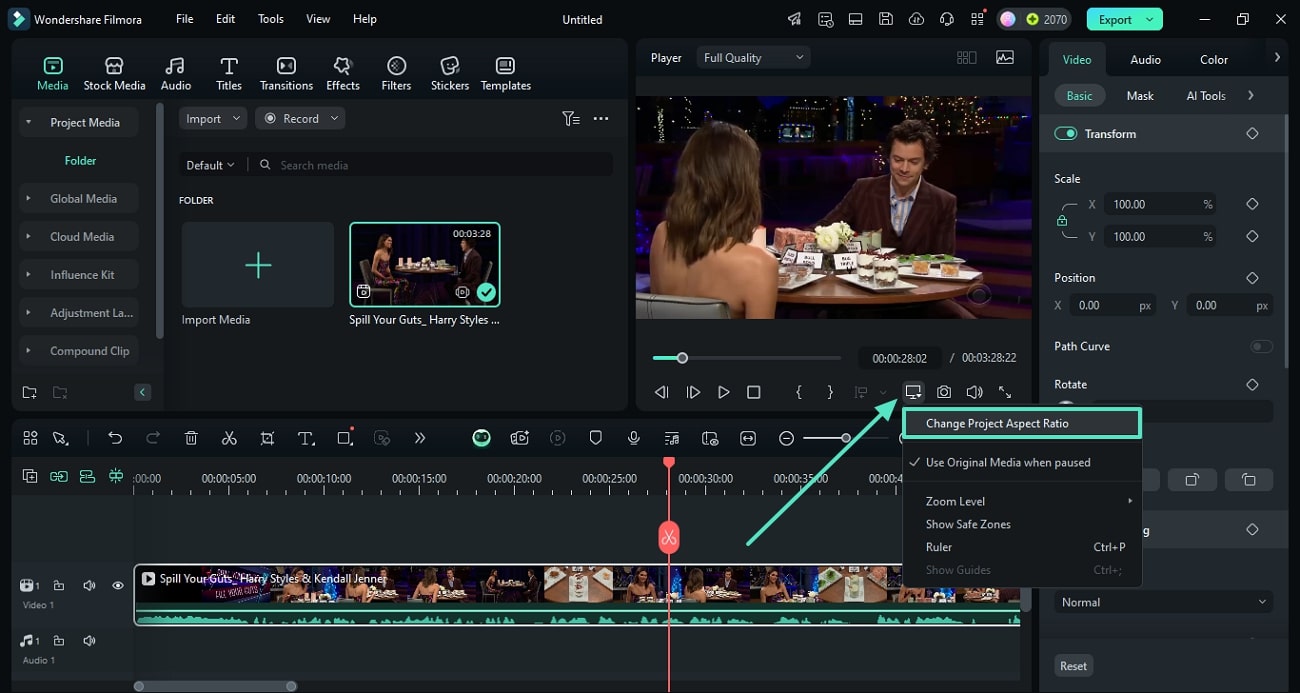
After dropping the uploaded video into the timeline, navigate to the preview window and click the "Settings" icon below it. Using the following drop-down menu, select "Change Project Aspect Ratio" to open a new window.
Step3Adjust the Size of the Video
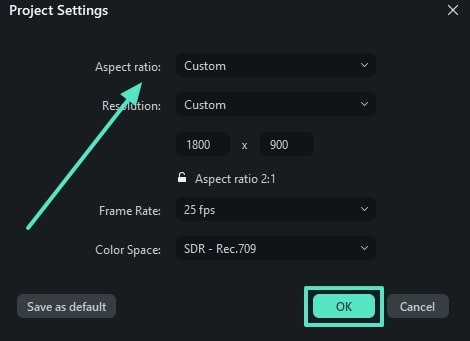
In the "Project Settings" window, expand the "Aspect Ratio" menu to select the size according to your social media platform and click "OK." Alternatively, you can type the custom resolution, and the aspect ratio will be auto-adjusted accordingly.
Step4Access the Project Settings Window From the File Tab
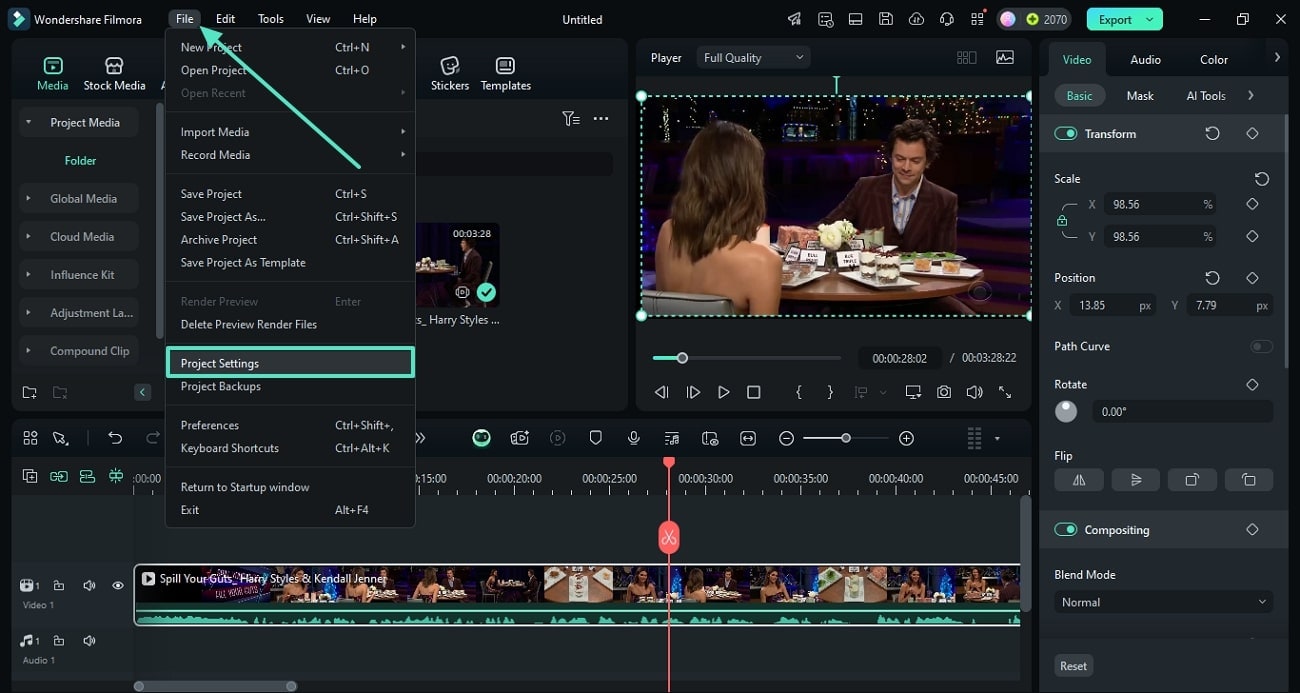
To access the aspect ratio adjustment window from the top toolbar, enter the "File" tab to extend a menu. Here, click "Project Settings" to open a window and repeat the process mentioned above.
Method 2: Using Crop and Zoom Function
Step1Access Crop and Zoom After Importing the Video
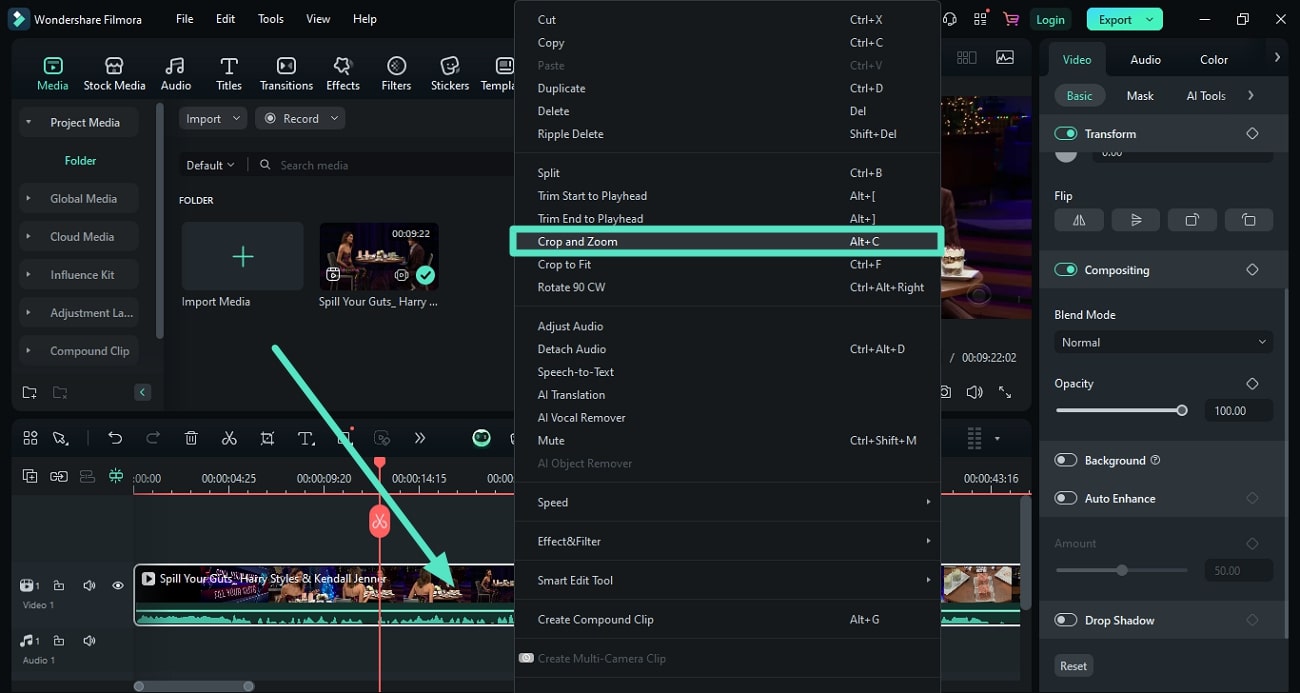
Once the video is imported to the editing interface of Filmora, drag it to the timeline to proceed forward. Next, right-click on the video track to enable a list of options. From here, select "Crop and Zoom" to open a new window.
Step2Select the Desired Area and Apply the Changes
In the following window, drag the cursor to the area to select the part you want to focus on and remove the remaining. You can also select the different aspect ratios from the drop-down menu provided at the bottom. To have a look at how your cropped video will look, click the "Play" icon to preview. Once you are satisfied with the results, press the "Apply" button at the bottom of the window.

Part 3. What is the common aspect ratio of videos?
The allowable aspect ratio for the videos and images differs with the social media platforms. In the case of the Facebook cover photo, the image size varies with desktop and mobile views. You can go for a horizontal frame with an aspect ratio of 16:9. Here, the width is wider than the height.
For Twitter and Facebook posts, set the aspect ratio for the media files to 1200 x 675 pixels. In other terms 16:9, again it looks more or like a horizontal frame. In the YouTube platform, the permitted channel art size is 2560 x 1440 and the thumbnail is 1280 x 720.
The Instagram and Pinterest pins opt for square-type video frames like 1200 X 1200 pixels or 500 X 500 pixels. The latter value holds good for setting profile pictures for your account. The YouTube channel icon must be 800 X 800 in a square frame to enhance visibility.

The Instagram posts allow the tallest media files like 1080 X 1350. Snapchat and TikTok go with 1080 X 1920 values. You can find the long Pinterest carrying posts measuring 1000 X 2100. Though this platform does not recommend this size, still the posts are successfully uploaded in this dimension flawlessly.
It is highly recommended to follow the above-discussed guidelines to post your favorite videos on the relevant social media platform without witnessing any compatibility issues. These are the common aspect ratio dimensions supported by the respective platforms. While posting the media files in this environment, you must abide by its standards to get rid of unwanted uploading issues. In certain digital spaces, you may not know the reason for the failure to upload the image or videos. In those scenarios, read the guidelines provided by that platform modify the media file dimension according to those values, and then try uploading it again. Most video upload failure happens due to the incompatibility of the media file sizes. Watch the dimensions before posting or uploading any media files in the online space.
Most social media platform allows both landscape and portrait video sizes optimally. You can switch to any size format as per your comfort. When you upload larger images or videos either you will receive an error message or it forces you to crop the content to fit perfectly with their guidelines. To overcome such a situation, you can check out the permittable file size before uploading the media files into its environment.
Part 4. Why Can't I change the aspect ratio of my video?
There are scenarios you may encounter while changing the aspect ratio of your videos. You can refer below to the common issues that require a better fix to overcome the irregular reframing activities.
- Solution 1: In this situation, you must fix the default spatial fit settings to fill the format in the final cut pro app. When you import the videos for editing, automatically the video would have taken this fit option. Before working on the aspect ratio values, modify the fit to fill settings so that you can crop the unwanted areas in the video frames precisely.
- Solution 2: Another alternate solution to overcome the above problem is that you must disclose the Video inspector in your Final Cut Pro application. Then, in the ‘Anamorphic Override' settings change the value to Standard instead of the none or widescreen mode. By altering this value, you can get the desired outcomes without any hesitation.
When you struggle to change the aspect ratio in your videos using the Final Cut Pro app, you must look for alternative solutions to fix them.
Conclusion
All in all, the article focused on how to change the aspect ratio using Final Cut Pro and its better alternative. It explained how Wondershare Filmora offers more precise and convenient methods to change the sizing of your media. Moreover, this AI-powered solution offers many customization options for users of all types to readjust their images and videos.


