Split Your Video into Sub Clips with Auto Scene Detection
Nov 18, 2025• Proven solutions
Scene detection is a very useful technique that helps you split a video at changes into sub clips automatically. When you want to synchronize audio and video tracks in a movie, or cut out some unwanted clips, auto scene detection will help you a lot because after scene detection, you can quickly find and focus only on the scenes that you want.
Though many video editing programs support auto scene detection, like FFmpeg, FCP, or Adobe Premiere, they often come on the complicated side. So here, I want to share a powerful and easy-to-use video scene detection software: Wondershare Filmora. With it, it takes only one click to make scene change detection, and load to the Timeline for comfortable editing. Download it to have a try!
Split a Video with Auto Scene Detection
1. Import your videos
After running this program, choose New Project. Then click Import to load your source videos to the User's Album. After being successfully loaded, they will be shown as thumbnails.

2. Detect scenes automatically in a click
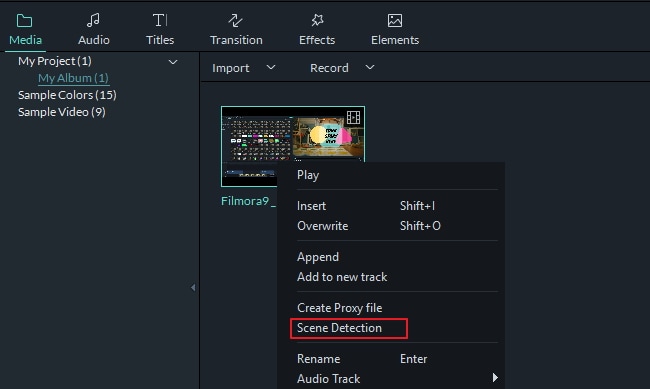
Then highlight a video clip in the User's Album, right click it and select Scene Detection. In the pop-up dialogue, simply click DETECH to start auto scene detection. Now, you see this program beginning to detect change scenes and place all different sub clips in the right window. When it's complete, you can double click any video segment to preview, and delete any unwanted items while keeping others intact. At last, click ADD TO TIMELINE to load them on the timeline.

3. Edit and enhance video in minutes (optional)
After the auto scene detection, you may go ahead to do all common edits like crop, rotate, trim, split, add background music, record voiceover, change volume, the playing speed, and more. Also, you can enhance your video with stunning transitions, titles, intros/credits, picture-in-picture effects, animations to make it more polished and professional-looking.

4. Save and share your creation
Now preview your movie and click EXPORT if satisfied with the result. Then choose a way to output your video. Here is a bunch of options for you.
- Save on your computer: Choose a format from many popular format options to keep the high quality of your original files.
- Play on your mobile phones or tablets: Go to the Device tab, and select the optimized format to gain best playback experience.
- Publish on YouTube: Click the YouTube tab, and fill your account information to share with your friends and family directly from this program.
- Burn to DVD: Convert your creation to DVD in minutes to play on wide-screen TV.

Conclusion
See, it is so easy to edit video with auto-scene detection . If you want to know more features about Filmora, check this video below and download it!
In this guide, we'll show you how to edit your first video step by step on your Windows or Mac, how to choose a video editing software and community provided.
by Liza Brown Nov 18, 2025 17:22 PM
Here we introduce you some screen recording programs as well as the best way to record your computer screen.
by Liza Brown Jul 14, 2025 14:51 PM


