How To Organize Photo Album On iPhone And iCloud
Dec 10, 2025• Proven solutions
Are you frustrated with searching for a photo from your last summer collection through the heap of images on your iPhone? If you are struggling to search for any particular image from your collection of photos on your iPhone, here is a guide to managing and organizing your iPhone images into a photo album. Yes, the iPhone photo albums are a great way to manage thousands of images, piled up on your phone. The photo album gives you easy and instant access to all the videos and iPhone photos. You may clearly add and organize the photo albums in your own way.
- Part 1: Organize Photo Album on iPhone
- Part 2: Organize Photo Album on iCloud
- Part 3: How to Edit Photos and Videos on Filmora App [iOS]?
Part 1: Organize Photo Album on iPhone
Introducing Default Albums
The default album organization on iOS devices enables hassle-free navigation to the desired media type. Recent captures are automatically saved in the designated folders, and users do not have to organize iPhone photos into albums. Explore the following list to see the default album categorization on iOS devices:
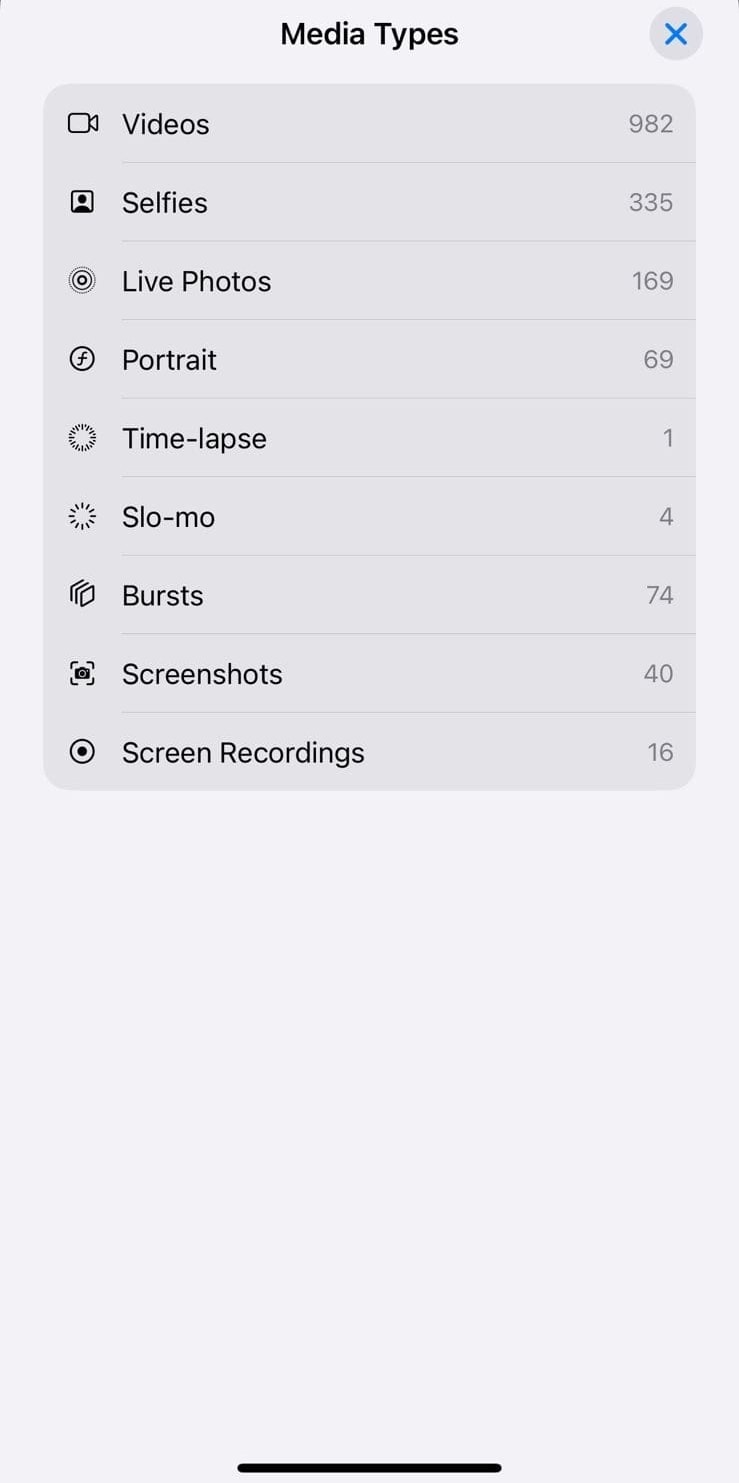
- Videos: As you create a video using your iPhone, it is automatically saved in the Videos album. This folder also features the GIFs in your media library.
- Selfies: This includes every image captured from the front-facing camera of your phone. Remember, the Selfies album only covers the photos captured without a self-timer.
- Live Photos: When you enable the live photo option, the media is automatically saved in this folder. Even if you disable the live function of an image, it still stays in this folder.
- Portrait: The Portrait folder has all the high-quality images that have been shot in the Portrait mode. This album also includes selfies captured in the Portrait mode.
- Time-Lapse: If you create a video using the Time-Lapse mode on your iPhone, you will not need to organize a photo album iPhone. Your phone will automatically save this media in the Time-Lapse media album.
- Slo-mo: The slow-motion videos can be accessed from this folder within your Photos app. As you open slo-mo footage in this album, you can edit it by applying various filters.
- Bursts: All the selfies taken from your phone with a self-timer are saved in the Bursts folder. You can open a Burst image and select the desired frame from the multiple images.
- Screenshots: The snapshots captured from your mobile can be accessed in this folder. After opening a screenshot from this album, users can crop and resize them.
- Screen Recordings: When you record your screen with or without the microphone, the footage is automatically saved in this designated folder. In this folder, you can view and share the desired screen recording.
The First Way to Add Photo to a New Album
Apple devices offer various methods to organize photo albums and make new ones. To learn about one of the methods of organizing albums on iPhone, follow the guide below:
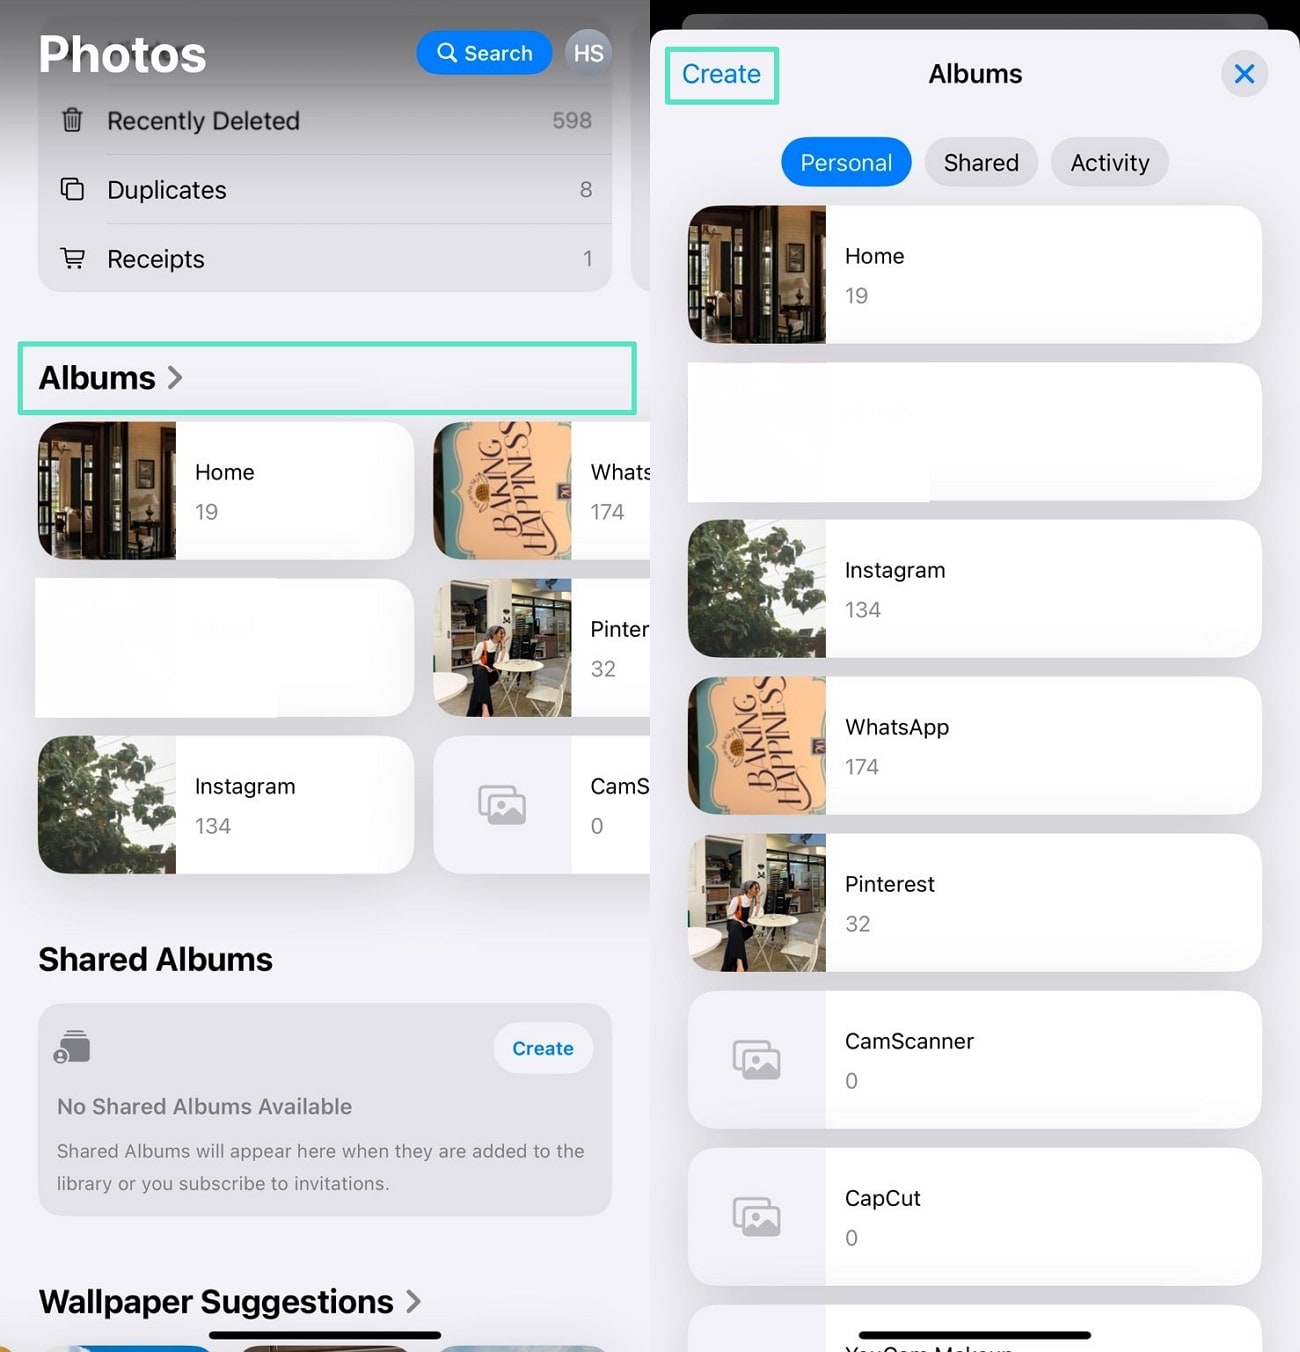
Step 1. To manage media in a new folder, open the Photos app and scroll down to tap the “Albums” tab. As the pre-existing albums appear, tap the “Create” option at the top left.
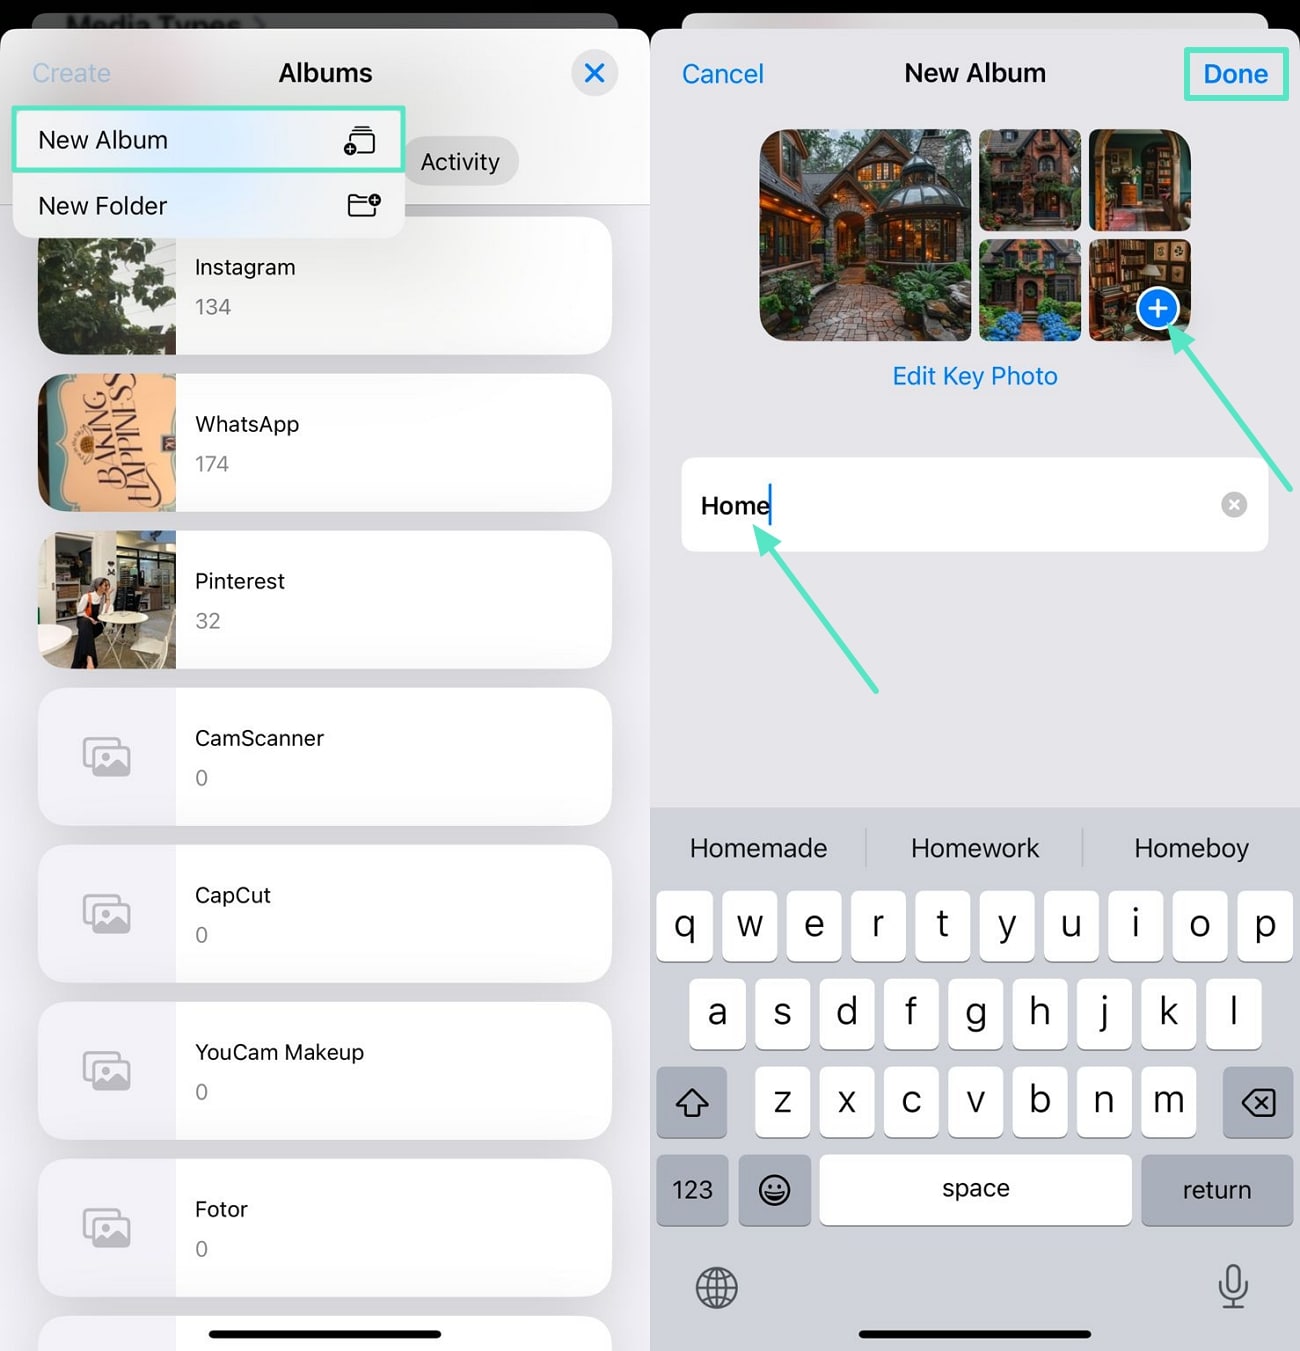
Step 2. From the extended menu, tap the “New Album” option and head to the next interface to type the name of the album. Tap the “+” icon to add new photos to this album, and press “Done” at the top right to successfully add the photos to the new album.
The Second Way to Add Photos to a Photo Album
Users looking for a simpler method of adding photos to a pre-existing album can use this method. Explore the guide below to learn how to organize photo albums on an iPhone:
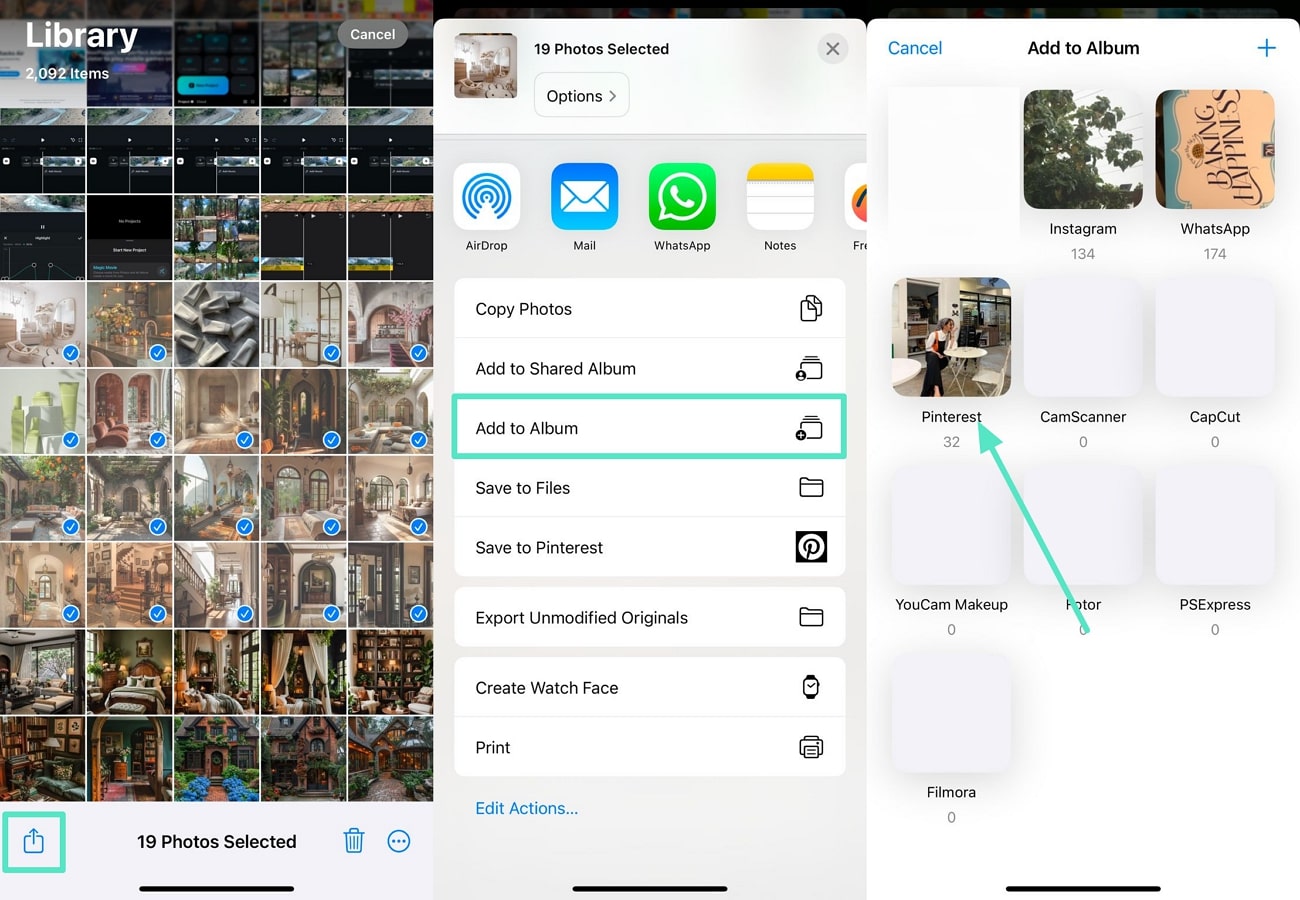
First, open the “Photos” application and select the photos that you need to add to the album. Tap the “Share” icon at the bottom left to select the “Add to Album” option from the extended menu. After the albums appear on the next interface, choose and tap the intended album to add all the photos to it.
How to Remove Photos from iPhone
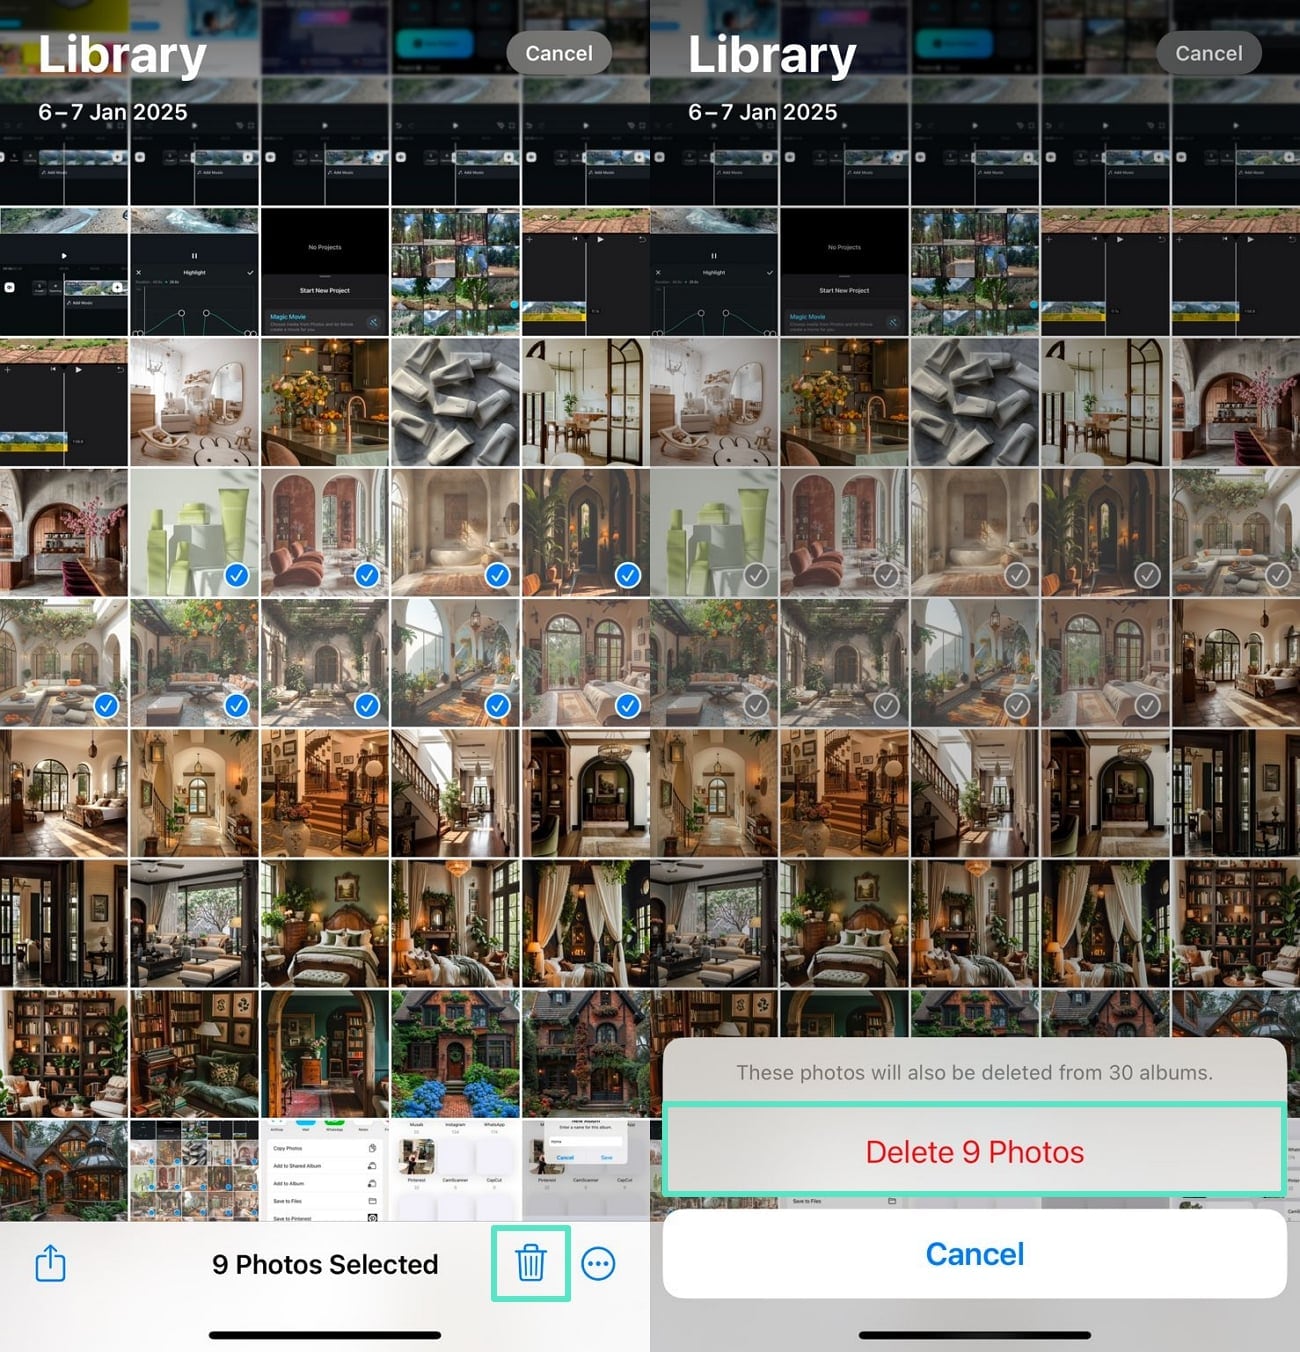
Deleting photos on this device is very simple, as you can remove multiple images at once. To learn more about this, follow the guide below:
Initiate by opening the “Photos” app, then select the unwanted images from the library. Now, tap the “Delete” icon at the bottom right and successfully remove the unwanted images from the device.
Part 2: Organize Photo Album on iCloud
With the introduction of iCloud storage, iOS users are now able to manage their albums within the iCloud app. This includes every action, starting from creating new albums and adding or deleting images from the pre-existing Shared Albums. A “Shared Album” is a media album on your iCloud that you share with a fellow iOS user. As the recipient can access your photos, you can manage the media in real-time.
How to Add an Album
Adding an album is a simple process, but you need to consider some prerequisites. Follow the guide below to learn how to organize photos into albums on iPhone’s iCloud:
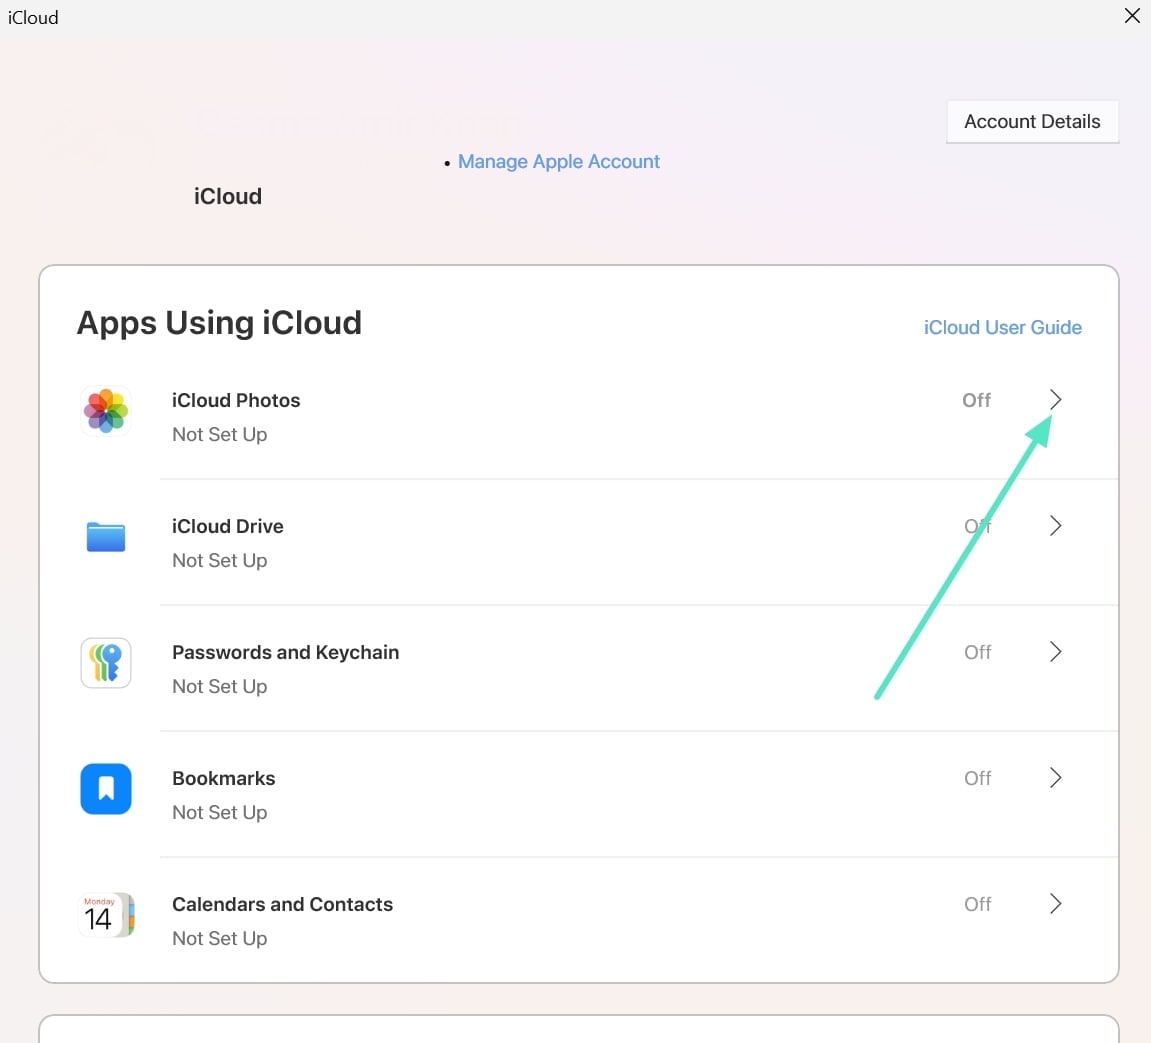
Step 1. First, open the iCloud application on your desktop and explore the main interface. Under the “Apps Using iCloud” section, select the arrow next to the “iCloud Photos” option.
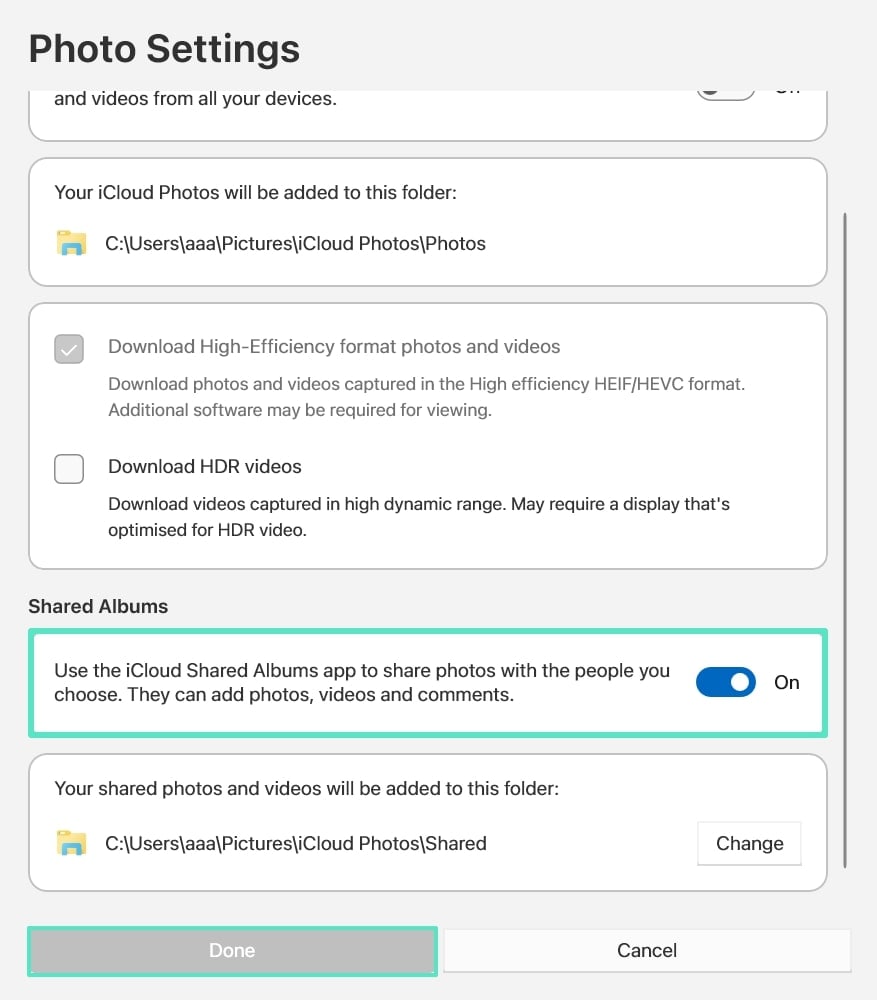
Step 2. Using the “Photo Settings” window, enable the “iCloud Shared Albums” option and click the “Done” button once you are done.
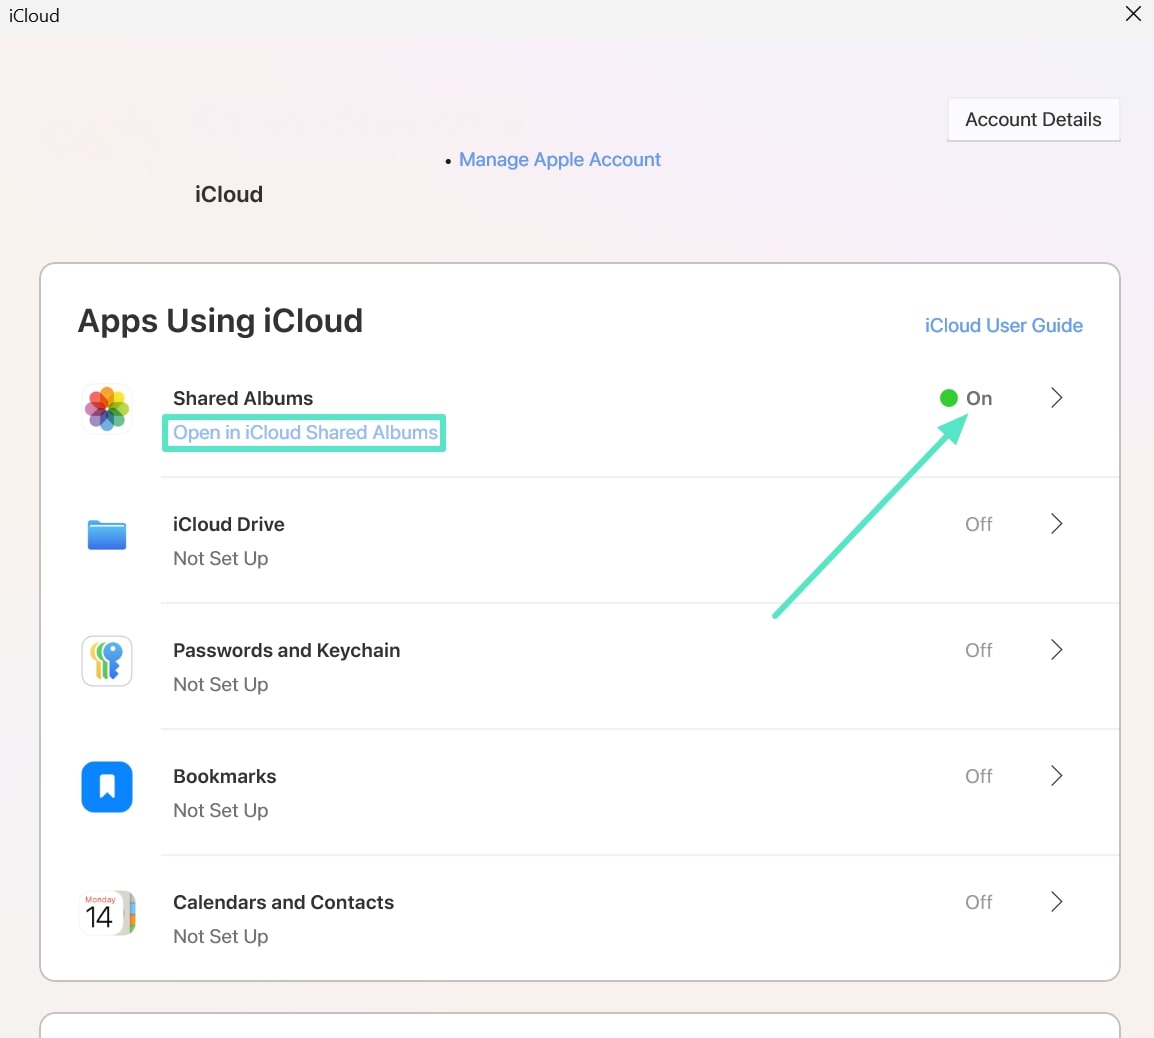
Step 3. Once the settings are changed to "On," select the "Open in iCloud Shared Albums" option to create a new album.
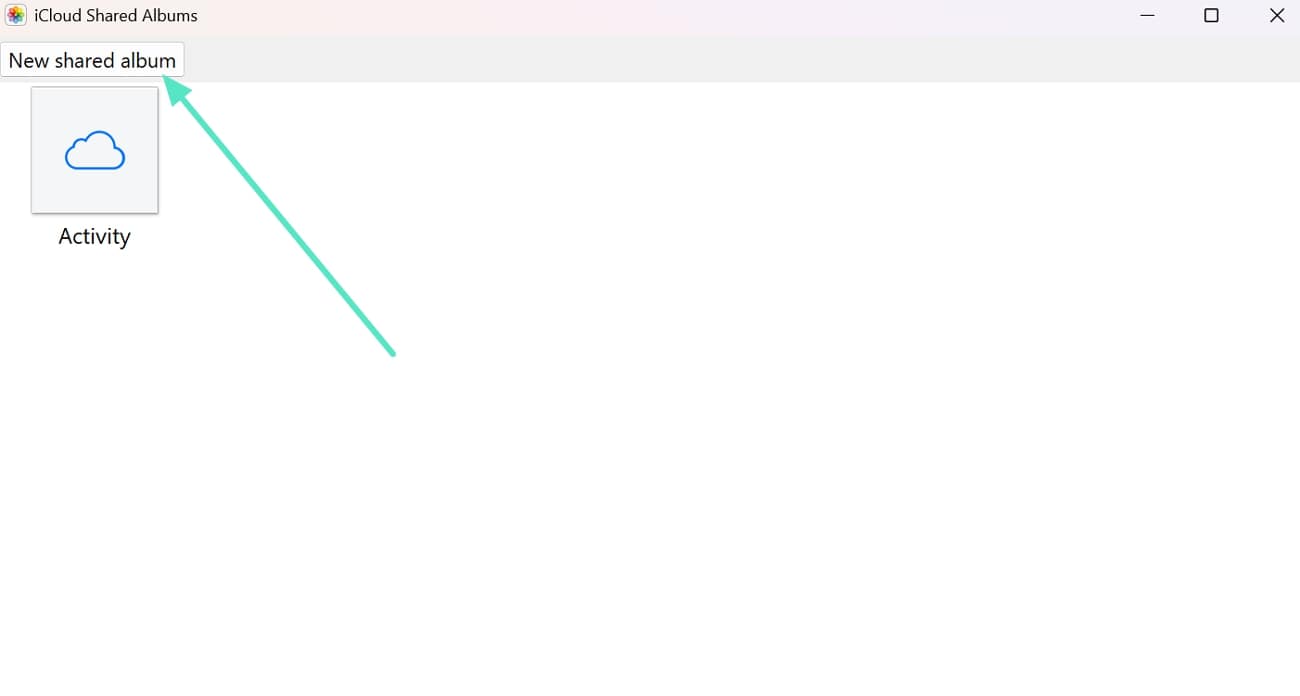
Step 4. When the next window opens, click the “New Shared Album” option to continue the process.
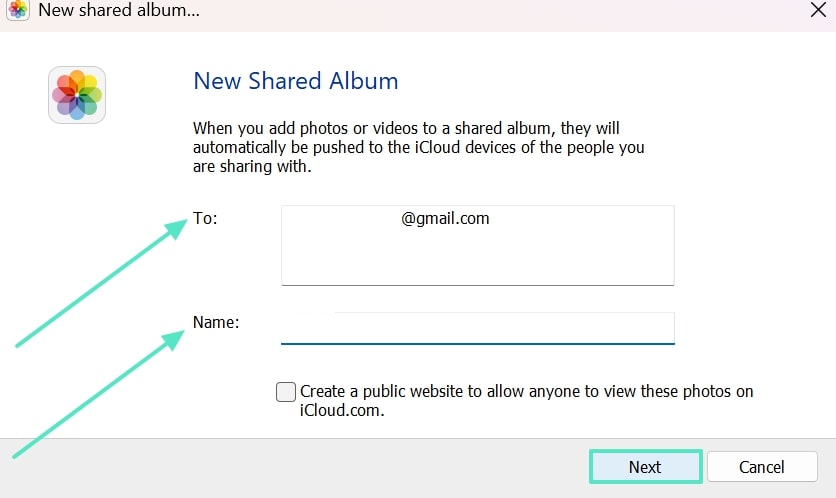
Step 5. In the “New Shared Album” window, enter the recipient’s email ID and name. Afterward, click the “Next” button to move forward with the process.
How to Add Photos to an Album
When you have created a new Shared Album on iCloud, you can start adding images to it. Follow the tutorial below to learn how to organize iPhone photos into albums:
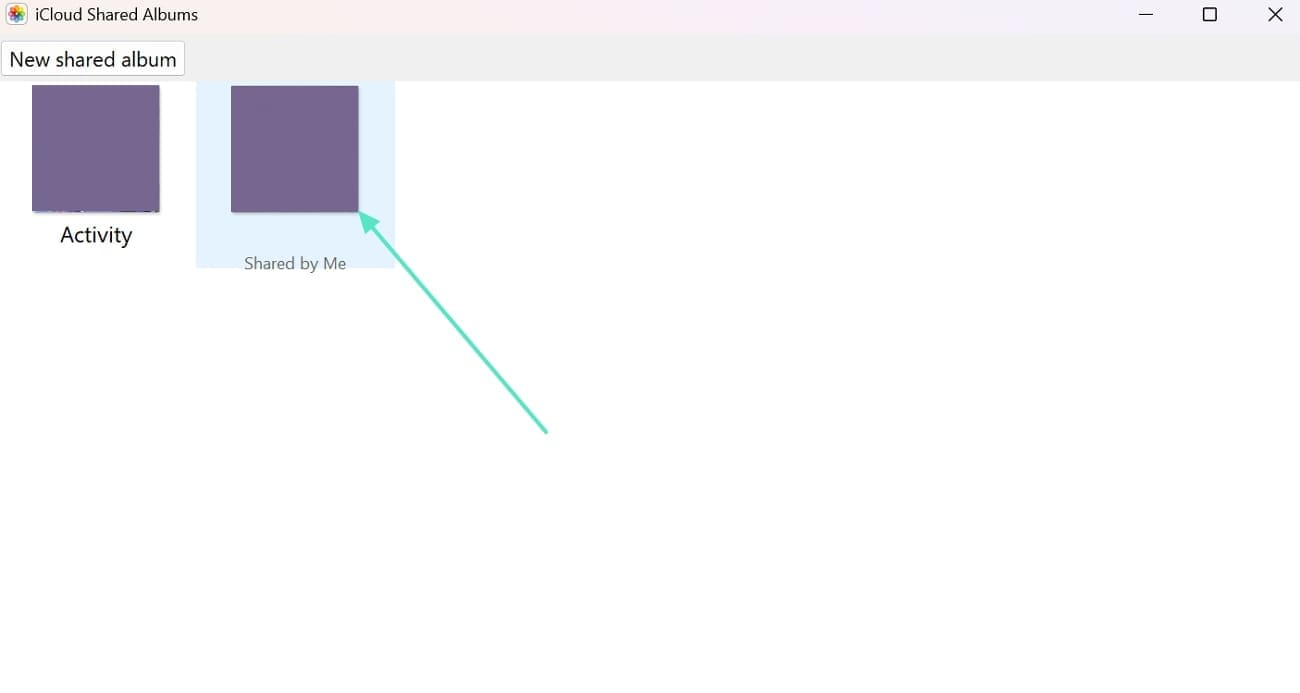
Step 1. To add images to the album, access the “iCloud Shared Albums” interface and double-click on the desired album.
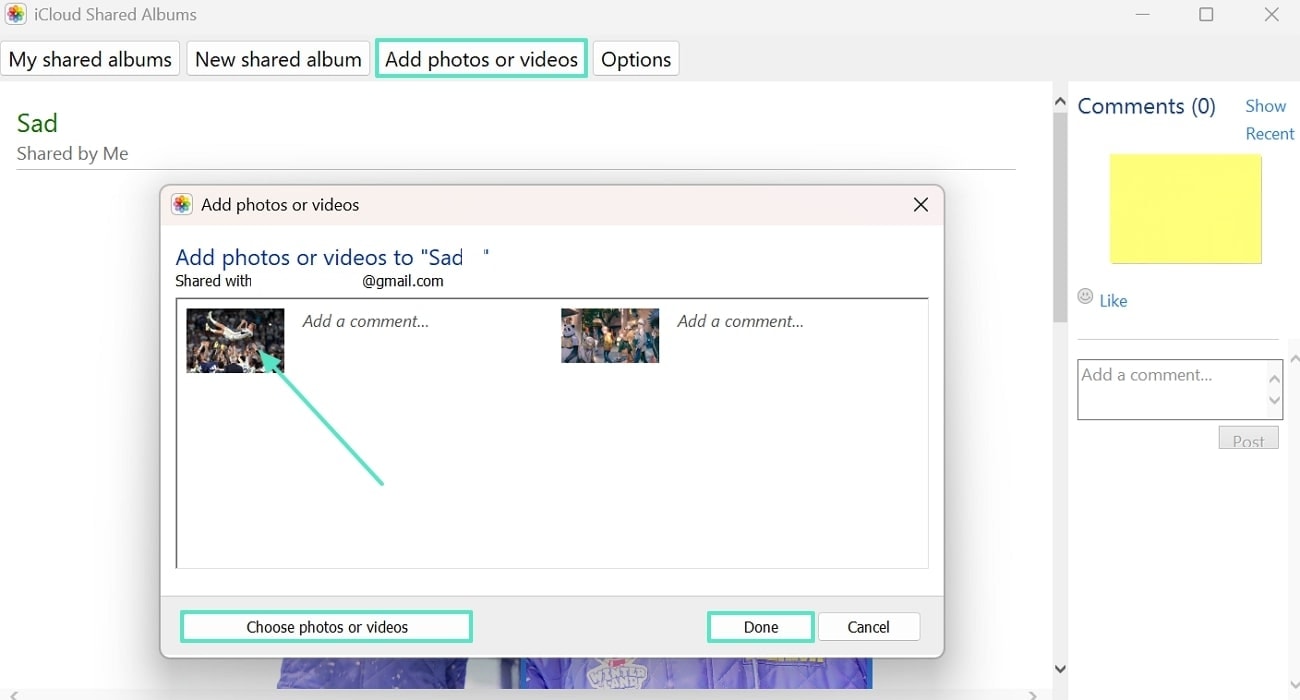
Step 2. To add media to this album, click “Add Photos or Videos,” and you will see a new window on the screen. Using this window, press the “Choose Photos or Videos” option and select the images to be added. Once the process is completed, click “Done” at the bottom right of this window.
How to Remove Photo from Album
After you have added media to the album, you can always delete them when needed. The following guide is all about removing images to organize photo albums on iPhone:
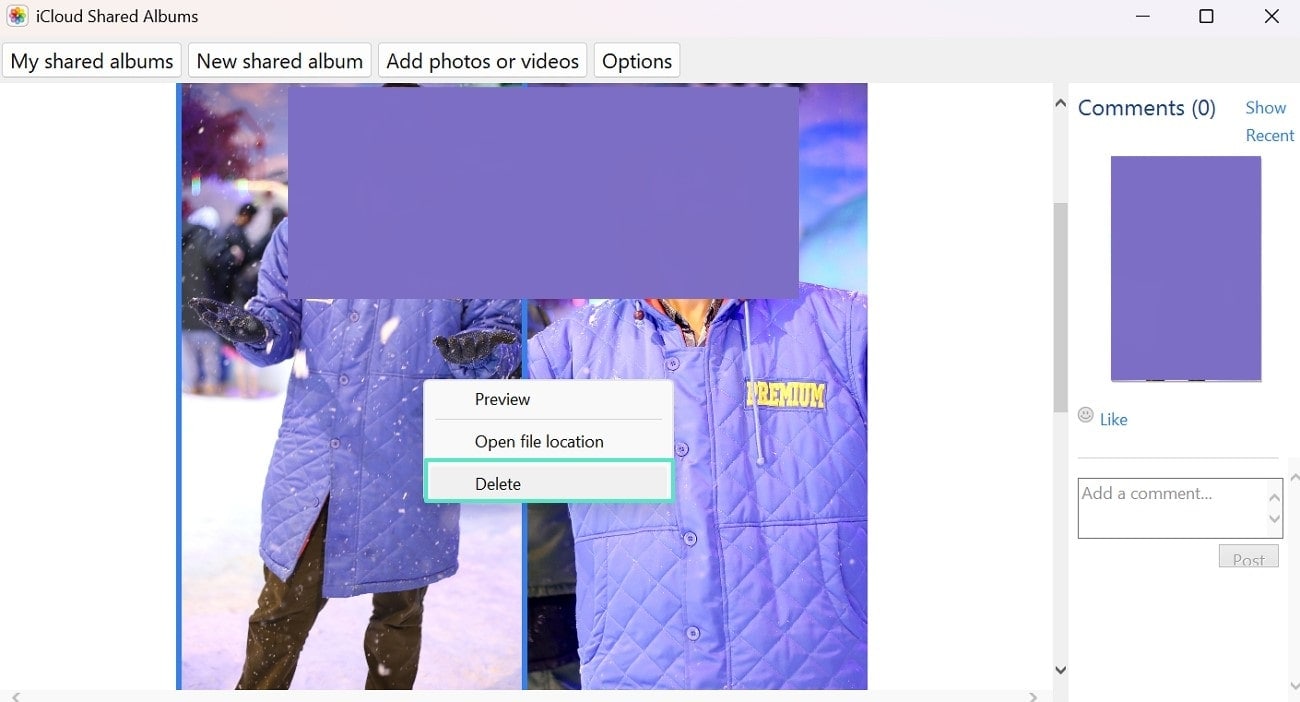
After you have added images, open the photo that needs to be deleted. Now, right-click on the image to successfully “Delete” it from the album.
Part 3: How to Edit Photos and Videos on Filmora App [iOS]?
To edit specific photos from your device, you need an application that lets you import the media as per the built-in categorization. An efficient editing application offers multiple editing options for its users that provide one-click enhancements. Additionally, your editor should have all significant basic and AI features to help you achieve a studio-quality result. Filmora App is a complete video editing application for iOS that offers features ranging from basic to AI.
Filmora for Mobile Filmora for Mobile Filmora for Mobile Filmora for Mobile Filmora for Mobile
Edit Your Photos and Video on Mobile
- • Powerful Brand New AI Features.
- • User-friendly video editing for beginners.
- • Full-featured video editing for professional.
Using its advanced algorithms, the Filmora App efficiently removes video backgrounds and offers solid-colored backdrop replacements. If the built-in colors do not suffice, you can explore the device's photo library and use a pre-existing image as a background. Also, users can enhance the video’s accessibility by adding textual descriptions at the bottom. This feature can be used when you make a slideshow of inspiring images.
A Walkthrough on Editing Photos and Videos in an Organized Album Using the Filmora App
Filmora is a robust image and video editing application that allows you to import media from travel albums and edit them using the built-in vlog templates. Follow the steps below to learn how to edit media after organizing albums on the iPhone:
Step 1. Upload Media From the Travel Album
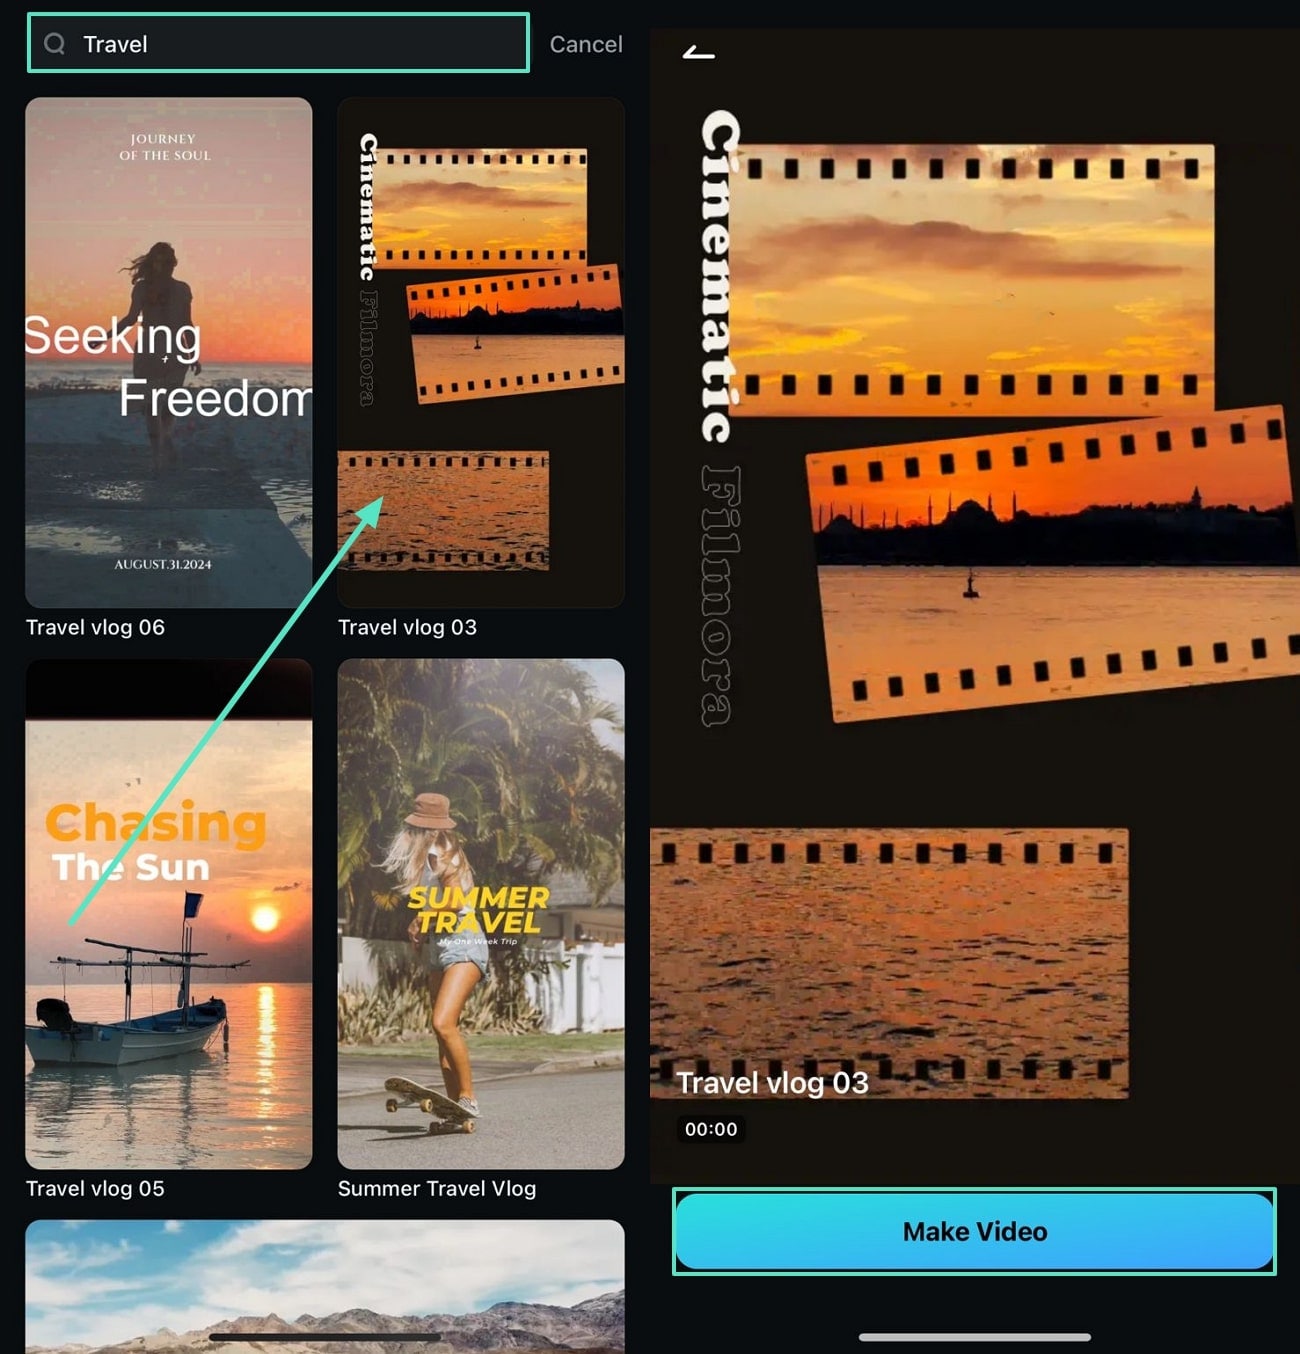
First, open the Filmora app on your device and enter the “Explore” tab from the bottom of the main interface. Now, tap “Template” in the new window and type “Travel” in the designated search bar.

Step 2. Select and Apply the Desired Travel Video Template
When the travel templates appear, select the desired option and tap the “Make Video” button in the following interface.
Step 3. Open the Travel Album to Continue
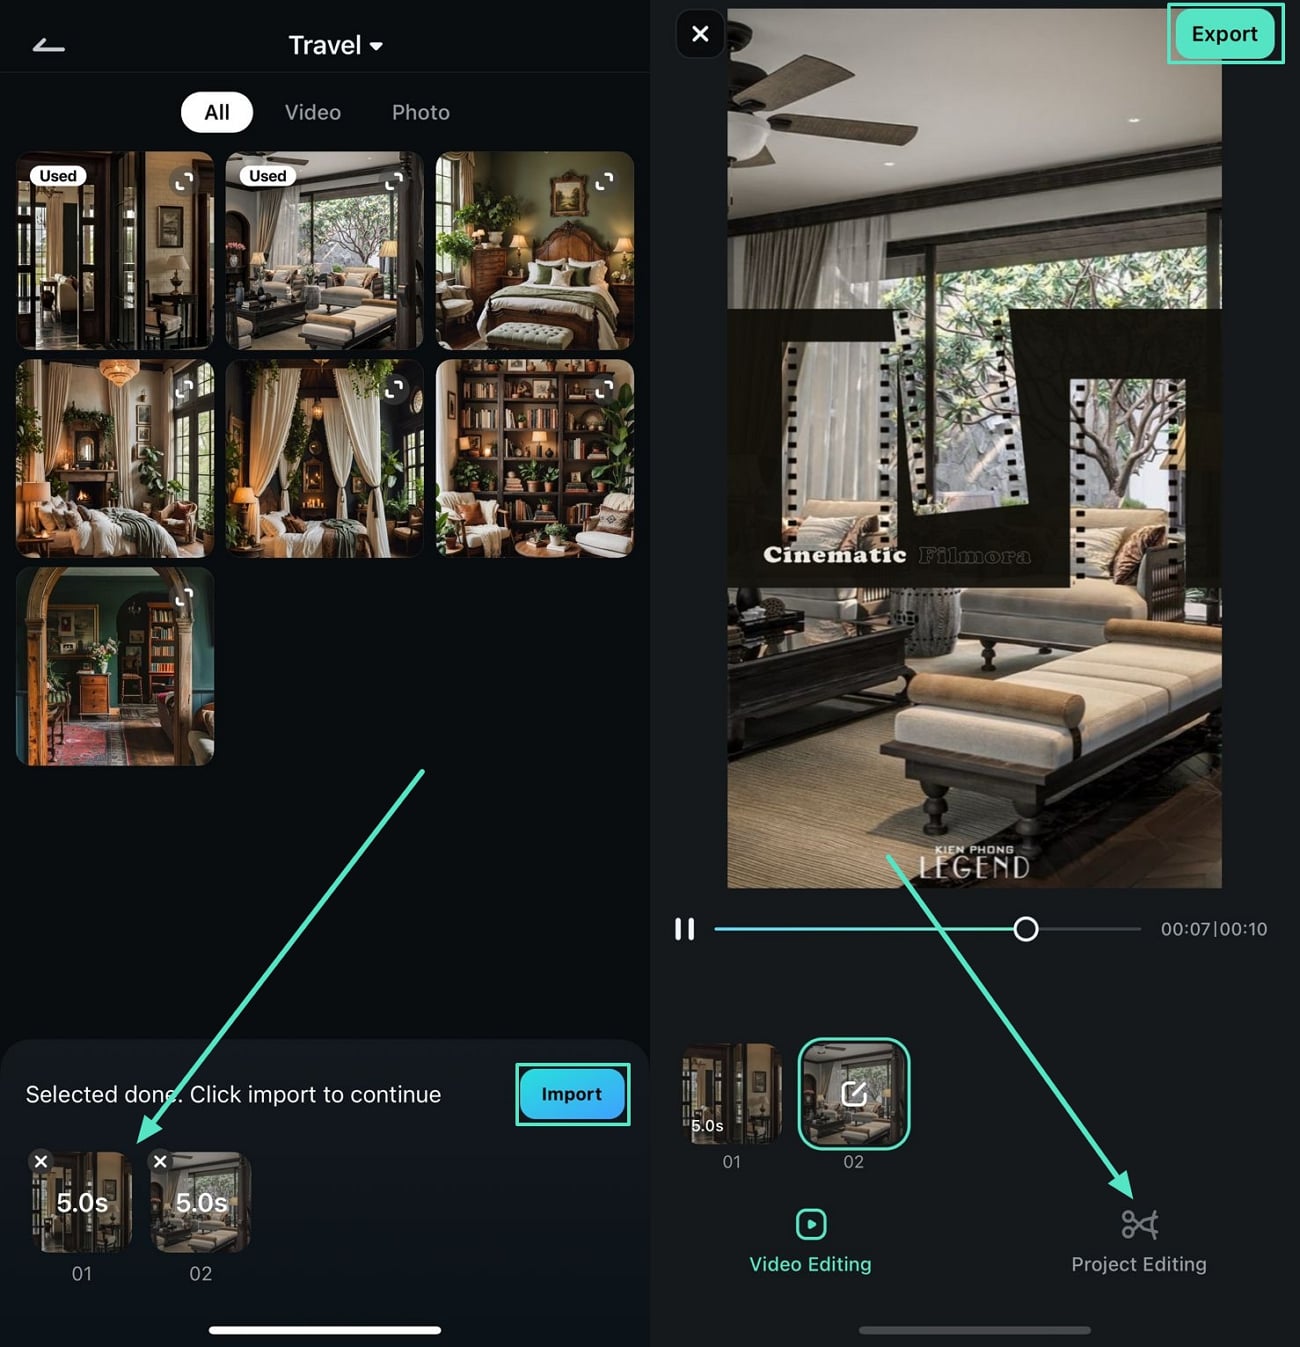
When your media library opens, use the drop-down arrow next to “Recent” and open the “Travel” album.

Step 4. Import the Media From the Travel Album
As you select the desired travel media, tap the “Import” button at the bottom right. This will automatically apply the selected video template to the media. When the final video appears, press the “Project Editing” tab to edit the project. If the results are satisfactory, “Export” the file through the top right corner of the screen.
More Features of the Filmora iOS App
- AI Captions: Filmora allows you to insert AI-driven captions into your videos in around 19 languages. You can select the built-in audio or import a voiceover to generate the captions.
- AI Reels Maker: Using this platform, users can convert their ordinary videos into perfect Reels. You can do so by choosing a content-relevant video theme, background music, and other attributes.
- AI Remover: Whether you have to remove a text or object from your media, you can use this feature. Simply select the elements by dragging the brush over it and the AI-powered functionality will remove it for you instantly.
Conclusion
Knowing the steps to add or delete iPhone photo albums or the icloud photos, makes the process far simpler and hassle-free. Locating a photo album or Apple iPhone photos has become an instant procedure after organizing the photo album on iPhone and iCloud.
Images come from the Internet


