Step-by-Step Guide to Transferring Photos Directly from iPhone to PC
Jul 14, 2025• Proven solutions
No matter how much storage space you have on your iPhone every once in a while you have to free up space in order to be able to take new photos and capture more videos. 4K and HD footage takes up a lot of space which is why it is important to clear up your iPhone frequently. Photo and video editing apps for iPhones are unquestionably very powerful, but PC photo and video editing software simply provide more options, which is why knowing how to transfer your photos to a PC is important to all iPhone owners who take video and photo editing seriously.
3 Easy and Free Ways to Transfer Photos and Videos from iPhone to PC
- Method 1: Transfer photos directly by connecting the iPhone to a PC
- Method 2: Using iTunes to transfer pictures and videos to a PC
- Method 3: Transferring iPhone photos via iCloud to a PC
Method 1: Transfer photos directly by connecting the iPhone to a PC
In order to transfer still or moving images from your iPhone to a PC, you'll need a USB cable to connect these two devices. Once you've successfully connected your device to the computer, unlock your iPhone and proceed to allow your computer to access the pictures stored on your phone.

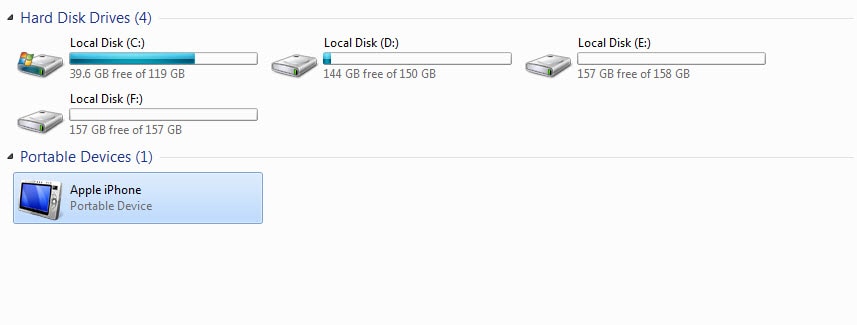
Open File Explorer (formerly "My Computer") on your PC, locate your iPhone under "Devices and Drives," then navigate to Internal Storage > DCIM folder to access your photos.

In the next step, you should select all the images you want to transfer to your PC and then use the right-click to copy them to a location on your PC where you want to store them.
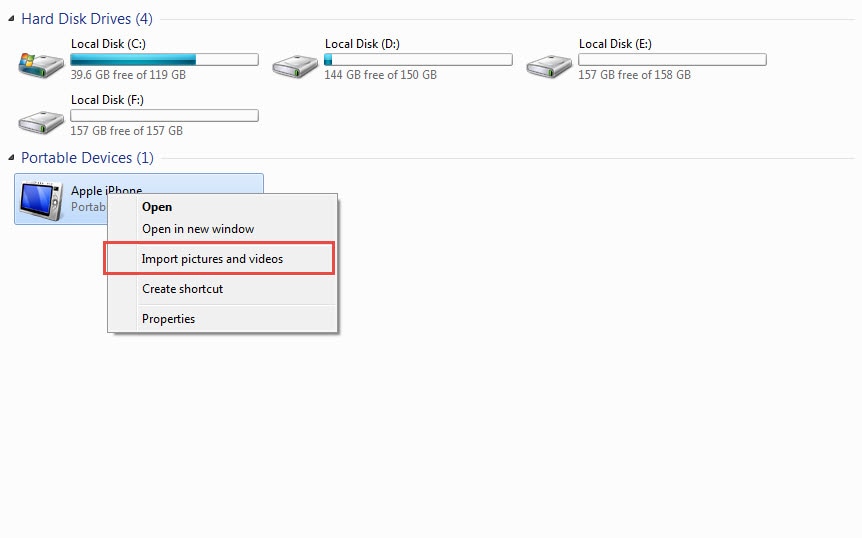
If you want to copy all the pictures and videos from your iPhone to a PC, right-click on the Apple iPhone icon in the My Computer folder and then select the Import Pictures and Videos option from the menu.

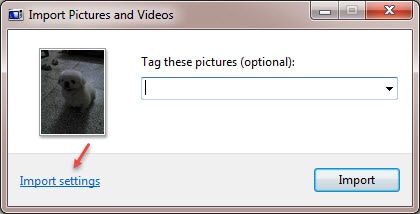
Once the Import Pictures and Videos window appears on your screen, click on the Import Settings option to select the folder on your computer where you want to store the photos and videos.

You can also click on the Always Erase From Device After Importing to automatically delete photos and videos from your iPhone.
Caution: Selecting 'Always Erase From Device After Importing' will delete all transferred files from your iPhone. Ensure you’ve backed up or verified the files on your PC before enabling this option.

After selecting the destination folder and adjusting the settings, click on the OK button and wait for the pictures to be transferred to your PC.
Method 2: Using iTunes to transfer pictures and videos to a PC
Transferring photos from an iPhone to a PC with iTunes requires you to have this software installed on both devices. If this is the case, you should connect your iPhone to a PC with a USB cable, but before you do make sure that all files you want to transfer are located in the same folder on your iPhone.

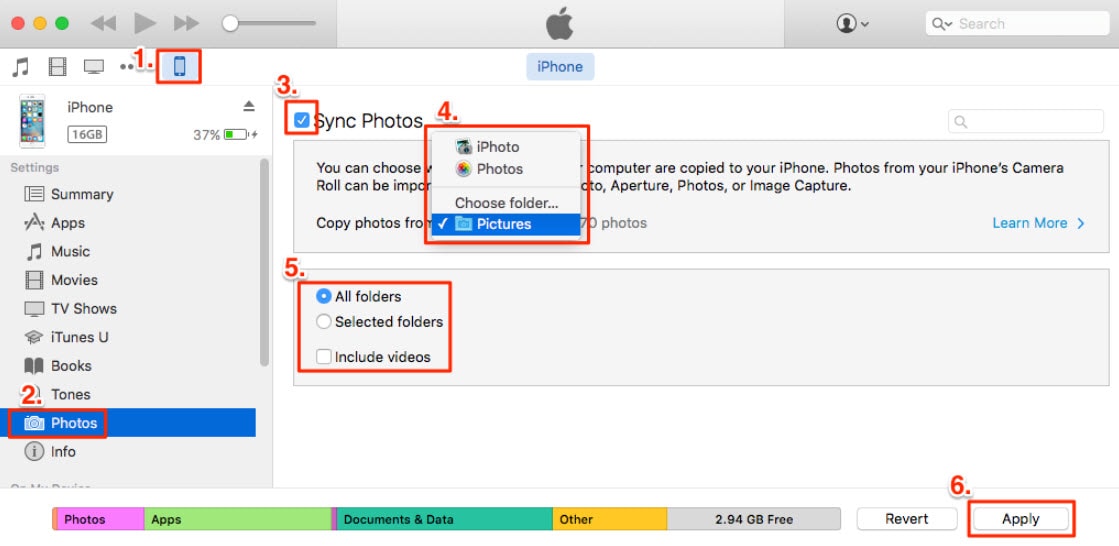
Open the software on your PC and click on the iPhone icon in the menu located in the upper left corner of the iTunes. The Settings menu will appear on the left side of your screen and you should click on the Photo tab. At the top of the screen, you'll be able to see the Sync Photo checkbox, click on it and then select the folder from the drop-down menu.
Locate the folder on your iPhone in which images you want to sync are located and select them. Once you've selected all pictures you want to transfer click on the Apply button located at the lower right corner of your screen. The duration of the transfer depends on the version of the Windows you have, and the transfer may be slow on some older versions of the OS.
Method 3: Transferring iPhone photos via iCloud to a PC
- Open the Settings app and tap your Apple ID at the top.Then go to "iCloud" > "Photos" and enable "iCloud Photos."
- Download and install iCloud for Windows from Apple's website, then log in with the same Apple ID used on your iPhone.
- Open iCloud for Windows, check "Photos," enable "Download new photos and videos to my PC," and choose a folder where the photos will be saved.
- Open File Explorer, navigate to the "iCloud Photos" folder, where photos will be organized by date, and you can copy them to other locations on your PC.
In this article, we will take you through several methods of resizing photos on an iPhone that will help you store more photos on your iOS device.
by Ollie Mattison Jul 14, 2025 14:51 PM


