How to Add a Watermark to a Video with Magix Movie Edit Pro

Sep 30, 2024• Proven solutions
In the age of digital information, protection of copyrights is a major concern for anyone who shares audio-visual content on the Internet. Watermarks are an excellent way of preventing other people from unlawfully using your intellectual property. However, adding a watermark to your video will somewhat reduce its visual appeal.
Magix Movie Edit Pro owners concerned with the protection against copyright abuse can add watermarks to their videos in just a few simple steps. In this article, we will show you how to add a watermark to a video with Magix Movie Edit Pro.
How to Add a Watermark to a Video with Magix Movie Edit Pro
Before making a decision to include a watermark in your video make sure that the watermark you want to use is tastefully designed since it will play a big role in how your audience perceives that video. Let's take a closer look at all the actions you need to take in order to successfully add a watermark to your video.
Import the file and place it on the track below the audio and video tracks
Regardless of the picture format of the watermark, Magix Movie Edit Pro will allow you to add it to its timeline. Usually, watermarks are saved as JPEG, BMP or GIF files and importing them into the video editor is easy. All you need to do is click on the 'Import' tab and locate the file you want to use on your hard-disc. Once you've located the file, drag and drop it to the track below the audio and video track.
If your project doesn't have an audio track, place the watermark file onto the track directly below the video track.
Adjust the settings
After you placed the file onto the correct track, the watermark will appear in the preview window, but its size and position will need further adjustments. Click on the 'Effects' tab and slide down to the View/Animation section and then choose the 'Size/Position' option from the menu. You can either adjust the size and position in the 'Effects window' on the right side of the editor's window by inserting values into boxes in 'Size' and 'Position' segments or you can use the 'zoom' slider to set the size of the file.
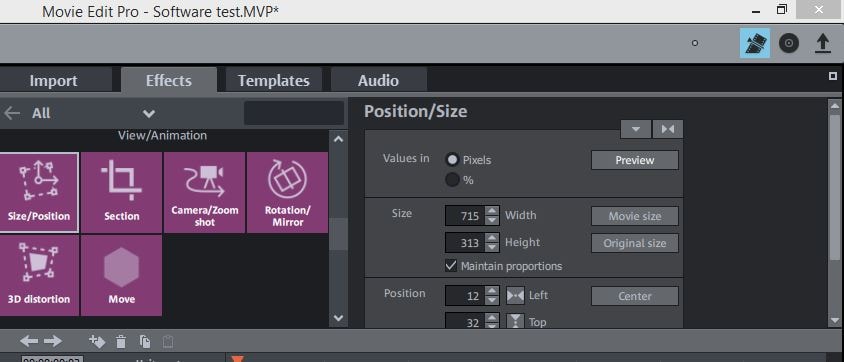
After you click on the 'Size/Position' option the rectangle that enables you to adjust the size of the file on the screen will appear in the preview window, select the file on the timeline and adjust its size and position.

Once you've placed the watermark where you wanted it to be, you can proceed to adjust its duration, by right-clicking on the file on the timeline and selecting the 'Change photo length' from the menu that emerges on the screen. Once the 'Duration for the current object' window appears, insert the amount of time you want the watermark to be visible in your video. If you would like the watermark to be visible throughout the whole video, drag the file's end, until the end of the video file and pay attention to match the durations of the two files.
Set the transparency level of the watermark file by dragging the line displayed across the file up or down, and you can also add 'fade in' or 'fade out' and other transitions by clicking on 'AB' icon displayed at the beginning and at the end of the watermark file.
A better way of adding a watermark to a video
Featuring a watermark in your video in Magix Movie Edit Pro is a simple process, but you if you would like to choose from ever 30 motion effects you should consider using Filmora video editing software. Wondershare Filmora enables you to add watermarks to your videos effortlessly, but it also provides you with a much wider range of editing options than Magix Movie Edit Pro. Furthermore, if you choose to use Filmora, you will be able to shape your watermarks in any way you want since this video editing software offers countless fully customizable masks that allow you to simply design the watermarks in accordance to your needs. Filmora provides support for a large number of different video file formats, which means that you can export the watermarked video in a format that best fits your needs.


Want to edit a video with an iPhone? Dive into the ultimate guide covering two best apps for beginners and professionals.
by Liza Brown Sep 30, 2024 19:24 PM
You must have already recorded many beautiful videos on your iPhone, but some are probably too long, and you want to eliminate unnecessary parts. There are a few simple and effective ways to achieve this.
by Liza Brown Sep 30, 2024 19:24 PM
Need help overlaying videos in iMovie? Check out our detailed guide to learn how to add pictures over videos in iMovie or create such effects with other clips.
by Liza Brown Sep 30, 2024 09:56 AM
Liza Brown
chief Editor
