
 100% Security Verified | No Subscription Required | No Malware

In this article
Avengers: Infinity War is the peak of the Marvel Cinematic Universe for many, and a few moments hit harder than when the Avengers disappear one by one after Thanos snaps his fingers. That scene has been parodied a million times, and lots of creators want to recreate that same effect.
If you're one of them, today we'll be the hero who shows you how to make people disappear using the so-called Thanos disintegration app, which is not what you think! Scroll down to find out.

Part 1. Getting Ready for Your “Snap” Scene
Before you turn your clip into a full-on Avengers disintegration scene, you've got to set things up right first. Think of this part as laying the groundwork so the effect comes out smooth and believable later.
So, take a minute to follow these simple filming tips before you start working on your snap scene.
1. Keep It Steady

Grab a tripod or rest your phone on something solid. A stable shot makes the Avengers disintegration effect blend perfectly, so the dusting looks clean instead of shaky.
2. Shoot a Clean Plate

Record one take with your subject, then another with just the background. This second clip is your secret weapon for making people disappear smoothly using the Thanos disintegration app.
3. Hold Still for a Beat

Have your subject stay completely still for a few seconds before the “snap.” It gives you enough clean frames to make the disintegration transition look seamless later.
4. Match the Camera Angle

Keep your camera angle and distance exactly the same for both takes. If you move even a little, the background won't line up when the Avengers disintegration effect kicks in.
5. Add Some Wind Movement

Use a small fan or gently wave something behind the subject. A bit of motion in the air helps the dust and ashes move naturally once Thanos' snap takes effect.
Part 2. Creating the Avengers Disintegration Effect With the Right Tools
Once you have your footage ready, it's time to bring the snap to life. This is where the real magic starts, when your ordinary clip begins to crumble into dust, just like in Avengers: Infinity War.
To pull it off, you'll need a solid editor that can handle both creativity and precision, and Wondershare Filmora fits that perfectly. It has all the tools you need to bring that dusting effect to life, from masking to overlays and sound design. With Filmora as your Thanos disintegration app, you're about to create a scene worthy of the snap itself.

 secure download

Here's what makes Filmora the right editor to create Avengers disintegration effects:
- Smart Masking Made Simple: Filmora's AI Smart Masking lets you isolate your subject in seconds. No need to spend hours cutting frame by frame just to make your Avengers disintegration look clean and natural.
- Smooth and Seamless Transitions: Filmora's creative transitions help blend the moment your subject turns into dust. Everything flows together naturally, just like the real snap in the movie.
- Dust That Feels Real: With petal and dust overlays, you can add flying ash and scattered fragments that bring your scene to life. It's the secret sauce behind that perfect Avengers disappearing effect.
- Sound That Sells The Scene: With Audio Effects and Sound Sync, you can add that subtle whoosh or crumble that makes everything hit harder. A good sound makes the dust effect twice as believable.
- Powerful Chroma Key Control: If you need extra effects outside the editor, Filmora's Chroma Key capabilities let you blend imported footage or overlays with precision. You can drop in external particle clips and make them look like they were part of your original Avengers disintegration scene all along.
With all these powerful tools packed inside the editor, Filmora makes it easy to pull off that epic Avengers disintegration effect. Even if you're just starting out, everything feels smooth and beginner-friendly. So let's jump right in and create your very own snap moment with the simple guide below.
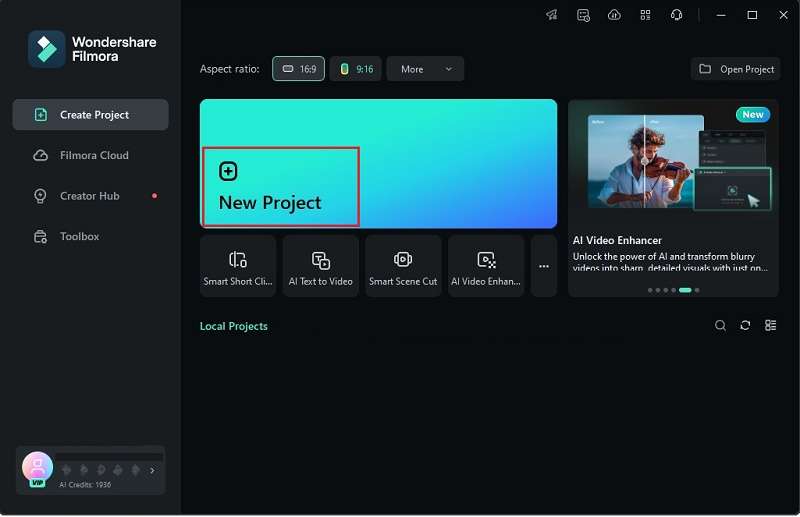
Step 1. Open Filmora and start a new project
First of all, make sure you've got the latest version of Filmora installed on your device. Once it's ready, launch the app and click “New Project” to start working on a clean timeline.
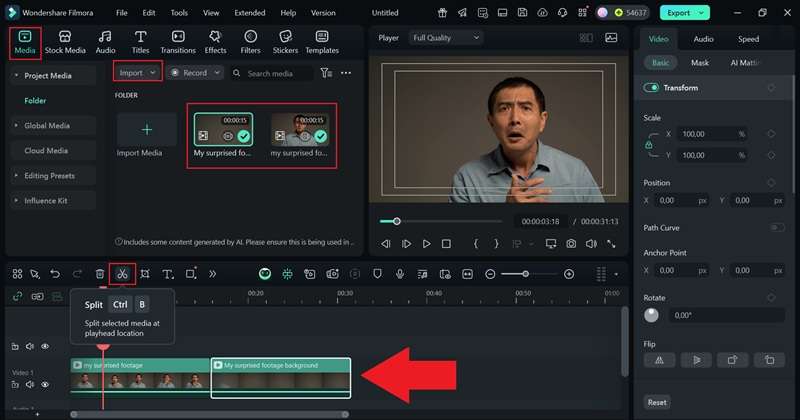
Step 2. Import your clips to the timeline
Now, go to the “Media” tab and click “Import” to bring in the clips you'll be using. You'll need both the original shot and the clean background plate. Drag them onto the timeline and place the background clip right after the original one. If there are any unwanted parts, use the Split Tool to trim them out easily.
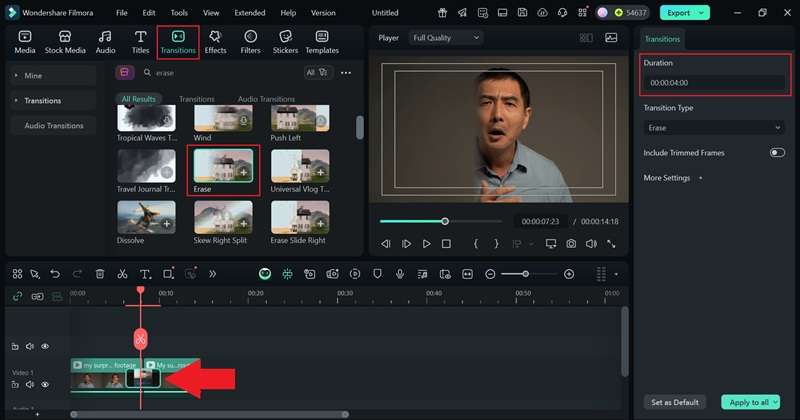
Step 3. Add transitions
Next, open the “Transitions” tab and use the search bar to quickly find the “Erase” transition. Drag it between your two clips to connect them smoothly. In the properties panel on the right, adjust the transition duration to around 4 seconds so the disappearing effect flows naturally instead of cutting too fast.
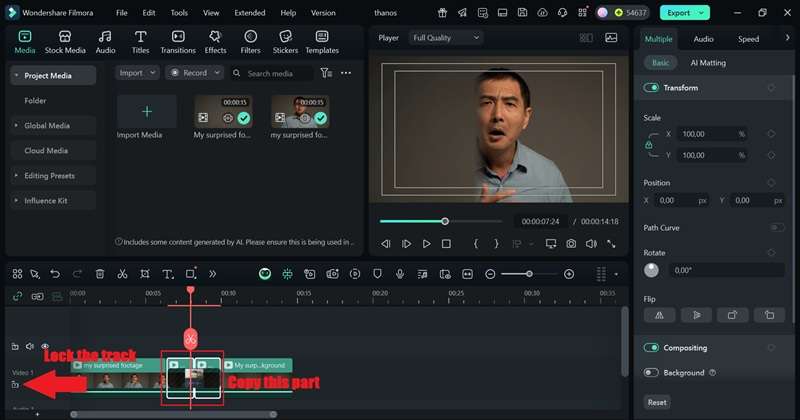
Step 4. Mask your video
To make the transition affect only the person in the shot, you'll need to use video masking:
- Cut the section where the transition happens and make a copy of it.
- Click the lock icon to protect your main clip from edits.
- Paste the copied clip above the main one.
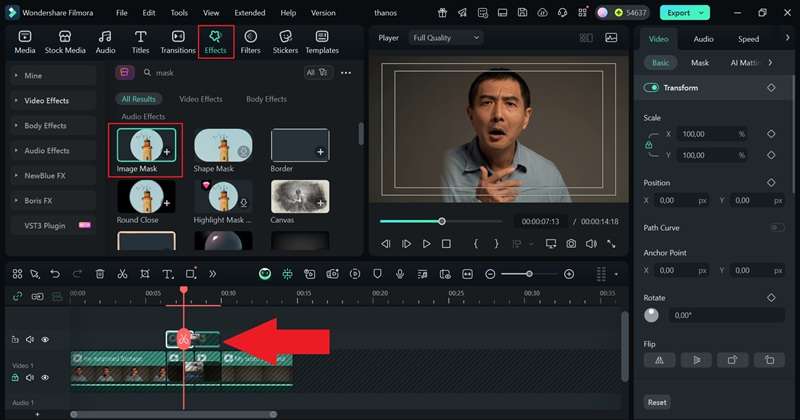
- Then, go to the “Effects” tab, find “Image Mask,” and drag it onto the pasted clip to apply the mask.
Step 5. Apply the disintegration effect
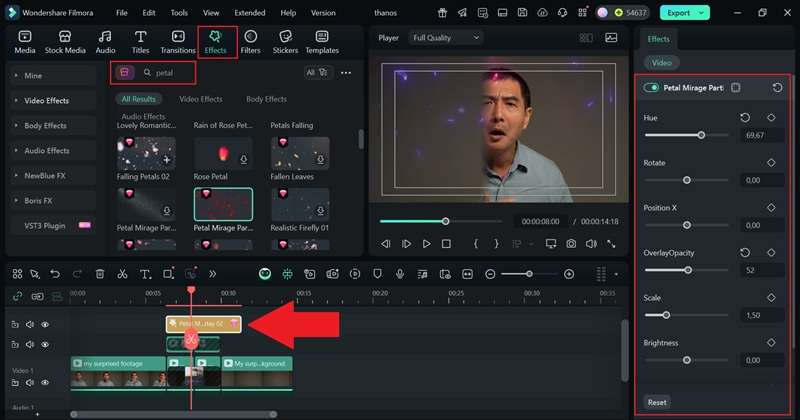
Now, this is the tricky part. To create the Avengers disintegration effect, Filmora offers several built-in “Petal” effects that can mimic the look of fading dust. Drag one onto your masked clip in the timeline, then open the property panel on the right to tweak the color and make it look more like ashes drifting away.
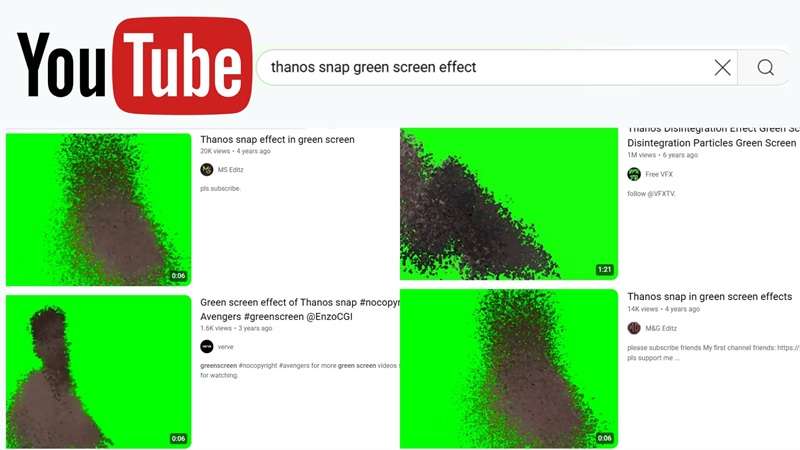
Or, you can look for disintegration effects online. There are plenty of free ones available on sites like YouTube and other stock libraries. Just download the clip you like, then import it into Filmora to edit and blend it with your scene.
Once you've downloaded the effects, import them into Filmora and drag them onto the timeline.
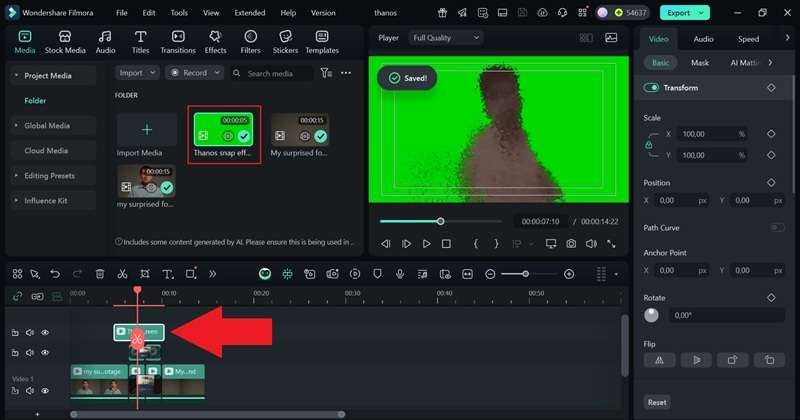
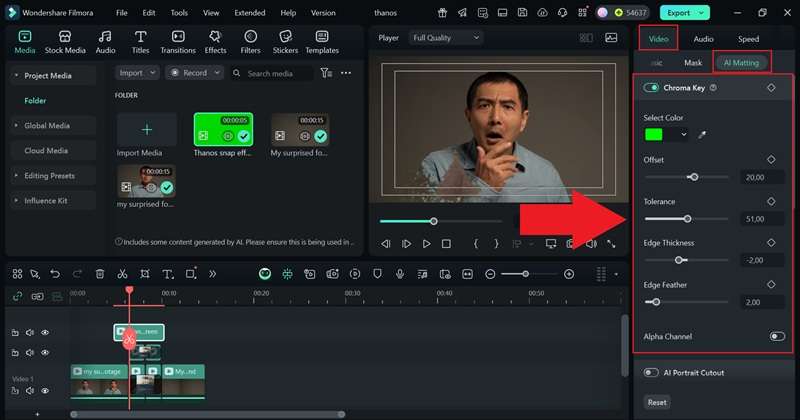
Next, select the green screen clip, open the “Video” section in the property panel, and choose “AI Matting.” Then, toggle on the “Chroma Key” feature, and you'll see the green background disappear, leaving your Avengers disintegration effects perfectly blended with the clip.
Step 6. Add sound effects
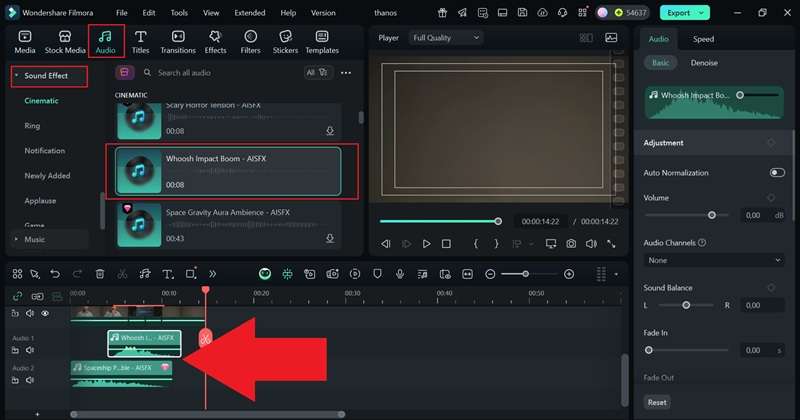
To make the scene feel more alive, add some sound effects that match the disintegration. Go to the “Audio” tab, choose “Sound Effects,” and explore the categories until you find the right ones. For this effect, use two sounds: one subtle background track and one strong whoosh for the moment the disintegration happens. Drag both to the timeline and layer the whoosh right above the background sound for a more dramatic impact.
Step 7. Export and save your video
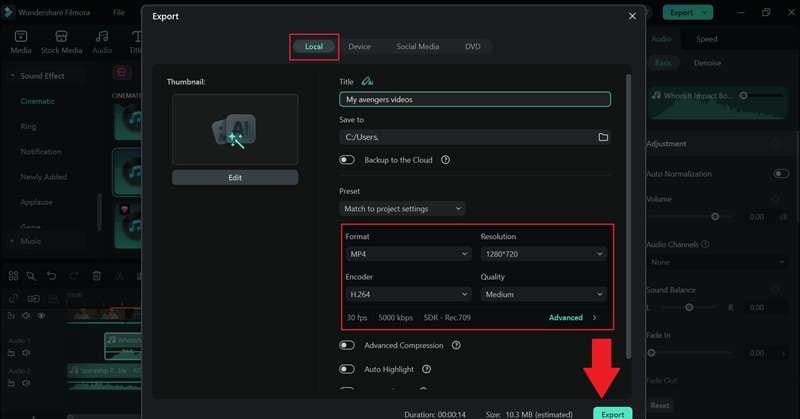
When your edit looks perfect, hit “Export.” Choose “Local” if you want to save it directly to your device, or select “Social Media” to upload it right from Filmora. Add a title for your video, pick your desired format and resolution, choose where you want it saved, and click “Export” again to finish the process.
And just like that, you pulled it off. Your clip now has that awesome Avengers disintegration effect, and it looks straight out of a Marvel scene. Now, let's take a second to admire your work and watch how every detail comes together like movie magic.
Part 3. Tricks to Make Your Avengers Disintegration More Realistic
Now that you've pulled off the Avengers disintegration effect in Filmora, you can see how simple yet effective it is. The tools do most of the heavy lifting, so even a quick edit can look cinematic.
But if you really want your clip to look like it belongs in the actual Marvel universe, you'll need to give it that extra polish. Here are a few simple tricks that can make your Avengers disappearing scene look even more realistic.

- Make The Dust Move Naturally: Give your particles a sense of direction by adjusting how they scatter. Make them flow one way, as if the wind is carrying them.
- Mix Different Particle Sizes: Combine larger fragments with tiny dust pieces to create depth. Filmora lets you layer multiple overlays easily, so your Avengers disappearing scene feels more dynamic and detailed.
- Add A Touch Of Motion Blur: Use Filmora's blur effects to soften fast-moving particles. This small detail makes everything look smoother and closer to real camera movement.
- Set The Mood With Color: Open the Color Correction panel and play with brightness and tone. A darker tint or cool filter instantly gives your scene that intense Avengers movie atmosphere.
- Add Light Flicker For Drama: A subtle flicker before the fade gives your Avengers disintegration a more powerful finish. In this case, you can use Filmora's lighting or flash effects to simulate energy leaving the body.
Conclusion
Thanos snapping his fingers and making the Avengers disappear remains one of the most unforgettable moments in modern cinema. So, we walked through how you can recreate that same Avengers disintegration effect using Wondershare Filmora, an all-in-one editor that keeps everything simple yet powerful.
With creative transitions, video masking, overlays, and chroma key tools, you can make your scene look just as dramatic as the original snap. Not to mention, Filmora also comes packed with built-in sound effects that perfectly match the dusting moment and make it feel alive. If you're looking for a Thanos disintegration app, Filmora is the one to use.
Frequently Asked Questions
-
Can I create the Thanos effect on photos, not just videos?
Yes, you can. The Filmora effect works on still images too. Just import your photo into Filmora, add a dust or particle overlay, and use masking to make parts of the image fade away like in Avengers.Yes, you can. The Filmora effect works on still images too. Just import your photo into Filmora, add a dust or particle overlay, and use masking to make parts of the image fade away like in Avengers.Do I need professional software like After Effects for this?Do I need professional software like After Effects for this? -
Do I need professional software like After Effects for this?
Not at all. Wondershare Filmora already has the tools you need to create the Avengers disintegration effect without the steep learning curve. You can get cinematic results with simple masking, overlays, and sound effects right inside Filmora.Not at all. Wondershare Filmora already has the tools you need to create the Avengers disintegration effect without the steep learning curve. You can get cinematic results with simple masking, overlays, and sound effects right inside Filmora.How long does it take to edit a disintegration video?How long does it take to edit a disintegration video? -
How long does it take to edit a disintegration video?
If you've got your clips ready, the whole edit usually takes less than an hour. The Avengers disappearing effect looks complex, but Filmora's built-in tools and overlays make the process fast and beginner friendly.If you've got your clips ready, the whole edit usually takes less than an hour. The Avengers disappearing effect looks complex, but Filmora's built-in tools and overlays make the process fast and beginner friendly.What's the best way to make group disintegration look real?What's the best way to make group disintegration look real? -
What's the best way to make group disintegration look real?
Edit each person's clip separately, then layer them together in Filmora. Add different particle directions and sound timing for each person so it feels like the Avengers disintegration scene where everyone fades at their own moment.Edit each person's clip separately, then layer them together in Filmora. Add different particle directions and sound timing for each person so it feels like the Avengers disintegration scene where everyone fades at their own moment.Grammarly
