Transcript
In this video, we will create this magic finger trick in Wondershare Filmora. First, shoot a video showing a thumbs up. Then, you need a few mechanical parts, which you will get from any free PNG website. Add 10 more tracks on "Track Manager." Drop your main clip at track 4. Identify the start of the effect and split the clip. Then, split the clip at the end of the effect and shift the second split part to track 2.
Add a "Freeze Frame" at the end of the first split part. Keep the freeze frame for 6 seconds and the 15th frame. Then, place the second split part right after the freeze frame. Split the clip at the start of the freeze frame. Then go to the "Mask," select the pen tool, zoom in to 75%, and create a mask around the thumb's upper part. Take a snapshot of it and "Invert" the mask.
Now, drop the thumb snapshot on track 5 at blank space. Go to the "Mask," and select the pen tool to mask the half area of the thumb. Take a snapshot, "Invert Mask," take a snapshot again. "Delete" the thumb snapshot from the timeline. Drop both half-thumb snapshots on tracks 8 and 9.
Turn on the "Transform" keyframe at the start of both snapshots. Then, go 10 frames forward, change "X" to -30 for track 8 snapshot, and set "X" to 30 for track 9 snapshot. Then, add a blank keyframe on both snapshots at 6 seconds. Go 10 frames forward and change "X" to zero on both snapshots. Shrink the snapshot to the last keyframe.
Adjust the main clip freeze frame according to the snapshots. Stop at the frame when the thumb is half open. Drop the first mechanical part PNG on track 3. Turn on the "Transform" keyframes. Adjust its "Position." Then, change "Scale" to 13.2. Now "Rotate" it and adjust "Position" again; take it behind the thumb.
After 8 frames, bring the half mechanical part in the black portion by using "X" and "Y." Bring out the full mechanical part in 5 frames. Bring the mechanical part down after 5 frames. Then, split the mechanical clip between the second and third keyframe. Shift it to track 5; this will create a pop-out effect.
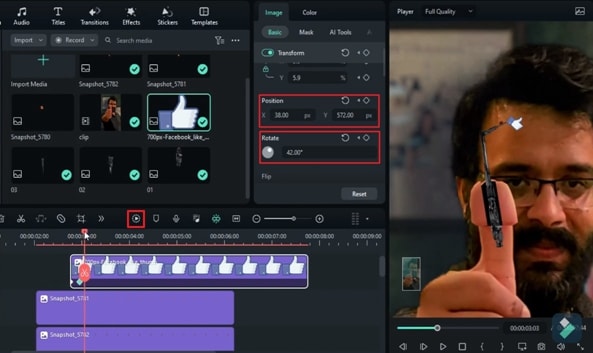
Drop the second mechanical part between the third and fourth keyframe on track 3. Adjust its "Position." "Rotate" it by 171. Reduce the "Scale" to hide it behind the first mechanical part. Turn on "Transform" keyframes, unlock "Scale," 12 frames forward, and increase "Y" and "Position" to make it visible.
Then, decrease the "Y" scale to 18.4 and decrease the "X" to 14.6. Increase the "Y" scale more to make it taller. Keep "Y" at 38.6 and adjust its "Position."
Then split the second mechanical part after three frames. Shift it to the same "Position" on track 6. Place the first part at 5 seconds and the 49th frame, and reduce clip duration. Then, add blank keyframes 13 frames backward.
Next, go 5 frames forward and change "Y" to "Position" to bring the first part in the middle of the thumb. Split it here and place the split part on track 3. Slide the mechanical part between the thumb at the end.
Then decrease the duration of the second part. Turn on "Transform" keyframes 10 frames backward. Then, after 5 frames, change the "Y" "Scale" to 13.5. Adjust its "Position" and split it here. Shift the split part to track 3 and make it disappear from the screen at the endpoint.
Drop the third part at 2 seconds and 38 frames. Do "Scale" and adjust its "Position" over the second mechanical part. Turn on "Transform" keyframes, and go 10 frames forward. "Rotate" it by –115 and adjust its "Position" on the tip of a second mechanical part. It will create an opening effect.
Turn on “Transform” keyframes at 5 seconds and 28th frame. Then, go 10 frames forward to create a closing effect by placing it at its starting point. Then locate the first keyframe and drop this PNG on track 9. Reduce its "Scale" to 2 and adjust its "Position" on the tip of the third mechanical part.
Reduce "Scale" to zero, then go to the second keyframe of the mechanical part and increase the PNG scale to 5.9. Adjust its "Position" on the edge. Go 15 frames forward, change "Rotation" to -22, and adjust its "Position" on edge
Turn on "Transform" keyframes in 20 to 25 frames forward. Then, create a drop effect and adjust "Position." Then, after 10 frames, change "Rotation" to 105 and adjust its "Position." Use the same process to create a swing effect. Just remember to keep the like PNG on edge and change rotation after every 10 frames to 105, then to 78. You can add variation by using different values to create a realistic swing effect. At the end, reverse the opening effect to create the closing effect. Now, let's see the final.
Guide to Add Magic Finger Trick by Using Filmora
What you need to prepare:
- A computer (Windows or macOS)
- Your video materials.
- Filmora video editor
Import the Video and Add Tracks
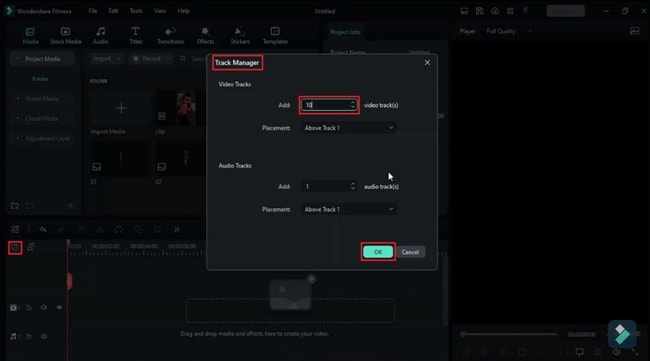
Begin the process by shooting a video including the object on which you want to apply the revealing effect. Import this video into the media panel after starting the new project. You need to add 10 more tracks to the timeline to create this effect.
To do so, go to the timeline toolbar and hit the "Manage Tracks" icon in the top left corner. A small window will appear on the screen where you can add as many tracks as you want and select "OK" to apply the settings.
Point Identification to Apply the Effect
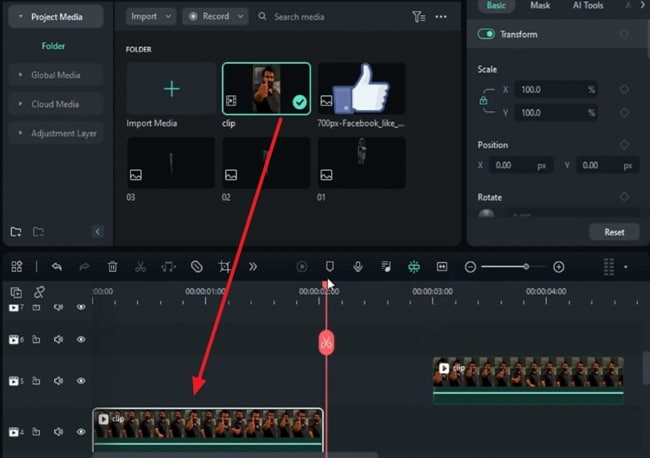
Select the video clip and drop it on the timeline track. By moving the playhead, identify the starting and end points where you want to apply the effect. You can split the clip at both points. As you split the video, select the second split part and drag it onto another track.
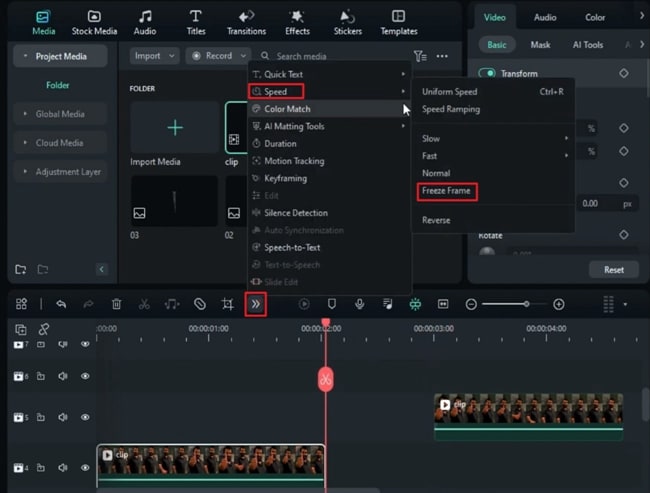
Add Freeze Frame on First Part
Select the clip's first part and navigate to the timeline toolbar. Hit the "More" icon and select "Speed" from the dropdown list. Now, add "Freeze Frame" from the expanded menu at the end of this clip. Keep it for a few seconds and bring the second split part in front of the freeze frame on the same track.
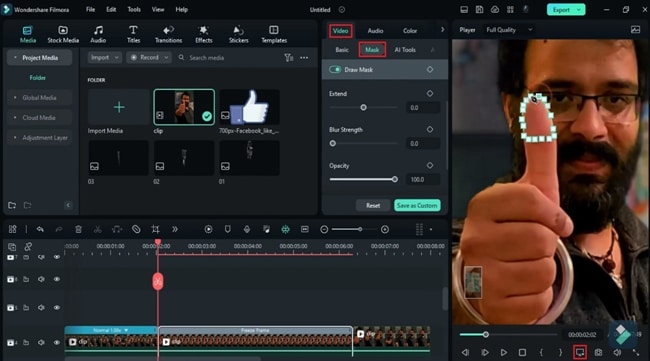
Split the Freeze Frame to Create Mask
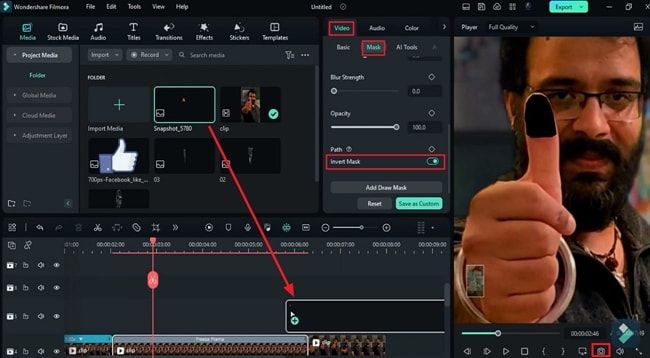
Again, split the first clip on which you have applied the freeze frame at the starting point of the freeze frame. Double-click the freeze frame clip and head toward the right settings panel. Under the "Video" tab, enter the "Mask" section and select the "Draw Mask" option to manually draw the mask around your object.
Zoom in from the “Display Settings” at the bottom of the preview panel to look for the details to apply the mask more accurately.
Taking a Snapshot of the Mask
Once you draw the mask, look for the camera icon at the bottom of the preview panel to take the "Snapshot" of the mask. Hit "OK" from the pop-up window to save this snapshot in the media panel. Move towards the "Mask" settings and scroll down to enable the “Invert Mask” option. Drag this snapshot and place it on the timeline track where no video layers are present.
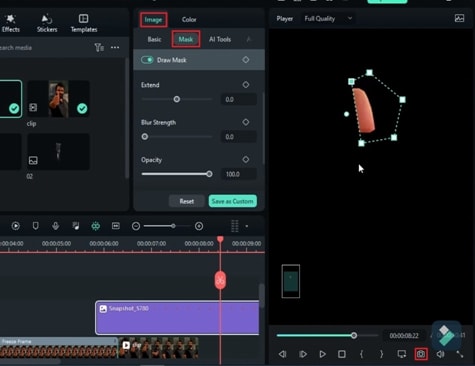
Split the Masked Object into Two Half
Furthermore, select the snapshot on the timeline and head towards the "Mask" settings under the "Image" tab and "Draw Mask" around the half area of your object. Take the "Snapshot" of the mask and save it in the media by hitting "OK."
Now, you can "Invert Mask" you have created to get the other half of the object. Again, save it by taking the "Snapshot" of this inverted mask. You can select the "Delete" icon to delete the original snapshot of the object from the timeline that you dropped earlier.
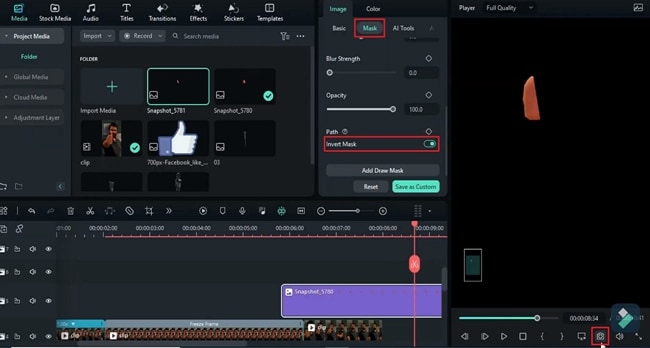
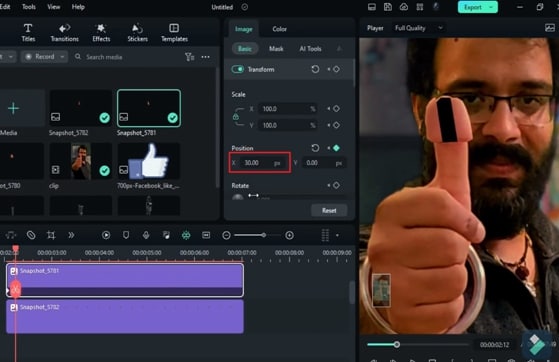
Drop the Split Objects on the Timeline
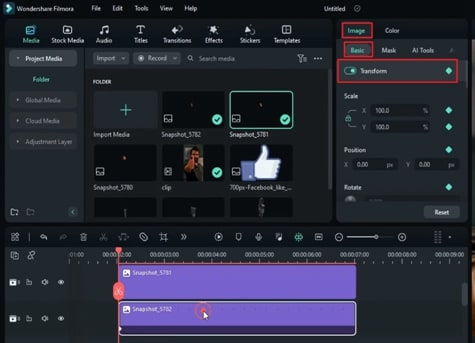
Select both the snapshots of the half objects and drop them onto the timeline on different tracks as video layers. To start applying the effect on both snaps, go to the “Image” settings and enter the "Basic" section. Enable the "Transform" button and add keyframes at the beginning of both these snaps.
Create the Opening and Closing Effect
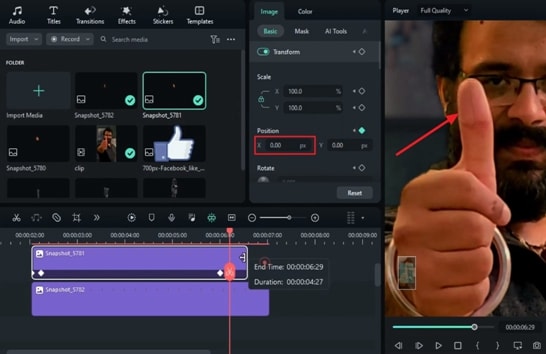
After placing the playhead at the required frames towards the right, select both the tracks containing the half objects one by one and change their “Position" on "X" to make them move apart. Similarly, you can add a blank keyframe by moving the playhead at the required frames.
Now, bring those split parts of the object closer to each other by applying a keyframe at that point and adjusting the “Position” to zero. You can trim the excess parts of the snapshot. Furthermore, adjust the freeze frame duration according to the snapshots' duration.
Adding the Revealing Object Layer
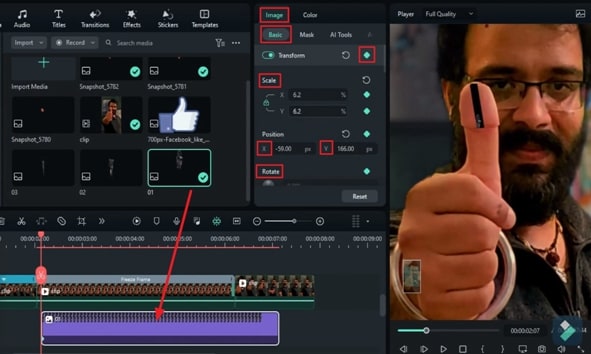
Select the freeze frame clip and move the playhead to the point where your subject is half-split. Import the object's media in PNG format to apply the revealing effect on this object. Place this object at another track below the above video layers.
Double-click this track, and from the settings, enable the "Transform" keyframe under the "Basic" tab of the "Image." Here, you can add a keyframe and adjust the "Scale," "Position," and "Rotation" of this object accordingly.
Create the Revealing Effect
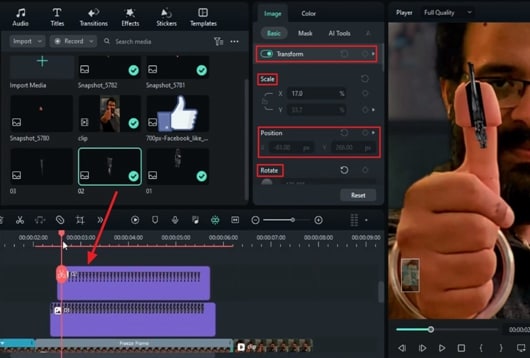
Make sure to adjust the "Position" on "X" and "Y" so that the hidden effect is created. Further, move the playhead a few frames forward. Add multiple keyframes by readjusting the "Scale," "Position," and "Rotation." You can gradually reveal the object by making the split parts move apart.
To create the pop-out effect, select the revealing object on the timeline. Split this clip after the initial keyframes and drop the second half part on the track above the freeze frame track. You can repeat the same process to apply the revealing effect for multiple objects. Make sure to place the layers of the objects a few frames ahead of the previous ones.
Furthermore, you can add “Transform” keyframes at the end of these layers and adjust the “Position” to create the hiding effect on your object.
Swing Effect on the Objects
If you want to attach another object and create an opening effect. Drop this object on the top track as a new video layer. Adjust its "Position," "Scale," and "Rotation" at the start and end points of this video layer to create the opening and closing effects.
Add keyframes to lock the settings on those specific points. Here, you can add more objects and create the swing effect by adding multiple keyframes and readjusting the size, "Position," and "Rotation" into the video layer. Do the same process in reverse to create the closing effect. Hit the "Render Preview" on the timeline toolbar to see the final results.
Wondershare Filmora has made the video editing process quick and easy. You can create multiple magic effects in your videos by using its built-in tools. This guide has taught you to apply the hiding, revealing, and splitting effects on multiple video layers. Following this step-by-step guide, you can easily create these magical effects for your projects.


