Transcript
In this video, we will bring you the throwing lighting bottle tutorial in Wondershare Filmora. First of all, you need to film a video of throwing a bottle like this. Then, "Import" and drop your footage on the timeline.
Go to "Speed" and reduce "Speed" to 0.30x, and split the clip to separate the part when the bottle is in the air. Then copy those two parts and paste them on track 2. Select the duplicated clip, go to the "Video," "AI Tools," and select "Smart Cutout." Place the playhead at the start and select the bottle using the "Brush." Then, go one frame forward and do the same. Then click on "Start Smart Cutout" to track the object automatically. Repeat the same process with your leftover duplicate clips.
Now, "Hide Track" 2; then, you will only see the bottle is visible. Check both duplicate clips to see if the mask is done properly. Then change the “Color” of track 1 clip to “Black&White.” For duplicate clips, change “Color” to “Boost Color” by using “Presets.”
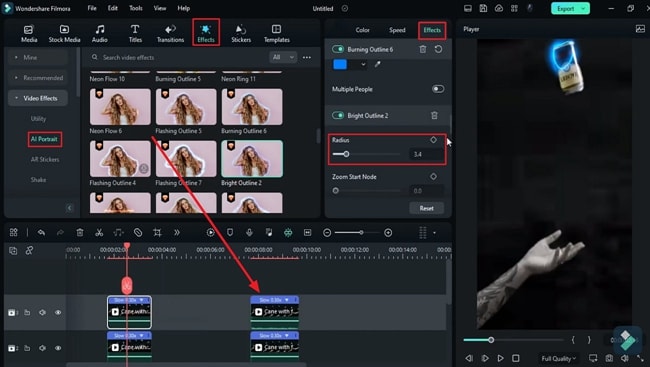
Now add the electrical lighting to the bottle. Go to "Effects" and under "AI Portrait," use "Burning Outline 6" on both the duplicate clips. Select a duplicate clip, go to the "Effect" and change "Radius" to 2.5, and go for the next duplicate clip, we change "Radius" to 3.
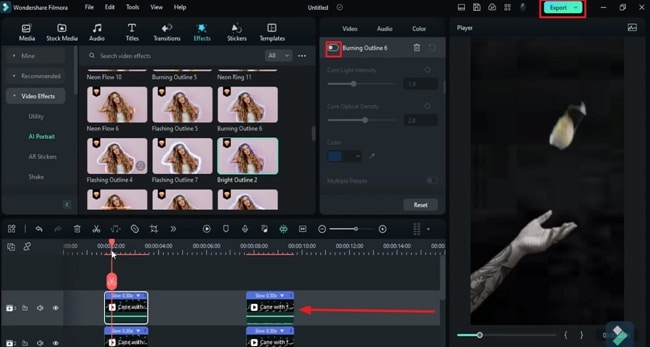
Once again, duplicate those clips on another video track. Then go to the "Effect" and change "Radius" to 3.7 and change "Radius" to 4 for the following clip. Here, you can see we get our "Effect." Once again, apply "Bright Outline 2" on both clips on track 3, but you can see there are no electric waves. To create waves, you can simply disable the “Burning Outline 6” “Effect” from track 3. Now, “Export” this clip.
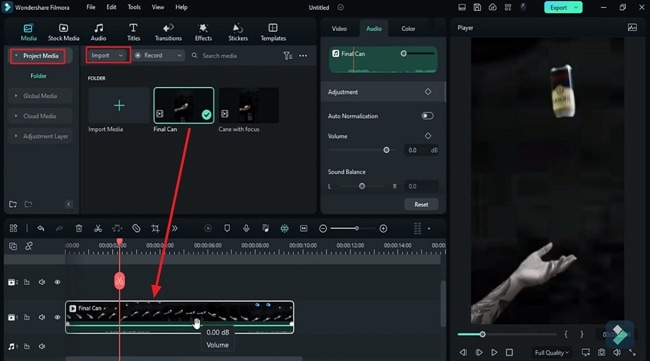
Delete all the files from the timeline and bring them back to the "Project Media." To give final results, go to the "Speed" and change "Speed" to 2.5x. Copy and paste the clip on the same track twice. Then go to the "Effects" under "Boris FX," go to "Blur," apply the "Fast Lens Blur" effect, and change "Iris Scale" to 1.5. Now, to unsharp our clip, use the "Unsharp Mask" effect. Change "Radius" to 7 and "Amount" to 70.3. Then, finally, go to the "Stylize" folder and apply the "BCC Prism" effect. Now, let's "Render" it to see the final preview.
Adding Lightning Effects on the Objects in Filmora
What you need to prepare:
- A computer (Windows or macOS)
- Your video materials.
- Filmora video editor
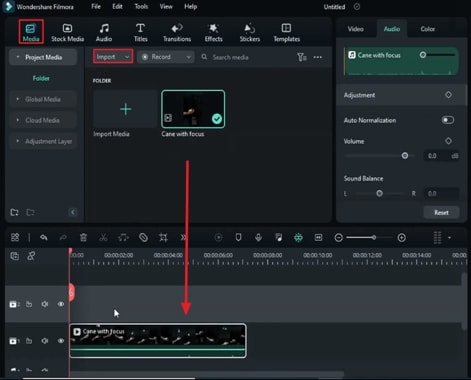
Import Media After Launching the Tool
To initiate the process, enter the new project in Filmora. Add the video to the "Media" tab using the "Import" option. Once you are done importing, select this video and bring it to your timeline.
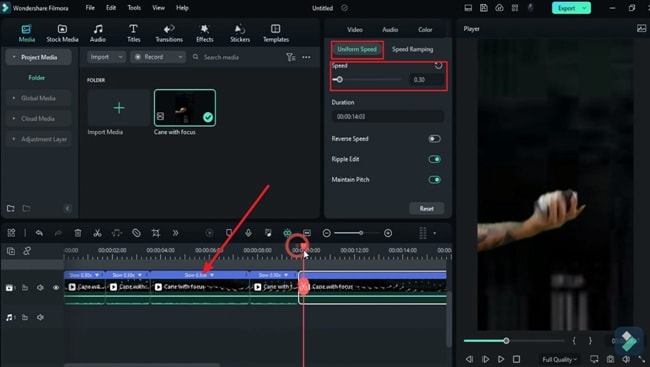
Reduce the Uniform Speed
Double-click the video on the timeline, and the settings window will appear on the right side. Enter the "Speed" tab, and by selecting the "Uniform Speed" option, you can reduce the overall speed of your video. Now, segregate the part of the clip by splitting it into different parts, and select the part that contains the object in the air on which you want to apply the effect.
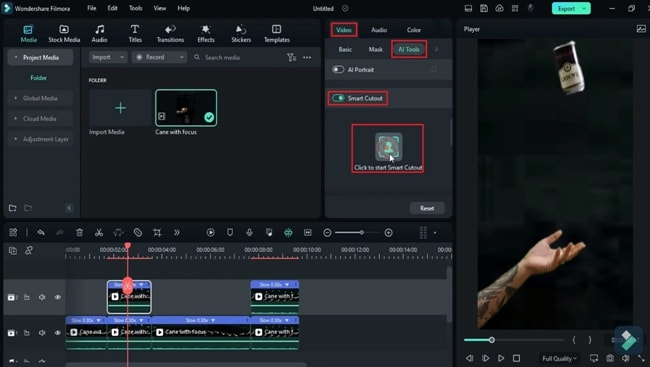
Enable the Smart Cutout
Select the parts of the clip containing the object in the air and drag them on the above track to make another video layer. Double-click the second timeline layer to enter the settings window. Navigate to the "AI Tools" under this panel's "Video" tab. You can find the "Smart Cutout" option here. Enable this button and hit the "Click to Start Smart Cutout" option, which will take you to a new window.
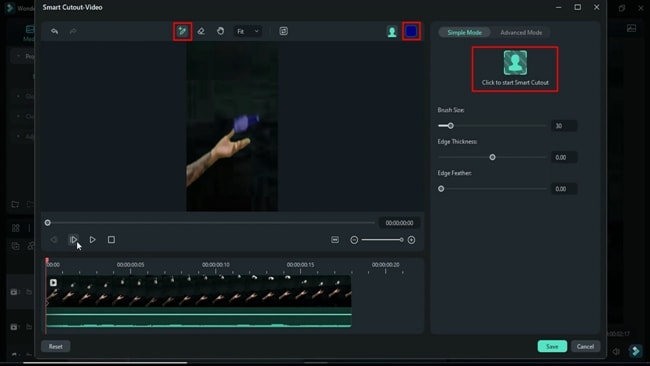
Track the Object with Smart Brush
Start the "Smart Cutout" from the newly opened window with the help of the "Smart Brush" tool by pointing out the object at the beginning of the video. Hit the "Click to Start Smart Cutout" from the right section to start tracking. Once the tracking is complete, you can "Save" your clip from the button on the bottom right of this window.
This way, your object will be tracked and isolated throughout your video layer to apply the effect. You can observe these results by hiding the first video layer by hitting the “Hide Track” icon from the left side of this track.

Apply Colored Effects on the Object
Now, move towards the first video layer and unhide it. Select this video, enter the "Color" tab from the right panel, and change the color of both the video layers as per requirements. To add the effect, select the second track on which you have applied the smart cutout.

Adjust the Effect Radius of the Second Video Layer
Navigate to the "Effects" tab, and from the left panel, select the effect you want to apply. As you hit the "AI Portrait" option from the left panel, you will be provided with multiple effects options to choose from. To apply it to the video, you need to simply drag and drop it on the video on the timeline.
Additionally, double-click the second video layer, and from the settings, enter the "Effect" tab. Scrolling down allows you to adjust the "Radius" according to your object's dimensions. Copy the second video on the above track on the timeline to make a third video layer. Here, you can also make the "Radius" adjustments and apply more "Effects" if required.
Export All the Video Layers
To create the waves of your applied effect, you can go to the settings of the track that contain duplicated clips and turn off the effect you selected previously on its original video. You need to save this clip to get these different videos as a single video. To do so, hit the "Export" button from the top right corner.
Delete the pre-existing videos on the timeline. Bring this exported clip into the "Project Media" by hitting the "Import" button and dropping it on the timeline.
Speed Adjustment of the Newly Imported Video
Afterward, select the video from the timeline, and from the settings, enter the "Speed" tab and select the "Uniform Speed" section, where you can change the speed of your clip. It is recommended to make it a little bit slower. Copy this clip and paste it twice on the same track.

Apply More Effects to Enhance the Visuals
Here, you can head to the "Effects" menu and select any desired effects for this video. After deciding which effects to apply, bring them on the timeline on the above tracks as new video layers. Extend these effects throughout the first video towards the right to use them appropriately throughout the video.
You can make more adjustments to the applied effects from the "Effects" in the settings window. Hit the "Render Preview" button on the timeline toolbar to see the final results.

Wondershare Filmora is a smart video editing software with built-in smart AI features that help you achieve impressive videos. In this era of fast-growing technology, Filmora has also contributed to eliminating the hassle of content creators. This guide has explained the use of Filmora to apply unique lightning effects on a single object in the video.


Speak Your Mind