Transcript
In this video, we will create this holographic effect in Wondershare Filmora.
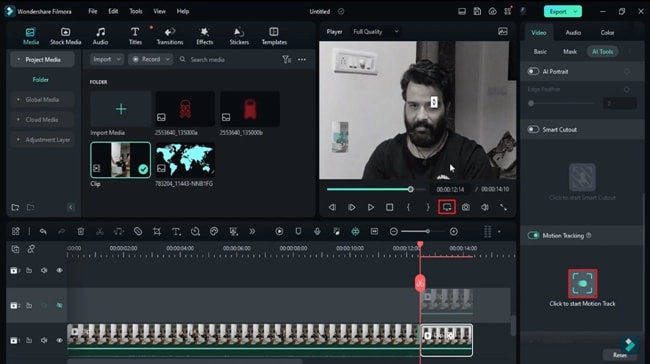
To create this effect, you should film footage like this. Then, we will add some visual effects to this footage. Drop it on track 1, then go to "Color" and select "Black&White" under preset. Split it when you're looking at the camera. Duplicate the split part on track 2. Turn on "Motion Tracking" for the main split clip. Hide track 2; zoom in for a better operation. Let's start to track on one eye. Do the same on the other eye on the track 2 clip.
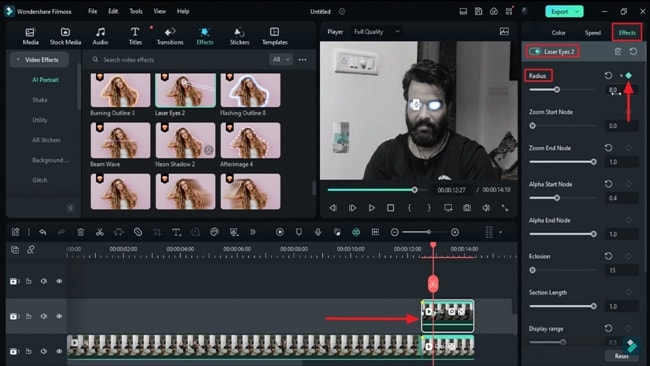
Then go to the "Effect," under "Video" effects, "AI Portrait" section, find the "Laser Eye 2" effect, and apply it on the track 2 clip. Under the "Effects" tab, turn on the "Radius" keyframe and set it at 0. Set "Zoom End Node" to 1, "Alpha Start Node" to 0.4, "Eclosion" to 15, "Display range" to 0.5, and turn off "Ray." Then go 13 frames further, set "Radius" to 8, "Display range" to 0.6, and "Eclosion" to 22.
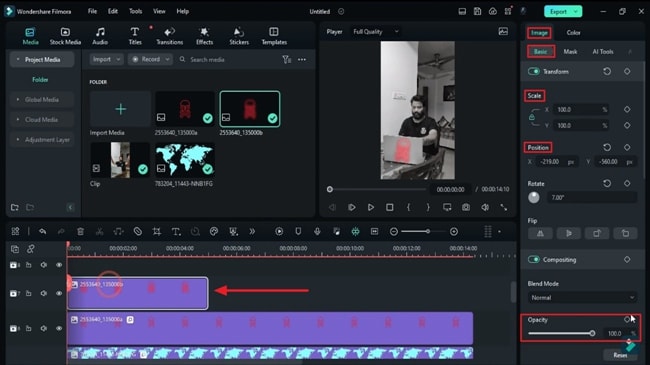
Then go to the "Stickers," drop "Lens Flare Element 11" on track 3, place it on your eye, then change "Blending Mode" to "Color Dodge." Decrease "Scale" to 74, unlock "Scale," and increase X "Scale" to 85 to make it wider. Set Y "Scale" to 65. Select track 1 motion tracking clip and select the "Lens Flare" effect under "Link Elements."
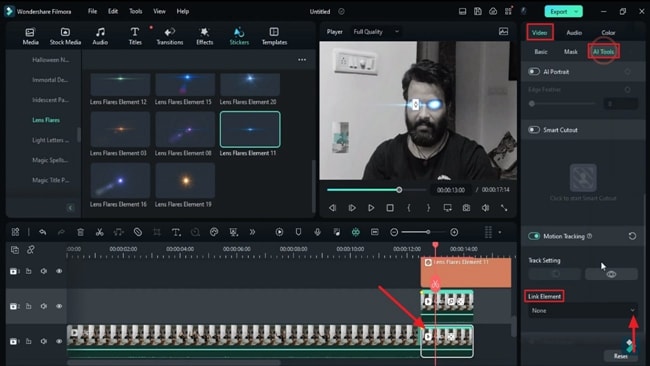
Now select the duplicate clip and drop “Lens Flare" again on track 4 and select “Lens Flare” clip under “Link Element” of Duplicate clips. Change "Blending Mode" to "Color Dodge" and adjust its "Scale" and "Position," then split and delete extra lens flares.
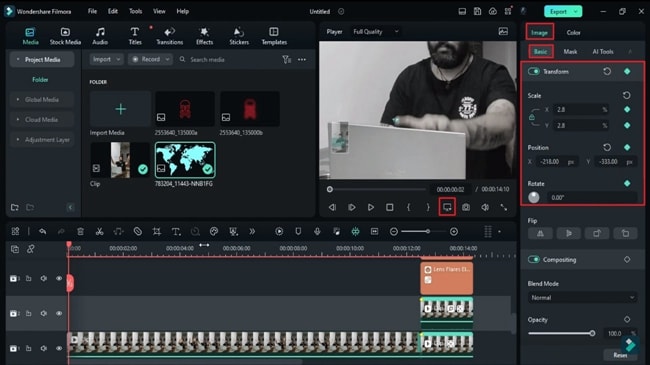
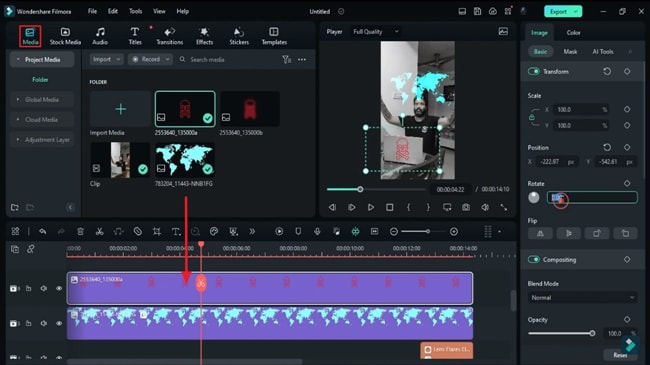
Next, drop World Map PNG on track 5, which you can download from any free PNG website. Adjust the preview screen to hand position, and when the finger is visible, change the map "Scale" to 2.8 and place the map at the fingertip. Turn on keyframes for "Transform," then go one frame forward and set the map on the fingertip. Do the same until your hand starts going down, then select the end keyframe and set "Scale" to 22.8./p>
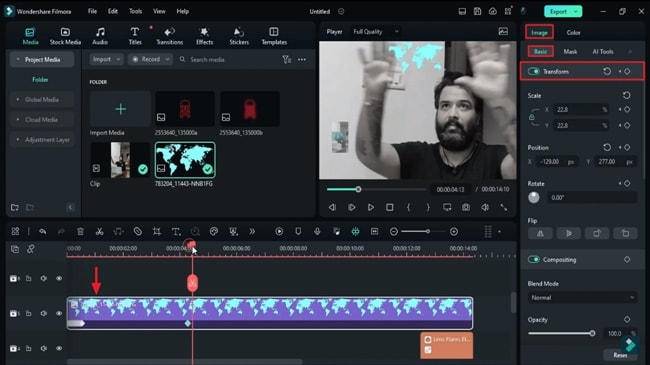
Now go forward and place the playhead right at a time of expend motion. Turn on the "Transform" keyframes. Go forward and stop when your action is about to be complete. Change “Scale” to 92.4. Change the “Zoom Level” to “Fit” and adjust the map “Position.”
Then go to the effects, and under “Boris FX," apply the "BCC Lens Correction” effect on the map. Click on this keyframe, go to the “Effects” settings, and set “Correction” to -47.3. Turn on the “Horizontal Perspective” keyframe. For correction, change “Scale” X to 89.9, “Scale” Y to 93, then click on the second keyframe. Under the effects setting, change “Correction” to 0 and “Horizontal Perspective” to 9. It will add a bit of perspective to the map.
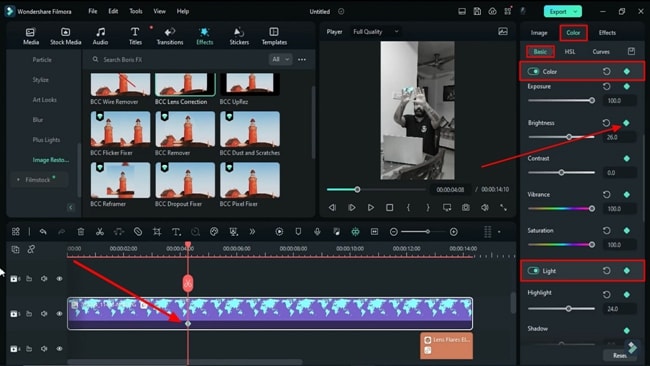
Next, go to the “Color,” click on the first keyframe, turn on keyframes for all sections, change “Temperature” to -100, “Exposure” to 100, “Brightness” to 26, “Vibrance” and “Saturation” to 100, and “Highlight” to 24. Then click on the 2nd keyframe. Change “Exposure” to 16.3, “Brightness” to 10.2, “Contrast” to 100, "Highlight" to 100, "Shadow" to 45.7, "White” to 44.2, "Black" to -100. Then change the matte “Blending Mode” to “Lighten.”
Now drop the danger sign PNG on track 6. You can download it from freepik.com. Place it on the top of the laptop screen cover and "Rotate" it by 7 degrees. Now go to the “Effect” and apply the “Lens Correction” effect. Go to the “Effects” setting, change “Correction” to 2.3, “Scale” X to 87.2, “Scale” Y to 84.2, “Vertical Perspective” to 3.8, “Horizontal Perspective” to 38.3, then change the signage “Blending Mode” to “Color Dodge.”
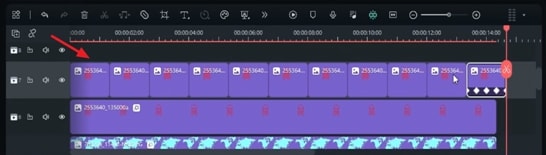
Drop this hazy danger icon PNG. We will use it to create a glow effect on danger signage. Place it on top of the danger signage. "Rotate" it by 7. Then, place the playhead at the starting point. Turn on the "Opacity" keyframe. Set "Opacity" at 50 and 10 frames forward. Again, set "Opacity" back to 100 and 10 frames forward. Repeat it for 1 second and 10 frames. Split the clip and duplicate it on the same track till the end.
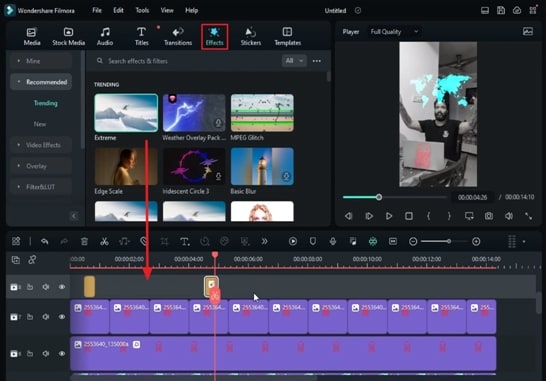
Now, to create a shake at the point of our motion. We will use this “Extreme” effect. Drop it just before the completion of the first action and keep it for 11 frames. Apply the same effect at a middle point to the next action keyframes. Keep it for 15 frames.
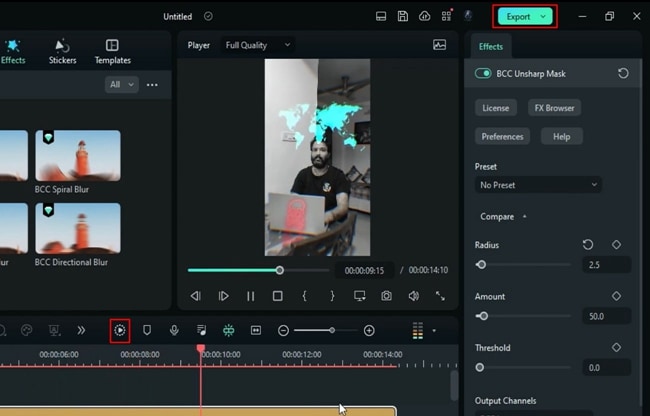
Now, to create a shadow of glow on the table, copy track 7 PNG and paste it on track 9. Flip it vertically and use a “Draw” mask to create a mask around the chair. Increase “Blur” and “Invert Mask.” Now duplicate on same track till end. Further, you can add the “BCC Prism” effect and “Unsharp Mask," depending on your clip.
Guide on Creating Holographic Effect in Filmora
What you need to prepare:
- A computer (Windows or macOS)
- Your video materials.
- Filmora video editor
Import Necessary Media
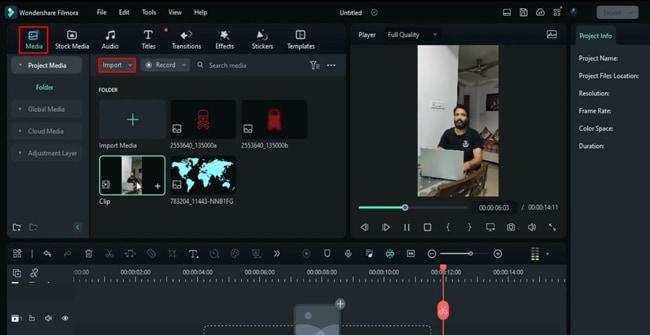
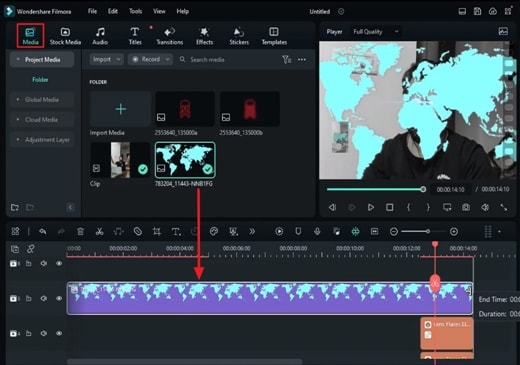
After launching, you need to import your video files into Wondershare Filmora. After creating a "New Project," go to the "Media" tab and then import your clip under the "Project Media" category. To create this effect, you need a video with specific hand movements and a PNG of the object you want as a hologram.
Add Visual Insights to Your Video
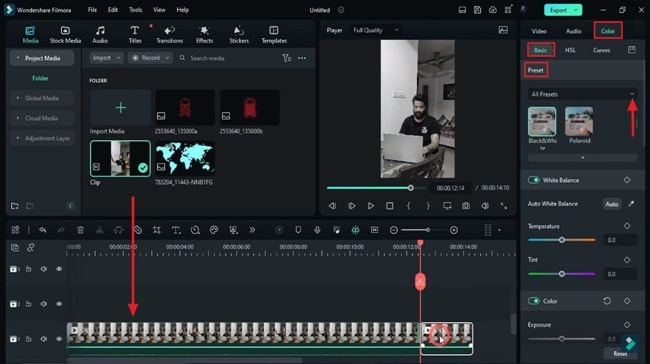
To add visuals, click on your clip in the "Media" panel and drag it to the timeline panel. After dropping the clip on the first track, click on it to open its “Settings” panel. From the "Color" tab, select a desired preset under the "Preset" section.
Split & Duplicate Video
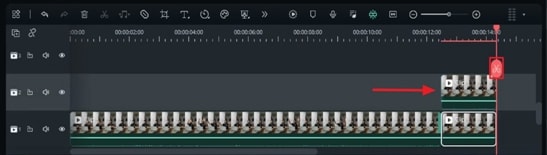
Go to the clip in the timeline track, place your playhead at the point you're looking toward the camera, and split it. To split a video, you just need to tap the "Click to Split" button on the playhead. Then, duplicate the split part on the track just above the split part in the first track.
Start Motion Tracking for Eyes
Tap the "Hide Track" button at the left for duplicated tracks as we're about to edit the clip in the first track. Afterward, under the "AI Tools" sub-tab in the "Video" tab, enable "Motion Tracking" for the main split clip in the first track.
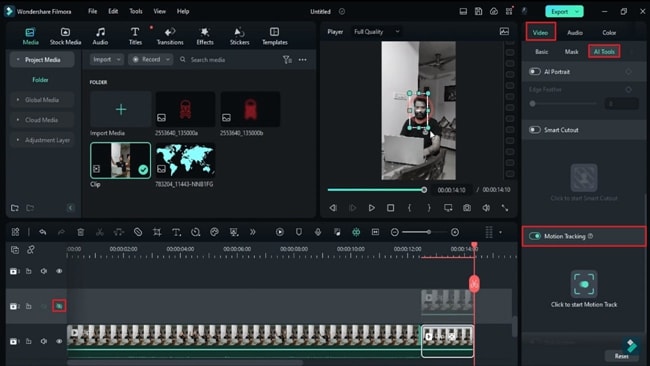
Go to the "Settings" icon at the bottom of the player and increase the "Zoom Level" of the video for detailed editing. After zooming in, cover one eye and click on "Click to Start Motion Track." Then, unhide the clip across the second track and repeat the same process on it for the second eye.
Add Laser Eyes Effect
Go to "Effects" in the custom toolbar and select the "AI Portrait" category under "Video Effects." There, you'll have to find a suitable effect and apply it to the duplicated clip in the second track.

Afterward, under the "Effects" tab on the right panel, adjust the settings under your effect's name section. There are options like "Radius," "Zoom End Node," "Alpha End Node," and more that will help in maintaining the diameter of laser eyes. Place your playhead at the start of this split clip and enable the "Radius" keyframe. Then, experiment with the "Radius" values and other options there.
Add and Adjust Lens Flare Sticker for Split Clip
You'll need more effort for a cinematic and high-quality laser-eye effect. Go to the "Sticker" tab on the custom toolbar, and under the "Lens Flares" category at left, choose a suitable sticker. Drag and drop this sticker on the track just above the duplicated clip. The effect will be visible on the preview screen, where you have to place it on your eyes.
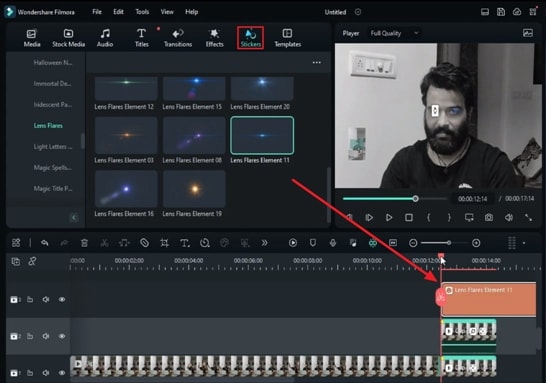
Following that, under the "Basic" settings sub-tab, change the "Blending Mode" and make changes in X and Y "Scale" to adjust the position of the sticker according to the eyes. Go to the very first split clip in the first track, tap on it, and under the "AI Tools" setting sub-tab, find the "Link Elements" section. Extend the "Link Elements" section from the left and choose "Lens Flare Element."
Drop World Map PNG and Adjust Settings
It is time to add and edit the world map hologram. First, go to "Media," and drag the map PNG to track the timeline and extend its duration. Increase the zoom level of the preview screen to make the hand visible.
Make the map smaller by changing its "Scale" value and "Position" to place it on the finger. Afterward, turn on the "Transform" keyframes, place the playhead a few frames forward in the timeframe, and change the map's "Position" again. Keep repeating this process until the finger reaches the top. At that point, increase the map's "Scale" level slightly to increase its size.
Adjust the Map at Points of Expansion
Now, move the playhead forward in the timeframe at a point where you're using both your hands to expand the map. Once you reach that point, turn on keyframes for "Transform." Move forward in the timeframe and place the playhead where your hands expand.
At that point, change the "Scale" level to enhance the map's size. Alter the zoom level of the preview screen to the original so that you can adjust the map's position in the middle of the screen. Make changes in "Position" values to do so.
Apply and Adjust Effect on Map
To enhance the perspective of the map on the screen, go to "Effects" and add a suitable effect on the map PNG clip in the timeline. Afterward, go to the "Effects" setting on the right panel and change "Correction." Turn on keyframes for "Horizontal Perspective" and "Correction." Make alterations in the value of the X and Y scale as well.
In the track having the map PNG, click on the first keyframe, which is the starting point of map expansion, and make color adjustments. Go to the "Color" tab in the side panel and turn on keyframes for all sections under the "Basic" settings. Make changes in the values of the given options accordingly.
Add Danger Sign PNG
Head towards your “Media” section again and drop a danger sign PNG on the timeline track. Adjust the duration of this PNG equal to other clips and bring it on your laptop cover in the clip. To adjust it, you’ll be making changes to its “Position,” “Rotate,” and “Scale” according to your object.
Drop an effect on this danger sign PNG track and change in the "Effects" settings from the right side panel. You can change its "Blending Mode" for better results.
Add Glow Effect to Danger Sign
Add and drop the hazy danger icon PNG on the track above the danger sign PNG to make a glow effect. Go to “Image” settings and change the values of “Scale,” “Position,” and “Rotate.” Then, place the playhead at the start of this glow effect track and turn on keyframes for “Opacity.”
Place the playhead at different points and keep changing the opacity value (high and low). Repeat this for some time, split, and delete the rest of the clip. Then, duplicate the edited clip until the end.
Create a Shake at the Point of Motion
For this, go to the "Effects" tab, choose the "Extreme" effect, and drop it to the timeline track. Drop it just before the completion of 1st action point in the video and increase its duration accordingly. Similarly, duplicate this effect at other points of action in the video, i.e., starting and ending points of expansion. Keep the duration the same for all.
Add a Shadow of Glow on the Table
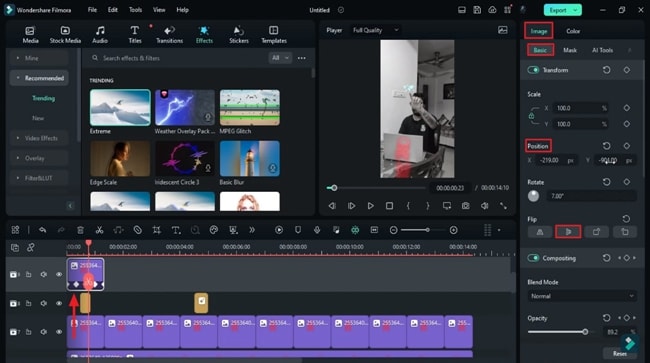
Add a shadow of a glow sign on the table for a more convincing and realistic outlook. For this, copy the image imported with the danger sign and paste it on another track. Flip it vertically under the "Flip" section from the "Image" settings.
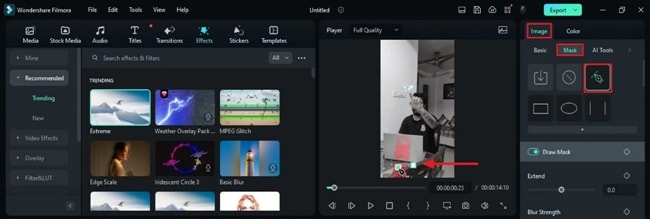
Then go to the "Mask" sub-tab, choose the Pen Tool, and draw a mask around the object where the shadow will be shown (that, in this case, is a chair). Increase the value of "Blur" and enable the "Invert Mask" option. Duplicate the track 9 effect till the end of its length. Further, you can add more effects and adjust their values depending on your clip.
See the Preview & Export the Final Video
After all this is done, go to the Preview screen and click the "Play" icon to see the final clip. If the outcome is as you imagined, click the "Export" button to end the process.
After reading the steps, you know how to enhance your videos through holographic effects. The map effect can especially be used in your travel-related videos. Moreover, you can achieve your favorite superheroes' resemblance through it. Follow this guide, and you can make such videos in minutes.


