Transcript
In this video, we will teach you how to create burst ball animation in Wondershare Filmora. First, drop your background footage on track 1. Next, add 12 more video tracks in "Track Manager." Here are some VFX packs that you can download from "Filmstock."
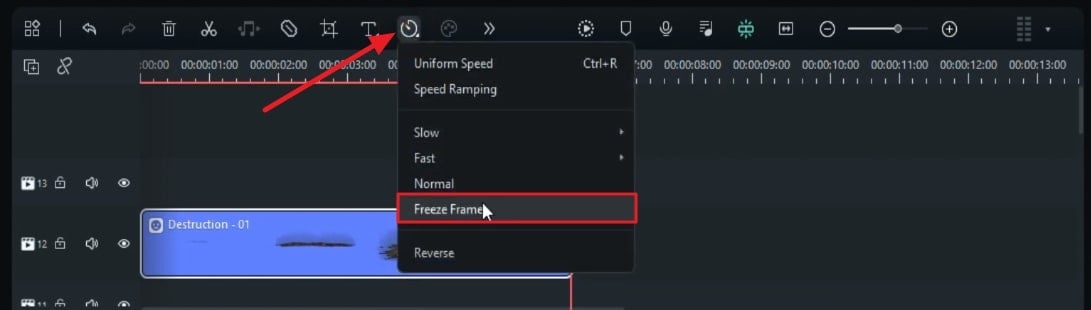
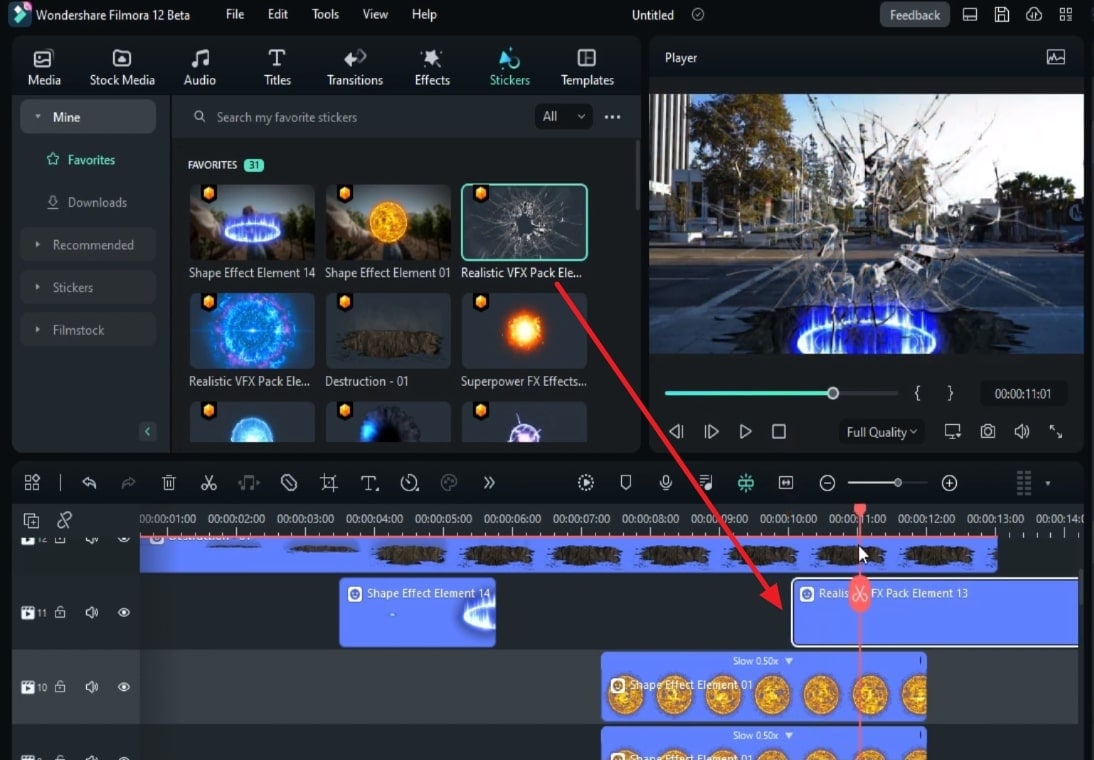
Now, go to the “Stickers,” drop the “Destruction” clip on track 12; stop at 4 seconds. Change the “Scale” to 85, align its position using the Y axis, then change “Blending Mode” to “Overlay.” Now, you can see the clip is perfectly blended with our background. Go to the last frame and add a “Freeze Frame,” then match the freeze frame duration to the background clip.
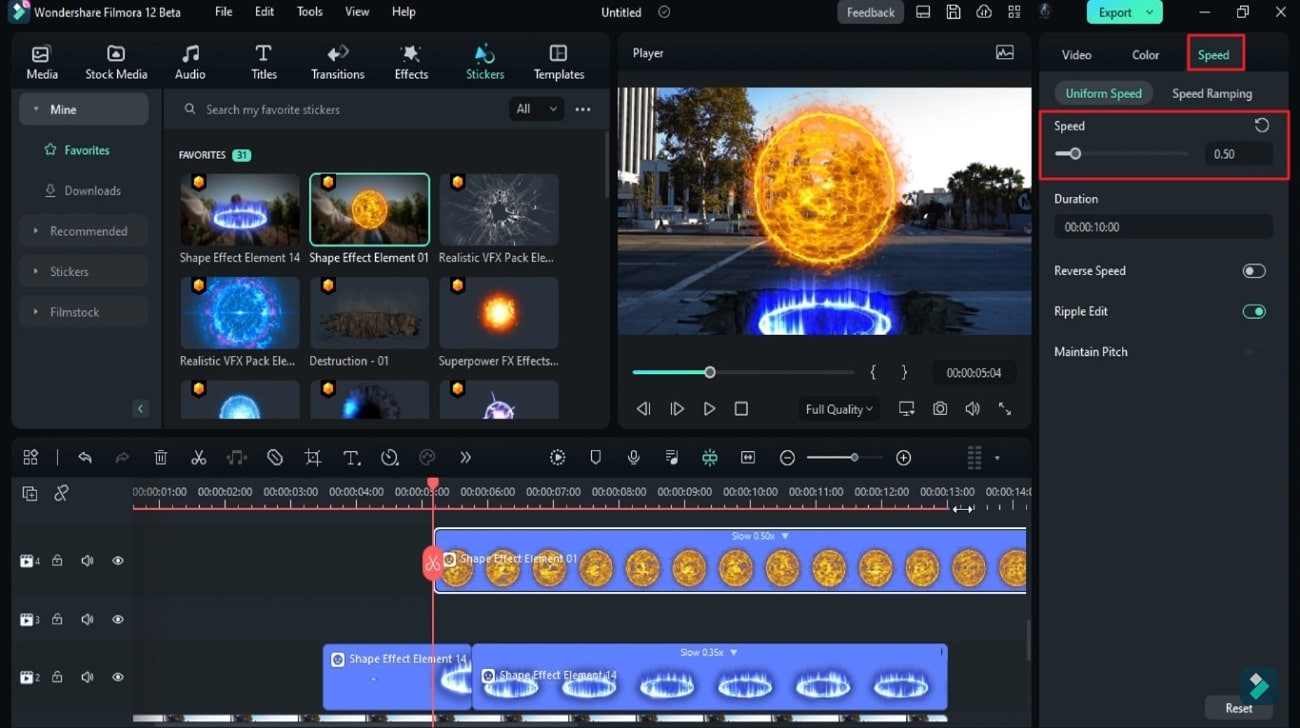
Drop “Shape Effect Element 14” on track 2 at 3 seconds and 12th frame. Place the playhead at 5 seconds and the 19th frame. Change the scale to 50, move it right under "Destruction," and split it at this point. Go to the "Speed" and change the speed "Duration" to 07 seconds and 18 frames. Match the “Duration” to the background clip. Copy the first part of the shape clip and paste it on track 11.
Create a keyframe in 5 seconds, turn on "Opacity," and change "Opacity" to 0 in the last frame. Next, drop the "Fireball" footage on track 4 at 0.5 seconds and 4th frame. Change "Scale" to 85, and change the Y value to 22. Then, reduce the "Speed" of the clip to 0.5x. Split the clip at 7 seconds and 7th frame and delete the part after 12 seconds.
Now, let's create a "Growing" effect for the fireball. Turn on the "Transform" keyframe at the start frame. Change "Scale" to 14 and change the Y value to negative 164. Then, after 1 second, change "Scale" to 85 and Y to 22. By this, it will create an impression that a fireball is coming out of the portal.
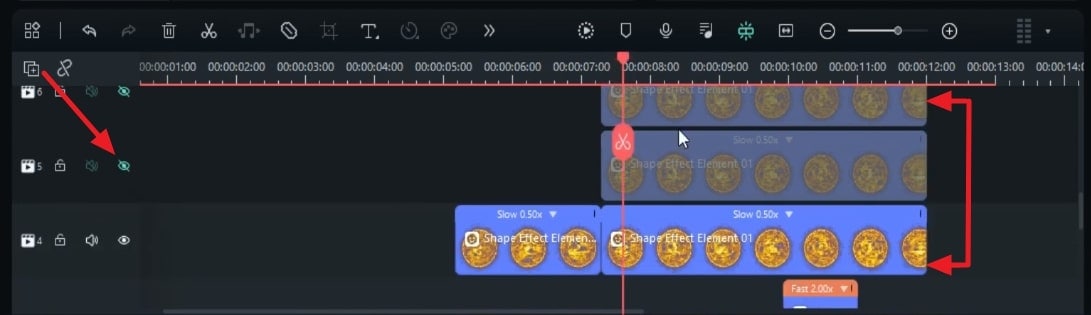
Drop the “Blur Shockwave Blast” clip on track 3 at 9 seconds and 23 frames. Change “Speed” to 2x and keep it for 1 second. Select the second part fireball, copy it, and paste it above from track 7 to track 9. Hide all the duplicate fireball clips.
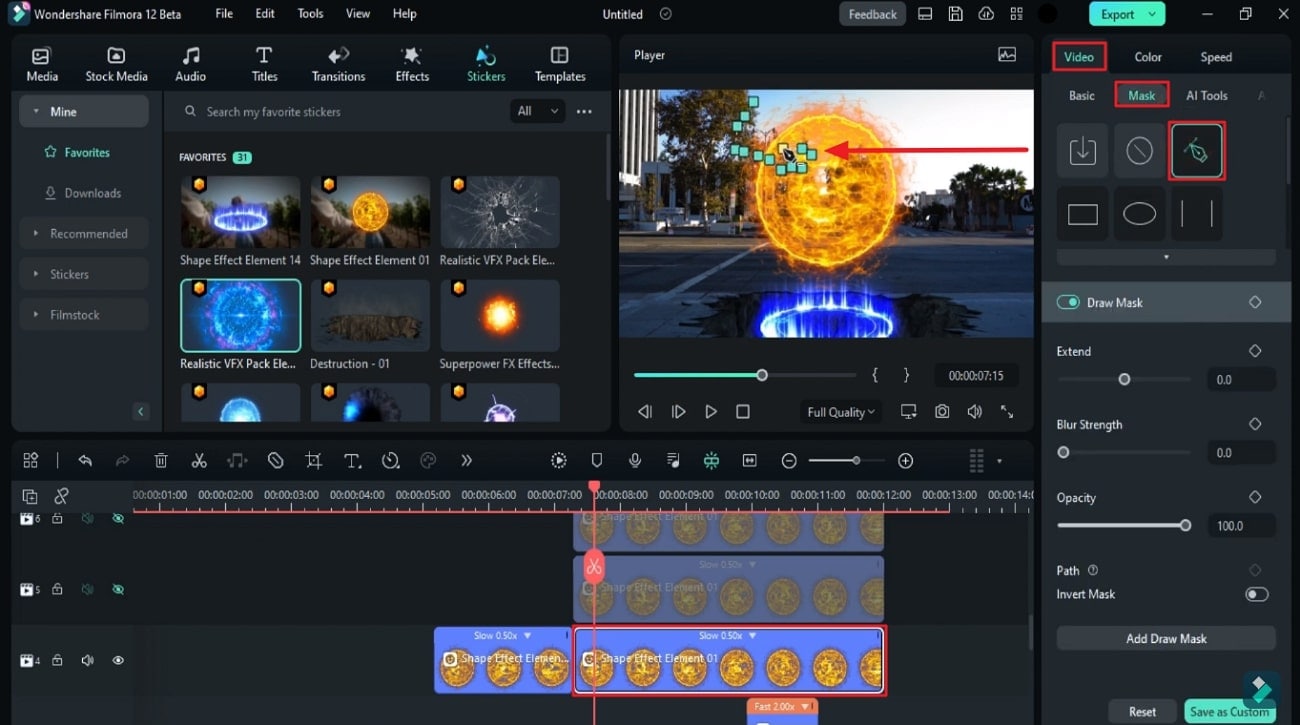
Select the original clip; go to the "Video," "Mask," and select "Draw Mask" to create a shape like this. Now unhide track 5 and change the "Zoom Level" to 50. Select track 5 clip and create another piece of shape next to the piece we created. Adjust the mask to hide any uncovered parts. Then unhide track 6 and create another piece shape mask. Do the same with the rest part of the fireball. Use around 15 to 20 fireball clips to create small pieces. You can use Track 10 for more masking.
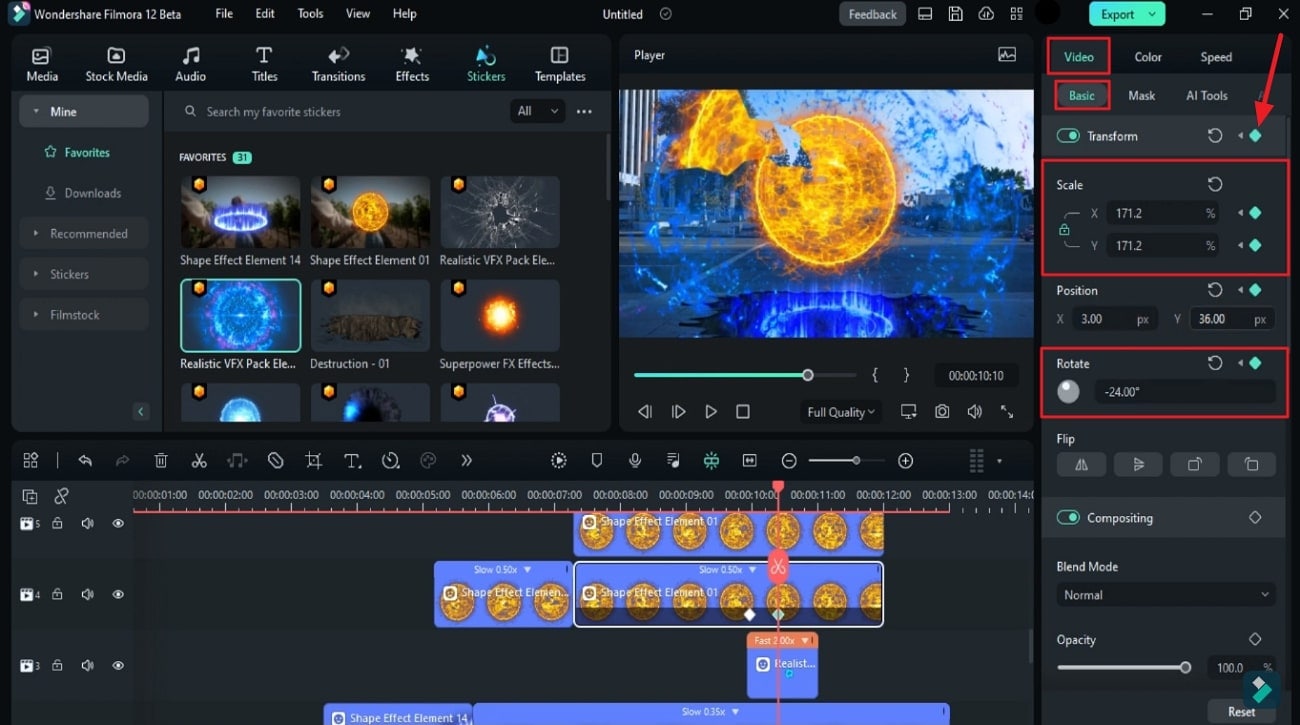
Once you're done with masking, change the zoom level to fit. Now turn on the “Transform” keyframe on all the fireball clips at 9 seconds and the 24th frame. Go 10 frames forward and start increasing "Scale" randomly. Add "Rotation" to the piece and adjust the "Position." Just imagine how fire shattered after a blast and created accordingly.
Select track 5 fireball and increase the "Scale," and give "Rotation." Do the same with the rest of the fireball clip. Then, go 10 frames forward, and, at this point, take all the parts out of the screen by using "Scale" and "Position." Also, add a bit more "Rotation" at this point to all the pieces.
Now, we will do some effects. Stop at 10 seconds; add this "Glass Shatter" clip on track 11. Check where this effect is getting over, split it, and create a "Freeze Frame" at that point and keep this clip till 13 seconds. Now, we will add some lightning to it. Stop where Fireball is out of the portal. Here, we drop the "Electricity" animation on track 13. It will create a kind of electric waves coming out from the Fireball.; adjust its "Duration" accordingly.
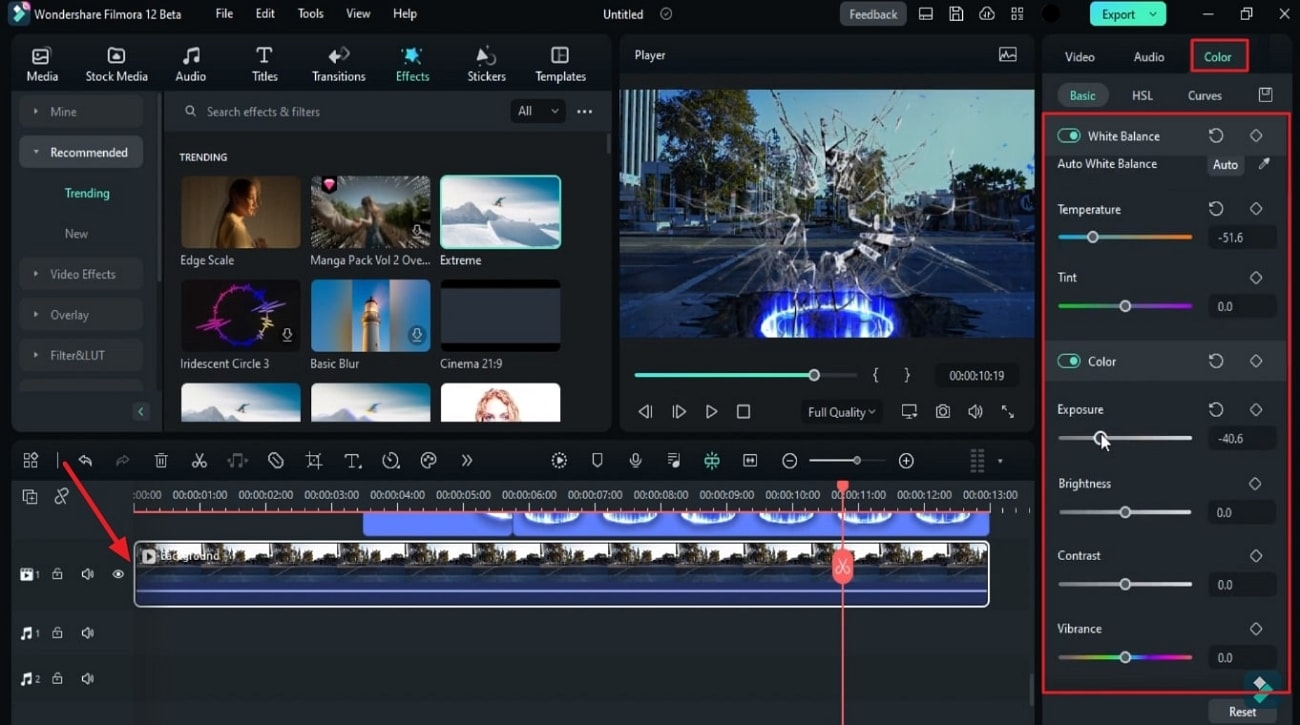
Finally, add some "Shake" effect for destruction and burst. Go to the "Effect" and drop the "Extreme" effect on track 14 at the 7th frame. Keep it till the destruction is completed. Duplicate it at a time of burst on the same track and keep it around 19 frames long. Now, let's change the color of the background video and make it more intense in blue color. Let's see the final preview.
Guide to Add a Burst Ball Effect Using Wondershare Filmora
What you need to prepare:
- A computer (Windows or macOS)
- Your video materials.
- Filmora video editor
Drag and Drop Your Video Clip on Timeline Track
Open Wondershare software, locate, and select the option to import your media files. After that, you'll find your video clip in the imported media files. Click and drag the video clip to the first track of the timeline.
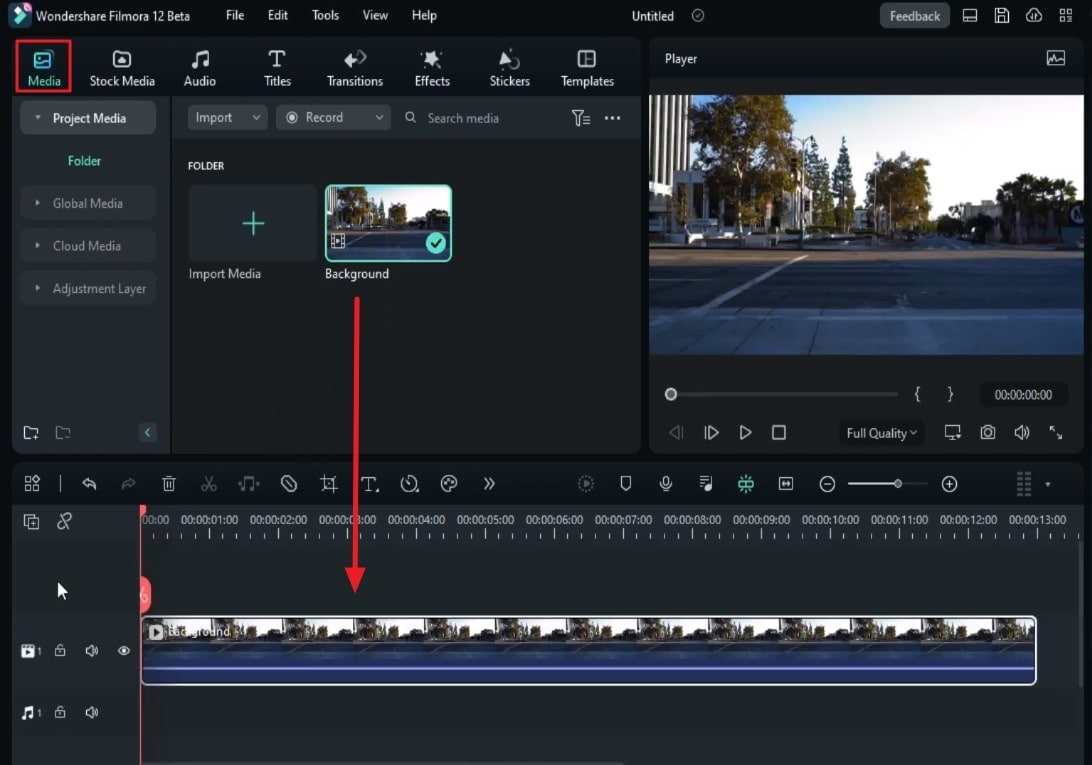
Manage Tracks and Add Video Tracks
Click the “Manage tracks” icon in the timeline's left corner. Select “Open Track Manager” from the options. In a new pop-up window, enter the number of additional video tracks you want to add.

Add and Adjust a Destruction Sticker and Freeze the Clip
Go to the "Stickers" section in the custom toolbar, search for destruction stickers, and select the one you prefer. Drag and drop the destruction sticker to the last track of your project. Move the playhead to some seconds further in the timeline. Adjust the "Scale" of the destruction sticker according to your preference. Go to the "Blend Mode" options, and from the drop-down menu, select an option accordingly.
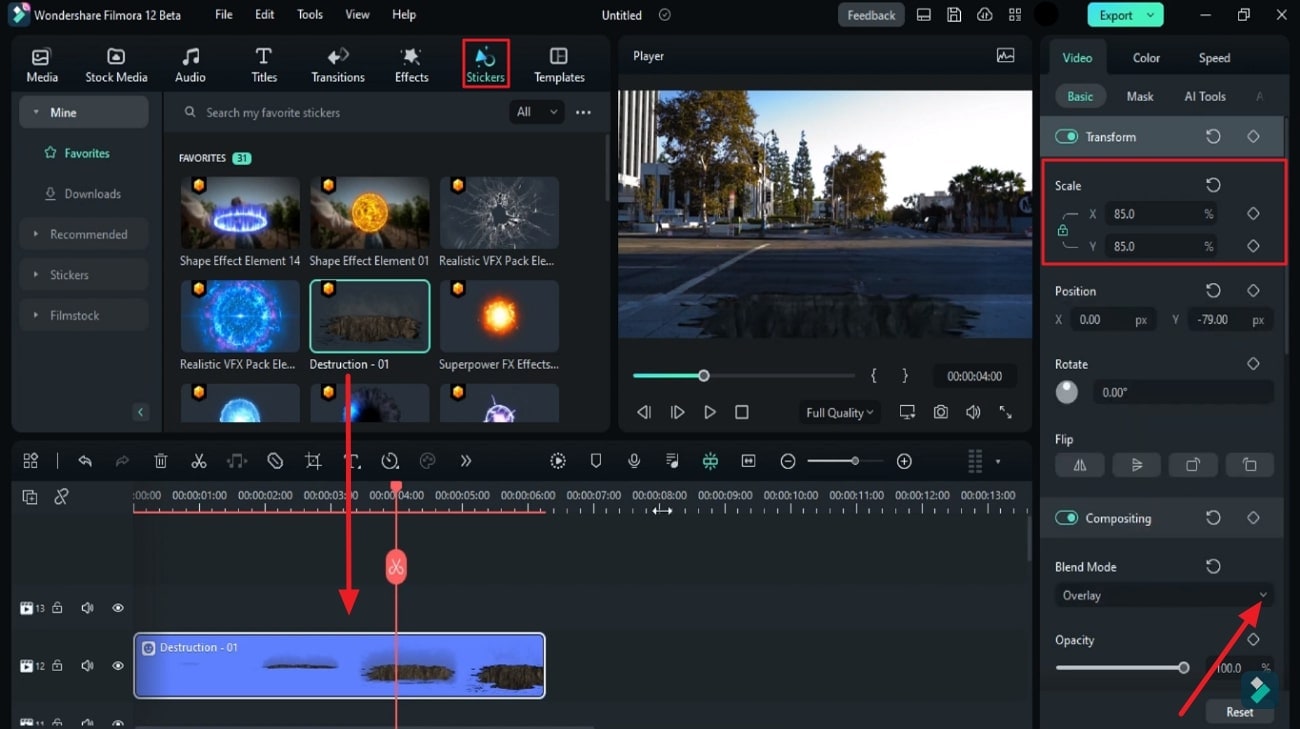
From the timeline toolbar, select “Freeze Frame” to add a freeze frame at the current position of the playhead. Adjust the sticker duration to match the original video clip duration.
Add and Adjust the Portal Stickers
From the "Stickers" menu, select a portal sticker and drop it to track above the main clip. Ensure that the sticker layer is placed a few frames from your original clip. Place the playhead at the center of your newly imported sticker. Split the sticker layer using the "Scissor" icon in the software. Adjust the "Scale" and "Position" of the other half of the sticker as desired.
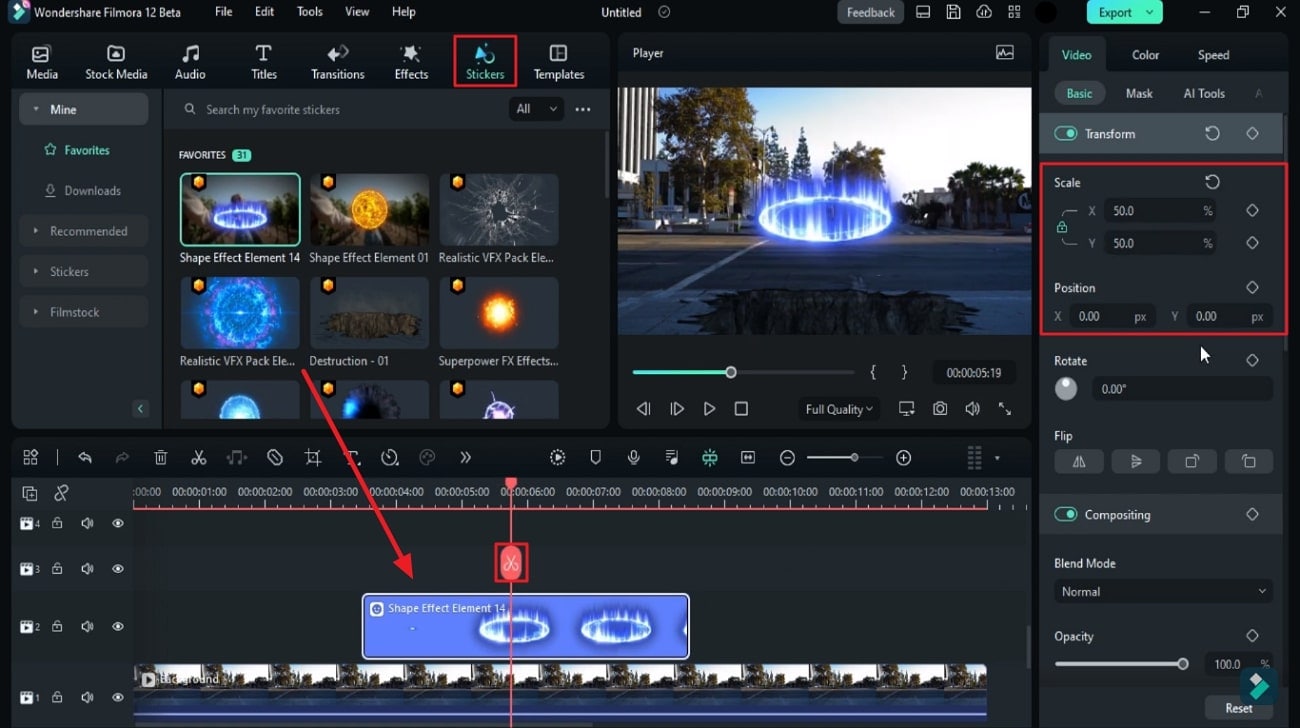
Optionally, change the "Speed" of the sticker layer from the "Speed" tab at the right-side panel. Drag the second half layer of the sticker and match its duration to the duration of your original clip. Keep changing the position of the playhead on this track and alter the values of "Scale" and "Position." This will show that the fireball is coming out of the portal. You can add additional effects from "Stickers" to make the fireball appearance more realistic.
Duplicate the Destruction Clip on other Tracks
Afterward, copy the second half portion of the sticker clip and paste it into the right tracks. Make sure the sticker layer is pasted a few frames further right to the original clip to align the duration. After duplicating the fireball clip, hide all of them from the left side of the timeline.
Draw a Mask for the Original Fireball Clip
To create a mask for a fireball, select the clip, go to the "Mask" sub-tab, and select "Draw Mask," which looks like a pen tool to create a mask around the fireball manually. Unhide the track above the original fireball track, "Zoom in to Fit Timeline," and draw a mask for it accordingly. Repeat the similar procedure for other duplicated fireball tracks as well. Once the masking process is completed, you can set the original zoom level back.
Add Transform Keyframes
Turn on “Transform” keyframes for all the fireball clips at the same time frame with the help of playhead. Place the playhead a bit further and start increasing the "Scale" value gradually. This step will add a spreading effect to the fire of the fireball. Repeat this process for all tracks, but make sure the "Position" and "Rotate" value of the next track is slightly higher than the other.
Move the Fireball Clips Out of the Screen by Adding Effects
Go a few frames forward in the timeline and use “Scale” and “Position” to move all the parts of the fireball out of the screen. Add a bit more rotation to all the pieces at this point. Meanwhile, add some additional effects in the clip at the last track at some time duration. Split the clip where the effect ends and create a “Freeze Frame” at that point and keep it for some time.
After that, drop another animation on the last track where the fireball is out of the portal. Adjust its duration as needed to create electric waves coming out from the fireball.
Add Final Effect to The Project
Furthermore, go to the "Effects" library, find the "Extreme" effect, and drop the "Extreme" effect on the timeline track where the fireball is out of the clip. This is to give the final touches to the video.

Change the Color and Finalize the Video
As some final adjustments, continue to adjust the colors of the background video to make it more intense in blue color. For this, select the 1st clip, and from the "Color" tab, make adjustments to enhance the colors of your clip. After that, see the preview of your video, move toward the "Export" button, and finalize your video.
Nobody wants to see content that is dull or similar to the others. Make your video content unique by creating a sci-fi burst ball effect just like a Hollywood movie. With this effect, you can create a feel just like a superhero movie. This effect will make your videos look supernatural but in a good way.


