Transcript
In this video, we will show you how to create this cloud-hanging overhead effect in Wondershare Filmora. First, drop your clip on track 1, change "Frame Rate" to 50 fps, and click on "Fit Clip to Timeline." You can download these different clouds' PNGs from pngwing.com for free. Also, download this "Blockbuster Pack" from "Filmstock" to create this effect.
Now, drop the cloud PNG on track 2, change "Scale" to 159, and adjust its "Position." Then drop this cloud PNG on track 3 and make it 6 seconds long. Add a "Position" keyframe, set X at -172 and Y at -9. Then, change the X value to -51 at the end.
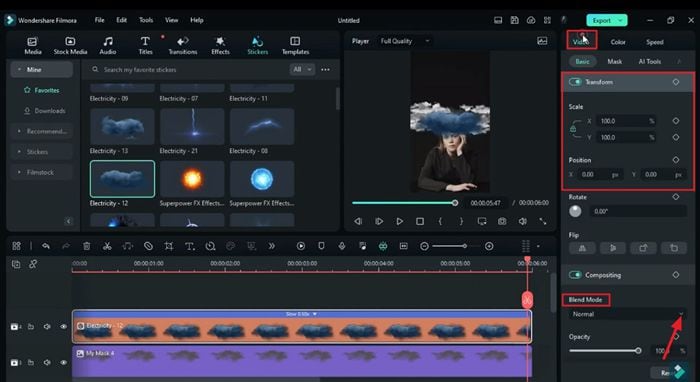
Now, go to the "Stickers" and drop "Electricity 12" on track 4. Change "Speed" to 0.5x and make it 6 seconds long. Then, change "Scale" to 85; move it to the left of the cloud. Change "Blending Mode" to "Lighten." Go to "Color" and change the "Exposure" value to 72, "Brightness" to -20, "Vibrance" and "Saturation" to -100.
Then drop "Electricity 8" at 1 second and 44 frames on track 5. Change X value to -100, Y to 36. Again, drop the Electricity 21 effect at 3 seconds and the 25th frame on track 5. Unlock the "Scale," set the X value at 101.2 and Y at 187, and adjust its "Position," it will create a light and striking effect. Change "Blending Mode" to "Screen."
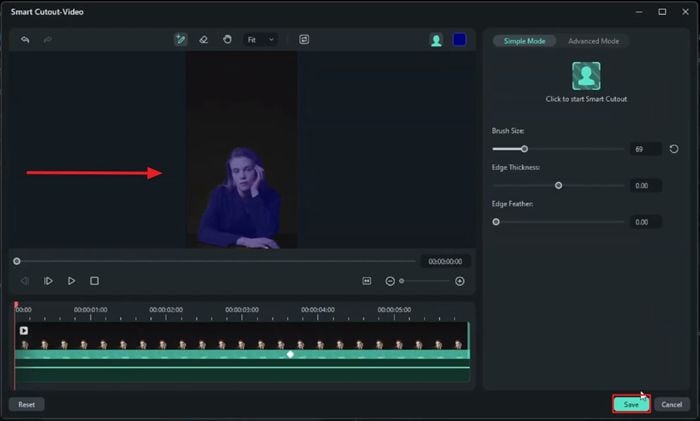
Then drop the same clip on track 6, go to "AI tools," and use the Smart Cut tool to cover the subject; then, you can see the cloud behind the subject.
Now drop another cloud PNG on track 7, reduce "Scale" to 57, and set its position. Duplicate the "Electricity 21" effect on track 8, split it at 3 seconds and the 25th frame. Select the second part, go to the "Mask," and select "Linear" Mask.
Rotate it by 90 degrees and change the Y value to -306. Turn on "Invert Mask," then select Smart Cutout clip on track 6, go to the mask, select "Linear" Mask, and rotate it by 90 degrees. Set Y at -736 and "Invert Mask."
Now check whether light and strike are behind the hand or not, and make some adjustments if needed. Then drop dark cloud PNG on track 9, and change "Scale" to 52. Now, we will make it travel from the left to the middle at a slow speed. Add a "Position" keyframe at the beginning and set the X to -631 and Y to 179. Add another keyframe at the end and set X to 191.
Drop another cloud on track 10, change "Scale" to 58.5, X position to -400, and Y to -72 at the beginning. Then, at the end, change the X value to -331. Just add a slight movement of the cloud, then again drop another cloud PNG. Set its "Position," again drop the gray cloud PNG, and adjust its "Position."
Go to the "Stickers" and apply "Electricity 11" on track 13. Change duration to 6 seconds, change "Blending Mode" to Lighten, and then adjust the color values to make it a slightly darkish cloud. Next, drop "Electricity 13" on track 14, make it 6 seconds long, and then set the X position at 231 and do some color adjustments.
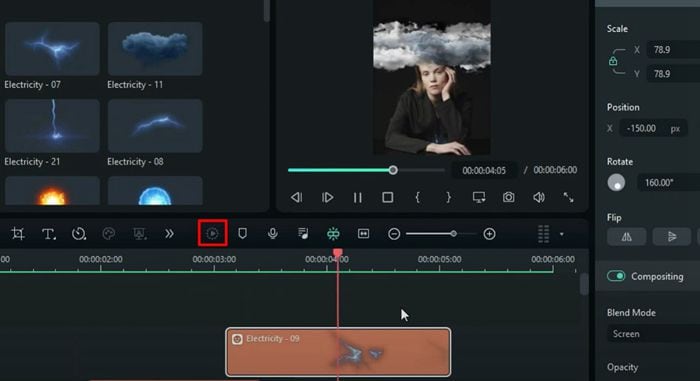
Last, drop the "Electricity 7" effect at 1 second and the 44th frame on track 15. Change "Blending Mode" to "Screen," "Position" X to 249, Y to 13. Then go forward at 3 seconds and the 5th frame and drop the Electricity 9 effect on track 16. Change "Blending Mode" to screen and set "Scale" at 78.9, "Position" X to -150 and rotate it by 160 degrees.
Now render it to see the final preview. If you're interested in more creative editing, check out filmora.wondershare.com.
Steps to Create a Cloud Hanging Effect in Wondershare Filmora
What you need to prepare:
- A computer (Windows or macOS)
- Your video materials.
- Filmora video editor
Import Media Files and Adjust Project Settings
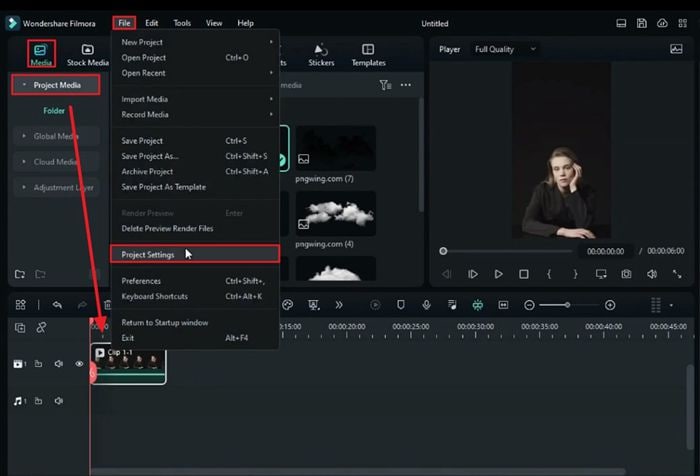
Access the "New Project" option in the main interface of Filmora to begin your video project. Import your clip and cloud PNG files into the "Project Media" section. Drop your clip into the timeline track and navigate to the "File" tab, locate and select "Project Settings." In the window that appears, choose the desired "Frame Rate" from the drop-down menu and click "OK."
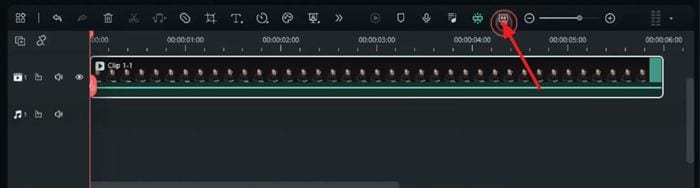
Ensure Proper Zoom Level
Make sure the zoom level is set to "Fit" for the video clip. If not, click the clip in the timeline, go to the timeline toolbar settings in the preview screen, and click on the "Zoom to Fit Timeline" icon.
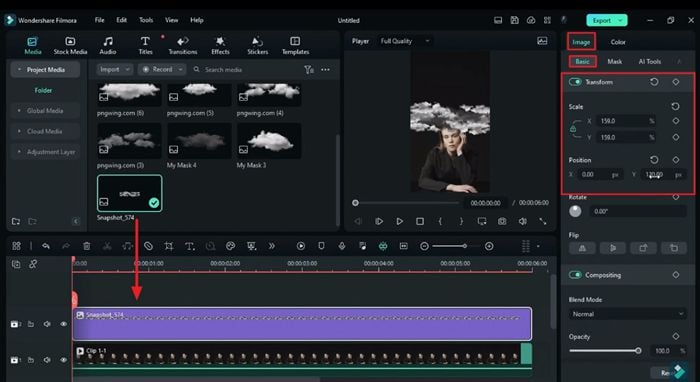
Adjust and Customize Cloud PNG Files
After that, place your cloud PNG on a suitable track in the timeline and adjust the "Scale" and "Position" of the PNG file using the right-side adjustment panel. Then, move the playhead and match the duration of the PNG file with the main clip. Drop a new PNG file and adjust similar parameters with keyframing. Adjust the playhead and modify the position keyframe to create the desired animation effect.
Add and Adjust Electricity Stickers
Click "Stickers" from the top toolbar of the main editing window, choose an electricity sticker, and place it on the next available track. Meanwhile, match the sticker's length with the clip and adjust the sticker's "Speed" using the slider from the adjustment panel.
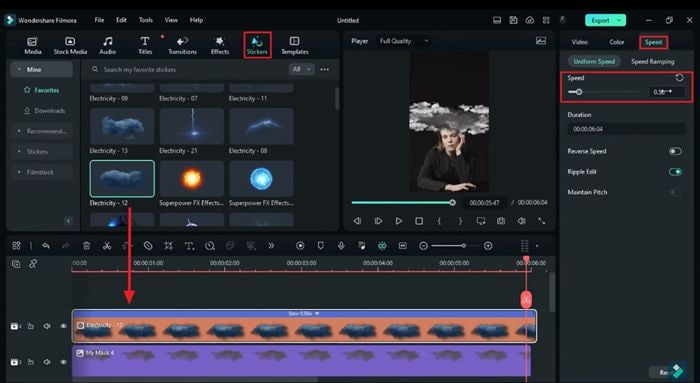
Go to “Video,” access "Basic" to adjust the "Scale" and "Position" of the sticker, and change the "Blend Mode" if needed. Make additional adjustments like "Exposure," "Brightness," or "Contrast" for the following sticker layers if required. Add more electricity stickers on different layers and adjust them accordingly.
Add Original Video Clip for Smart Cutout
Bring the original video clip from the "Project Media." Drop it on timeline tracks based on availability and look for "AI Tools" in the right-side adjustment panel. Select "Smart Cutout" and click "Click to start Smart Cutout." Following that, use the AI tool to cover the subject and click "Save" once done.
Add Clouds and Lightning in the Background
Drop different cloud PNG files and lightning stickers on further tracks to appear in the background of the subject. Drop the electricity sticker at different durations so that you can get closer to the lightning effect.
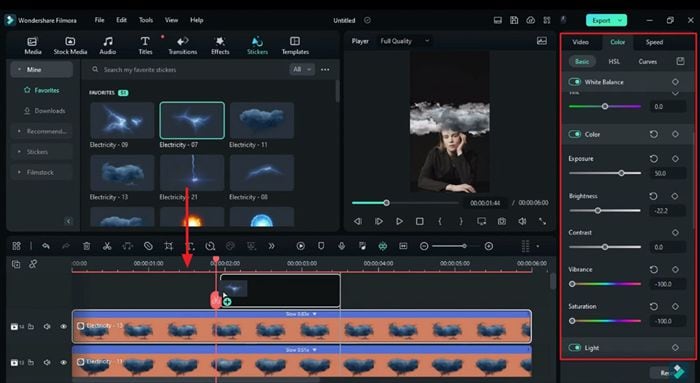
Furthermore, do color correction and set position values for these stickers and cloud PNG files to match the tone of your video clip. Once done, press "Enter" to render the video. Review your video in the Preview Screen and save it once you're satisfied with the result.
This guide has helped you learn how to create a cloud-hanging effect using Wondershare Filmora. Everything you need to create this effect, such as cloud images and stickers, is offered by Filmora. Moreover, this guide also helped you to color adjust multiple layers to fit the color tone of your entire video footage.


