Transcript
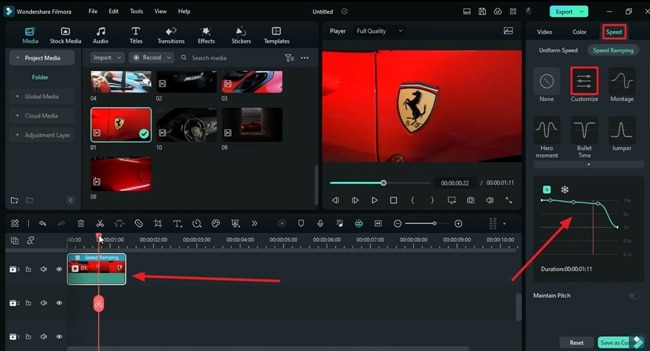
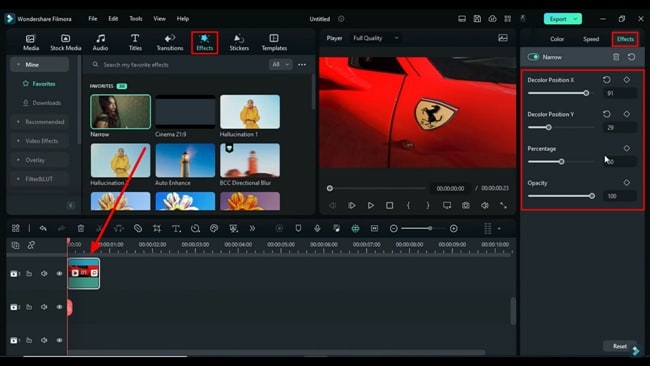
In this video, we will create an intro-like movie in Wondershare Filmora. First, drop your first clip on track 3. Go to the "Speed Ramping," choose custom, and create a fast speed ramp, keep it for 23 frames. Go to the "Effects" and search for "Narrow" effect. Apply it to your clip. Go to the "Effects" setting, change "X" to 91, "Y" to 29, and "Percentage" to 100. Turn on the keyframe, and change "Percentage" to zero in 3 frames forward.
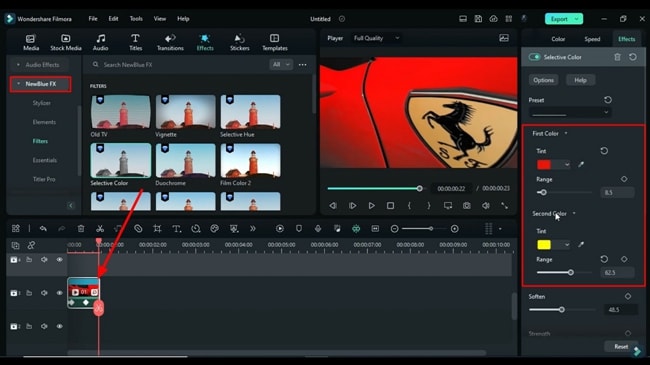
Then, add a blank keyframe at the 13th frame. Change "Percentage" to 100 at the 22nd frame. Then go to the "Blue FX" effect and apply the "Selective Color" effect. Unfold the "Second Color" option, change "Range" to 62.5, and then go to the "First Color" section. Change "Tint" to red and change "Range" to a 100. Turn on the keyframe at the start point, then set the range to zero at the 12th frame. So, now we have only the Ferrari logo in color.
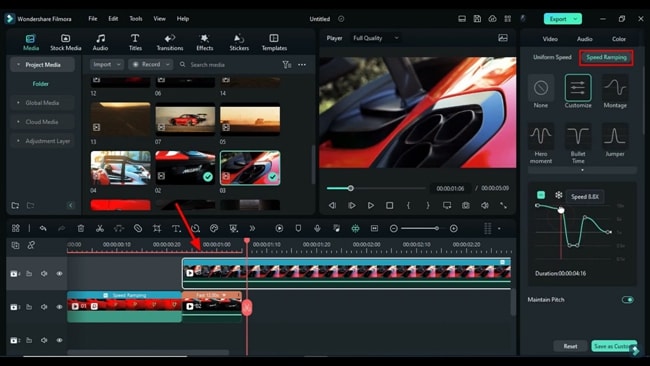
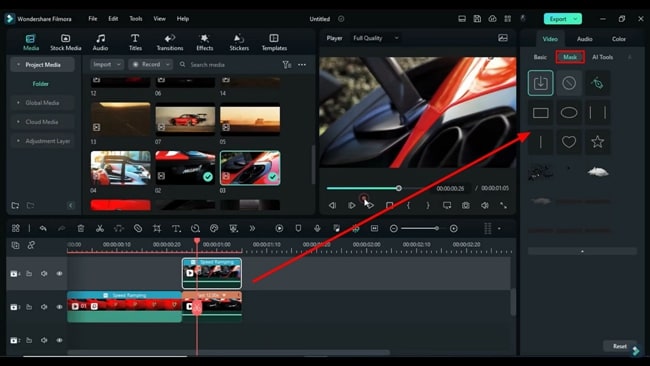
Then drop the second clip on the same track. Change "Speed" to 12x. Adjust the clip position and keep the part you need. Drop the third clip on track 4, and do some "Speed Ramping" accordingly. Then, split at one second and 5th frame. Go to the "Mask" and import paper rip PNG as a mask, which you can download from freepik.com. Select imported PNG as a mask, and adjust the mask position. Go to the "Video" and adjust the clip "Position."
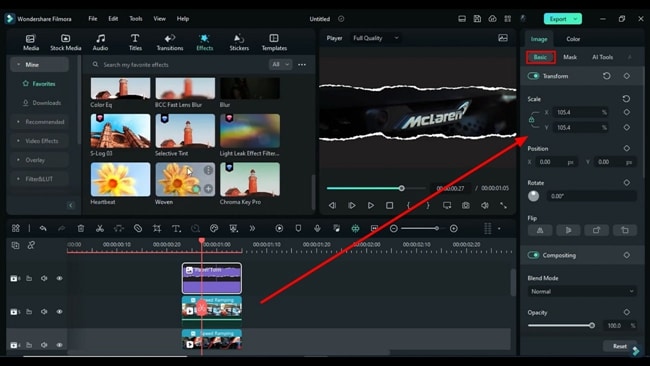
Drop the 4th clip on track 5, do the same, and apply the upper paper rip PNG as a mask. Adjust mask and clip "Position". Drop the original PNG on track 6. Adjust its "Scale" to fit in the screen. Go to "Effect" and apply "Chroma Key Pro." Go to the setting, and under "Chroma Key," select a color from PNG. Now, you can see we have created a paper-rip split screen.
Drop the next clip at track 3, do some "Speed Ramping" accordingly, then split the clip at one second and the 18th frame. Drop the next clip at track 3, "Scale" it up, do some "Speed Ramping," and split the clip at 2 seconds. Then, go to the "Transitions," apply "Cinematic Travel Vlog," and keep it for 8 frames. Then drop the next clip on track 3, again do "Speed Ramping," and modify the "Montage" speed ramp effect. Split the clip at 2 seconds in the 22nd frame. Increase the “Scale” and adjust the “Position.”
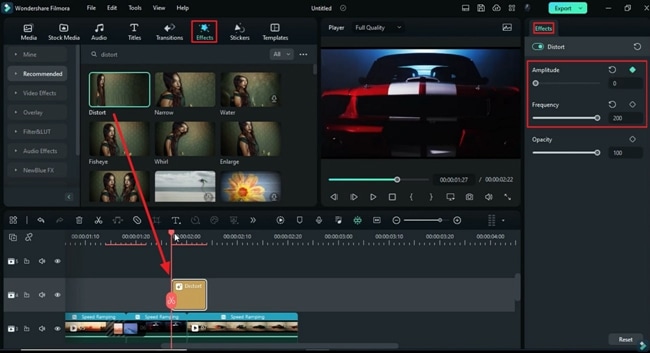
Then go to the "Effects" and search for the "Distort" effect, and apply it on track 4. Place the Playhead at 1 second and 27th frame and drop the effect to this point. Split the effect at 2 seconds and 4th frame. Change "Frequency" to 200 at the start of the effect, "Amplitude" to 0, and turn on the keyframe for "Amplitude." Change "Amplitude" to 200 and 3 frames forward. Last, change "Amplitude" to 0 and 3 frames forward.
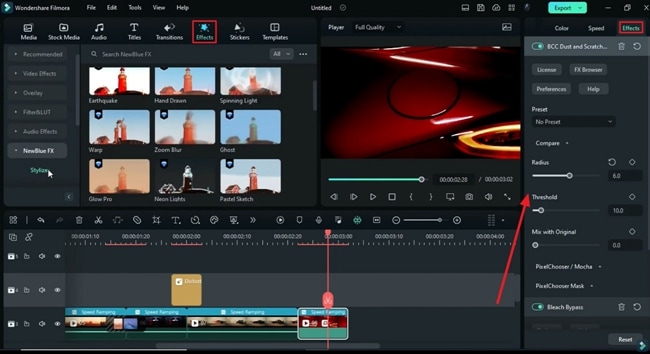
Next, apply the next clip at track 3. Choose “Hero Moment” for “Speed Ramping” and modify it. Then, split the clip at three seconds and 2nd frame. Go to the "Effects," find "NewBlue FX," and apply the "Bleach Bypass" effect, which helps create a cinematic highlight effect, as you can see in the clip. Change "Light Curve" to 90.6. Then go to "Boris FX" and apply "BCC Dust and Scratches" effects. Change "Radius" to 6. It will help to remove extra light.
Then apply "Motion Blur" on track 4 here, and keep the effect for 4 frames. Change "Blur" to 0 and turn on the keyframe at the starting point. Change "Blur" to 100 after 2 frames and change "Blur" to 0 after 2 frames. Drop the next clip on track 3 here; you can try different options for "Speed Ramping." Then, split the clip at three seconds and the 19th frame. Go to the "Mask" and use the pen tool to create a paper rip mask.
Duplicate it on "Track 4," "Invert Mask," select a duplicate clip, go to the "Basic," and turn on "Transform" keyframes. Shift to the left upper corner, and do the same with the original clip on track 3. Then, rest the "Position" keyframes to default after a few frames. Then drop any previous clip on track 2. Increase "Speed" if you want to, adjust its "Position," and keep it for a few frames. Increase the duration of the duplicate clip to 5 frames, split it, and remove the mask.
Next, apply the "BCC Cartoon Look" effect under the "Effects" setting, turn on the "Line Threshold" keyframe, and set it at 100. At the end, set it at -200. Then, drop the next clip on track 3, just under the split clip, go to the "Speed," and change "Speed" to 11x. Keep it till 4 seconds and 2nd frame. Apply the "BCC Cartoon Look" effect. Turn on the "Line Threshold" keyframe and set it at -200 at the start of the clip. After 15 to 18 frames, set it at -31. It will create a dark cinematic effect.
Then apply the next clip on track 3 and change "Scale" to 120. Turn on the "Position" keyframe. Then, split the clip at 4 seconds and the 17th frame and set "X" to -124. Then, turn on the transition keyframe at 4 seconds and the 10th frame. Then, create a zoom-in effect on the camera lens one frame before the end and adjust its "Position." Then lock at 4 seconds and 10th frame.
Go to the "Mask," select "Circle," change the "Width" to 30, and "Invert Mask." Adjust its "Position" on the lens. Turn on the "Blur" keyframe and increase "Blur" to 100%. Then, change "Blur Strength" to 0 in 1 frame before the end.
Drop the next clip on track 2 at the first keyframe. Increase "Scale," then do speed ramping. Split the clip at 5 seconds and 6th frame. Under the "Boris FX" effect, apply the "BCC Net" effect. Go to the "Effects" setting, expand "Blur," and change X to 0 and "Opacity" to 0. Then expand "Color Correct," turn on the "Hue" keyframe, and set the "Hue" at -360. Set the "Hue" to 360 after 12 frames.
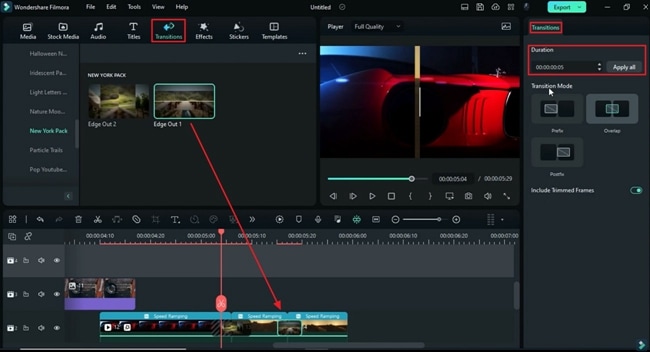
Apply the next two clips and do the speed ramping. The first clip should be 11 frames long, and the second clip should be 12 frames long. Go to the "Transition" under "New York Pack," apply "Edge Out 2" on these two clips and keep it for 8 frames. Then apply "Edge Out 1" on these clips and keep it for 5 frames. Apply lens clip on track 4. Change "Speed" to 25x, keep it till 6 seconds and 6th frame. /p>
Then apply these text initials Snapshot; you can use your logo here. Adjust their "Position," turn on the "Transform" keyframe for the first initial, put it in the left lower corner, and "Rotate" it by -63 degrees. Bring it back, set rotation at -12 degrees after 6th frames, and bump it into the letter V. Then set “Y” to 0 after two frames. Adjust its “Position” and the rotation to 0. We will do the same with the letter "P."
Select the letter "V" and create a dropping in from the top effect and use rotation to make it dynamic. Now split all three letter snapshots at the last keyframe and keep the rest of the snapshot till 7 seconds and the 8th frame. Now go to the "Stock Media" and apply a solid "White" color on track 2; keep it as long as a split snapshot. Now, select snapshot and change "Exposure" to -100 and "Brightness" to -100. To convert a letter from white to black, do the same with the rest of the letters.
Last, apply Filmora word snapshot at 6 seconds and 20 frames. Adjust its "Position," create a fade-in effect from 7 to 8 frames. Adjust its starting position, then keep it till 7 seconds and the 8th frame. Now, apply the "Adjustment Layer" on track 7 to match the duration. Go to the "Effects" and search "Retro Cinema" effect. Apply on "Adjustment Layer" and change "Opacity" to 82.
Then, search and apply the "Vintage Movie" effect and change "Opacity" to 93. Then, apply the "Film Grain" effect and set grain "Percentage" at 30. Now, let's render and see the final preview.
Tutorial on Creating Movie Intro
What you need to prepare:
- A computer (Windows or macOS)
- Your video materials.
- Filmora video editor
Speed Ramping the Video
Import your clips after creating a new project in Wondershare Filmora. Now, drag and drop the clips on the timeline panel. Select your clips and move to the right-side panel. Press the “Speed” tab and enter the “Speed Ramping” section. Increase the speed of your video by selecting the “Customize” option and adjusting it manually. Next, trim your clip duration in the timeline panel.
Creating Zoom-in and Zoom-out Effect
Move towards the "Effects" tab and apply your desired effect on the video by dragging it on the track. Further, move to the "Effects" tab in the right-side panel and adjust the "Decolor Position X" and "Decolor Position Y" values by moving the sliders. You can also create a zoom-in and out effect by adding a keyframe by moving the “Percentage” slider at different timeframes.
Further, move back to the "Effects” tab again in the menu bar, and here, choose "NewBlue FX." Choose the required color effects and drop them on video tracks in the timeline panel. After that, head to the "Effects" settings again, and under the selected color, change "Range" for "First Color," "Second Color," and change "Tint" for "First Color." Also, you can add a keyframe for "Range" for "First Color."
Masking the Video Layer
Here, you can add another video clip and adjust its duration. You can also increase the "Speed" of this clip from the "Uniform Speed" under the "Speed" settings. Next, drop another video on the above track, do the "Speed Ramping" from the right-side panel, and split the clip after adjusting the playhead.
Next, you can also apply "Mask" on this layer. You can import your downloaded mask or choose from the available options in the "Mask" section under the "Video" settings.
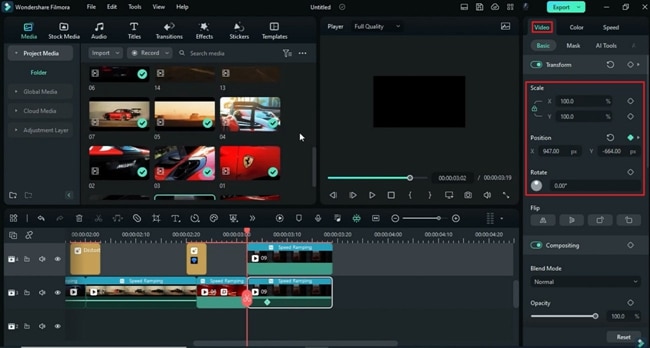
Adjust Positions for Your Clips
Now, double-click the masked layer and adjust the "Position" of the applied mask by changing "X" and "Y" under the "Mask" section to change the "Position" of the clip. Afterward, go to the "Video" tab, and in the "Basic" section, change the "X" and "Y" values for the position. Now, drag and drop some PNG images and apply the same changes to them.
Color Adjustments of the Mask
Here, you must drop effects from the "Effects" tab either by searching for it or choosing from available effects. Then, head to the "Effects" option in the right-side panel, set its "Amplitude," "Frequency," and turn on the keyframe for "Amplitude" if needed.
Next, apply the same "Mask" on another layer and make the same adjustments. To make it look more attractive, you can again apply the same mask on another layer. Add some effects to it from the "Effects" tab in the main toolbar and make a change in its color settings from the "Effects" tab on the right-side panel. Also, do some "Speed Ramping" for each clip to make them look perfect.
Drop a Few More Clips and Apply Changes
Additionally, go back to the first video layer that contains two clips, drop as many clips as you are right next to these clips, and change the settings for each slip as per requirements. Go to the "Video" tab and adjust the "Position," "Scale," "Rotation," and all the other available adjustments.
If required, you can also apply the "Mask" and "Transitions" between these layers. Keep adding keyframes if you want to lock your specific setting at a specific point on a clip.
Apply Transitions to the Edited Clips
You can also make different video layers. To do so, drop your clip on another track of the timeline and make the adjustments from the settings after applying "Effects" on this clip. You can use as many clips on as many layers as you want by avoiding the time "Duration" of corresponding clips to avoid the pauses. Apply "Transitions" and Effects" of your choice on the clips of the layers if required.
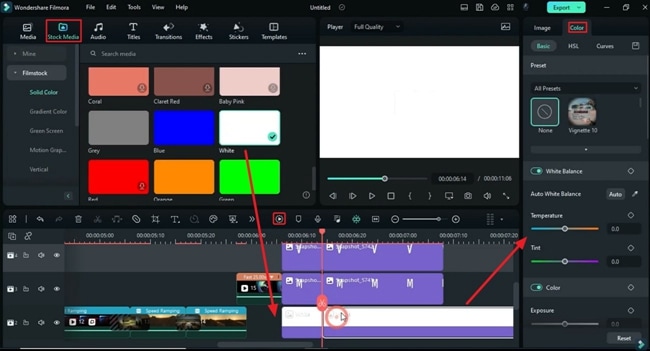
Add Solid Colors and Adjust their Parameters
If you want to add the title text to this clip, add your letter clips next to the main video layer, create a layer by keeping on different tracks, and make the settings adjustments like "Position," "Rotation," and "Scale" as you like it. Additionally, you can apply the mask and "Effects" and change the "Color" of the text and its background from the respective sections and their settings after importing it from "Stock Media." At the end, "Render Preview" your video.
In this video tutorial, we learned how to create intro movies like the intro from your normal clips. The process of adding multiple video clips on multiple layers and adding effects and transitions to make it attractive is all explained. Intros are only a starter, if you want to make a video like a movie, you can also try these recommendations. However, you might find creating a movie intro difficult, but not with Filmora.


