Transcript
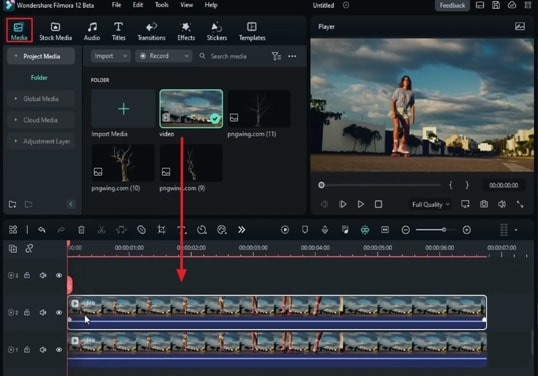
Today, we will show you how to create the upside-down Stranger Thing scene effect in Wondershare Filmora. First, drop your footage on track 1 and track 2. Here, we need motion tracking. Select track 1 footage, go to the "Video," and turn on "Motion Tracking" under "AI Tools." Hide track 2 footage and set the position of the track to such a point where it stays stable. Here, I am using Sky and hit on start "Motion Tracking."
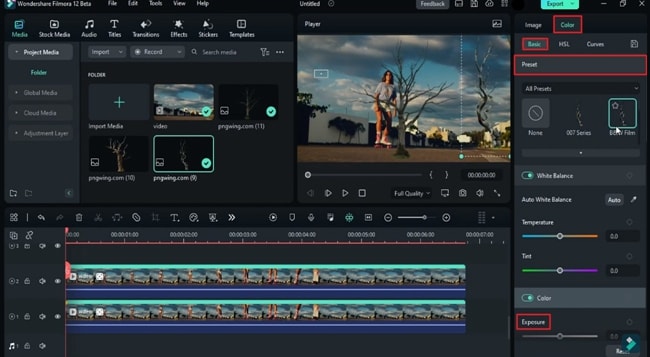
Unhide track 2 and track motion for this footage also. You can find the footage on pngwing.com. Here, we drop the dead tree PNG on track 5 and drop the second PNG on track 6. Select track 1 footage and link the PNG to "Motion Tracking," increase its "Scale," and place it wherever you want. Change the color to "Black and White" on the preset and decrease "Exposure" a bit because we are going to make a night scene.
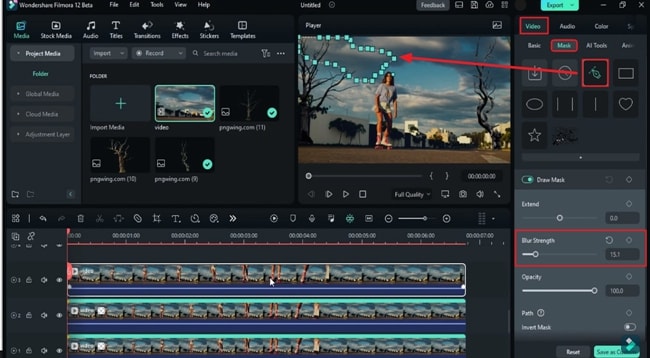
Then select the second clip link to the second tree PNG and adjust its position. Change the color to "Black and White" and reduce "Exposure." Now you can see that our trees are intact in that position. Drop your footage one more time on track 3. Go to the "Mask" and select the "Draw Mask" tool. Create a "Mask" around the cloud in the footage and increase "Blur Strength" to 15.
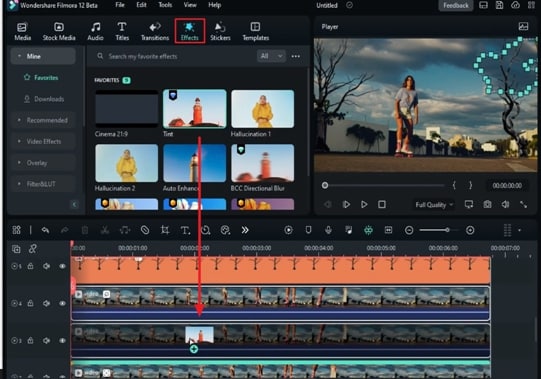
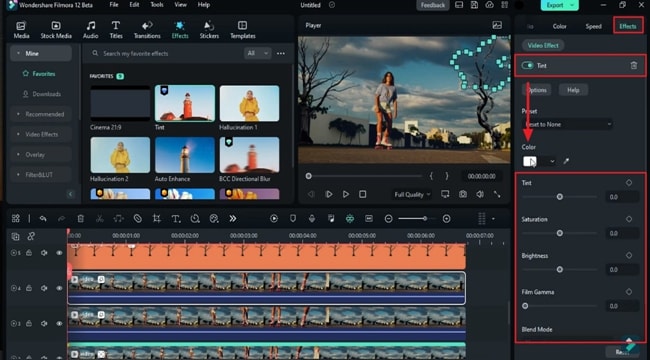
Again, drop your footage on track 5, and this time, create a "Mask" around the cloud towards the right side. You can even adjust the mask point position and increase "Blur Strength" to 18. Now, we are going to convert both masked clouds to red color. Go to the "Effects" and apply "Tint" on both the masked footage. Select your footage, go to the "Effects," and change the tint 'Color" to red. Increase "Tint" to 100%. Increase a bit of "Saturation" and change "Blend" to 84.2.
Then, select your second footage and do the same change Tint “Color” to red and some color adjustment but with different values. So that both clouds look different. Again, go to the “Mask” and increase “Blur Strength” a bit on both clouds.
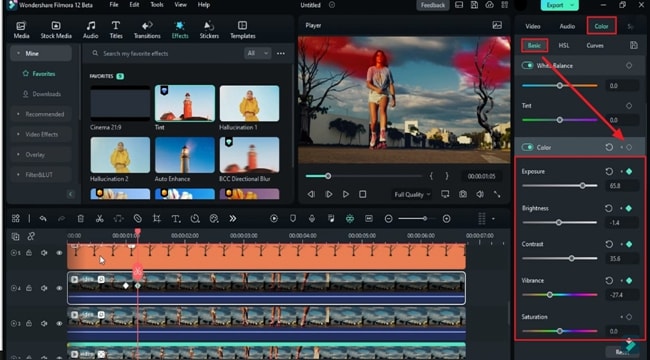
Then, let's create a lightning effect; turn on keyframes for "Color." Go 5 frames forward and increase "Exposure" to 65 or 66. Reduce "Brightness" a bit, increase "Contrast" by 35, and reduce "Vibrance." Then, go 5 frames forward and set the "Exposure" value to zero along with others' value. Next, go 1.5 seconds further and turn on keyframes for "Color." Increase "Exposure" in 5 frames, then go two frames forward and reduce "Exposure" to zero. Increase "Exposure" by 60 in two frames. Then, after 3 frames, set all values to default. In the same way, you can create further flash or lightning effects on both cloud clips.
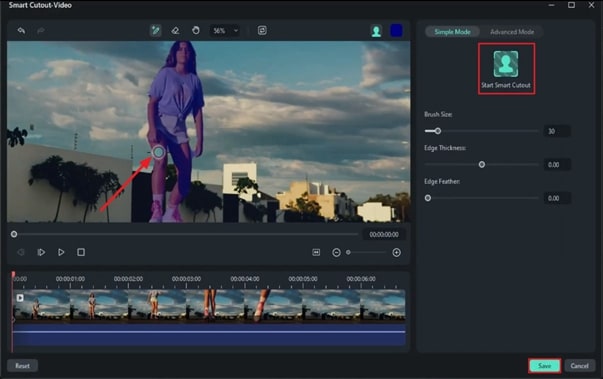
Again, drop your footage on track 7. Go to the starting point and turn on "Smart Cutout" under "AI Tools." Create a selection mask around your subject. You can even reduce the brush size. Then, create a selection around the skate wheel. Use the erase tool to delete the overlapping selection. Then, click on "Start Smart Cut" to track down our subject "Save" it. As you can see, the tree is behind our subject when our subject is crossing it.
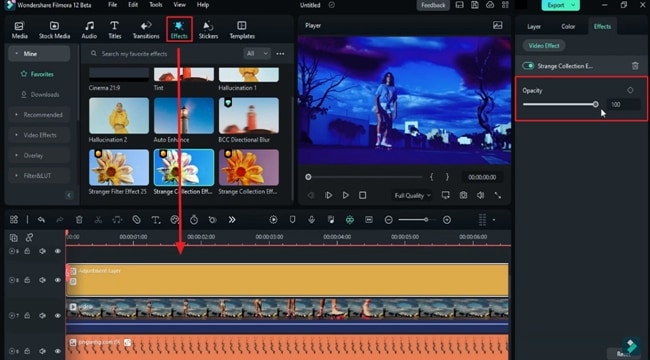
Now, to create a night effect, you can use "Effects" and "Presets" or even "Color" options, but we will use a strange collection effect. Drop the "Adjustment Layer" on the top track, go to the "Effects," and drop the "Strange Collection Blue Effect" on the adjustment layer. Go to the "Effects" and change the "Opacity" to 53. Then drop pink or red "Strange Effect" on the adjustment layer and change its "Opacity" to 63. Now we have a nice purple color. Finally, let's render it and see the final preview.
Tutorial on Creating Strange Things Upside Down Effect in Filmora
What you need to prepare:
- A computer (Windows or macOS)
- Your video materials.
- Filmora video editor
Import Your Files and Start Motion Tracking
Start by launching Wondershare Filmora on your device; click the "New Project" button to start a new project. From the "Media" tab, import your clips in the media panel and drag and drop the clip to different tracks.
Enable Motion Tracking for Your Clips
To initiate motion tracking, click on your clip in the timeline track, and at the right-side panel, enable "Motion Tracking" under "AI Tools" from the "Video" tab. Once you enable motion tracking, set the position of the track at a stable point in the background.
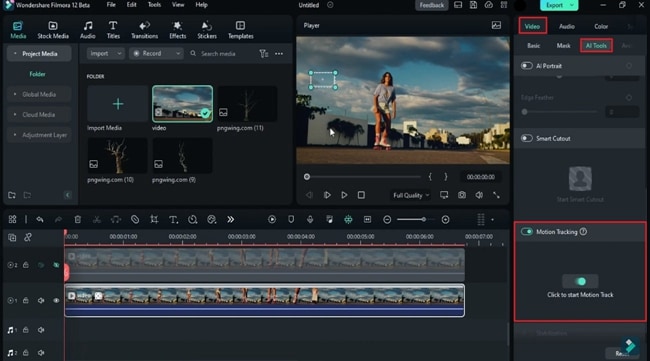
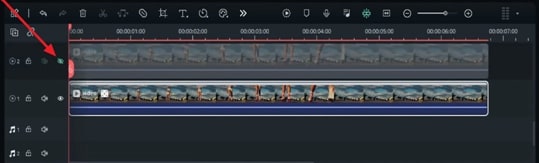
Meanwhile, hide the other clip by hovering towards the "Eye" icon from the left side of the timeline panel. After setting the position of the motion track, hit the icon saying, “Click to start Motion Track.” Repeat the similar process for the other clip after unhiding it.
Import PNG Files and Make Respective Adjustments
In this step, import the images that you want to incorporate in the video in PNG format. Select these recently imported PNG files and drop them on the tracks above the clips. Afterward, extend and align the duration of PNG by dragging it along the length of the pre-existing video layers.

Following that, link these PNG images to the pre-existing clips in the timeline. For this, click on the clip you desire to link and go to the right-side panel. Under "AI Tools," find the "Link Element" section and link clips and images, respectively. Moreover, increase the "Scale" and Position" of these PNG images according to your video.

Make Color Adjustments for PNG Images
Now, it is time to set the colors of these PNG images. For this, go to the "Color" tab on the right panel, and under the "Basic" sub-tab, make respective settings for a darker or night theme. You can do this under the Preset" section. Furthermore, adjust other settings like "Exposure" and "Brightness" for a realistic night scene. Repeat the same process for the other clip and PNG in the timeline.
Masking the Desired Areas in the Clip
Select the same footage and drop it on the tracks that are between your clips and PNG images. Select them from the timeline one by one and draw the mask around the desired areas of each layer from the "Mask" section under the "Video" tab. Choose the "Draw Mask" tool and start drawing it manually. Furthermore, change the "Blur Strength" settings and repeat the same process for other tracks.
Colorizing the Masked Layers
To add color to the mask layers, head to the "Effects" menu and apply any color effect on the masked clips. As you drag and drop the desired effect on the masked video track, it will auto-adjust itself on masked areas.
To change the color of the effect applied on the masked areas, go to the “Effects” settings from the right panel. Under the “Color” section, choose a color of your choice from the available options. Experiment with the available sliders of “Tint,” “Saturation," and "Blur" to achieve the desired effect. After that, you can adjust the "Blur Strength" of the mask again. Repeat the process for the other masked clip as well.
Creating the Lightning Effect
To create a lightning effect in the footage, navigate to the “Color” tab and turn on the keyframes of “Color” by scrolling down this tab. Keep placing the Playhead at multiple points and add keyframes at each point. After adding each keyframe, you are required to make adjustments under the “Color” keyframes accordingly to achieve the desired effect. Repeat the same for all the masked tracks until you achieve the desired effect.
Track the Moving Object by Smart Cutout
Place your clip again on a new track and place the playhead at the start of this clip. The "AI Tools" under the "Video" settings. Enable the "Smart Cutout" tool, and a new window will appear.
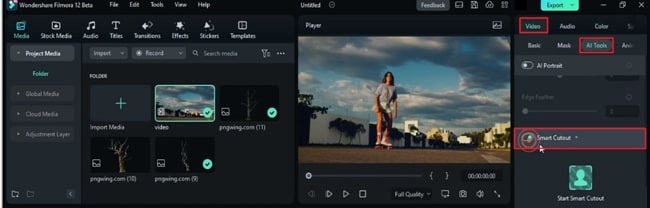
On the new window, draw the mask using the "Brush Tool" around the moving object. You can adjust the size of the brush tool by moving the slider for more fine results. After drawing the mask, select "Click to start Smart Cutout" and wait until the tacking is complete. Now, you have successfully tracked the object's motion, and you can see the results from the preview window by playing it.
Creating Strange Effects
To create more effects, go to the "Effects" menu and select the "Adjustment Layer" from the left panel. Drop this layer on the topmost video layer and apply some strange-looking effects by choosing them from the effects menu. Drop these effects on the adjustment layer as well. You can make the "Opacity" adjustments from the "Effects" settings tab by moving the slider. Now, playback to see the final results.
Filmora has enabled digital creators to achieve the most creative editing goals in no time. In this guide, we have learned to create strange upside down effects in the videos. It also explains how to incorporate multiple media files into the videos using the tools of Filmora. Now, you can create fun content by using Filmora and impress your viewers.


