Transcript
In this video, we will create a weather-changing effect in Wondershare Filmora. First, add 10 tracks on "Track Manager." Drop your first footage on track 7, keep it for 10 seconds, and delete the extra part. Then, fit the clip into the timeline.
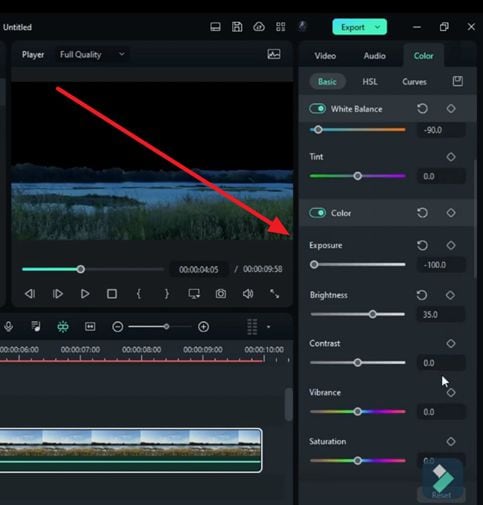
Change "Zoom Level" to 100% and adjust zoom in screen position. Go to the "Mask," select the "Pen" tool to create the mask around the tree line for removing the sky. Then, change "Zoom Level" to "Fit." Now, to convert day into night. Go to the "Color," change "Temperature" to -90, "Exposure" to -100, "Brightness" to 35, "Contrast" to -17, "Vibrance" to -10, "Saturation" to -40. Then change the "Shadow" value to 25 and "White" to -23.
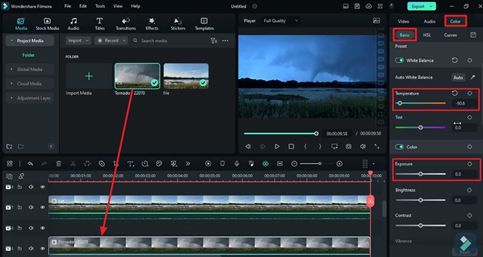
To make it darker, you can set "Temperature" to -100, "Brightness" to -11, and "Contrast" to 17. Now, drop the Tornado clip on track 5. Keep it as long as the main clip. Then, under "Color," change "Temperature" to -90.6 and "Exposure" to -95.
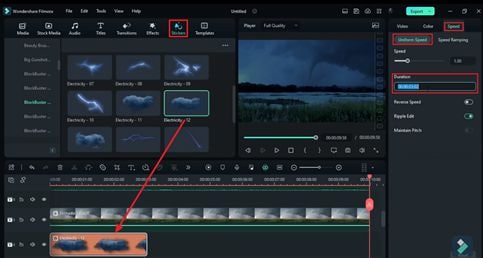
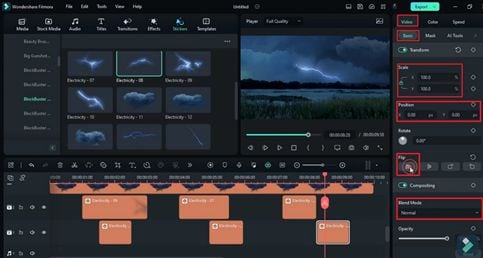
Adjust its "Position" in the "Video" setting. Then go to the "Stickers," download "Blockbuster Pack" from "Filmstock." Drop the "Electricity 12" effect on track 4. Go to the "Speed" and change "Duration" to 958 to match it with the main clip. Select the Tornado clip and change "Blending Mode" to "Screen." Select track 4 clip, and change "Scale" to 69.8 in "Video" setting. "X" value to -733 and "Y" to 199. Then, do some "Color" adjustments to blend color with the background.
Next, drop the "Electricity 11" effect on track 3. Change its "Duration" then change "Scale" to 71. "X" value to 735 and "Y" to 296. Then again, go to the "Color" and do color adjustments to blend it. Then place the playhead at 1 second, and drop the "Electricity 9" effect on track 2. Change "X" "Position" to 756 "Y" to 315. Then locate at 3 seconds and 59th frame.
Next, drop the "Electricity" effect on the track, change "Scale" to 105, "X" "Position" to -498, and "Y" to 220. Then, go to 7 seconds, and in the 10th frame, drop the "Electricity" effect on the track. Change "X" "Position" to -183 and "Y" to 78 and "Flip" it horizontally.
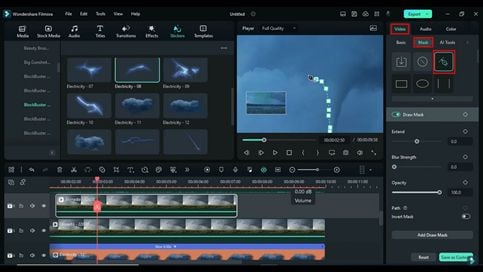
Copy the tornado clip, select track 6, and paste the tornado clip at 1 second and 31st frames. Keep this clip till 7 seconds and the 13th frame. Then, go to the "Mask" and select the pen tool to create a mask around the tornado. Increase blur strength a bit, then go to the "Color," change "Exposure" to -100 and "Brightness" to -93.7 so that it will blend perfectly with the background.
Duplicate tornado clip on track 8 to create a reflection in the water. "Flip" it vertically and adjust it on the lake. Go to the "Mask" and create a mask to keep the lake in the reference. Then, do some "Color" adjustments to blend it. Change "Blend Mode" to "Normal" to reduce "Opacity" to 61. Then go to the "Color" and change "Exposure" to -25, and again change "Opacity" to 29.7.
Then copy lightning clips from track 1 and track 2 and paste them on tracks 9 and 10. Again, follow the same steps and create a lightning reflection in the water. Adjust the "Opacity" and "Exposure" to blend them with the background, but do not change the placement or position of any clip. Now, let's "Render" it to see the final preview.
Creating Weather Lighting Effect using Wondershare Filmora
What you need to prepare:
- A computer (Windows or macOS)
- Your video materials.
- Filmora video editor
Create the Video Layers
First, open Wondershare Filmora tool and select the “+” icon to start the project. Now, import your media from the “Media” tab into the media panel. To do this type of editing, you need to add multiple video tracks to the timeline.
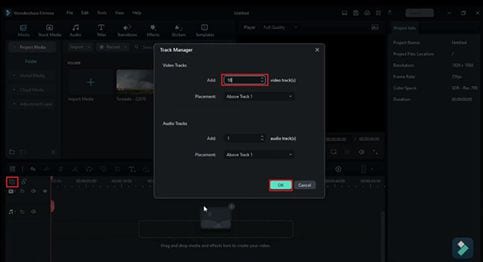
You can achieve this by hitting the "Manage Tracks" icon on the extreme left of the timeline. A new window named “Track Manager” will appear on the screen. You can enter the number of tracks you want to add in the provided space. To apply the action, click the "OK" button from the bottom right corner of this window.
Drop the Footage on Timeline
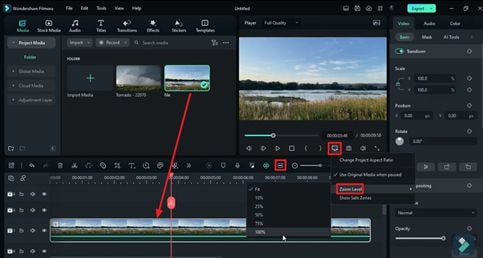
Select your imported media and drop it on the timeline on the timeline track. You can trim the unrequired part of the clip by placing your playhead at that point. After trimming the clip, extend your required clip to make it fit the timeline by selecting the “Zoom to Fit Timeline” icon on the timeline toolbar.
Here, select the "Settings" icon from the preview window to find the "Zoom Level" from the dropdown menu. Select the desired percentage from the expanded menu. After that, adjust its position manually from the preview window to focus on the required area.
Mask the Object for Further Editing
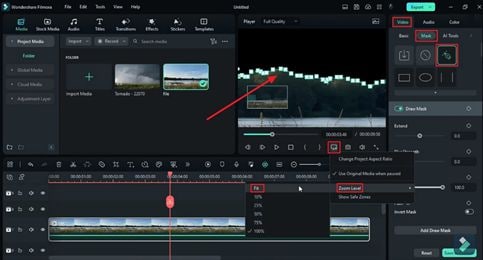
Move forward to draw the mask around the required area. Select the video layer on the timeline and look for the "Video" settings in the right panel. Go to the “Mask” sub-tab from the "Video" tab and find multiple masking videos options.
You must select the "Draw Mask" option to manually create a mask around your object. As you draw the mask, select the “Setting” icon again. You can zoom out your video layer by hitting the "Zoom Level" and selecting the "Fit" option from the provided list.
Undergo the Settings Adjustments
Moreover, to adjust the overall light effect of your video, double-click the video layer and enter the "Color" tab from the right-side panel. Here, you can adjust the "Temperature," "Exposure," "Brightness," "Contrast," and "Vibrance" values by moving the slider. You can also change the "Saturation," "Shadow," and "White" values by scrolling down this section to achieve your desired results for your video.
Add More Video Layers
To add another video layer, select the video clip from the media panel and drop it on another track of the timeline. Undergo its duration adjustments according to the pre-existing video layer. Double-click the added layer to adjust its settings. From the right panel, select the "Color" tab and adjust the "Exposure" and "Temperature" values as per requirements.
Incorporating Effects from the Stickers Menu
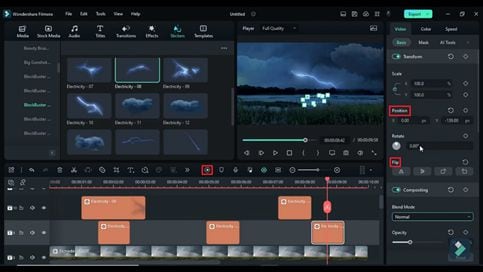
Select the "Video" tab and enter the "Basic" section to adjust its "Position" on "X" and "Y." Furthermore, enter the "Stickers" menu and download your desired lightning effects from the "Filmstock" menu. Select the desired sticker and drop it on the timeline tracks as a new video layer. Select these tracks one by one and adjust their "Speed" from the right menu. You can adjust their "Duration" according to the existing video layers.
Apply Multiple Effects to the Videos
Double-click the first video layer and change the “Video” settings. Enter the “Basic” tab and scroll down to find the “Blend Mode” and change it as per requirements. Again, go back to the stickers layers and change their "Scale" and "Position" on "X" and "Y" from the "Basic" settings. Similarly, apply color adjustments from the "Colors" tab by moving the available sliders to blend the video layers properly.
Mask the Background to Apply Effects
Once the desired effect is achieved for the object, you can work on your background. Choose the background clips, if any, and drop them on the timeline on different tracks to create a duplicate video layer.
Select one of the background layers and head to the settings panel. From the "Video" tab, enter the "Mask" section and select the "Draw Mask" option to manually create the mask around the object. You can also adjust its appearance from the "Color" section by moving the available sliders.
Creating the Reflection of Background
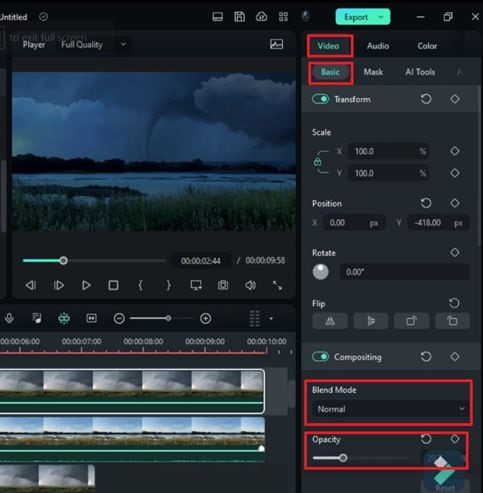
To create a reflection of your background, move forward to duplicate the background video layer on the timeline. Double-click this duplicated track and go to the settings panel. From the "Video" tab, enter the "Basic" and scroll down to find the "Flip" option. Flip this layer vertically by selecting the option and adjust its "Position" on "X" and "Y" at the place where you want the reflection.

Create a Mask Around the Reflection
Select this video layer and head to the settings; hit the "Mask" from the "Video" tab. Now, draw the mask around the reflection from the "Draw mask" tool and scroll down to adjust the "Blur Strength."
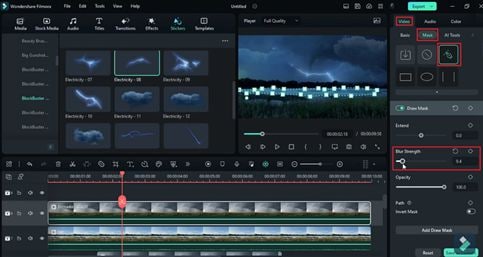
Now, change the “Blend Mode,” and “Opacity” by moving the slider. You can also enter the “Color” tab to make further adjustments. Keep on changing these adjustments until you get the desired results.
Apply More Effects on the Created Reflection
After creating the reflection of the background, you can also do the same for the lightning effects to fall on the background. To do so, copy the effect layers of the background and paste them on the tracks above the reflection. Undergo the settings adjustments and “Flip” them to make the reflection look super natural. It is recommended to keep the position and alignment exactly like the original one. Find the “Render Preview” button from the timeline toolbar to observe the final results.
Video editing is the last but most tricky part of content creation. Applying multiple effects to achieve a certain goal sometimes becomes the most challenging task. This guide is about how to add lightning effects and other effects on videos and creating their reflection using the preset effects of Filmora. With Filmora, you can easily achieve any goal related to video editing.


