How to Create Dance Lighting Video Effect
Want to make your dancing video eye-catching and graphically intense? Make your moves stand out and enhance your dancing video graphically using amazing effects in a few steps.
Tool
Assets
Transcript
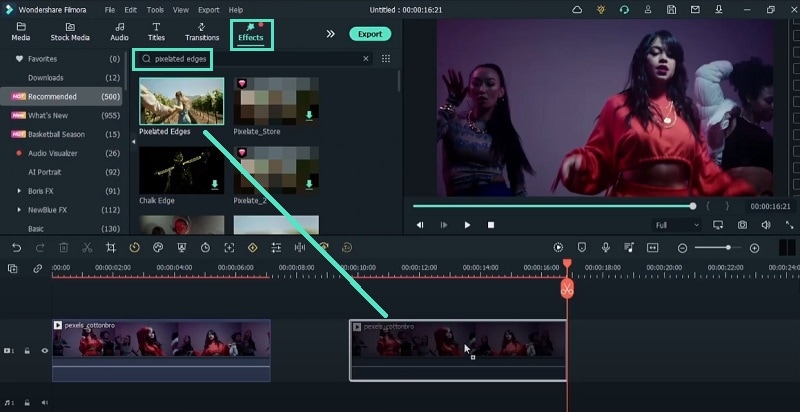
Import your video clip onto Project and drag it onto the timeline. Zoom out the timeline and move the playhead forward where there is nothing. Copy and paste the original video and select the duplicate video.
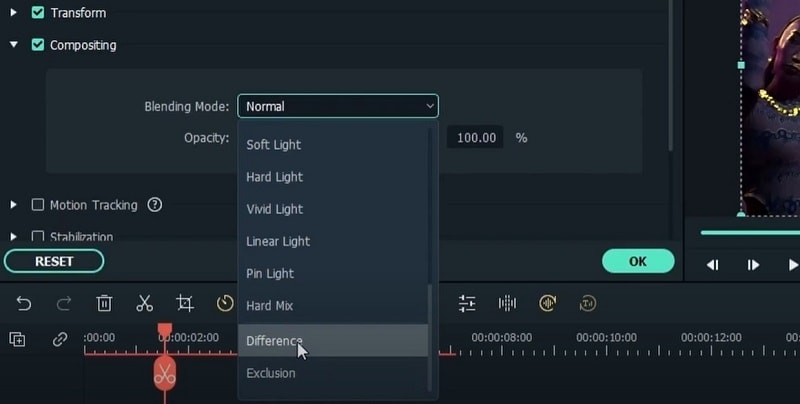
Head over to Effects. Search for “Pixelated edges”. Drag it onto the duplicate video. Drag the duplicate video with the effect right above the original video. Double-click on it and go to Compositing.
Change the Blending mode into “Difference”. You will only see outlines and not the subject. Go to Video> Effect and change the color of the outlines. Export the video footage and name it based on the colors.
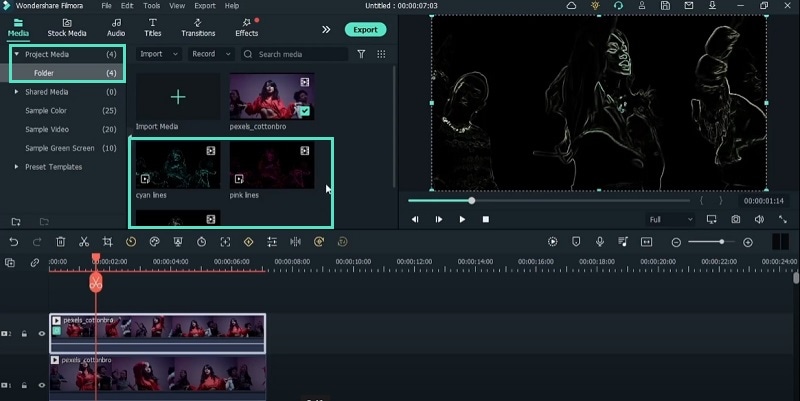
Repeat the above steps multiple times so that we have multiple colors for our final result. Just go back to the top video clip, head to Video>Effect and choose a new color. Export and save the file with the color name.
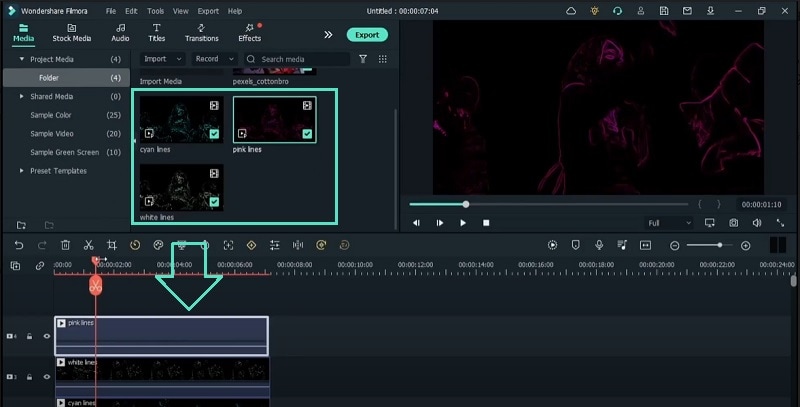
Import the exported videos into your Project. Place them on top of the original video clip onto the timeline. Change the blending mode of all the new color videos from Normal to Screen.
Play the video, and you will see neon line edges. Head over to Effects menu and search for “glow”. Drag and drop Glow effect on top of all the new video clips except the original one for better neon effect.
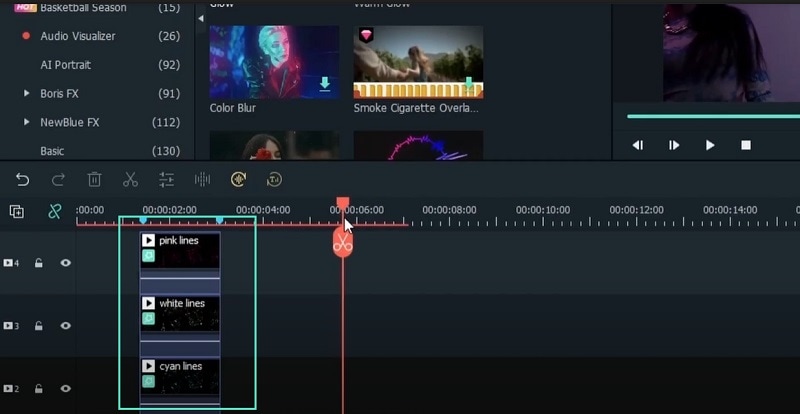
Double-click on the video clips and go to Video>Effect to adjust the parameters for the glow effect as per you preference. Hide the new video clips so that the original one shows up and you can mark spots conveniently.
Move the playhead to find out where you want the effects to show up, and hit “M” to mark them. Unhide the hidden video clips and go to first and second markers, and cut all the new video clips. Delete the unnecessary parts.
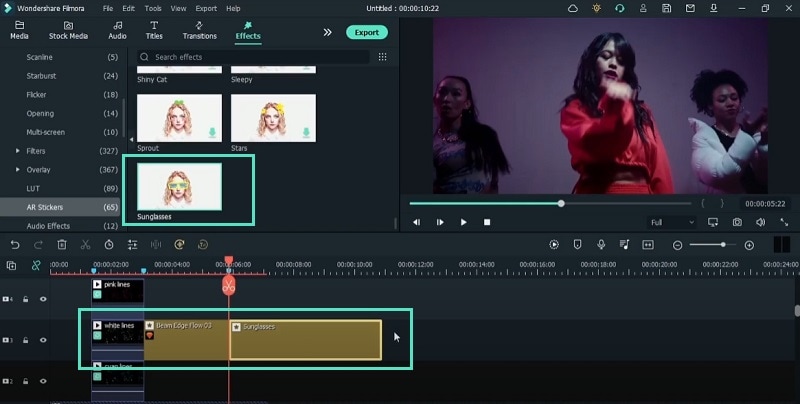
Head over to Effects menu and go to AI Portrait. Drag Beam Edge Flow 03 on top of your video beside the last effect. You will see lines around the subject. Double-click on the effect and customize the effect such as color.
In the same Effects menu, go down to AR Stickers and look for Sunglasses. Drag it on top of your video, and it will put sunglasses on the subject. You can go ahead and add a filter to bring all the effects together.
Go to Effects> Filters> Instagram and drag and drop The Unicorn effect on top of all clips. It will add a purple hue on top of all effects and make them look more neon. You can double-click and reduce Opacity.
How to Create Dance Lighting Video Effect
What you need to prepare:
- Your computer (Windows or macOS)
- Video clip with the subject giving angry expressions
- Wondershare Filmora video editor
Download and install Wondershare Filmora on your computer(Windows or macOS). Click on New Project button from the welcome screen. Otherwise, go to File menu and click on New Project option.

Go to File> Import Media and click on Import Media Files option. Otherwise, drag and drop the dancing video clip into Project Media folder directly.

Drag and drop the dancing video clip onto Timeline. Move the playhead to a blank area and copy and paste the original video. Go to Effects and search for “pixelated edges”. Drag and drop Pixelated Edges effect to the duplicate clip.
Drag the duplicate clip over the original video clip. Double-click on the duplicate clip and go to Basic and turn on Compositing. Change the Blending mode to Difference. Go to Video> Effect> Color and select any desired color. Export the video project and save it with the color name.
On the timeline, double-click on the duplicate video clip and go to Video>Effect> Color and change the color again and export the video again. Repeat the same with another color as well. Thereafter, bring all the exported new video files under Project Media folder.
Delete the duplicate clip from the timeline and bring in all the new imported clips onto the timeline above the original clip. Double-click on each clip and go to Video> Compositing and change Blending Mode to Screen. Go to Effects and search for “Glow”. Drag and drop Glow effect to each of the new imported clips.
Put the playhead where you want the effect to appear and disappear. Hit “M’ key on the keyboard to mark the points. Select the new imported clips and make cuts and delete rid of the unnecessary parts. Go to Effects> AI Portrait> Beam Edge Flow 03. Place it on top of the original clip after the new clips have ended.
Go to Effects>AR Stickers> Sunglasses and place it onto the timeline by the side of the Beam Edge Flow 03 effect. Go to Effects> Filters> Instagram and add TheUnicorn effect on top of all clips. Play the video and export to save it in any desired file form.
What you’ve learned:
- How to add neon line around the subject
- Create different colors of neon lines and enhance them
- How to AR Stickers like sunglasses to the subject


