How to Make an Animated Travel Map Video for Free [3 Best Methods]

Jun 09, 2026• Proven solutions
Want to create a stunning animated travel map video for free? You're in the right place. An animated map brings your journey to life, showing your route in a dynamic and engaging way—perfect for vlogs, travel diaries, or social media updates.
Whether you're looking for a quick online animated travel map generator or a powerful desktop tool, this guide has you covered. We'll walk you through three popular methods, including using free online tools and creating a custom map animation with Wondershare Filmora (on both desktop and mobile).
In This Article
Quick Comparison: Best Animated Travel Map Methods
| Method | Platform | Best For | Cost |
|---|---|---|---|
| Online Generators (e.g., Multidev) | Web Browser (Online) | Quick, simple map videos | Free |
| Filmora Desktop | Windows & Mac | Custom animations, high-quality results | Free Trial / Paid |
| Filmora Mobile | iOS & Android | Making animations on the go | Free |
Method 1 Using an Online Animated Travel Map Generator (Free & Fast)
For those who need a quick and easy solution without downloading any software, a free online animated travel map generator is the perfect choice. You can create and share your journey in minutes directly from your web browser. Here are our top picks for 2024.
Our Top Pick: Creating a Map Video with Multidev
Multi.dev is a powerful yet simple web-based application to build awesome animated maps. It's free, fast, and lets you download your video, making it our top recommended online tool.
Follow a simple step-by-step guide to making animated travel maps with Multi.dev:
Step 1: Open Multi.dev and Start a New Map
Visit Multi.dev from your internet browser. You can either edit the demo video on the homepage or start creating a new animated map from scratch.

Step 2: Add Your Locations and Travel Mode
Using the search bar on the left, type in your starting location. Then, add your next destination. The tool will automatically draw a route. For each leg of the journey, you can choose from eight travel modes, including airplane, bus, and train.

Step 3: Customize Your Map Theme
Multi.dev offers several minimalistic map themes to choose from. Select the one that best fits the style of your video or presentation.

Step 4: Download or Share Your Animated Map
Once you're happy with the result, click the “Create Video” button to render and download the animated map as a video file to your computer. You can also get a shareable link via the “Share Animation” option.

Alternative Option: Pictramap
Pictramap is another online tool with a very simple interface for making a travel map animation. It's great for quick visualizations. However, please note that at the time of writing, Pictramap does not offer a direct way to download your animation as a video file.
You can create a map by signing up, adding locations, and choosing your travel mode. While it's easy to use, the inability to download the final video is a significant limitation for video creators.

The process to create an animated travel map with Pictramap is given below:
Step 1: Create a Project
Launch your favorite web browser, go to https://www.pictramap.com/, click Create yours now, it's free, and sign up to Pictramap using your preferred method. When you are on the Dashboard, enter a name in the field available under the My Projects section, and click Create to create a new project (the animated map).
Step 2: Define the Locations and Method of Commute
On the map, right-click the location you want to start your journey from, enter the name of the location or any other significant title, and click Add. Click the location marker, click the Travel Mode icon, and select your preferred mode of travel. Repeat this process to mark the destination location as well.

Step 3: Preview the Animation
Click the View Animation button from the upper-right corner of the page to see the animated travel map.

Pro Tip: How to Record ANY Online Map Animation for Free
What if you love an animation from a site like Pictramap but can't download it? There's an easy fix: screen recording! You can use the free screen recorder built into Wondershare Filmora to capture it.
- Open Filmora and choose the "Screen Recorder" function.
- Play the map animation in your browser (use full-screen mode for the best quality).
- Start and stop the recording. The captured video will automatically appear in Filmora's media library, ready for you to trim, edit, and export as a high-quality MP4 file!
Method 2 Creating a Custom Map Animation with Filmora for Desktop (Full Control)
The entire process of how to make map animation video in Wondershare's Filmora is categorized into two parts, wherein the first part you will collect all the ingredients that are needed to get started, and in the second part, you will actually make an animated map using the tools and features present in Filmora.
Watch a video tutorial to see how to make an animated map for a video:

1-1: Prepare the Travel Map Materials
Following are the ingredients and the methods to collect them for animated travel map preparation:
Step 1: Get the Map
The first thing that you would need to prepare an animated map is an image of a realistic map. Thanks to Google and Microsoft, these things are now pretty easy to arrange. The process is given below:
- Launch your preferred web browser
- Type google.com in the address bar or the search box and hit Enter
- Scroll to zoom out so you can see the entire world map on one screen

- Type Snipping Tool in the Cortana search box present on the left side of the Taskbar
- Launch Snipping Tool, and use it to capture the screenshot of the map
Note: Snipping Tool is a built-in app in Windows 10 and is available for free. If you are using any other operating system, or have a different program to capture the screenshots, feel free to use it according to your convenience.
- Save the screenshot you captured as a JPG file on your PC
Step 2: Mark Out the Map Path
The next step in the process of preparing an animated travel map is to mark your route on it. To do so, you can use any of your preferred photo editing tools. However, to keep this illustration simple, Microsoft Paint is used here, and the method is given below:
- Right-click the screenshot you just captured
- Go to Open with on the context menu, and then click Paint from the submenu that appears
- Pick your preferred color from the pallet of the Paint interface. It is advisable to use an eye-catchy shade such as Red
- Use the Sphere shape tool to draw a circle over the source and destination locations on the map
- Use the Line tool to draw a line from the source point to the destination. Try giving the line a few turns to make it look realistic
- Go to File > Save As, and save the marked image with a different name
Note: Once this is done, you should have two image files of the map, i.e., one without the marks and one with it
Step 3: Download Some Travel Icons
Another important ingredient in an effective travel map animation is touring icons such as location marker image, a traveling medium symbol like a helicopter, airplane, car/bike (for short distances), etc. A couple of websites that offer royalty-free stock photos at absolutely no cost are listed below:
Note: Although the websites given above allow you to download and use their stock images and icons for free, you may need to give credits to the designers/creators of the symbols while using their objects. Therefore, you are suggested to check the Terms & Conditions and norms of usage of the elements before downloading and adding them to your projects.
1-2: Make Animated Travel Map Videos with Filmora
After you have gathered all the necessary ingredients that are required to create a travel map animation, it is now time to get to work. The following instructions would guide you through the step-by-step process of preparing a decent and realistic animated travel map in Wondershare Filmora:
Step 1: Import Ingredients to Filmora and Add Them to the Timeline
Launch the video editor on your computer, click anywhere inside the Media window in the upper-left area, and import all the images and icons that you collected earlier to the program. Next, drag both the images of the map, i.e., with and without the marks to the Timeline, and ensure that they are of the same duration and are placed on the same track.

Note: Be sure to put the map without the marks first, and then the one with the marks. Also note that the images have the playback duration of 5 seconds in the Timeline by default, and this tenure can be reduced or increased by dragging the side handle of the media to the left or right respectively.
Step 2: Add Transition for Illusion of Route Appearance
Go to Transition from the standard toolbar at the top, locate the Erase Slide transition effect from the available presets, and place it in between the two image files that you earlier added to the Timeline. Next, click and drag either of the side handles of the transition to the end of the media clip. Notice how the other side of the effect is expanded in equal proportion.

Step 3: Preview and Export
Press the Spacebar on the keyboard to preview the video and see if the route appears as if it is being drawn on the map. Once the animation looks acceptable, click EXPORT from the top-center, go to the Local tab on the Export window, select MP4 from the formats list in the left, and click EXPORT from the bottom-right corner to export the current animation to MP4.
Step 4: Customize the Travel Map Media
Either start a new project and import the video of the map you exported in the previous step to the app and then to the Timeline, or remove the existing media from the Timeline in the same project, and add the exported video to it for convenience.

Next, position the Skimmer (Playhead) a couple of frames before the one the route line appears and starts stretching from, and click the Split icon from the editing toolbar above the Timeline itself. Repeat this process for the other side of the media, i.e., position the Skimmer a couple of frames after the route line reaches the destination location, and click the Split icon again. Then remove the separated segments from both the sides by selecting them and pressing Delete on the keyboard, leaving only the portion where the animation is visible.

Optionally, right-click the media that is left behind in the Timeline, and go to Speed and Duration from the context menu. On the Custom Speed box, drag the Speed slider to the left to decrease the playback speed resulting in the increased duration of the media. Alternatively, you can manually enter a value in the Speed box to get precise tenure. Click OK when you are done.

Step 5: Add Animations to the Travel Map
Right-click the media in the Timeline, and go to Add Animation from the context menu. Make sure that the Skimmer is on the first frame, and add several keyframes as explained below:
- Click Add to add the first keyframe

- Move a couple of frames further, and click Add one more time. Now, while you are on this second keyframe, use the Scale slider to zoom in to the map so the source location remains within focus.

- Next, move the Playhead further and add another keyframe a couple of frames before the route line hits the edge of the window.
- After this, move the Playhead again and position it where the route line reaches its destination location. Add another keyframe here as well, and move the map in the Preview window so the focus is now on the destination.
- Move the Playhead a few frames further, add another keyframe, and use the Scale slider to zoom a bit more into the map to make the entire animation look realistic. Click OK to save the changes.
Step 6: Add Icons and Titles, and Export the Project
Drag the image of the traveling medium to the Timeline, and place it on the frame the route line starts from. Make sure to place the image on the track above the map, and stretch it to the end so it remains visible throughout the animation. Next, use the method explained above to add keyframes to move the medium along with the route line from the source to the destination. Optionally, add the image of the location marker at the destination point, go to Transition, and add your preferred transition effect, preferably Dissolve, to the marker track in the Timeline so it looks as if it has appeared as the medium arrived the destination.
Get back to the first frame in the Timeline, go to Titles on the standard toolbar, and add a title preset somewhere near the source location. Resize the text, change the format as needed, and add your preferred caption to it such as the start time, name, etc. Reduce the duration of the track so the title appears for a few frames, preferably before the map animation starts. Click OK when done. Repeat this process for the destination point as well.
Once everything is complete, click the Play button in the Preview window to review your work. If the video looks acceptable, click EXPORT from the top-center of the interface, and use the method explained earlier to export the animated travel map in your preferred format.
![]()
You May Also Like: ✈️🌍Flight Route Animations
1-3. Draw Path & Animate Travel Routes with Pen Tool in Filmora
Filmora also lets you manually draw and animate a custom travel route — a great way to create your own animated travel map or travel map animation with more freedom.
Step 1. Select the Pen Tool in Filmora and draw the route directly on your video. When finished, right-click and choose Stop.
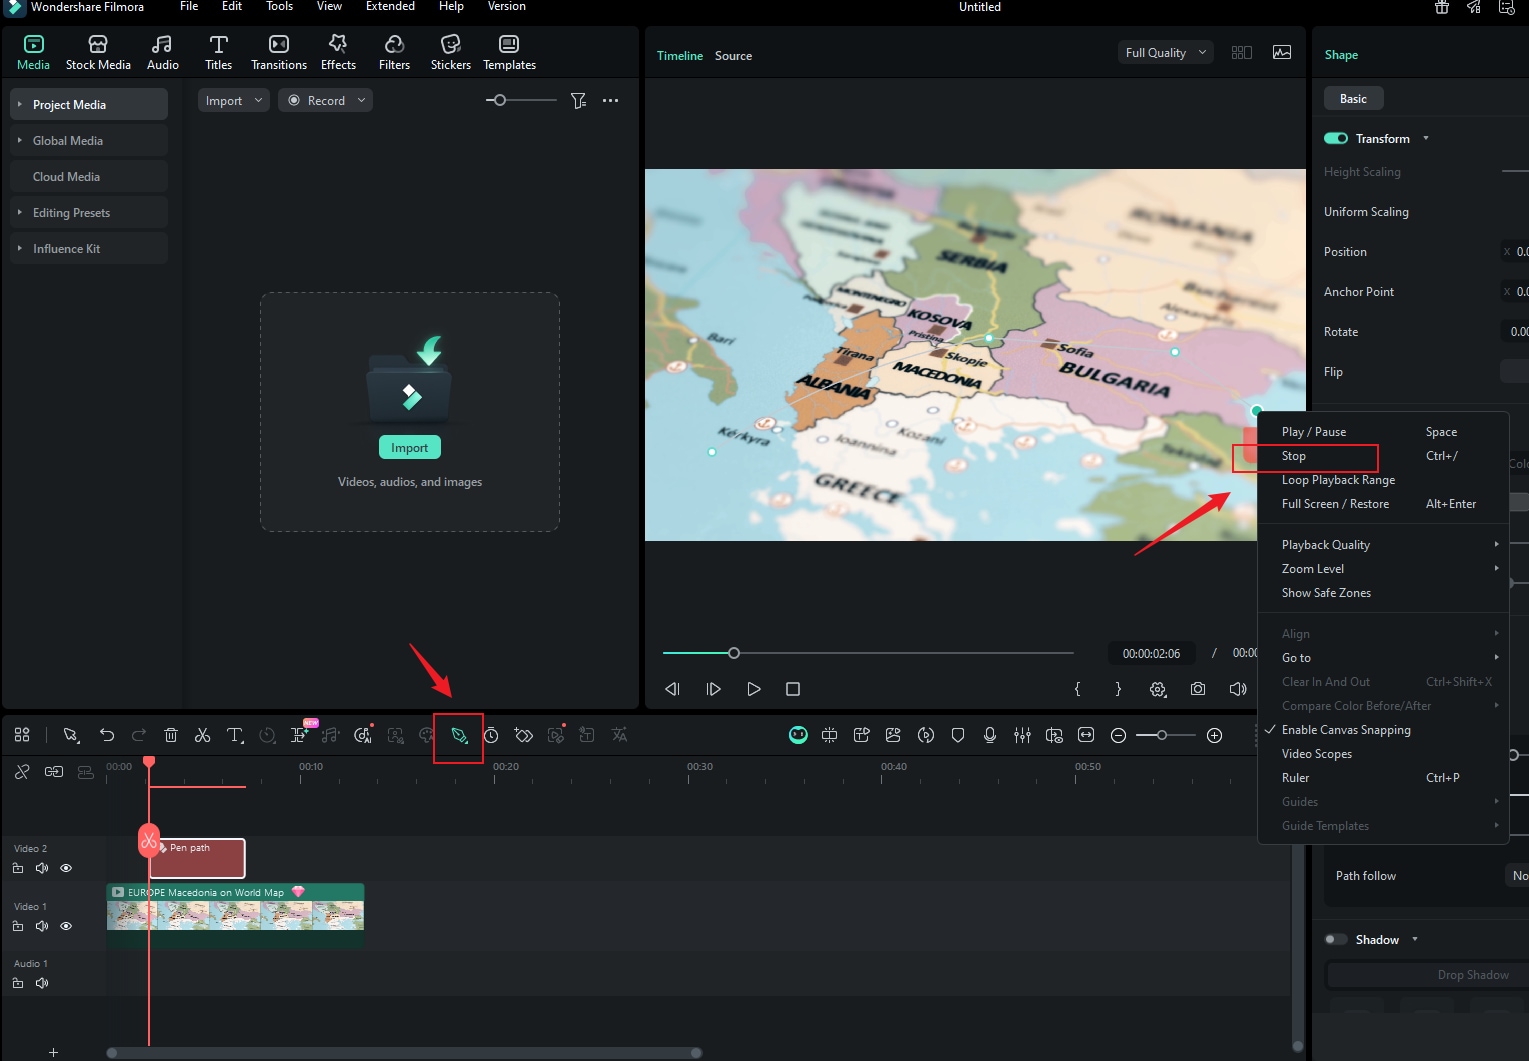
Step 2. Go to the right-side Shape panel and customize the route's Stroke and Effects style.
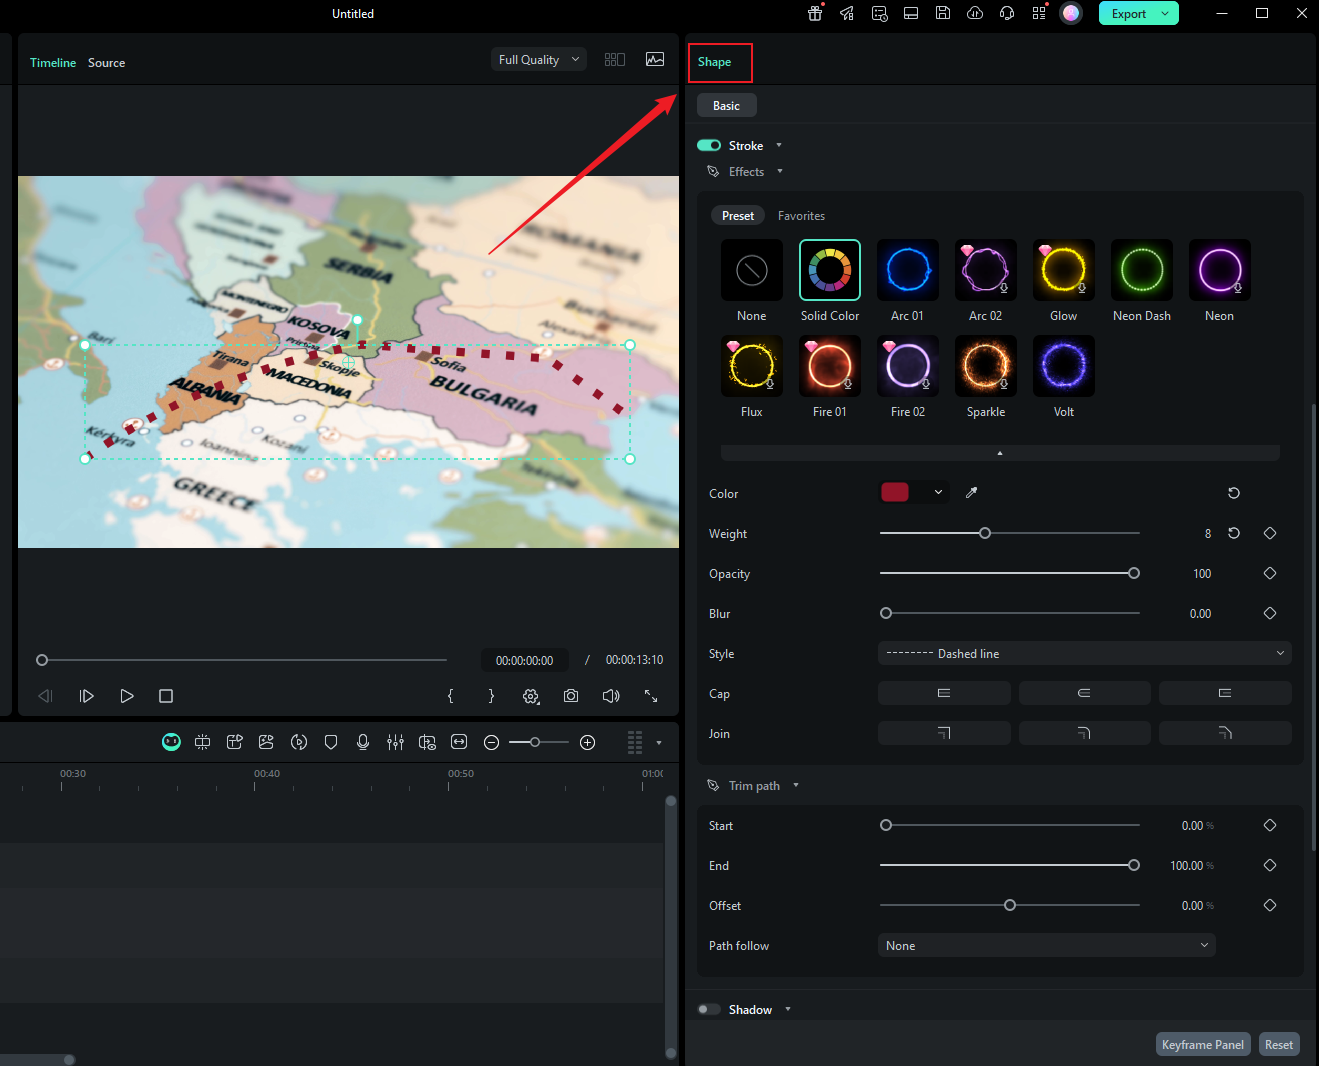
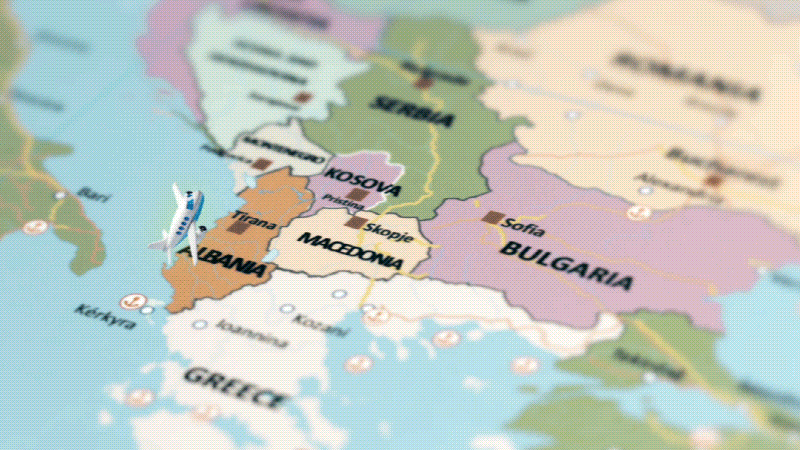
Step 3. In Trim Path, set the Start and End points. Under Path Follow, choose a sticker (plane/car/person) and add keyframes so the sticker travels along your path.
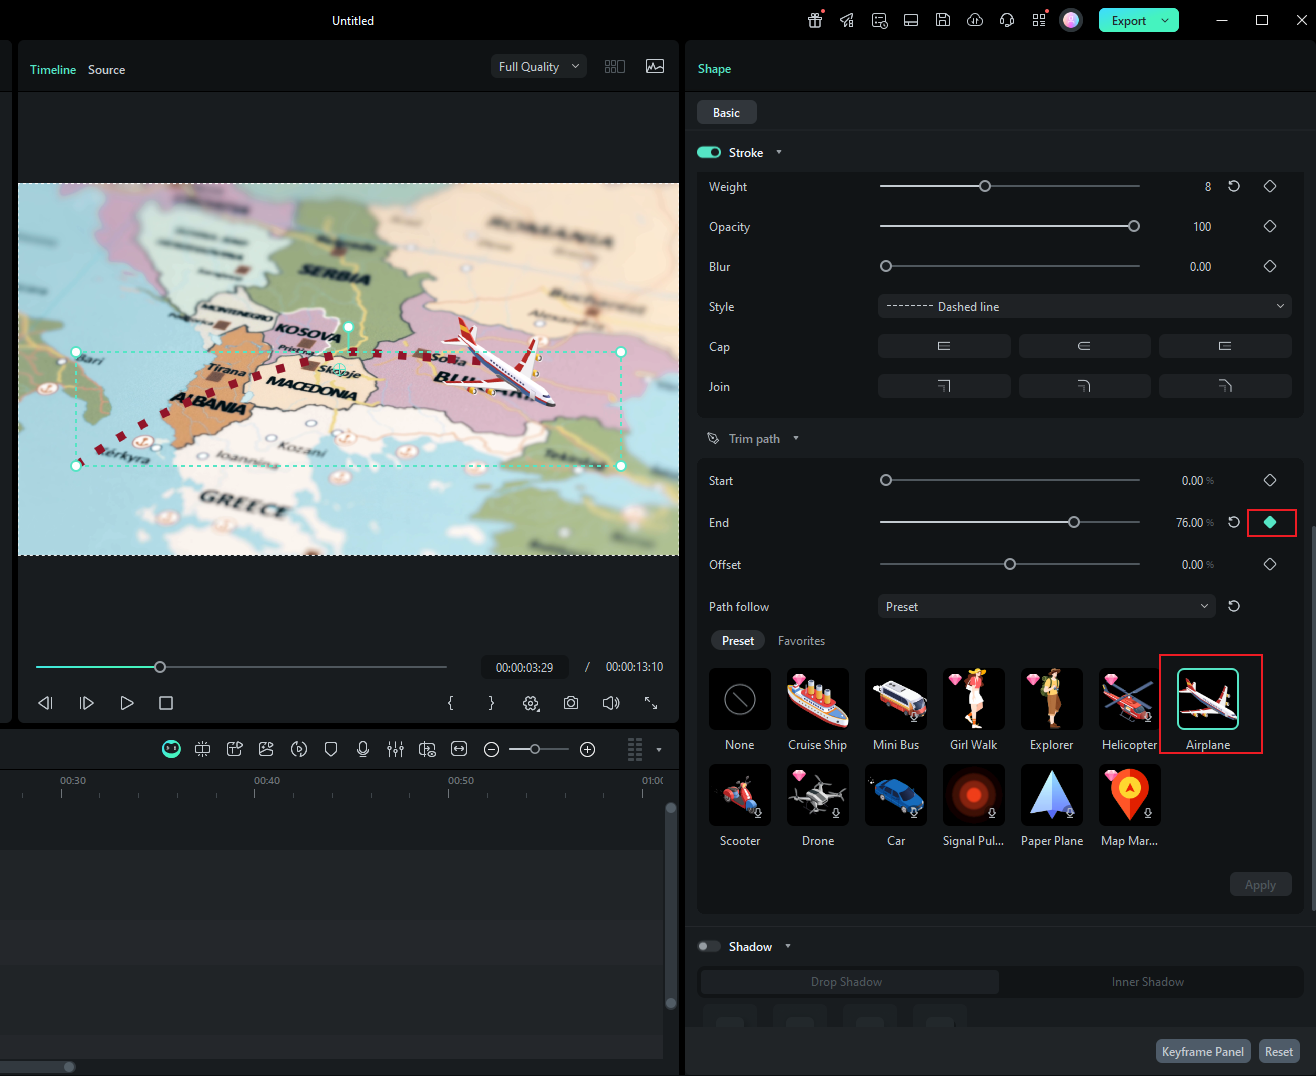
Step 4. Scroll down to preview — the route line and sticker will play as a smooth travel map animation.
1-4. Use AI to Create Unique Animated Travel Map Video
Wondershare Filmora also offers the ability to generate visual content automatically using advanced AI functionality. The tool inputs image prompts and enters your requirements to create flawless videos intelligently. Read the steps mentioned below to learn how to use Filmora's AI functionalities to craft travel map-related videos:
Step 1. Select the Image To Video Function From Filmora's Homepage
After you have launched the tool on your device, access the "Toolbox" located on the homepage and pick the "Image To Video" tab to enter the editing interface. Here, press the "Create" option under the "Custom" option to add the map image that you gathered earlier.

Step 2. Opt For Stitch Mode and Add Another Image
To let the tool generate video from multiple image resources, enable the "Stitch mode" in the following window and add another image. Once the images are added successfully, press the "Submit" button to proceed forward.

Step 3. Enter Your Requirements and Generate an Animated Travel Map
In the text field located within the interface, type the requirements for your video. You can specify the elements you want in your video within 200 characters. Now, press the "Generate" button to let the tool start the AI-generation process.

Step 4. Review and Export the AI Travel Map Video
Once the process is executed, the video will be generated within the "Player" section on the right. Have a preview of it by clicking the "Play" icon located below. Finally, head to the top right corner and press "Export" to save the generated video once you are satisfied with the results.


Method 3 How to Make a Free Animated Travel Map on Mobile (Easy & Quick)
The Wondershare Filmora mobile app lets you create a free animated travel map video with ease. Show your vacation itinerary, highlight road trips, or add transitions between stops, all in just a few taps. It's one of the best ways to make vlogs, reels, city guides, or hiking adventures more visual and fun. Plus, editing on your smartphone keeps things simple so you can create and share content anytime.
Here's how to create a free animated map for your travel video on mobile:
Step 1: Start a New Project and Import Your Map
Tap New Project on the Home menu to get started. Next, import the image file that contains the map of your travel route. Select the media track and adjust the clip length by dragging its edge or using the Duration tool below.

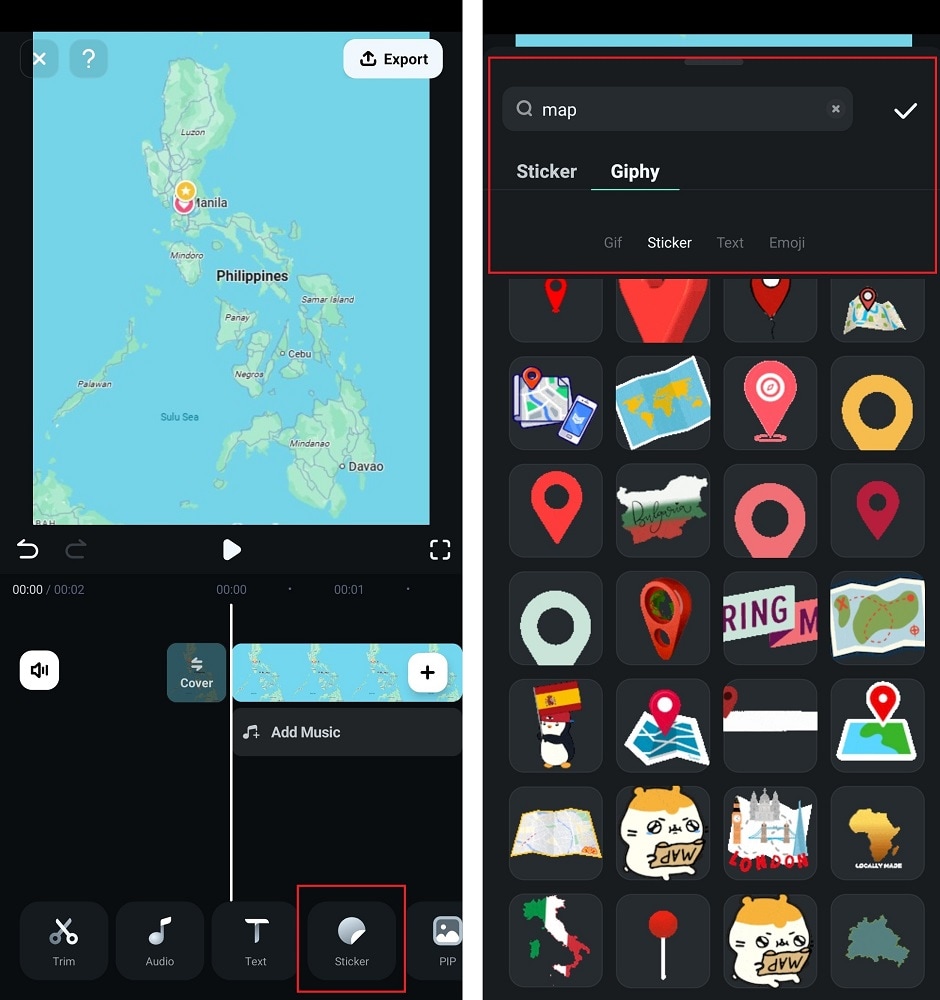
Step 2: Add an Animated Map Sticker
Open the main menu at the bottom and tap Sticker. Enter Map in the search bar, then switch to the Giphy tab. Browse the Sticker category and select an animated map sticker from the results. Tap the check icon to add it to your project.
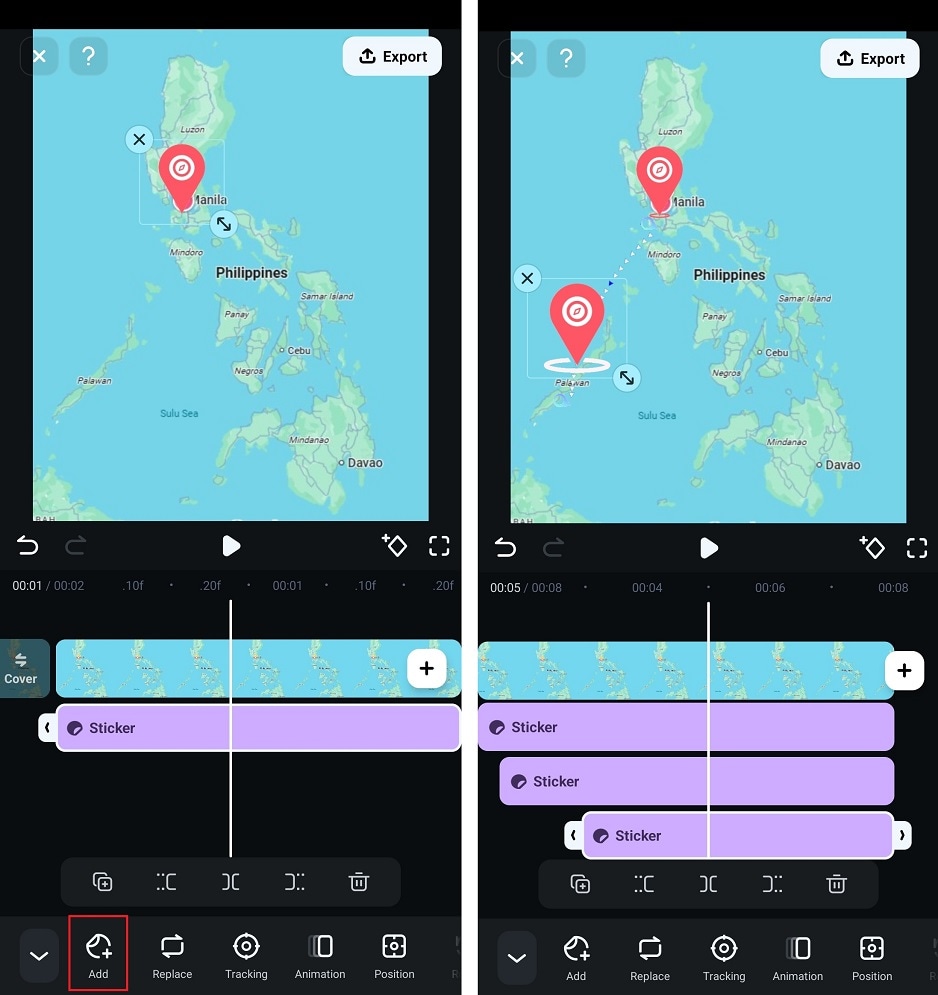
Step 3: Resize and Place the Sticker
Pinch the map sticker on the player window to resize or rotate it, then place it on the map (for example, as point A). Select the Sticker track and adjust its duration to align with the media clip.

Step 4: Add More Stickers to Show the Route
Repeat the steps or tap Stickers > Add on the bottom menu to find and add more animated stickers to the travel map video. After placing the next sticker on the player window, adjust its track's start and end points. Set it to appear a few seconds after the first sticker and ensure it ends at the same time as the other tracks.
Step 5: Preview and Export Animated Travel Map Video
Play and preview the animated travel map video you made in Filmora for mobile. Once done editing, tap Export and save it on your device.

 secure download
Conclusion
An animated travel map plays an important role in adding a realistic touring effect to your motion picture projects. While you can use a web app like Pictramap to create such an animation online easily and for free, the limitations it comes along with might keep you from choosing this method.
Instead, you may want to get more inclined toward a dedicated post-production software like Wondershare Filmora that gives you full control over the process, and the freedom to choose your preferred format to export the animation to for independent usage.
Looking for free anime clips for editing? Discover the top 4 sites for high-quality anime raws (4K/HD) to create viral AMVs with Filmora. Download now!
by Benjamin Arango Jun 15, 2026 15:32 PM
Looking for the best Xbox emulator for Android? Discover the top original Xbox emulators, including Android APKs and cross-platform tools to play classics like Halo in 2026.
by Benjamin Arango Jun 15, 2026 15:32 PM
Discover the most stable PS1 emulators for PC and Android in 2026. Learn how to set up RetroArch, ePSXe, and Mednafen to play classic PlayStation 1 games with original BIOS support.
by Benjamin Arango Jun 15, 2026 15:32 PM
Benjamin Arango
staff Editor
