

 TL;DR:
You can create a zoom-through text animation by placing a background video beneath a thick text layer and applying scaling effects, choosing your software based on your need for intuitive presets, manual keyframing, or browser-based editing.
● For beginner to intermediate users, Wondershare Filmora requires capturing a bold text title as a screenshot to create an image layer, applying the Pan and Zoom tool inward, and changing the blending mode to reveal the underlying video.
● Advanced editors should choose Premiere Pro or After Effects, which require setting manual Scale keyframes and applying a Matte Key or Track Matte effect to mask the background footage inside the moving text.
● Canva provides a basic online alternative for beginners, but because it lacks advanced keyframing, you must use a workaround by uploading a transparent text PNG across duplicated pages and applying a Match and Move transition.
Ask AI for a summary
 ChatGPT
 Perplexity
 Gemini
 Claude
 Grok
Grok
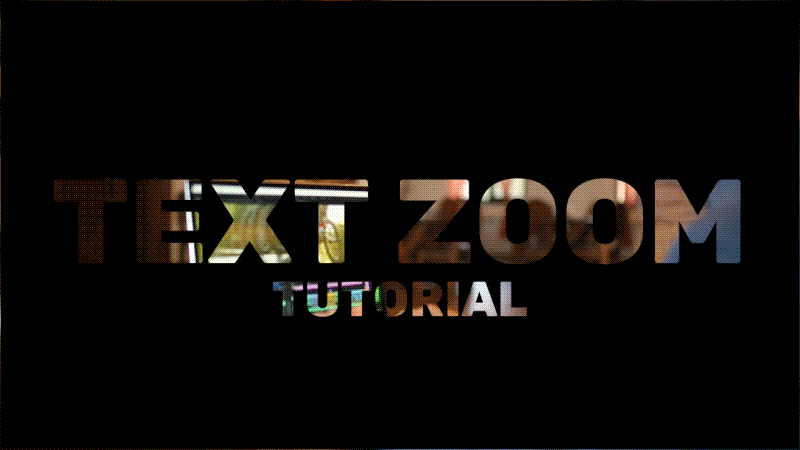
Today, let's level up your video editing skills by mastering the zoom in and out effect for both video and text. You've probably seen those clips that start with a dramatic zoom in and out video effect—a technique where bold text enlarges, revealing the footage within.
For the cool effect it brings, this animation is actually easy to create. We'll demonstrate it using an easy video editor like Wondershare Filmora, so that everyone can pull off this effect, even if you haven't edited before.
Part 1. Understanding Zoom Text Effects (Key Concepts)
A zoom text effect is a creative visual technique used by editors to shift the viewer's focus, either by moving closer to emphasize detail (zooming in) or pulling back to reveal the bigger picture (zooming out).

When combined with a text, this effect gives the impression that the camera is traveling through or away from the letters. The text usually sets the theme or message of your video, while the scene it reveals supports that idea visually, almost like the story unfolding right behind the words.
So, it's not just cool to look at. If you're someone who likes giving names or titles to your videos, you can use this zoom text effect to make your intro stand out.
Part 2. Common Use Cases of Zoom In & Out Text Effects
There are certain moments in video editing where zooming in and out text effects works especially well.
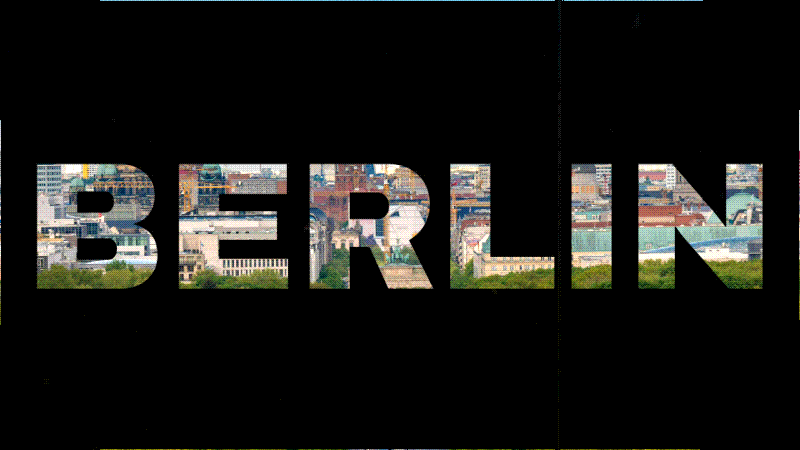
1. Location Tags in Travel Videos
In travel vlogs or even film, the location tag often appears on screen to show where the story takes place, like "Bali," "New York," or "Berlin." Instead of just leaving it as plain text, you can make a transition to the next scene through the zoom-in text effect and reveal the location.
2. Intros and Openers
When starting a video, the zoom-in and out effect can pull the viewer's attention straight to your title or logo and give the opening a nice bit of energy. It's often used to introduce their channel name, tagline, or the video's main topic in a bold way.
3. Scene Transitions
Regular zooming in and out has been commonly used to make scene changes feel smoother. When you combine it with text, it helps give context, like showing where the story is heading or what the next part is about. A zoom through text transition keeps the flow natural between clips and helps viewers follow along with what comes next.

4. Video Promos
Zoom-in and out text animations also work perfectly for short promos or teaser videos. They help highlight important phrases, your brand name, or event titles in a way that's memorable and easy to remember.

Part 3. Step-by-Step: Master the Filmora Zoom In and Out Effect for Text and Video
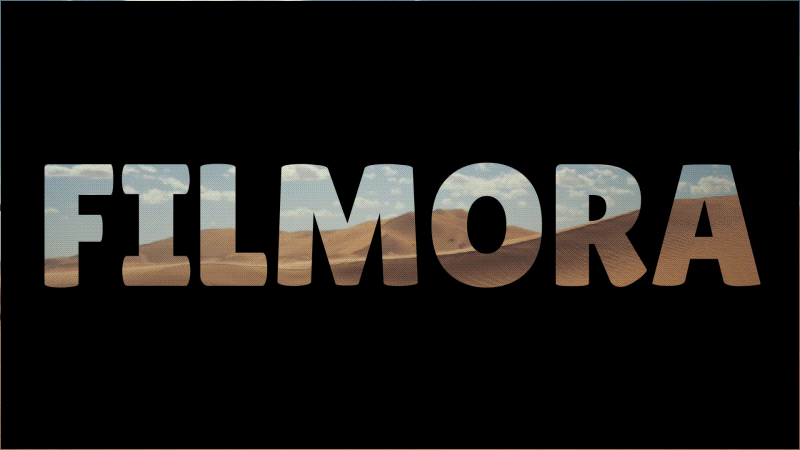
After seeing how the effect works, let's start creating your own text zoom-in animation using Wondershare Filmora. Filmora is an easy-to-use video editor that is perfect if you are a beginner, yet still powerful enough to handle advanced visual effects like this without holding back your creativity.
To make this text zoom in effect in Filmora, you'll first need to create your text and turn it into an image layer. Then, apply the Pan and Zoom feature to add that smooth zooming motion. We'll show it in detail in the step-by-step below.
How to Zoom Text or Text Zoom In Using Filmora
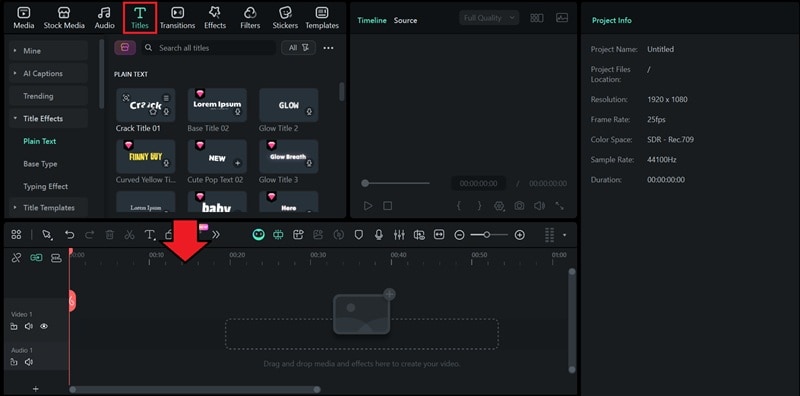
With your Filmora installed, open the program and create a new project.

Inside the editing workspace, head to the Titles menu and use the plain basic one. Drag it to the timeline.
Customize your text from the properties panel on the right. Type in your title or phrase, then switch to a bold, thick font to leave enough room for the zoom later.
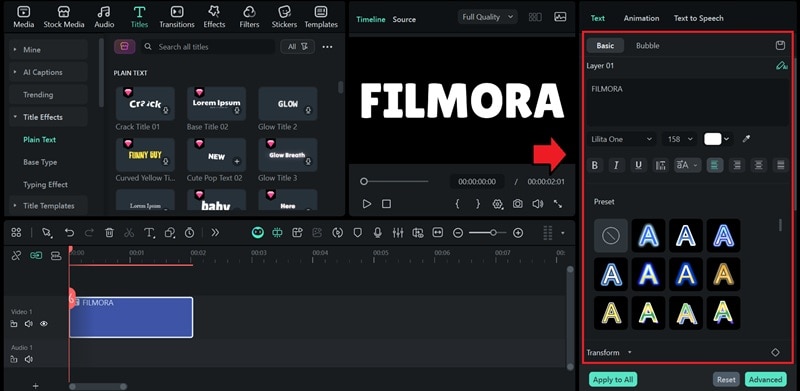
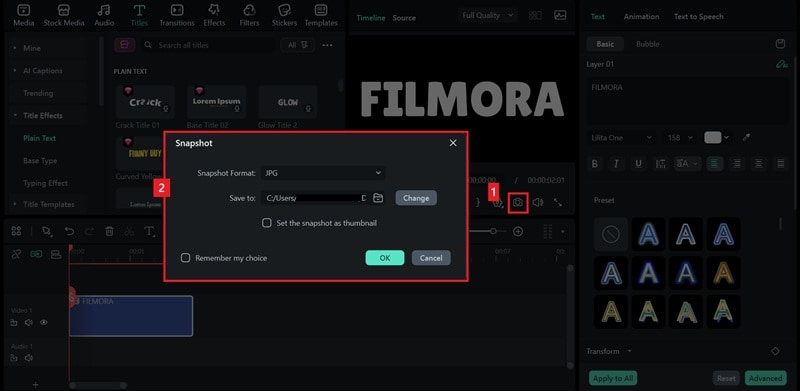
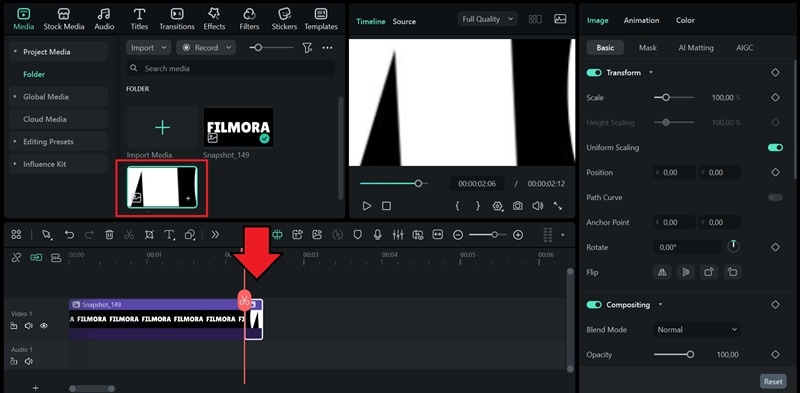
Turn the text into an image layer by clicking the Screenshot button. This will capture the text as a still frame, which you can then use to create the zoom-through transition in the next steps.
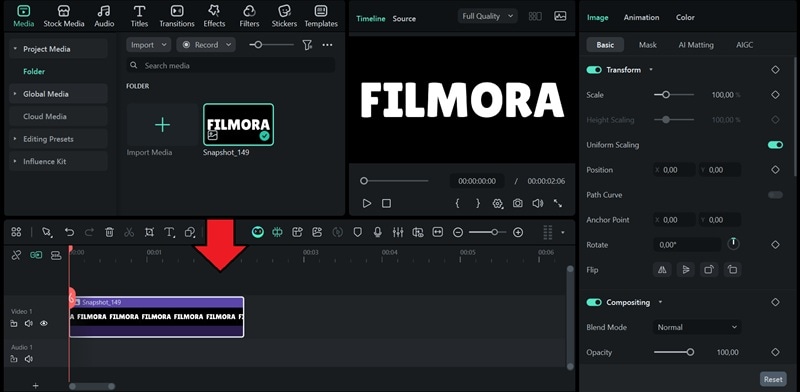
Next, remove the original Title track and replace it with the text screenshot you captured earlier.
Adjust the duration of the clip, then right-click on the track and choose "Crop and Zoom." You can also click the Crop icon from the toolbar for quick access.
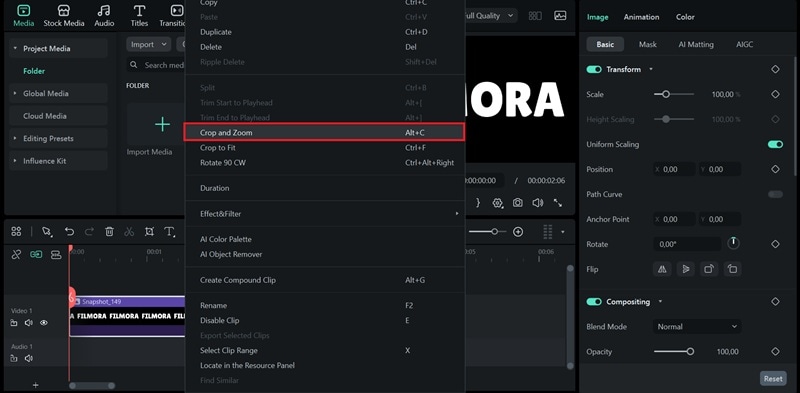
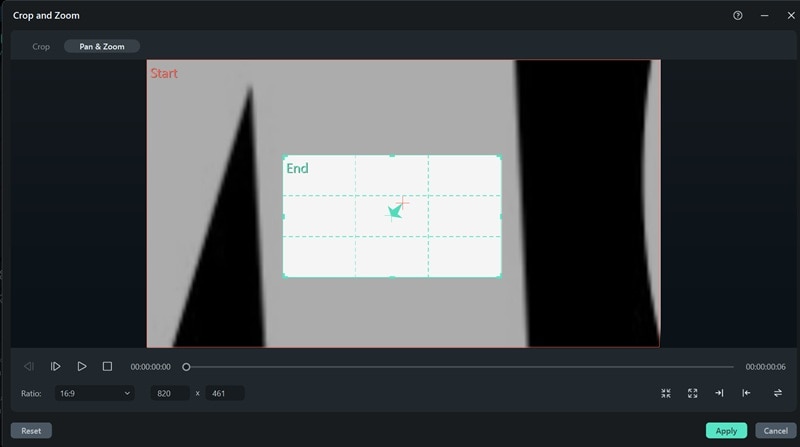
In the pop-up window, go to the "Pan and Zoom" tab. You'll see two frames: Start and End.
- Set the Start Frame to cover the entire screen.
- For the End Frame, drag one of the corners inward to make it as small as possible, then move the box to the center of the text.
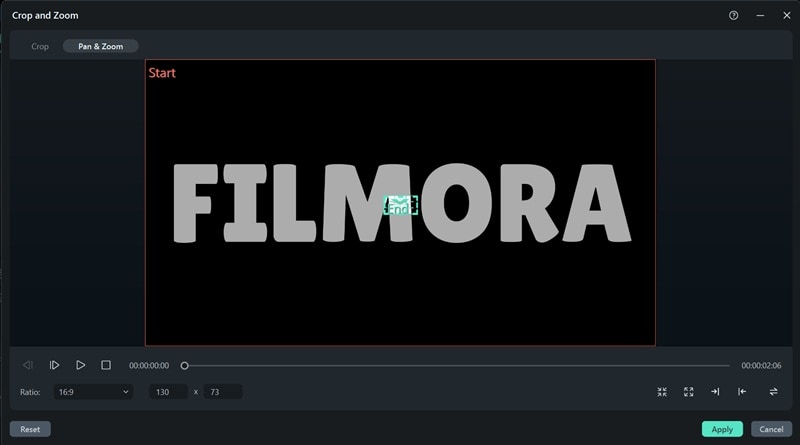
Once everything looks right, click Apply. You'll now see the Pan and Zoom effect applied to your text.
Note: If there's still a gap and the zoom doesn't perfectly cover the letters, you can take another snapshot at the point where the zoom stops.
- Play the timeline and stop at the last frame of the zoom.
- Take another snapshot at that point and place it right after the first snapshot.
- Apply the Pan and Zoom effect again.
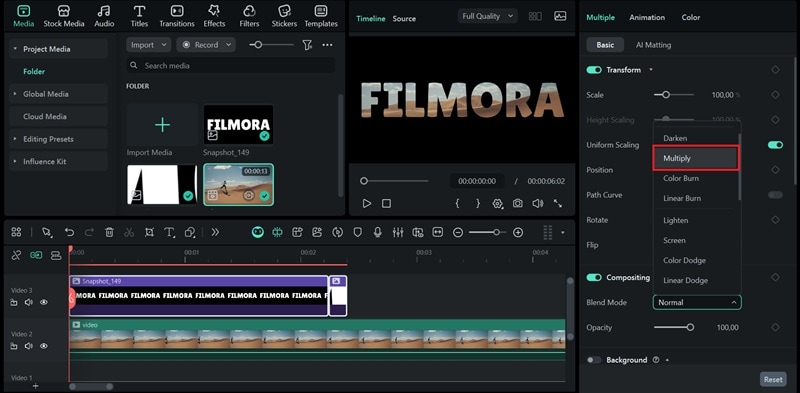
With your text ready, it's time to add the background video. Import the clip you want to reveal through the text and place it on the track below your text layer. Make sure the video extends beyond the end of the text animation.
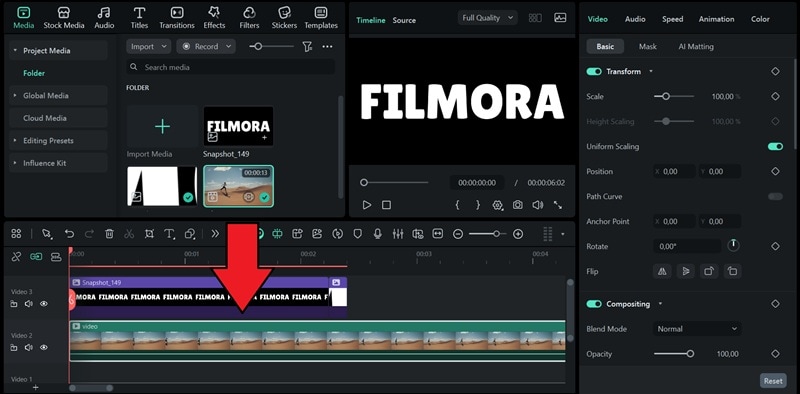
After that, select the text clip, go to the Compositing section, and change the blending mode to Multiply (if you are using a black background) and Lighten or Screen (if you are using a white background).
Preview the result and make any adjustments if needed.
Create More Text Animation with Filmora
After successfully creating the zoom text effect, you can explore even more creative text animations in Filmora. There are a lot of text animations that you can experiment with, from basic to more stylized ones.
Aside from that, many Title templates in Filmora already come with built-in animations. You can apply them instantly, customize the font or color, and have professional-looking text ready to use for any kind of project!
Part 4. Alternative Approaches & Tools Comparison
Besides using Filmora, advanced zoom in and out video effects can be created in professional editors. We compare how to achieve the Premiere Pro zoom in and out effect, the Davinci Resolve zoom in and out effect (as a popular alternative), and the simplest methods using a zoom in and out video effect app like Canva.
1. How to Master the Premiere Pro Zoom In and Out Effect
The steps for creating a zoom-in and zoom-out text effect in Premiere Pro are slightly different from those in Filmora:
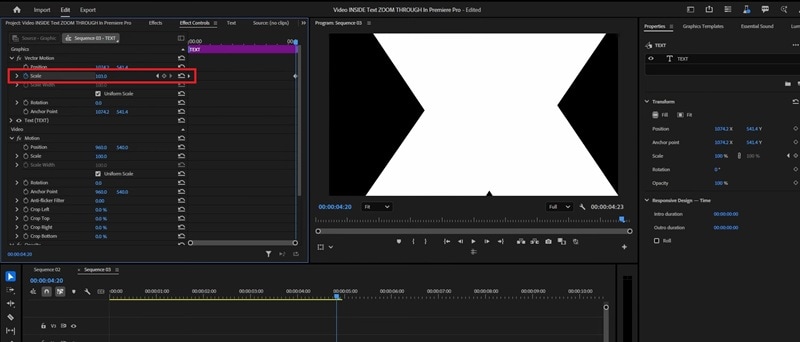
- Use the Anchor Point as a reference for where the zoom originates.
- Set keyframes for the Scale property, starting from a smaller value that fits your scene, and gradually increase it until it zooms in on the text.
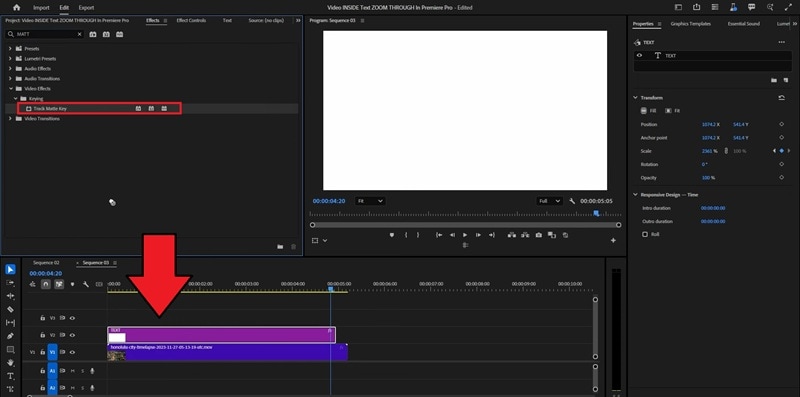
To blend the text with your video:
- Import a video and place it beneath the text layer on the timeline
- Apply the Matte Key effect to the text layer to make the video appear inside the text.
2. Creating the Advanced Zoom Through Text Effect in After Effects
For creating the zoom through text effects in After Effects, the process is pretty similar to Premiere Pro. You'll need to set keyframes for the Scale properties to control how the camera or text moves.
- After adding a video to the timeline, insert the text and adjust the position.
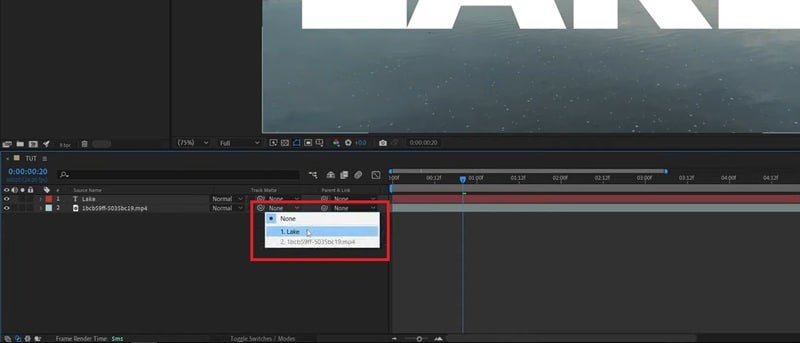
- Select Toggle Switches/Modes at the bottom of the timeline panel to display the Track Matte options.
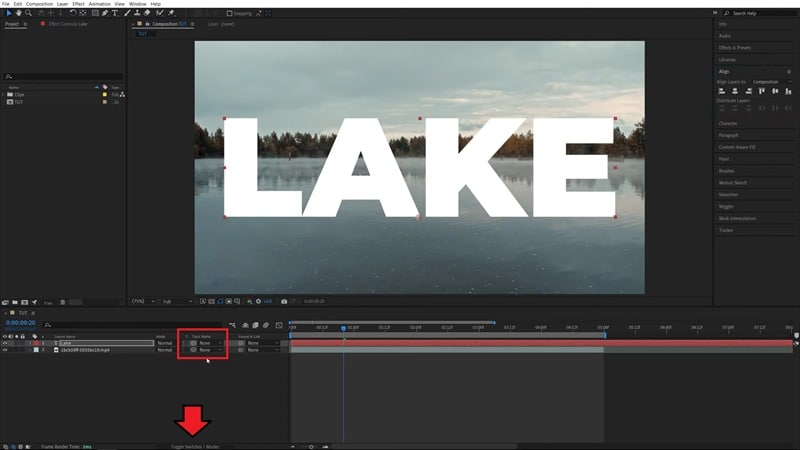
- On the video layer, set the Track Matte to your text layer. This will make the video appear inside the text.
For zooming through the effect:
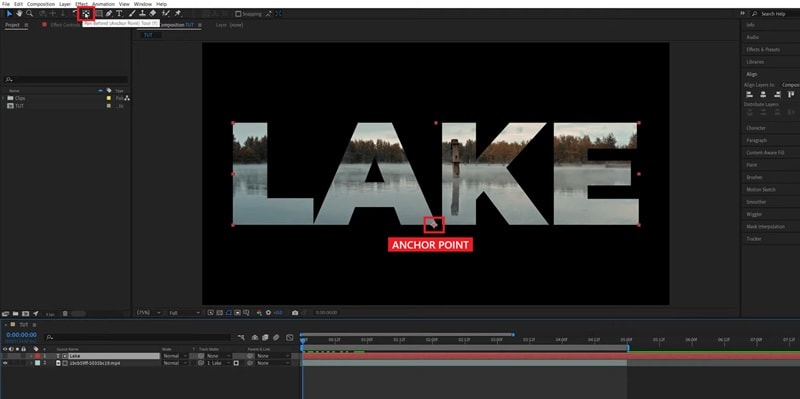
- Select the Text layer, then choose the Pan Behind Tool (Y).
- Move the Anchor Point to the spot where you want the zoom to focus or pass through.
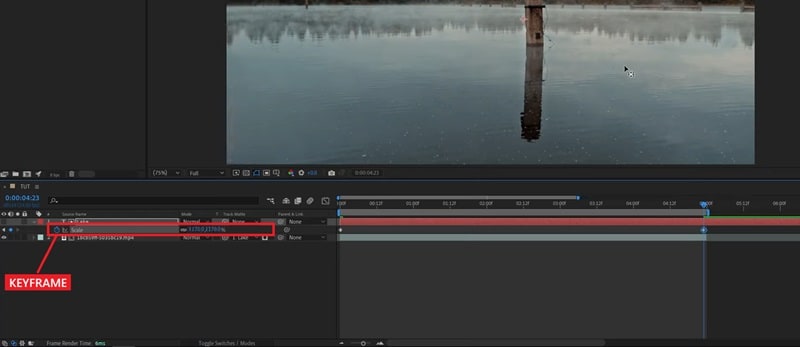
- Press S to reveal the Scale property, and set your first keyframe at the starting size.
- Move the playhead to the end of the animation, increase the scale until it zooms through the text, and add your second keyframe.
3. Creating Zoom Text Animation Online on Canva
If you prefer using an online video editor instead to create simple zoom text effects, you can use Canva. But since Canva lacks advanced features like keyframing animation and Pan and Zoom, you'll need to use a small workaround to achieve the effect.
- Create a shape and place your text on top of it.
- Save the design as a PNG file.
- Upload both the video you want to use and the text image into Canva.
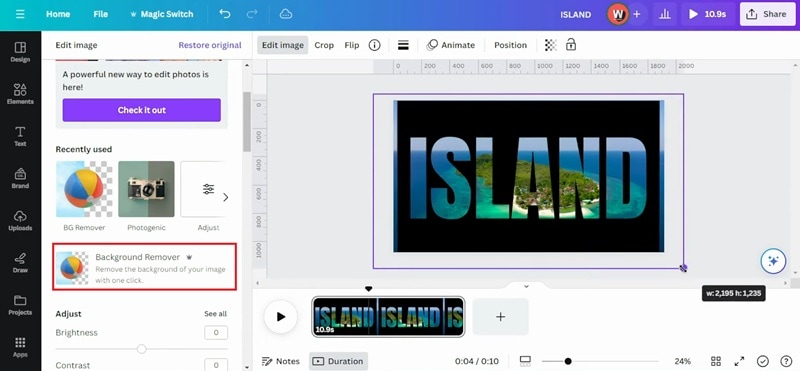
- Use the Background Remover tool on the text image to make it transparent, then adjust its position and placement over the video.
To make the zoom through text effect:
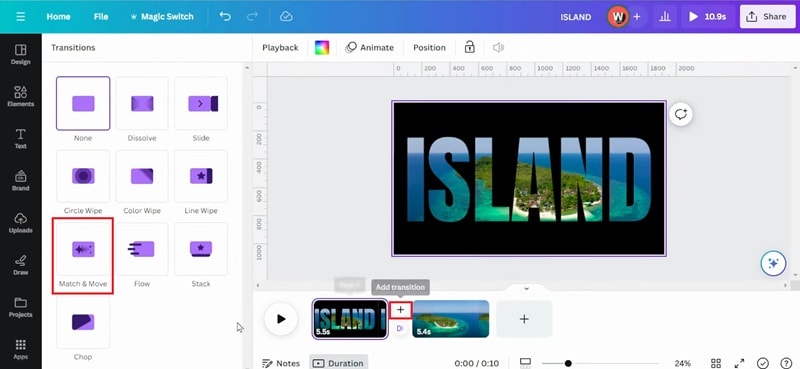
- Add a new page and duplicate the text image.
- On the second page, resize the text until it fills the frame or reaches the zoom level you want.
- Add a transition between the two pages and choose "Match and Move."
Which Method Should You Go for?
Now that we've gone over several ways to create the zoom-in and zoom-out text effect, we've made this quick comparison table to help you decide which workflow feels most comfortable for you.
| Dimension | Filmora | Premiere Pro | After Effects | Canva |
| Platform | Windows & macOS | Windows & macOS | Windows & macOS | Online |
| Ease of Use | Easy to use with intuitive controls | Moderate; requires some editing experience | Moderate; requires some editing experience | Easy with limited control |
| Methods | Pan & Zoom, Blending Mode | Keyframes & Matte Key Effect | Keyframes & Track Matte | Match and Move Transition |
| User Level | Beginner to Intermediate | Advanced | Advanced | Beginner |
Conclusion
Your intros and transitions don't have to look plain anymore. The text zoom-in effect is a simple way to add depth to your videos, and now you know exactly how to create it using different methods.
The zoom in and out effect is a simple way to add depth to your videos, and now you know exactly how to create it using Filmora, Premiere Pro, and other apps. With Filmora, you can achieve this powerful zoom in and out video effect easily using the Pan and Zoom tool. Ready to try this Filmora zoom in and out effect yourself?
