How to Use 3D Camera Tracker in After Effects on Mac
Mar 17, 2026• Proven solutions
Whether you are an aspiring director or a home movie maker, Adobe After Effects’s camera tracking is one of the exceptional functions. The 3D camera tracking in After Effects on Mac helps track objects within a specified video clip to add various 3D elements. The ideal use of motion tracking can effectively transform live-footage into the stuff of engaging high-tech footage. Without further ado, let’s understand the tracking camera in After Effects in detail as follows.
Part 1: What’s 3D Camera Tracking?
You can perform 3D camera tracking in After Effects with its inbuilt 3D Camera tracker. In general terms, the match-moving or motion tracking describes live-action cameras' simulation process and their related perspectives via After Effects or similar software. The 3D motion tracking is typical of special effects on different feature films and commercials, including character animation. The 3D camera tracking in After Effects is to simulate the intricate moves of a live-footage camera across all three axes.
The 3D camera tracker's effect helps analyze different sequences of video to extract 3D scene data and camera motion. It further allows us to composite the 3D elements over 2D elements correctly.
The next section will cover the After Effects camera tracking tutorial in terms of a 3D camera tracker.
Part 2: How to Use the 3D Camera Tracker in After Effects on Mac?
Given below is a full-fledge Adobe After Effects camera tracking tutorial with the help of 3D Camera Tracker.
Step 1: Launch After Effects on Mac
Download After Effects on Mac and set the project. Then select Composition > New Composition. Set the width as 1280 and height as 720 in the Composition Settings window. Set the Duration to 12 seconds and Frame Rate to 25 to confirm with the OK button.

Step 2: Import Media File
Select theimage sequence and go to File > Import > File. Turn on the JPEG sequence option in the Import File window and hit the OK button.

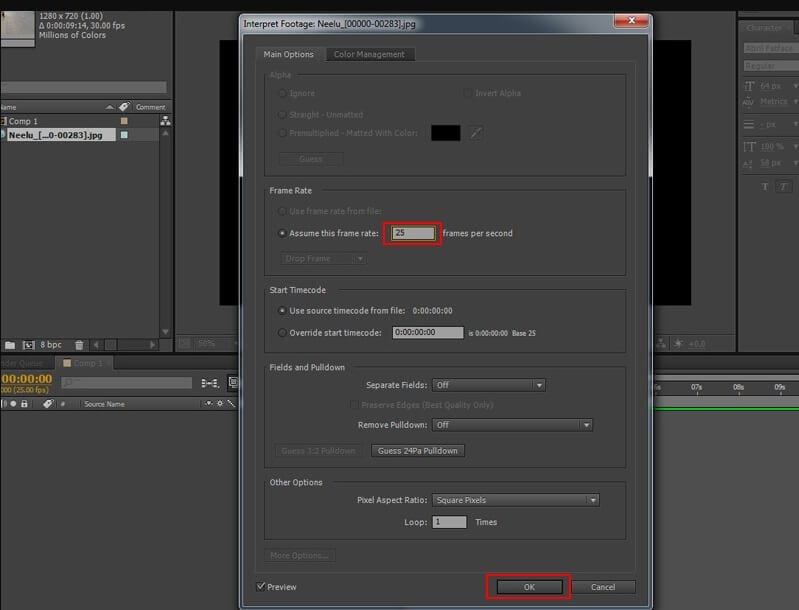
After selecting the image sequence in the Project window, open the Interpret Footage window and set the frame rate to 25 to confirm.

Then, drag and drop the image sequence in the composition bar as shown below.
Step 3: Open Track Camera
Select Animation > Track Camera.

Step 4: Analyze the Footage
After you open the tracking camera, it starts analyzing the background footage in two steps.

Step 5: Add 3D Camera Tracking in After Effects
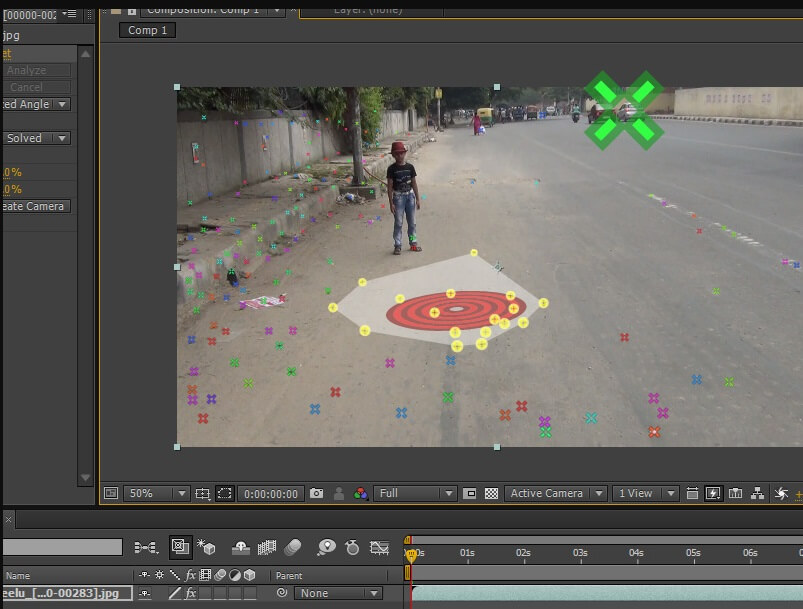
After the analysis process ends, increase the value of Track Point Size in the 3D camera tracker effect.
![]()
Step 6: Select Track Points
Now, you are required to select different track points to generate a dummy 3D plane/null. Please select at least four of them, as shown in the image below.

Step 7: Get the Null Object
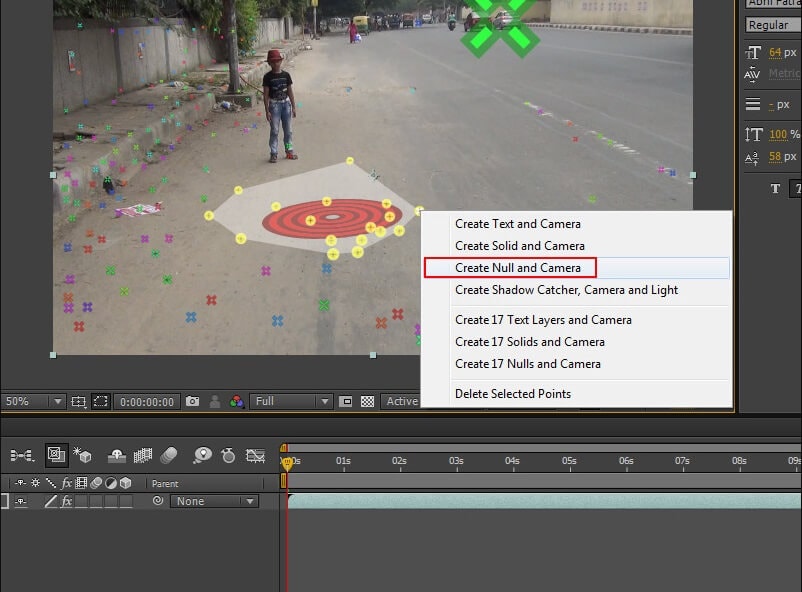
Right-click the selected points and hit the Create Null and Camera button.

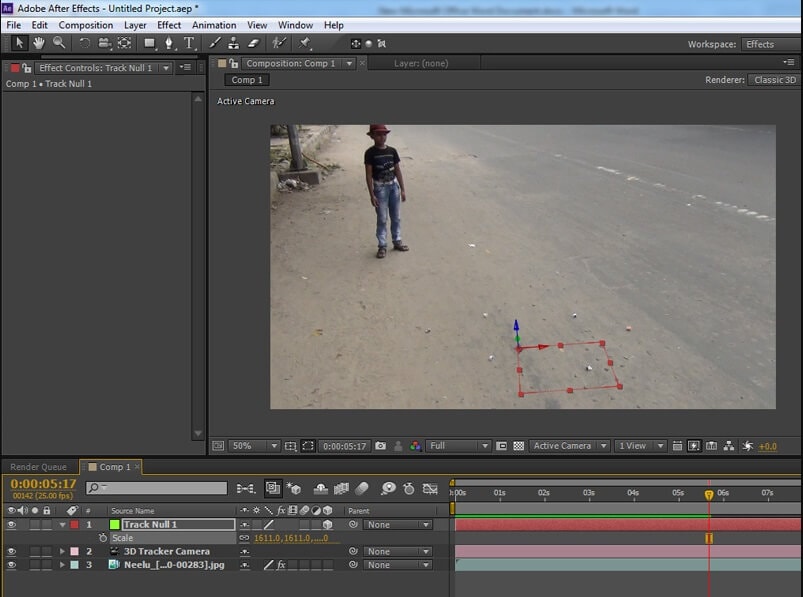
Now, you have the null object and 3D camera in the timeline. The null object acts as a placeholder to stick with the footage and follow the camera.

Step 8: Export 3D Camera Tracker Data
You can export this 3D Camera Tracker data to various applications as follows.
- Select File > Export > Maxon Cinema 4D Exporter.
- Select among the Extrude or Text option in the Text Exporting dialog box.
![]()
- Once you name and save the file, open it in a 3D application.
Part 3: Common 3D Camera Tracker Problems in After Effects
After understanding how to track camera After Effects, it's time to discuss their standard troubleshooting, which you faced or may face in the future while operating the software. So it's better to deal with them now!
- Fix the 3D Camera Tracker
If you get to see the error as “3D Camera Tracker: Layer size must match the composition and use default transform”, fix it now as follows.
You are first required to note the size of the image sequence or video clip. Then, select the clip and right-click Pre-Compose. Use the Settings provided in the Pre-Compose window. Hit the OK button to confirm.
Now, go to Composition > Composition Settings and set the size to the same as you noted earlier. Click and drop-down and select Reset under Transform if you have already set it to the Fit to Composition.
Then select the clip > Effect Controls > 3D Camera Tracker to make it work again.
- Fix the Analysis Solve Failed Error
It occurs when Adobe After Effects camera tracking fails. Sometimes you also get to observe Background Changes and Multiple Camera Angle in the video sequence.
So, what do you need to resolve the issue? You need to trim the video with a change in Camera Angle, Video Frame, or Background.
You can trim video till the first change. Then, play the video and check if you see only one camera angle and no change in the background.
Go to Effects Control > 3D Camera Tracker and delete the previously added effect to the clip.
Then move to the right and under the Tracker menu, click on the Camera Tracker.
The issue will resolve now, and you will start to analyze the video for 3D tracking points. You can hover over the tracked points as well.
- No Depth from a Tripod Pan Solve
The error “no depth from a tripod pan solve” will show at the target icon's bottom. It happens even if the track points are at equal distance from the camera and of the same size.
Well, it's not a situation to freak out! It's all done due to the absence of the parallax effect. This effect usually comes to notice when static objects seem to be moving at different speeds from different distances. Similarly, the 3D Camera tracker uses this effect to figure out an object's reach from one another.
The panning movement occurs when the camera doesn't move across the scene very much. It's the reason the 3D tracker says that it can't derive in-depth information due to the absence of parallax effects in the shot.
Instead of freaking out, you can either use a 2D motion tracker or attach objects to “flat” track points. It will link other layers to the movement of the camera, and the issue will resolve.
Conclusion
So, this is all about 3D camera tracking in After Effects on Mac. We discussed the ultimate tutorial with regards to using the 3D camera tracker and following the right path. Also, there are common troubleshooting issues with the solutions discussed in the last section.


Liza Brown
chief Editor