Have you ever watched a movie trailer and wondered why it instantly feels cinematic? It's not the color grading, nor the dramatic music. It's those black bars that are framing the scene. If you've been searching for how to add cinematic black bars to videos with ultimate ease, you're in the right place. This guide will walk you through what they are, why they matter, and how to create them on your desktop or mobile devices with an easy tool.
In this article
What Are Cinematic Black Bars (a.k.a Letterboxing)?
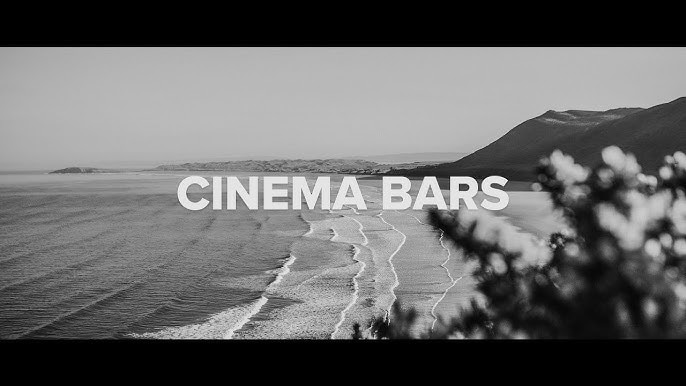
Cinematic black bars, also called letterboxes, are horizontal black frames at the top and bottom of a video. They are designed to mimic widescreen aspect ratios like 2.35:1, 2.39:1, or 1.85:1, even if your original footage was shot in the standard 16:9 format.
It's important to explain the difference between letterboxing and pillarboxing. Letterboxing adds bars on the top and bottom (to get a widescreen effect), while pillarboxing adds bars on the left and right to get vertical or square footage on a widescreen display.
Think of black bars as a visual frame. They don't crop out parts of your video, but are rather overlaid on top. The goal is to guide the viewer's attention and increase immersion.
Why Should You Even Add Black Bars?
If you are thinking that adding cinematic black bars is all about aesthetics, you're not completely right. They can also be a powerful storytelling device. Here's why they work.
- Cinematic Aesthetic – Cinematic black bars give your footage an instant "movie" feel, and your video will immediately look more polished and professional.
- Focus Composition – These black bars also direct attention toward the subject by subtly masking certain distractions in the background, which is great for storytelling.
- Hide Mismatched Footage – If you want to blend clips with slightly different framing or resolutions, this technique will bring them closer together.
- Match the Widescreen Aspect Ratios – Adding the same black bars across multiple clips shot on different devices will ensure visual consistency throughout.
If you are working on casual or lifestyle videos, you should use thinner bars, while thicker bars work better for more dramatic and high-impact stories.
How to Add Black Bars to Your Video
Filmora is an all-in-one video editor perfect for adding black bars. Available for desktops (Windows and Mac) and mobile (Android and iOS) devices, it offers four distinct methods to add cinematic black bars to videos, and that's just a fraction of what it can do. Beyond this, it offers motion tracking, AI background removal, cinematic LUTs, advanced audio editing features, and seamless transitions for turning raw footage into polished stories.
Apart from that, the easy, non-linear magnetic timeline is perfect for creating a seamless video flow, and dozens of helpful AI features will help you refine your footage, like the AI Video Enhancer and AI Color Palette. You can also use the AI Image (text-to-image) and the AI Text-to-Video Veo 3 feature to pump your creativity to the max.
Here's how to add cinematic black bars in Filmora. Before you begin following the steps below, make sure that you download and install both the desktop and mobile versions of Filmora.
Method 1: Add Cinematic Black Bars to Videos with Effects
Let's start with the desktop version.
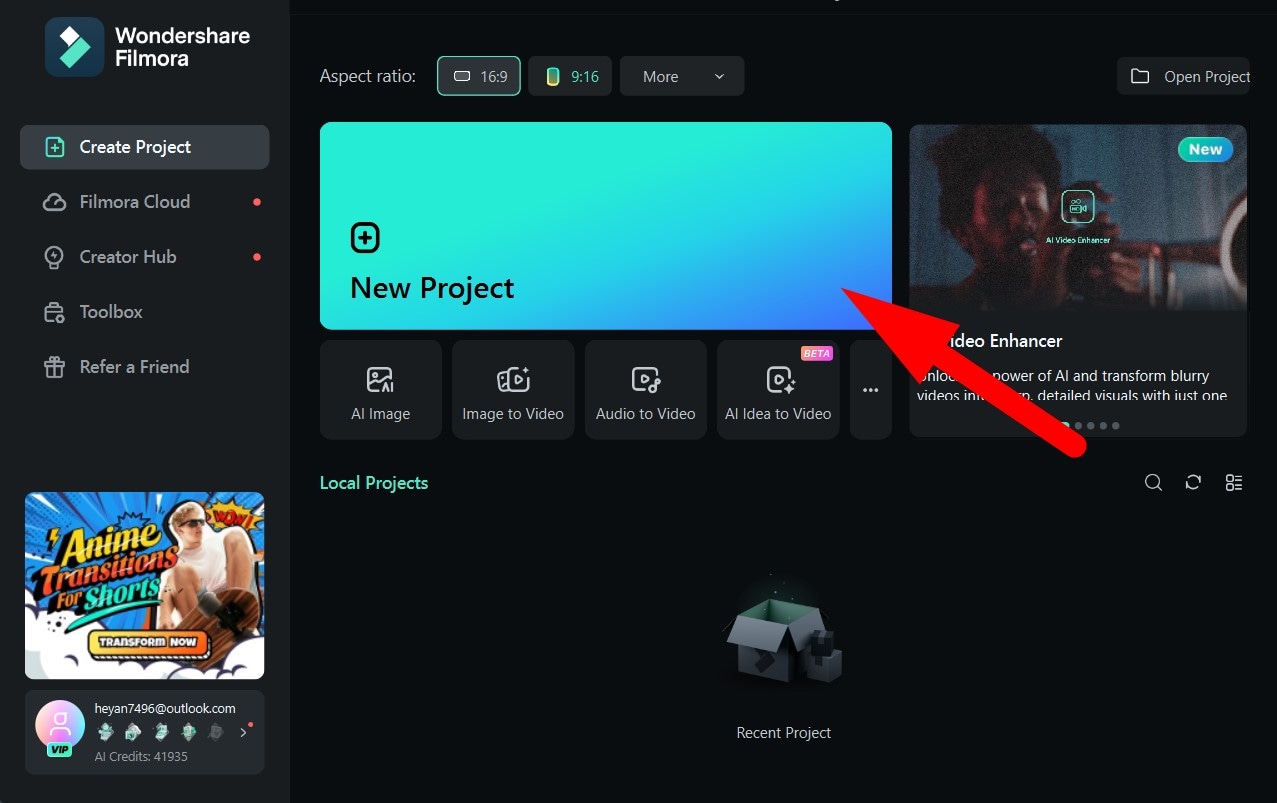
- Open Filmora and create a New Project.
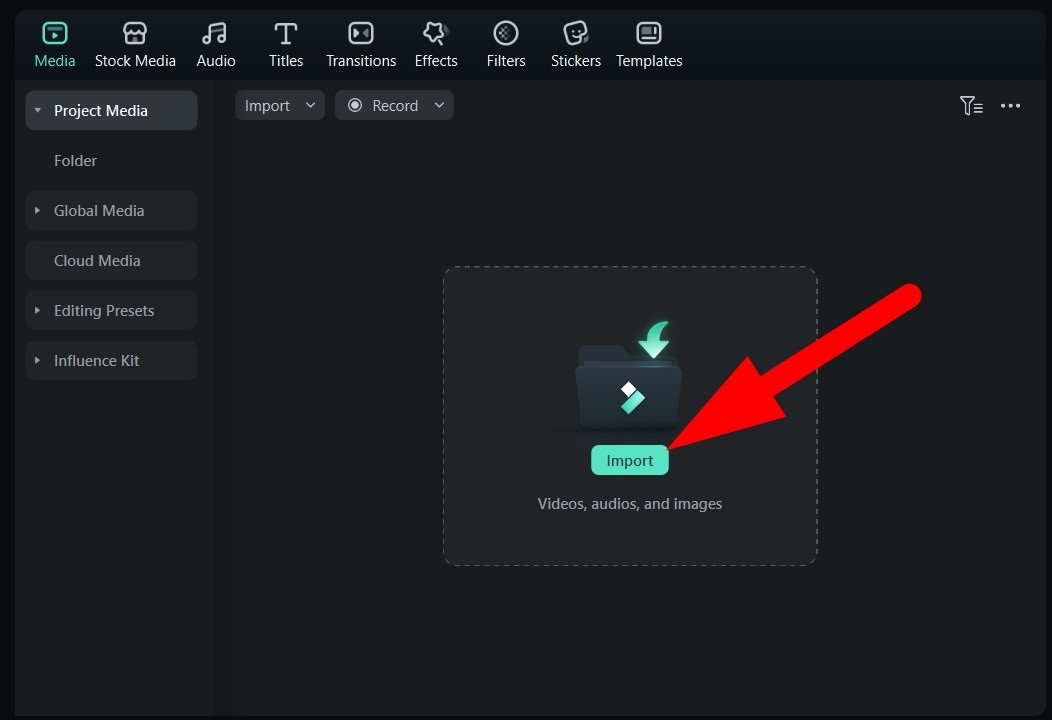
- Click on Import and add a video file that you want to edit.
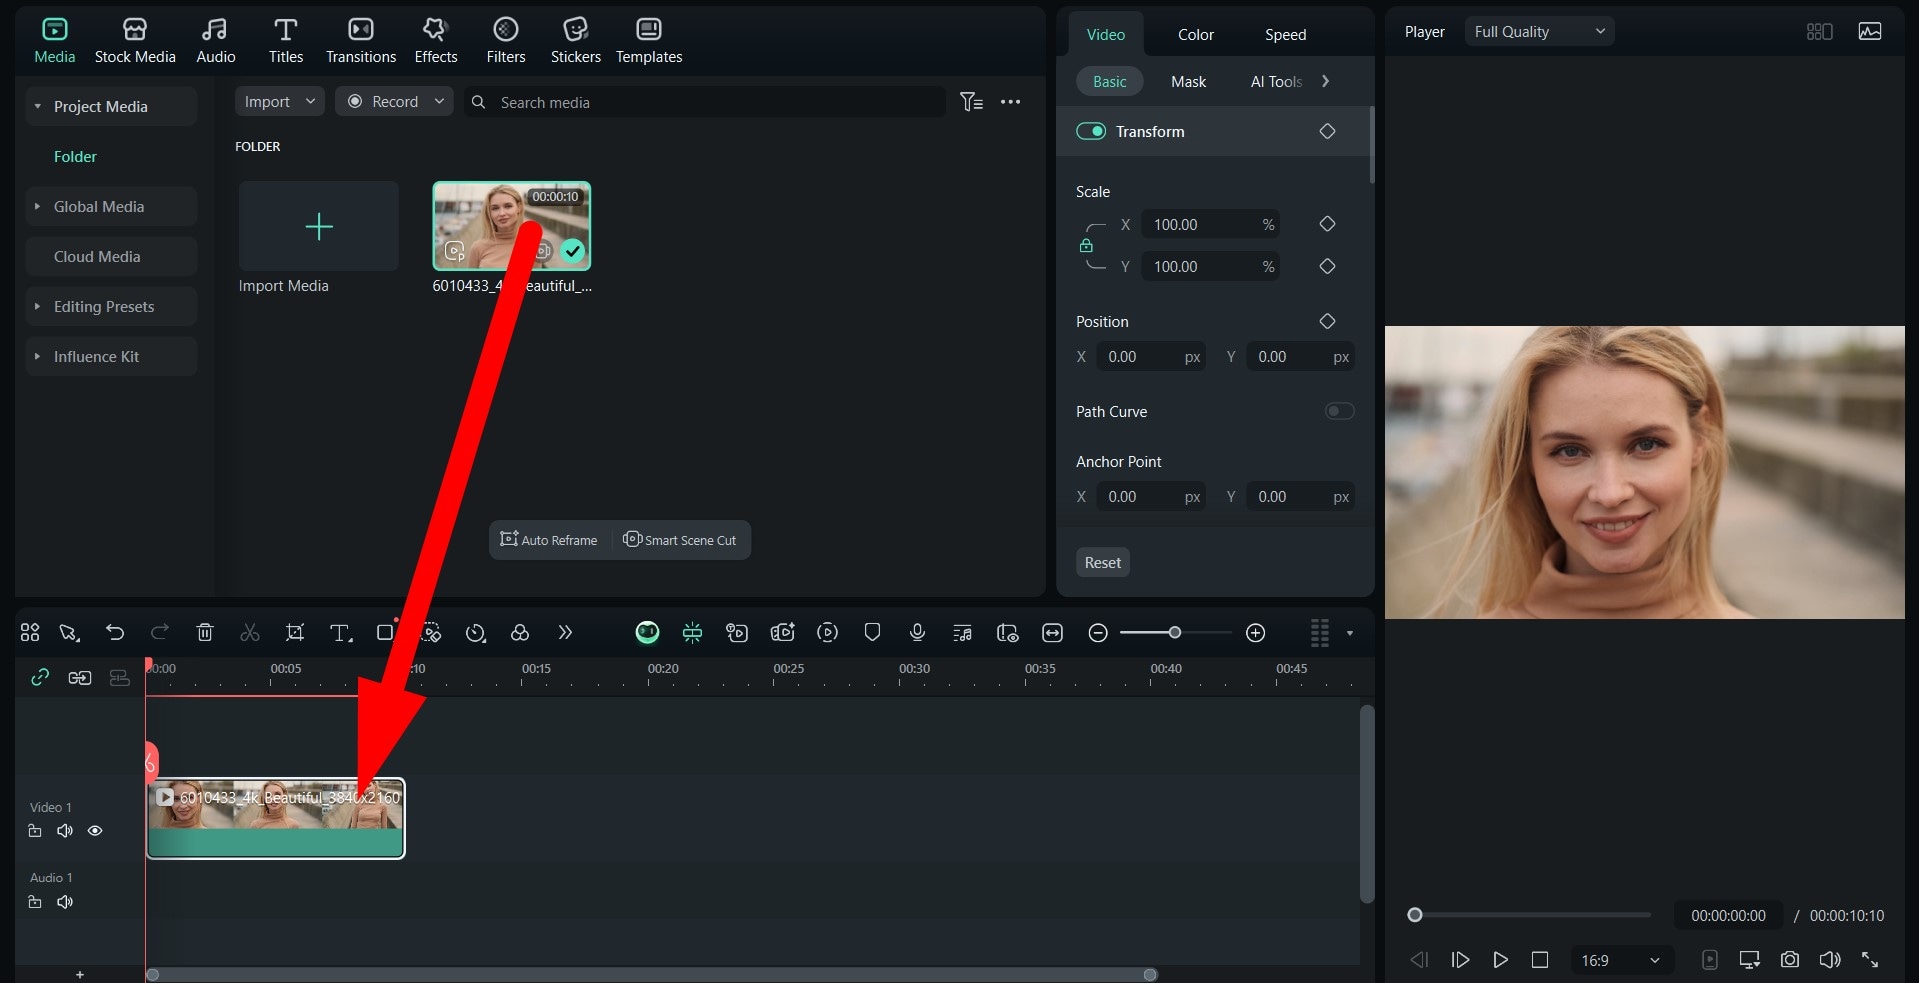
- Drag the video to the timeline.
- Go to Effects and type "cinematic black bars" in the search bar. Click on the available options to preview the effect, and when you find something you like, drag it to the timeline above the video clip.
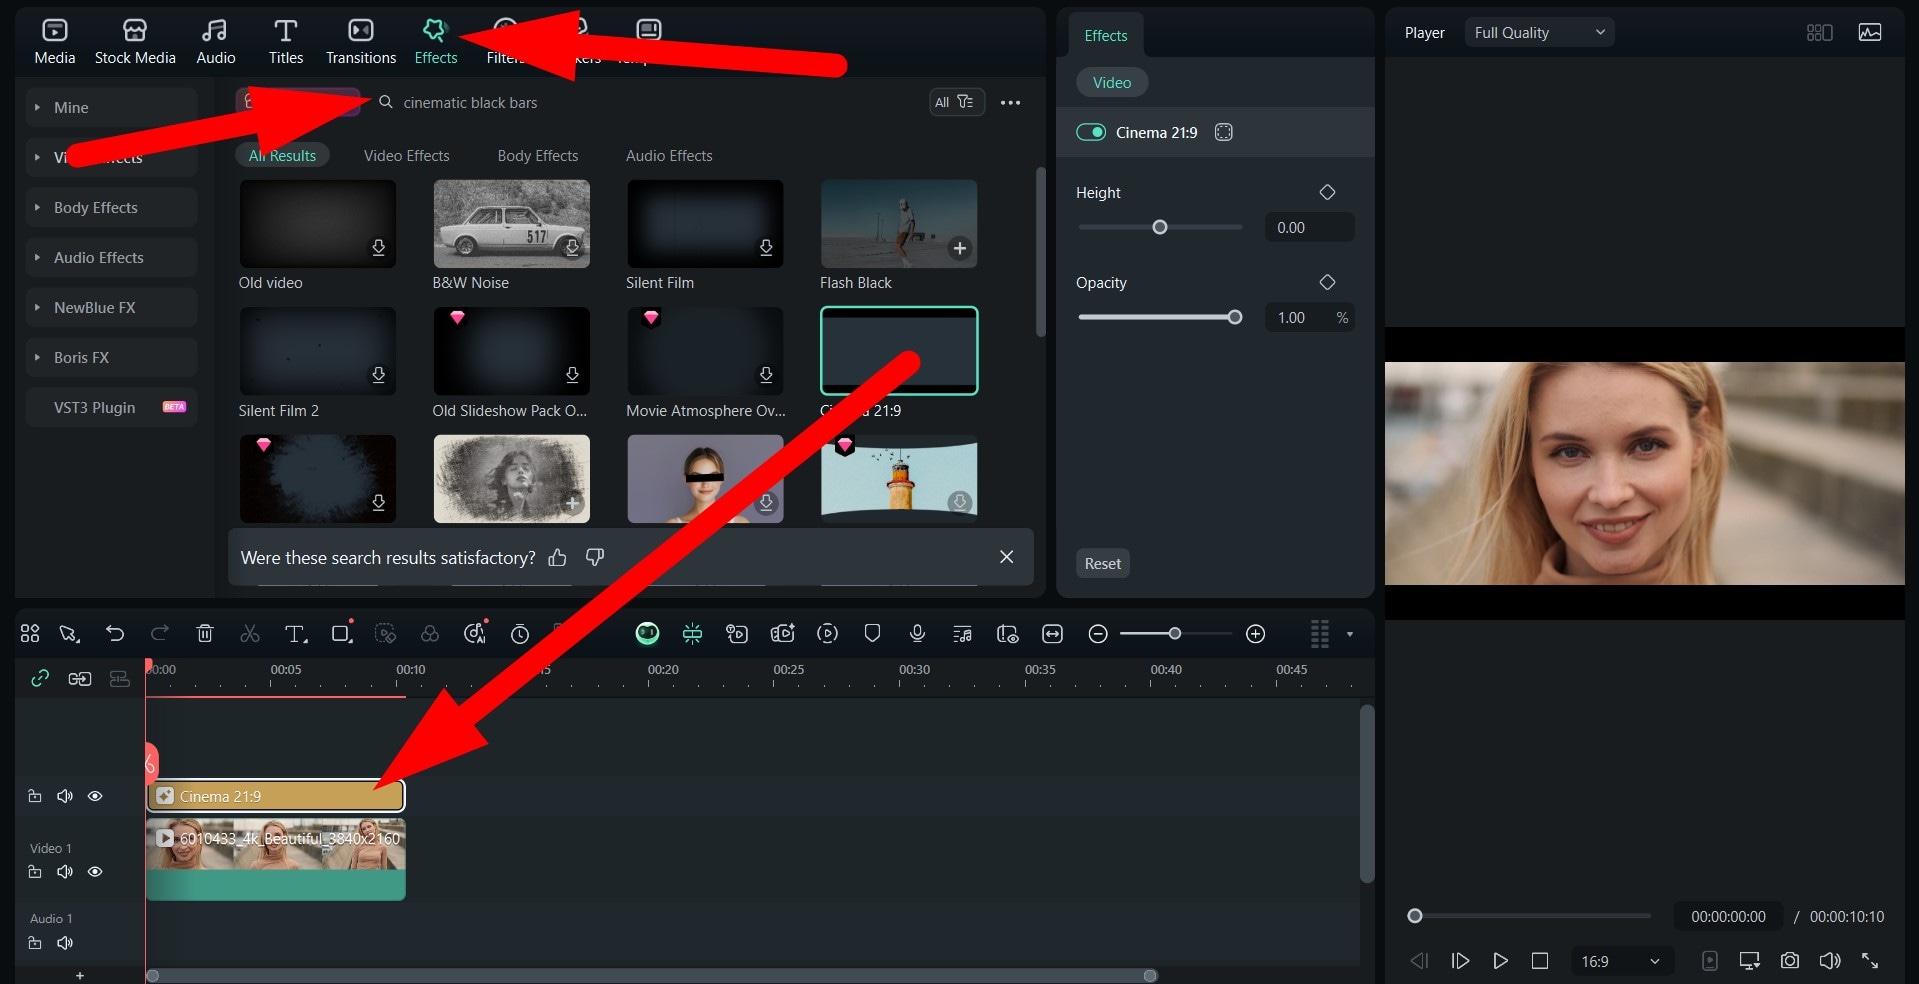
- Take a look at the result.

And now, let's consider how to add a cinematic feel to your videos using the mobile version.
- Open Filmora Mobile and tap on New Project. After that, simply import a video from your device.
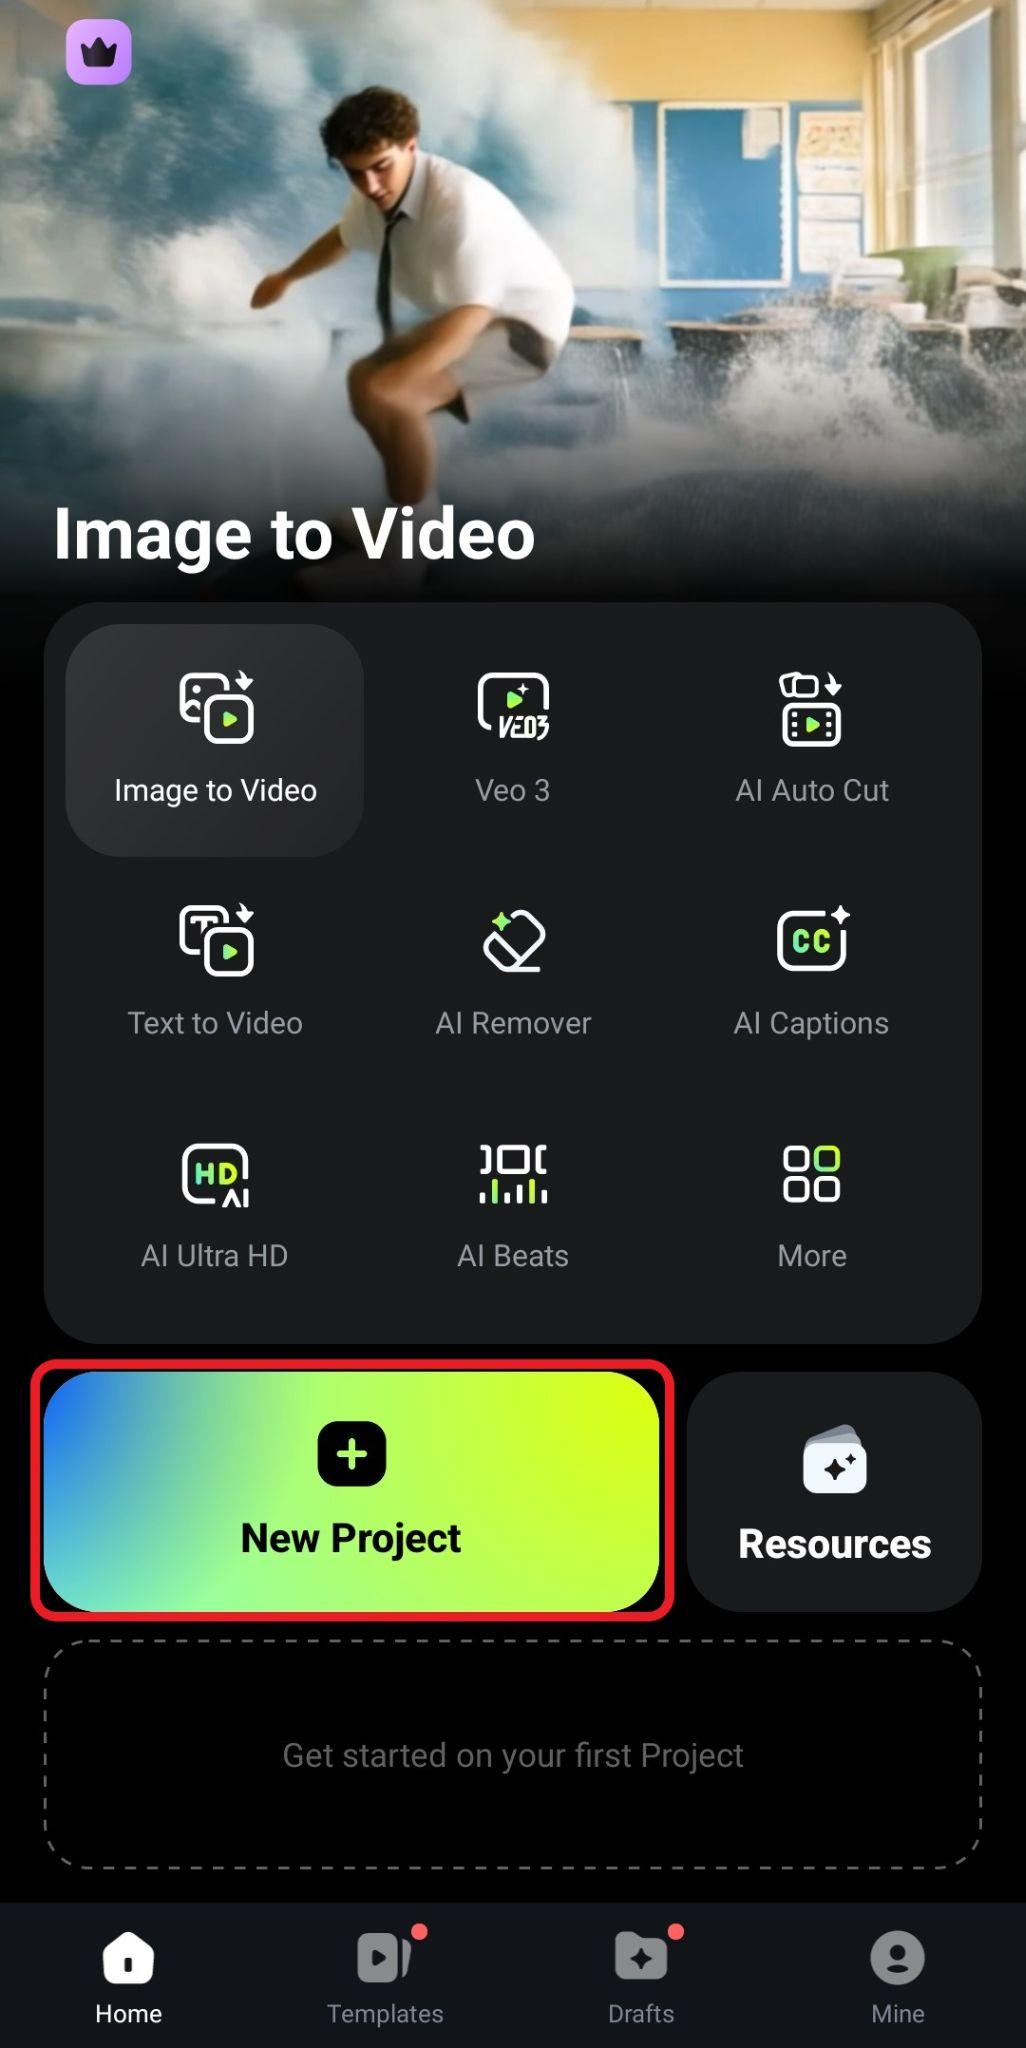
- Navigate to the Effect tab in the bottom menu.
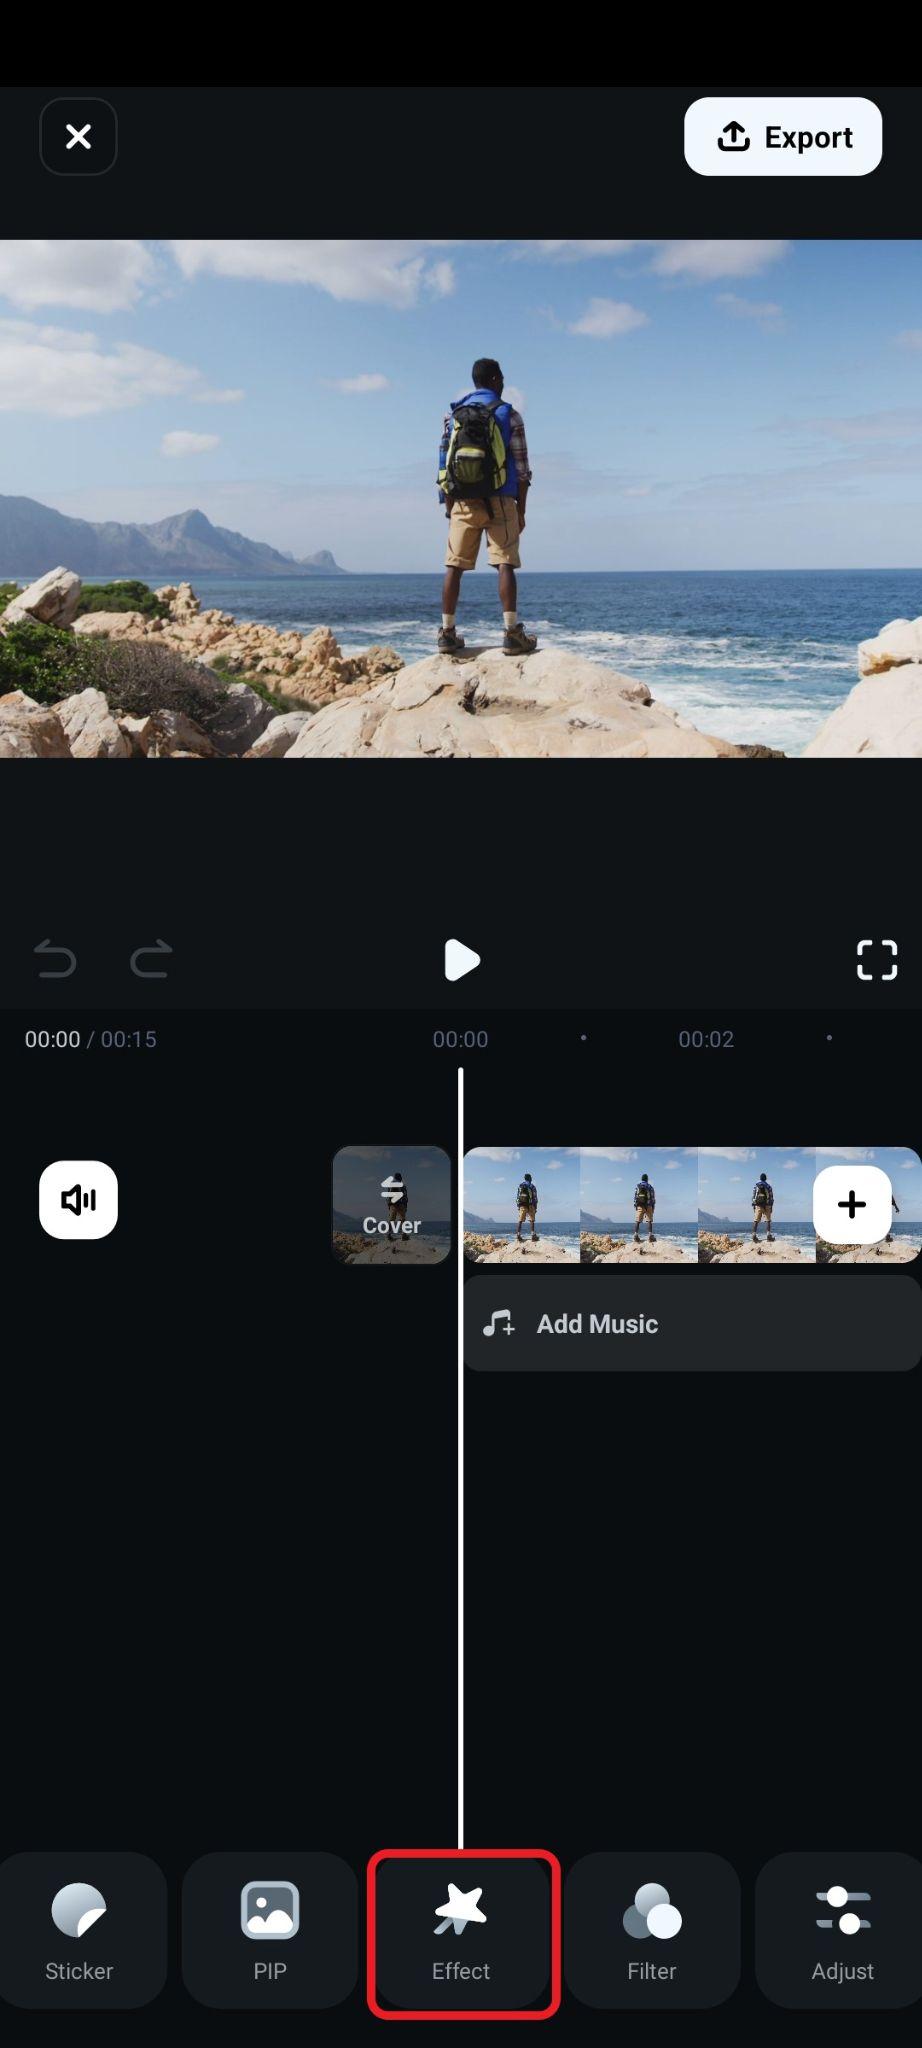
- And now, type "cinematic black bars" in the search menu, select an effect that you like, and tap the checkmark to accept the changes.
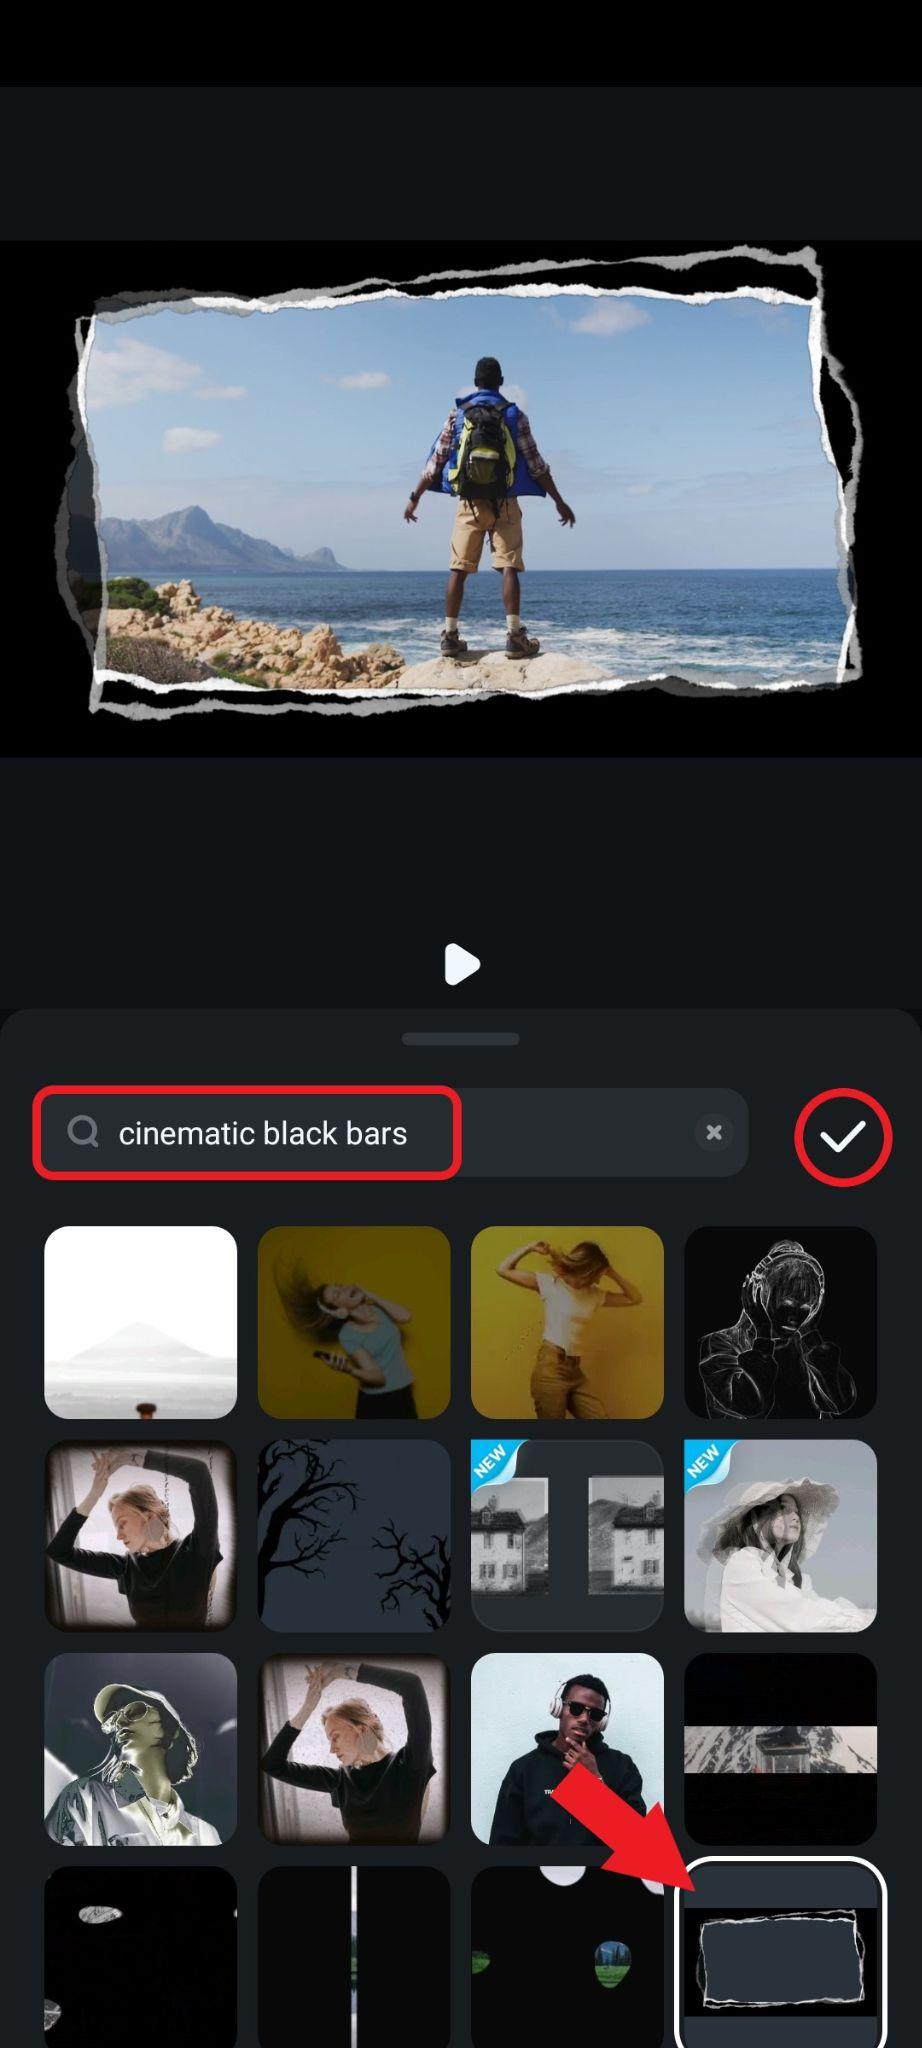
- For the mobile version, we took a more artistic approach and added a cool, vintage black bar overlay. Check out the result.

Method 2: Add Cinematic Black Bar Stickers to Videos
In addition to adding cinematic black bar effects, Filmora also allows you to add cinematic black bar stickers to create the same visual feel.
The process is more or less the same. Go to Stickers, type "cinematic black bars" in the search bar, click through the available options, and drag the one you like to the timeline above the video clip.
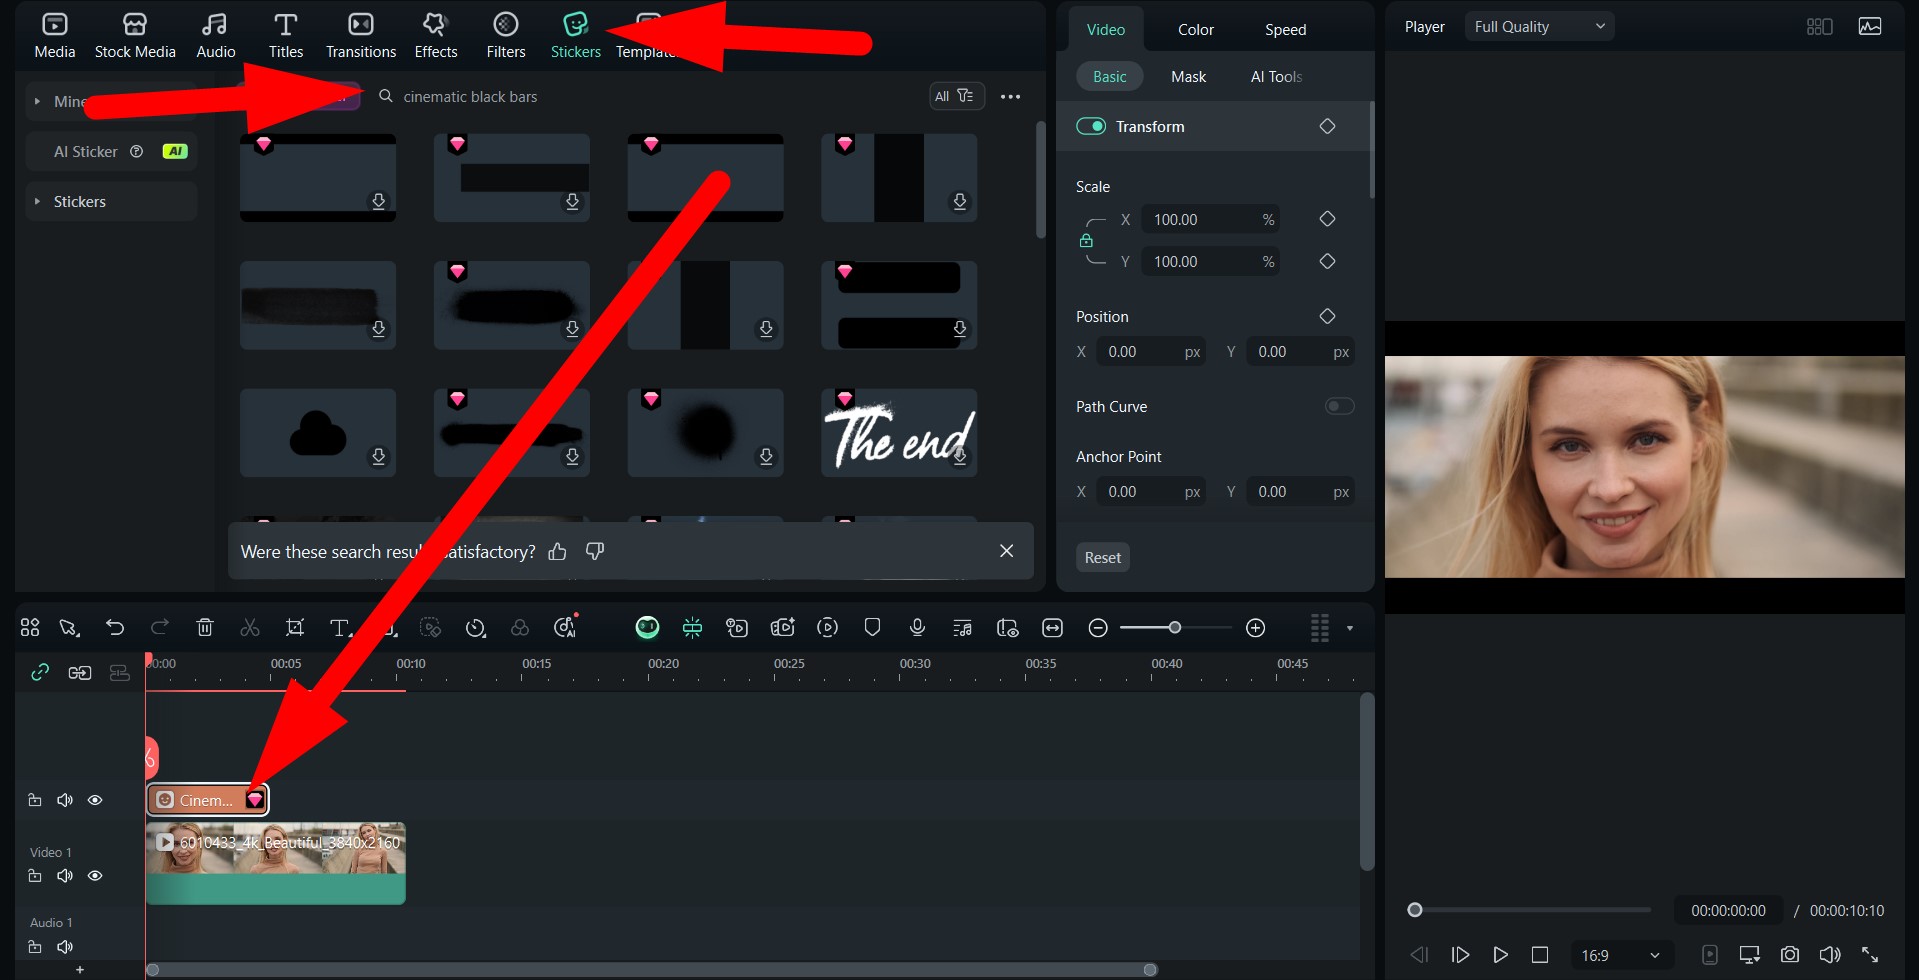
The result is similar to the first method. Check it out.

As for the mobile version, the process is also similar to the first method.
- Find the Sticker tab in the bottom menu.
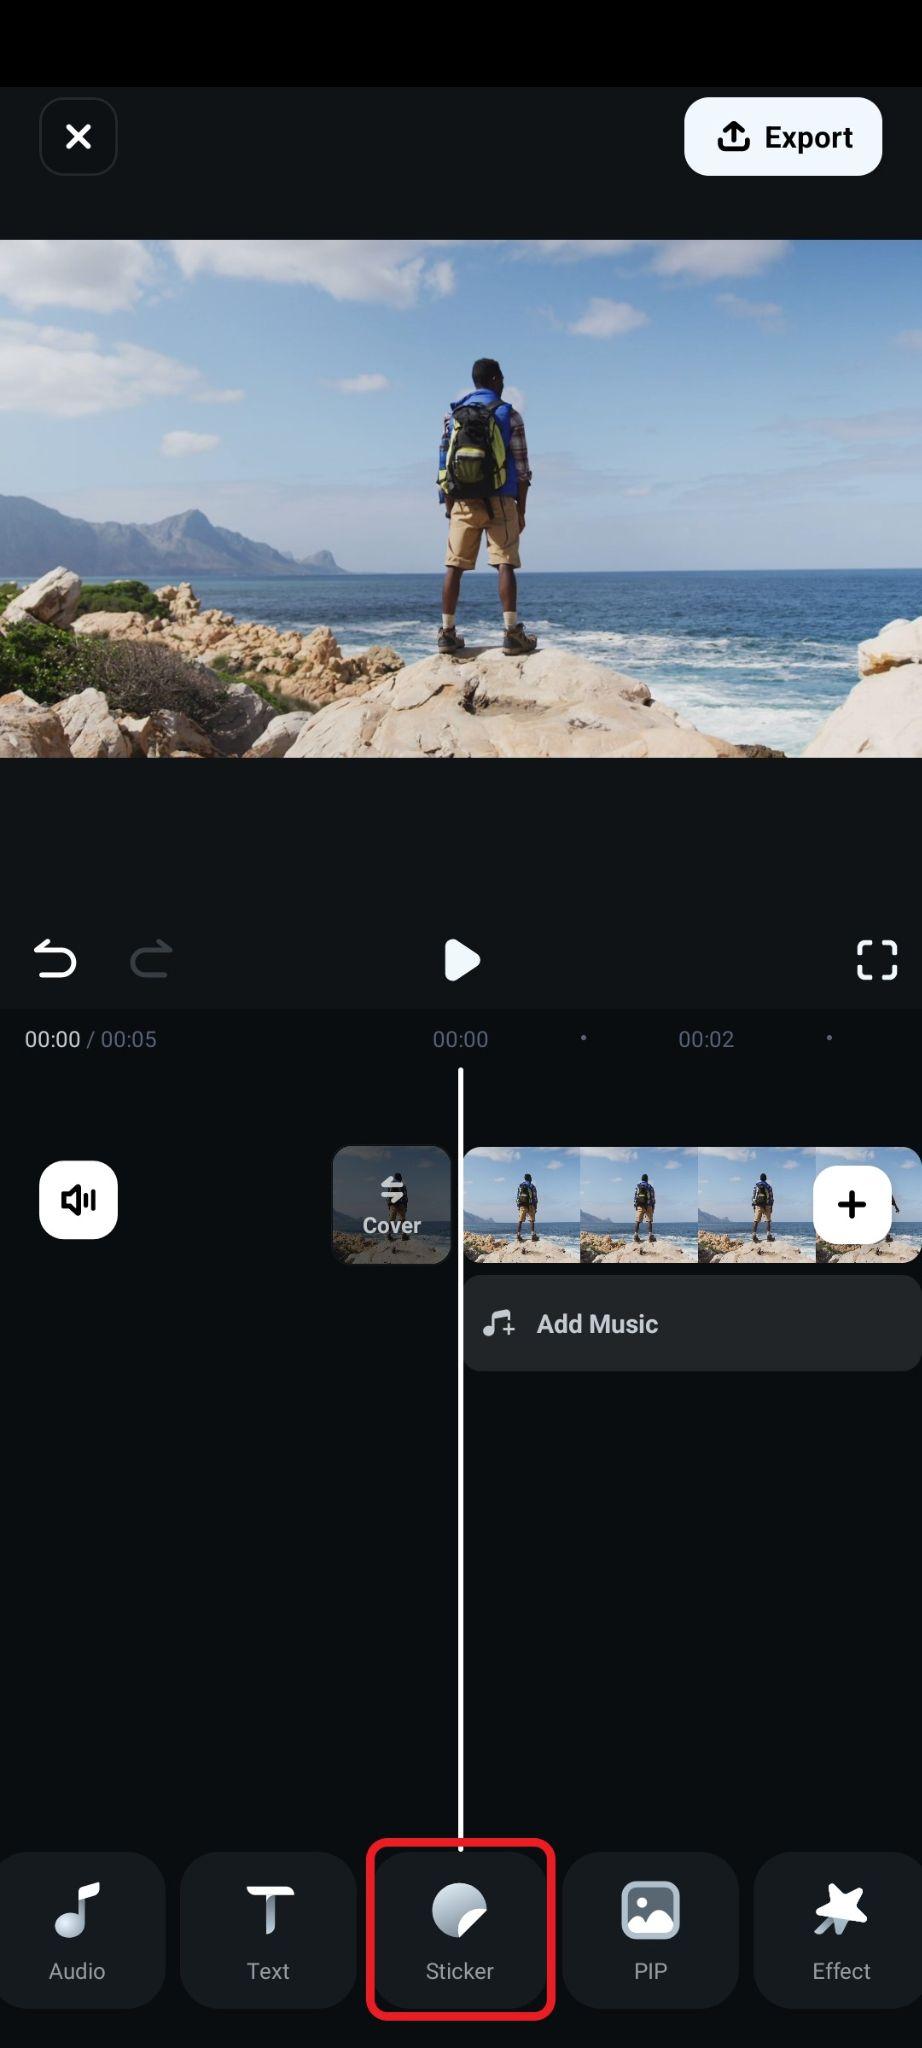
- Type "cinematic black bars" in the search bar, and pick a sticker that you like. Adjust the size and position of the sticker in the preview section, and accept the changes.
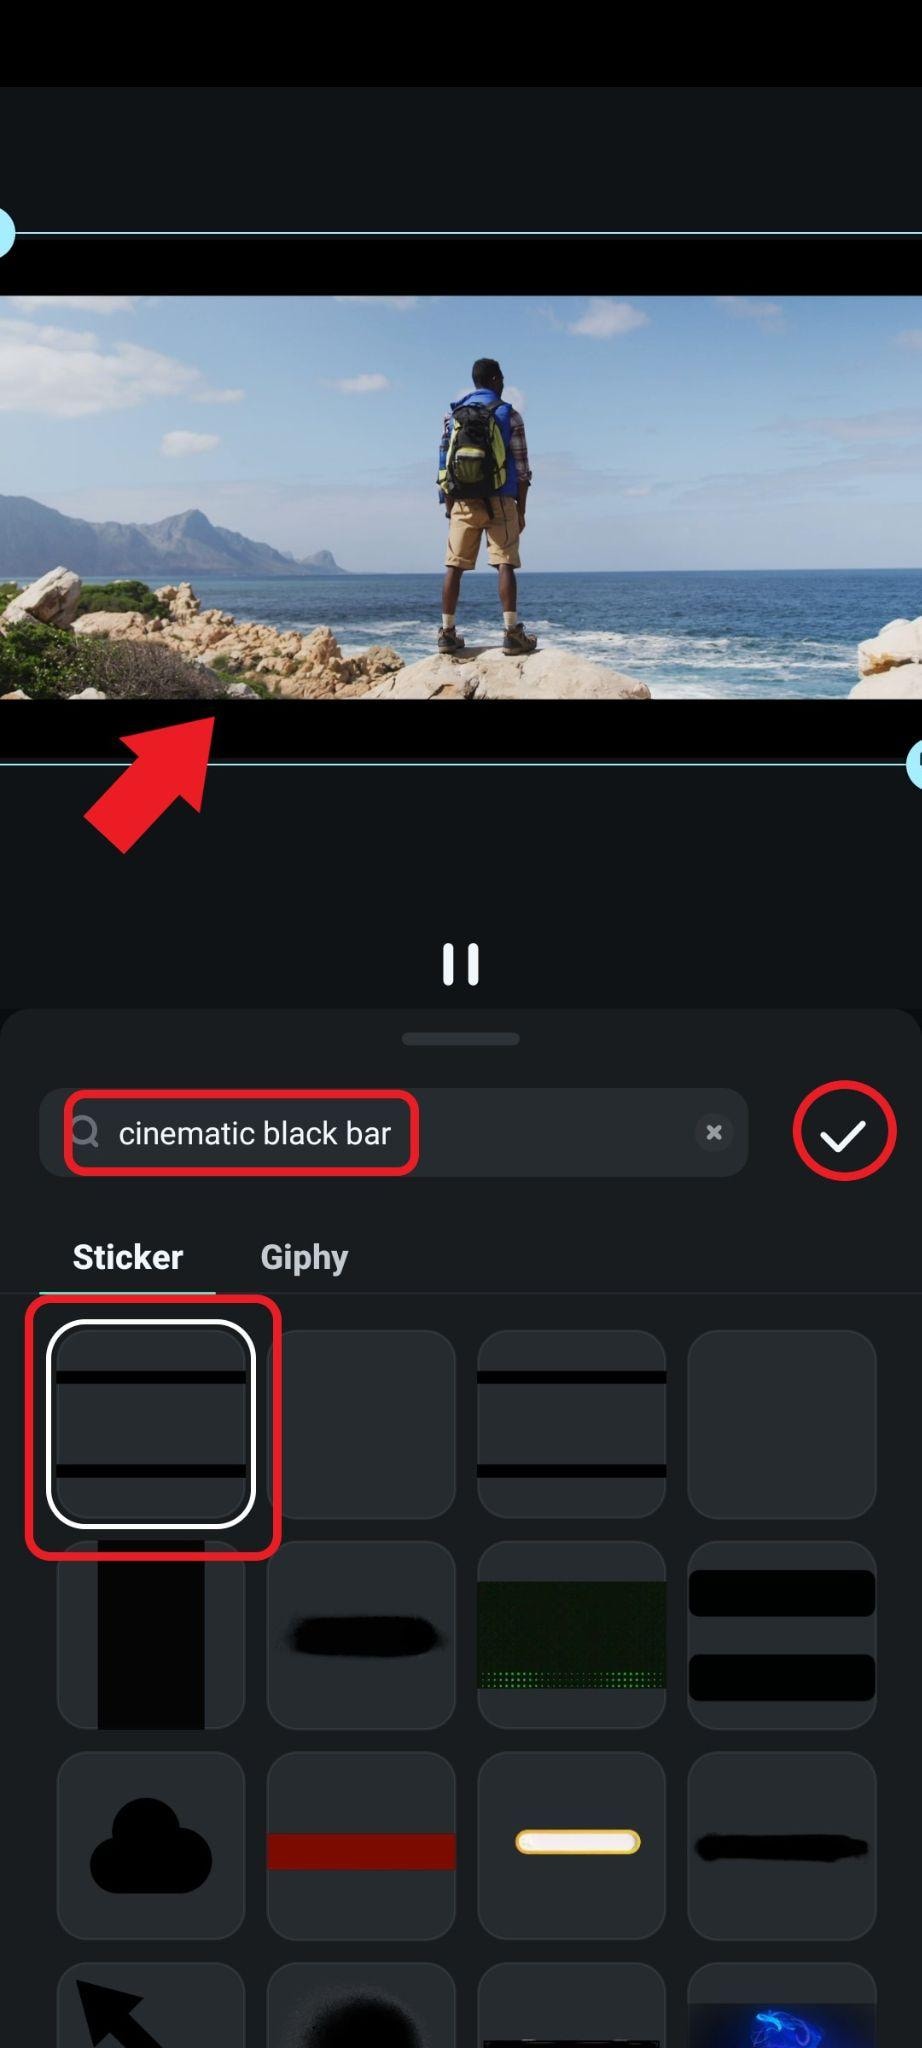
- Check out the result.

Method 3: More Customization: Add a Rectangular Shape as a Cinematic Black Bar
As a powerful video editor, aside from providing preset cinematic black bar effects and stickers. Filmora gives you much room for customization. You can add a rectangular shape and adjust it manually to add a cinematic black bar to your videos.
- In the timeline menu, find the Drawing Tool, click there, and then click on Rectangle.
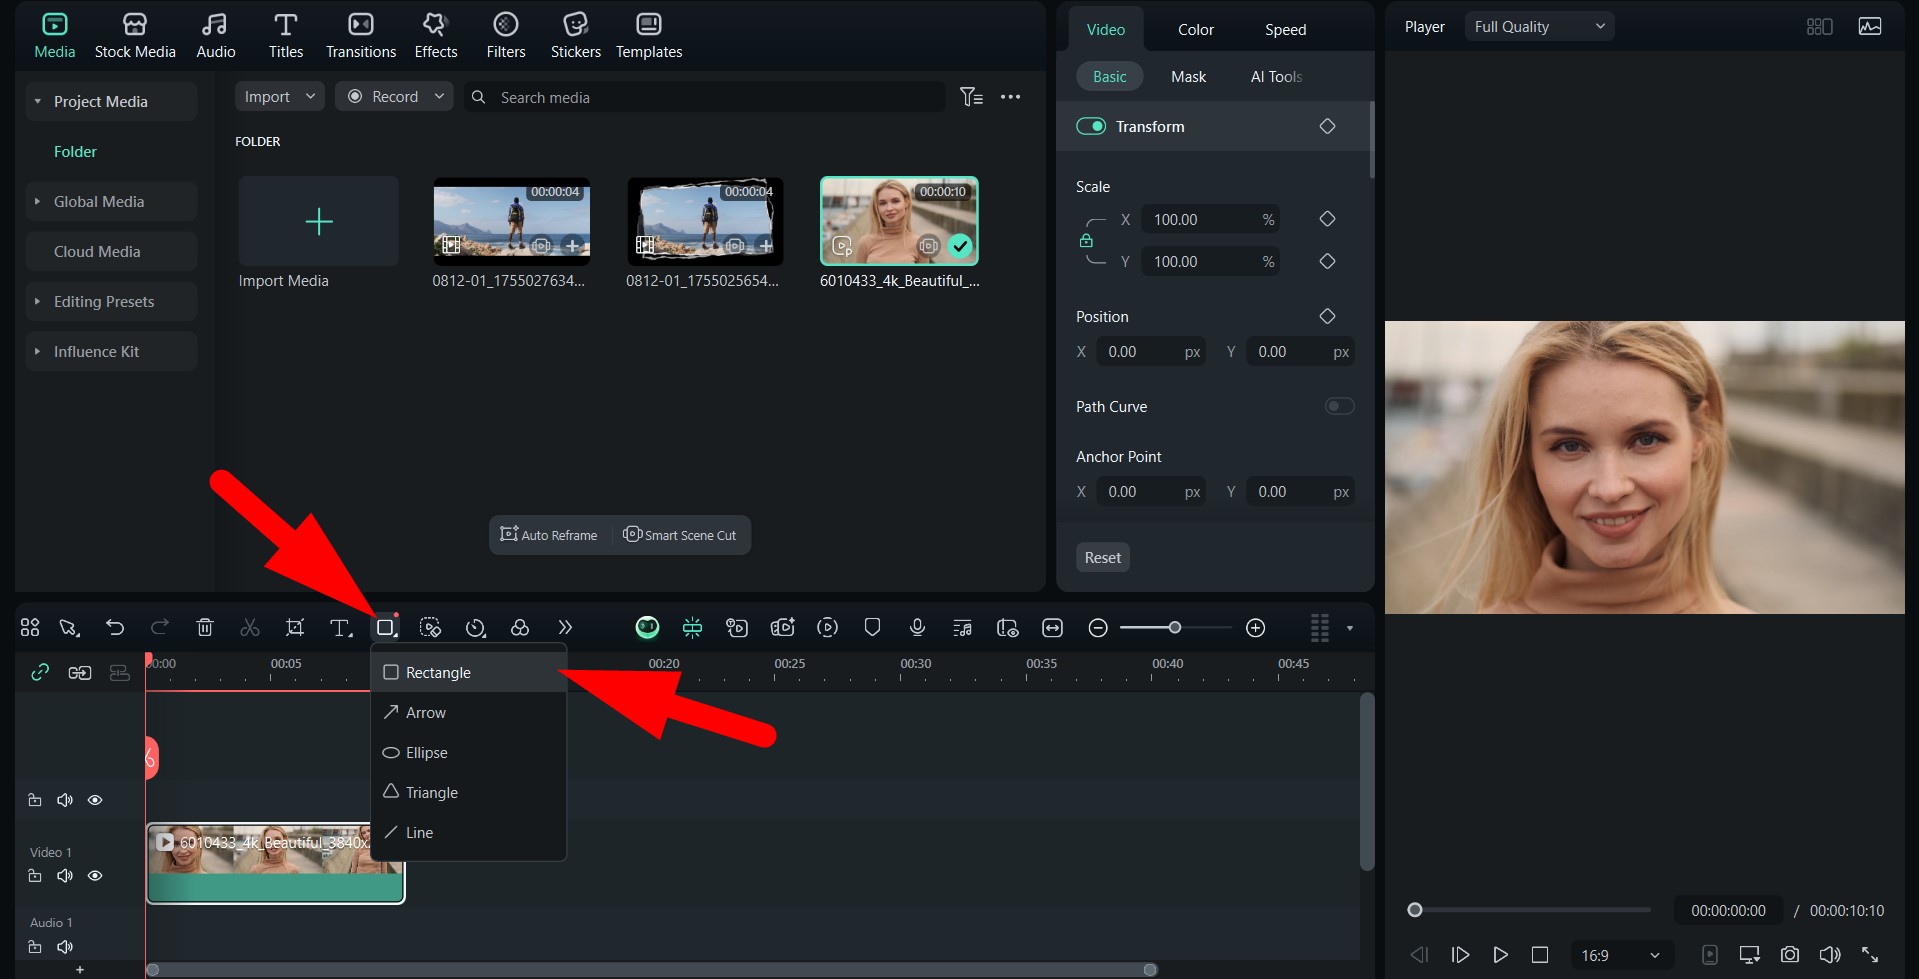
- In the preview window, draw two rectangular shapes directly at the bottom and top of the frame. Then, go to Shape > Basic and find the Fill option. Finally, change the color to Black.
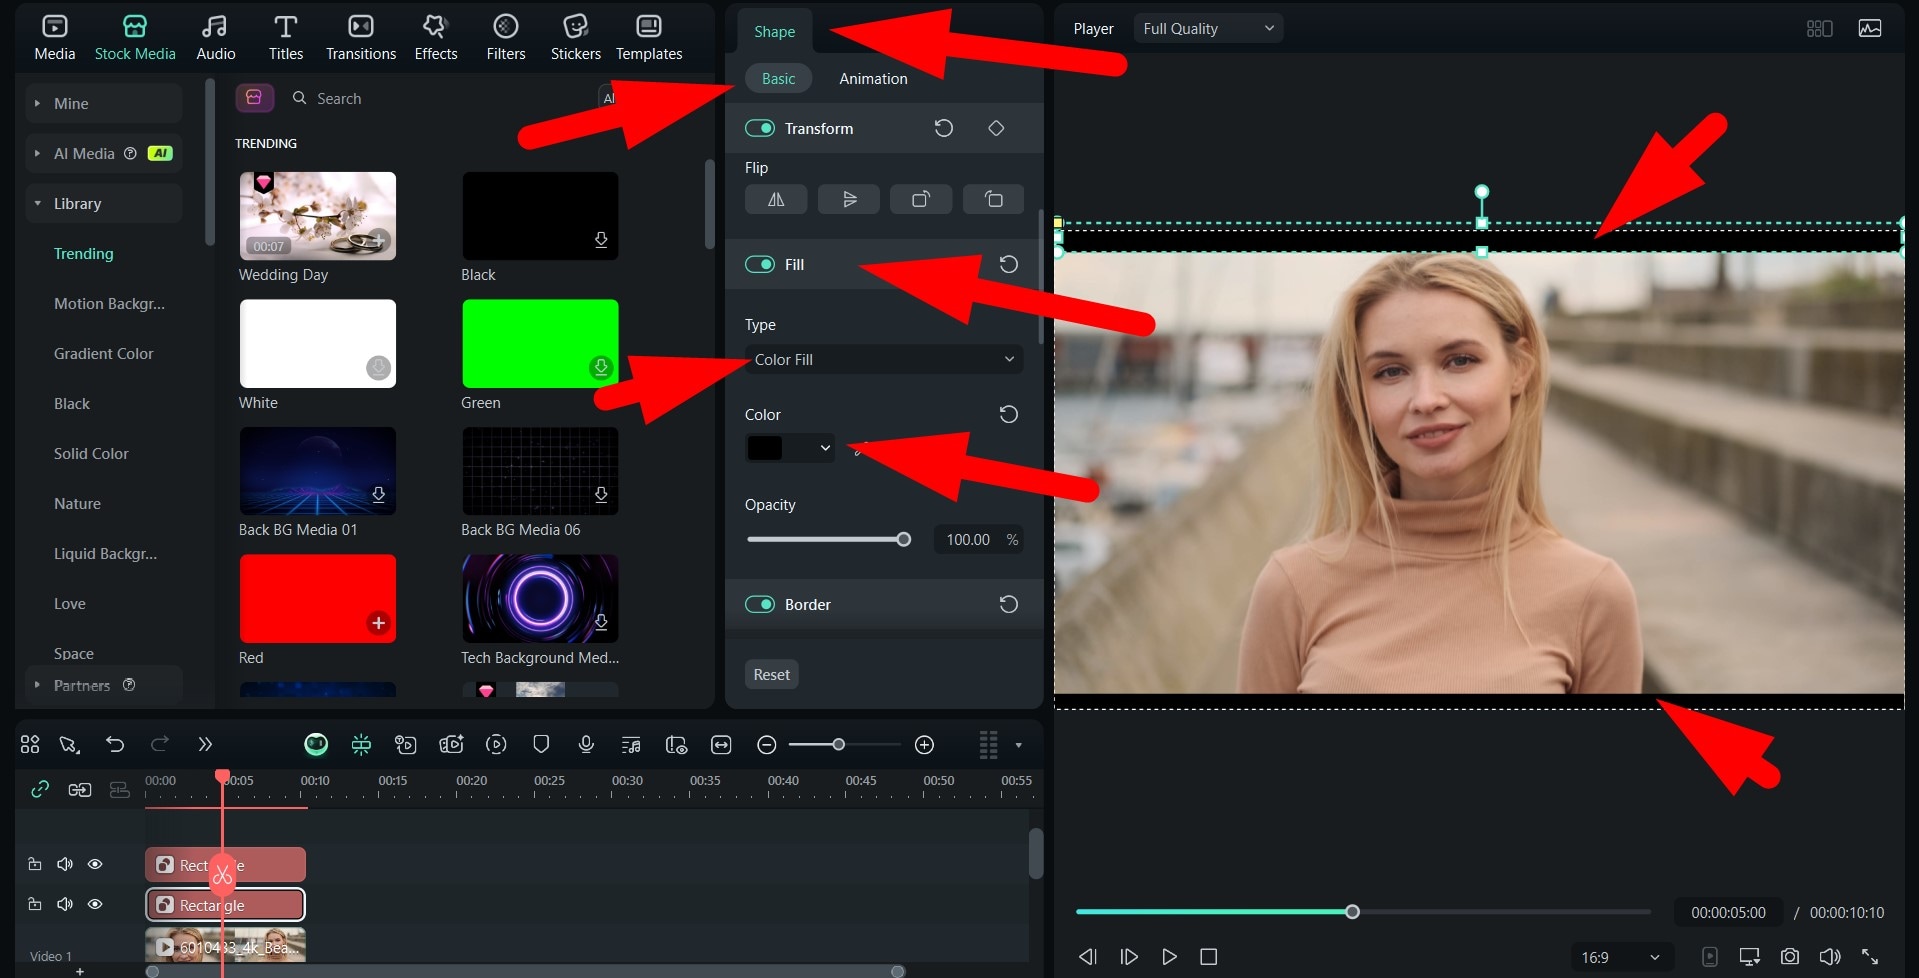
- For this method, we wanted to add very thin cinematic black bars. Take a look.

Method 4: Be Creative: Add Masks to Create Cinematic Black Bar Effect to Videos
If you are looking for a more creative way to make your videos look cinematic, in addition to providing a cinematic black bar, you can also try to add a different shape, like a movie screen, to your videos.
- Go to Stock Media and search for a fully black frame. Then, drag it to the timeline above the video clip and go to Image > Mask, where you can pick the oval shape.
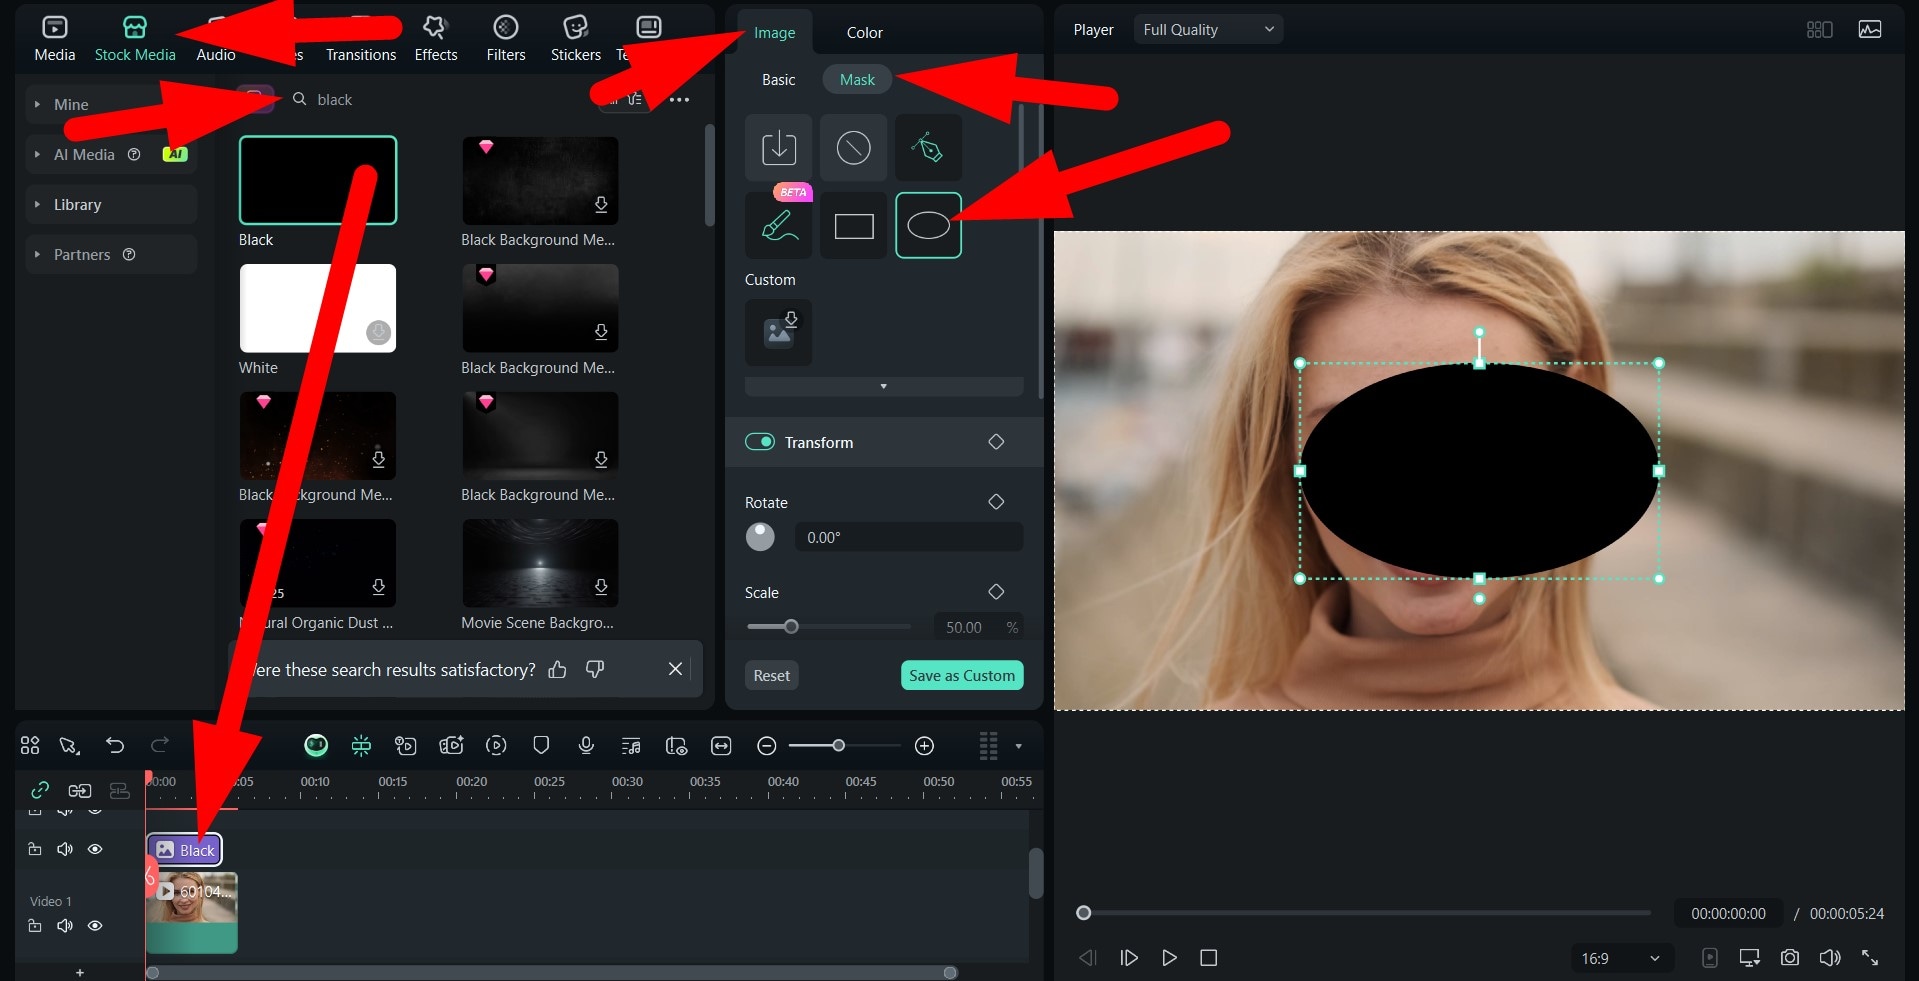
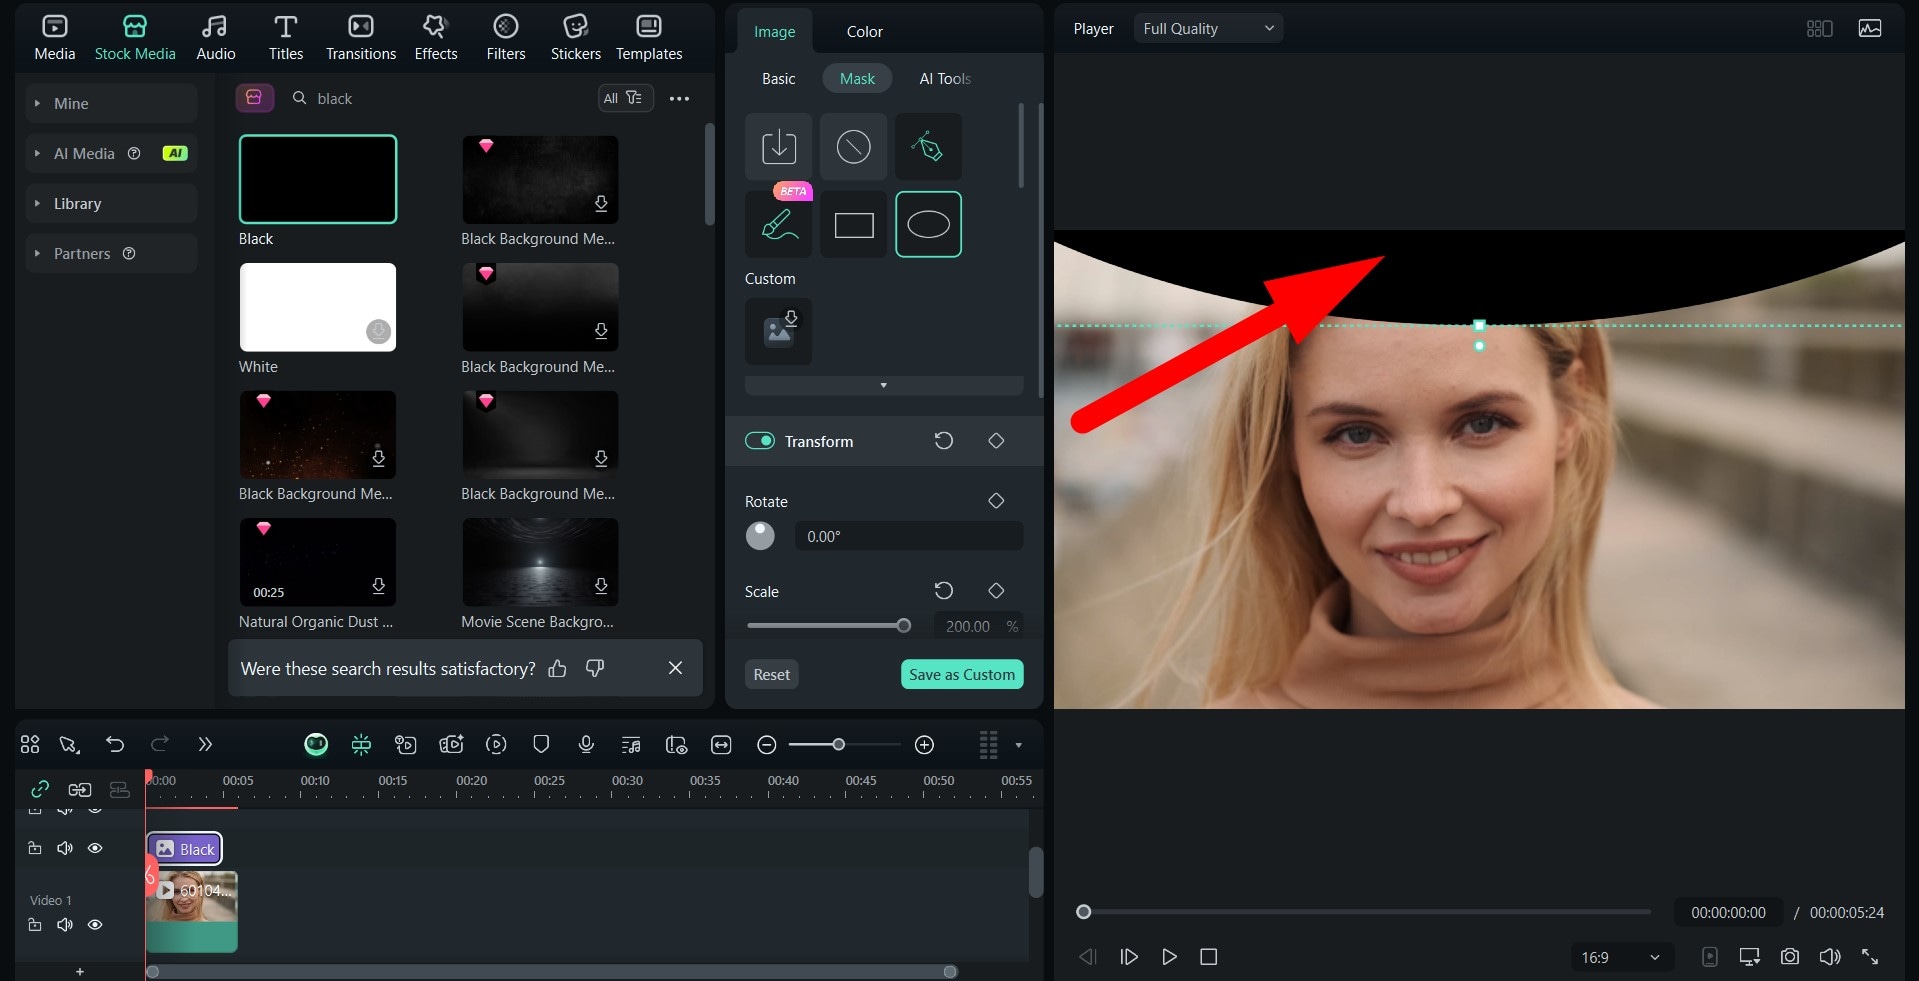
- Enlarge the new element so that it is way bigger than the frame and move it up.
- Repeat the same process for the lower part of the frame.
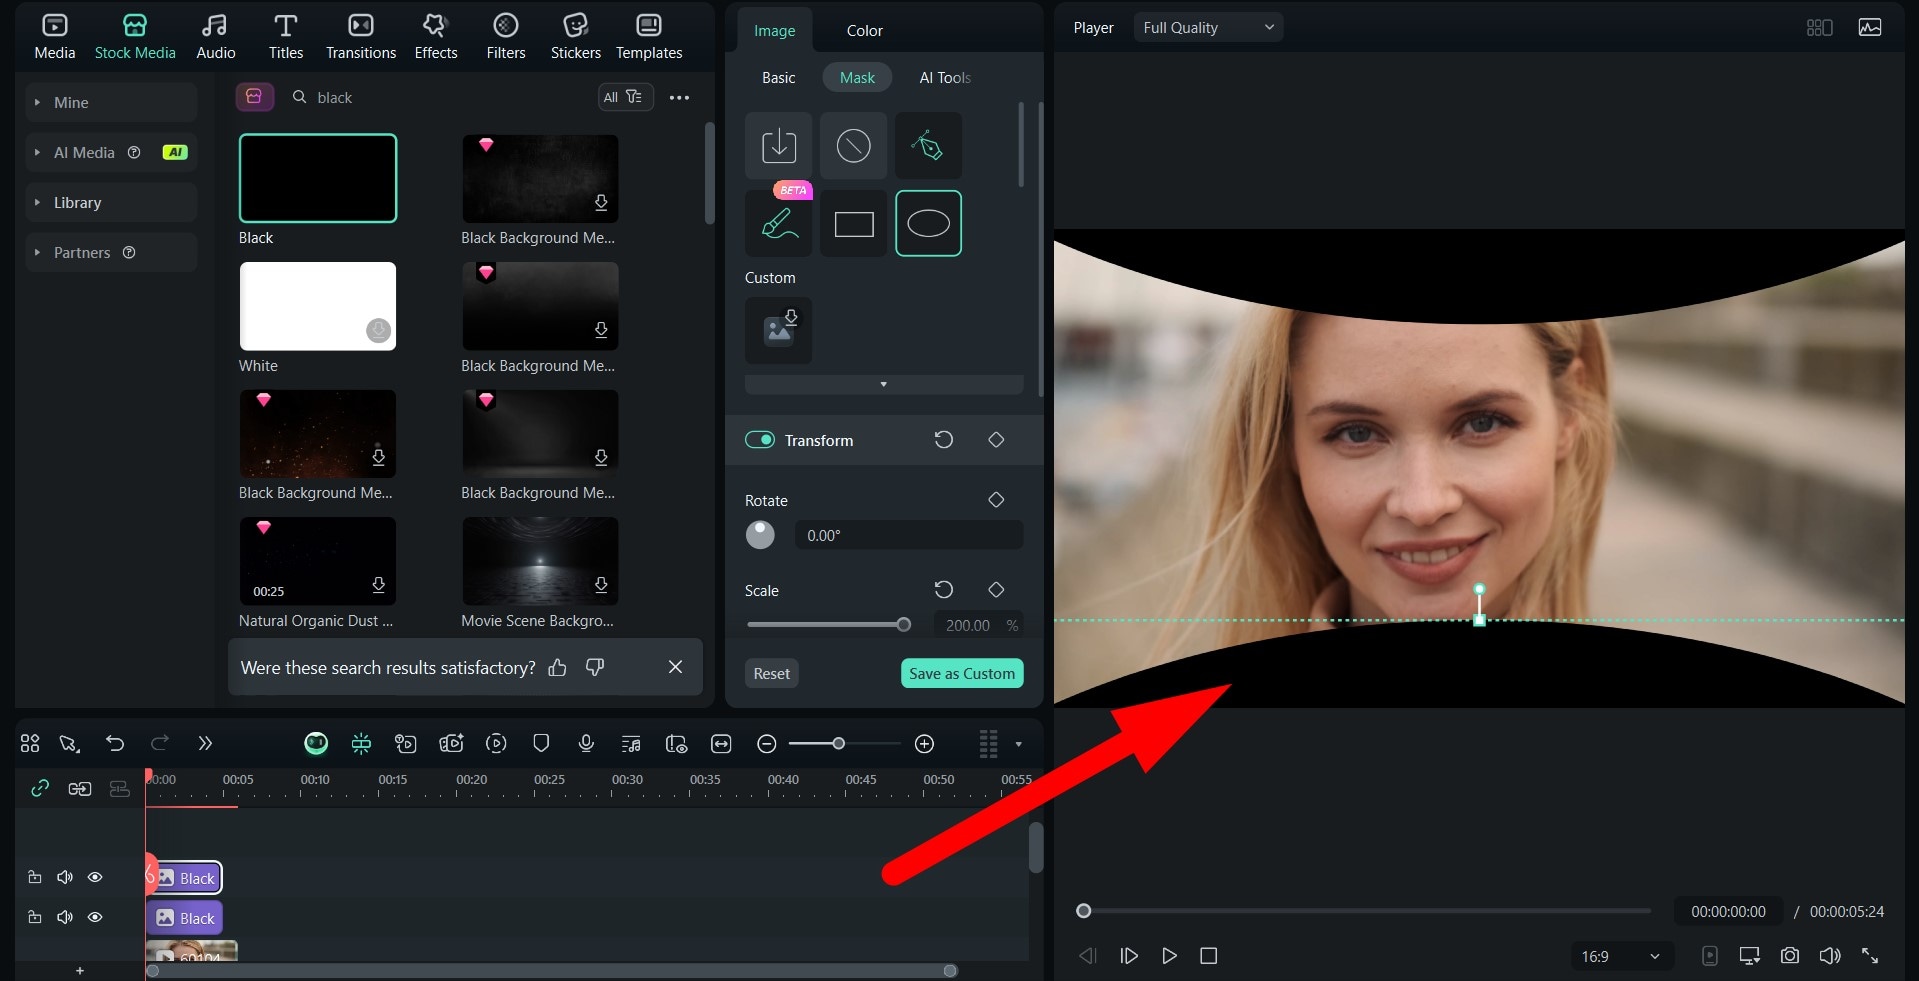
- Take a look at our unique result.

That's the best thing about Filmora. Not only does it offer several ways to get where you want to go, but it also gives you creative freedom to experiment and achieve attention-grabbing results.
Bonus Tips for Making Videos More Cinematic
Adding black bars is just the beginning of your filmmaker's journey. Here's how to push your footage even further into movie territory.
- Color Grade Like a Filmmaker – Manually adjust the contrast, saturation, and color balance to give your footage a cohesive, cinematic tone. Golden yellow hues work well for nostalgic or romantic stories, while cooler tones (like dark blues and greens) are better suited for thrillers and sci-fi.
- Use Depth of Field to Guide the Viewer – Blur the background slightly (or shoot your video with a wide-angle lens) to ensure that the subject pops in the scene. This technique will definitely lead to a more professional, Hollywood-inspired look.
- Match Your Frame Rate to the Mood – The Hollywood standard is 24 frames per second. It gives your video that classic "film" flow, while higher frame rates can feel more "alive" and modern, and are commonly used in TV series (especially soap operas). Naturally, you should stick to one frame rate in all clips.
- Add Cinematic Camera Movement – Even in post-production, you can add subtle zooms, pans, or dolly effects, especially if you are working on a static shot. This simple edit can make the scene feel more fluid and dynamic.
- Pair with the Right Music – The soundtrack is half the cinematic experience. Choose music that matches your scene's pacing and mood. Filmora can be of huge assistance here because it offers a vast library of licensed music from Universal Studios.
- Keep Your Composition Tight – Filmmaking rules are there for a reason, and unless you are a veteran filmmaker who knows how to break them, you should stick to them completely. This means that you should follow the rule of thirds and maintain headroom so that the black bars will actually enhance and not hinder the frame.
Common Mistakes and How to Fix Them
Finally, before we conclude, we wanted to offer a little troubleshooting section where we will discuss the most common mistakes related to cinematic bars. Don't worry! The fixes are also there.
Mistake 1: The cinematic bars are cutting out important headroom.
Fix 1: Reduce the bar's thickness or reposition the shot and move it down a bit.
Mistake 2: You went with a low-res export to save time, and the cinematic bars are pixellated.
Fix 2: Always export at a higher bitrate and resolution to offer your audience the best viewing pleasure.
Mistake 3: The cinematic bars appear to be inconsistent across different clips.
Fix 3: Make sure that you use the same overlay preset across all clips in your project.
Mistake 4: The bars are making the subtitles hard to read.
Fix 4: Enlarge the cinematic bars just enough to move the subtitles inside the black area for maximum readability.
Conclusion
Adding cinematic black bars is one of the quickest ways to transform ordinary footage into something that feels like a real film. With Filmora, you can apply them in minutes and in several different ways. When you are done, source your footage with professional editing tools, and use that to tell your story. Download Filmora today and see why it is slowly becoming one of the go-to video editors for professional and beginner filmmakers alike.


 100% Security Verified | No Subscription Required | No Malware


