How to Adjust Audio Volume in Videos [4 Ways]

Jan 06, 2026• Proven solutions
 TL;DR:
You can adjust audio volume in Filmora by manipulating the timeline volume line for the entire track, using the volume slider in the Audio Editing panel, applying fade effects, or adding keyframes for variable volume changes across a single clip.
● To adjust the volume directly on the timeline, you must first enlarge the track by selecting the Big option from the Adjust Track Height submenu to reveal the draggable volume line.
● The Audio Editing panel controls left and right channel balance, where a value of 0 dB is perfectly balanced, -100 dB routes all sound to the left channel, and 100 dB routes it to the right.
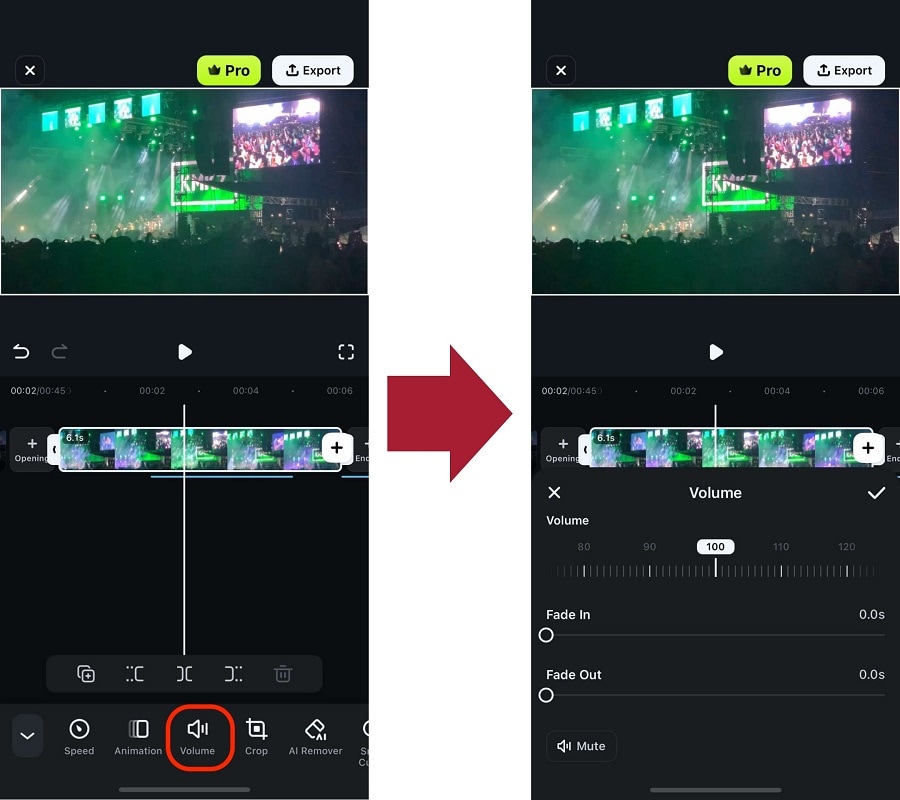
● Filmora Mobile users on Android and iOS can adjust volume and fade durations by selecting a timeline video and using the virtual knob inside the Audio menu.
Ask AI for a summary
 ChatGPT
 Perplexity
 Gemini
 Claude
 Grok
Grok
Some of the greatest film directors of all time have used sound to make the scenes in their movies more dramatic, romantic or to build suspense. The importance of sound for the overall quality of a video is often overlooked by young filmmakers, as they tend to dedicate all of their attention to the visual part of their projects.
The fact of the matter is that even a minor error in the video’s soundtrack can distract the viewer and ruin a video completely. That’s why, in this article, we are going to show you four different methods of adjusting the audio volume in Filmora.
Here is a more detailed guide on how to increase the volume of your video.
Four Ways of Adjusting Audio Volume in Filmora
The audio clips often have different volume levels, so in order to create a balanced soundtrack, you have to adjust the volume of each audio track you intend to use in your projects. Filmora offers several different ways to adjust the volume of audio files quickly and effortlessly. Here’s how you can increase or decrease the volume of the audio clips in Filmora.
Download Filmora and watch the video below to get a full knowledge abtou adjusting volume!

 secure download

1. Changing the Audio Volume of Entire Track
This is probably the easiest and fastest way to adjust the volume of a video or an audio file in Filmora. After you import the file into a project you just have to add it to a certain position on the timeline. You can do this by simply dragging and dropping the file at the location on the timeline where you want the file to be placed. Click on the Add Track menu that is located in the upper left corner of the timeline and select the Big option from the Adjust Track Height submenu.
Enlarging the video and audio tracks will enable you to see the audio volume line that is displayed over all clips that contain sound you add to the timeline. Click on the line and drag it upwards if you would like to increase the volume or drag it downwards if you want to decrease the volume of an audio or a video file.
2. Applying the Fade In and Fade Out Effects to Change the Audio Volume Partially
Once you add an audio clip to an audio track on Filmora’s timeline, you can adjust its volume from the Audio Editing panel. Double-clicking on an audio file will bring up the Audio Editing panel that contains Fade In and Fade Out sliders. Both sliders are going to be set to zero by default, so you just have to drag each of them to the right in order to create the Fade In or Fade Out effect.
Filmora also lets you create the Fade In and Fade Out effect directly from the timeline, as you just have to hover the mouse over an audio file and drag the Fade In or Fade Out markers to set the duration of the effect for that particular file.
3. Using the Volume Slider to Change the Audio Volume
On the left side of the Audio Editing panel that can be accessed by double clicking on an audio file, you will be able to see the volume slider. Its value is going to be set to 0 dB by default and you just have to drag it upward or downward in order to adjust the audio volume. As you drag the slider the new audio volume value is going to be displayed in a box below the slider. The left/right balance value can be adjusted by dragging the knob that is located above the volume slider in either direction. Alternatively, you can insert a new numerical value in the box below the knob. If the displayed value is 0 dB, then the left and right channels are balanced, while the value of -100 dB means that all the sound goes through the left channel and if the displayed value is 100 dB all the sound will go through the right channel.

4. Adding Keyframes to Adjust the Audio Volume
Once you add an audio file to the timeline you can adjust its volume by adding keyframes to it. Place the playhead to the exact spot in the audio file where you want to add the first keyframe and then double click on the file to bring up the Audio Editing panel. Click on the Add Volume Keyframes icon and use the volume slider to adjust the volume at the position of the first keyframe.

Simply move the playhead and change the value on the volume slider to add new keyframes to the audio file. This method of adjusting audio volume enables you to set different volume values for different parts of an audio file.
Still not solved? Try this audio guide of Filmora to settle all the audio problems.
[Bonus] How To Adjust Audio Volume in Filmora Mobile
If you’re editing videos on your phone, then Filmora also has an option for you. Sometimes, editing videos with a smartphone is more convenient because it’s always with you. So, you should install a reliable video editing tool on your phone, just like Filmora. It has comprehensive audio controls, the same as the desktop version.
To access audio adjustment tools on your phone, follow the steps below:
Step 1: Install Filmora on your smartphone (available on Android and iOS.)
secure download
Step 2: Create a New Project and Import the video with the volume you need to adjust.

Step 3: Select a video from the timeline. Then, go to Audio. From here, you can perform two actions:
- Adjust Volume. Just slide the top-most virtual “knob” and adjust the values accordingly.
- Fade In/Fade Out. Use the play head of each feature to set the time that the audio fades.
With those steps, you should have successfully adjusted your audio. As a final tip, using headphones to assess the volume better and how it plays out with your video is better.
Conclusion
Having complete control over the volume of all audio files you use in your projects is important for so many different reasons. Filmora offers four easy ways to adjust the audio volume so you can focus on more important tasks. Which method of adjusting the audio volume in Filmora do you like to use the most? Leave a comment and let us know.
secure download
Shanoon Cox
staff Editor
