
For the Best Results, Use the Latest Version.
-
Preparations
-
Account
-
Get Started & Basic Settings
-
Compatibility & Tech Specs
-
Performance Settings
-
-
Creating Projects
-
Creating New Projects
-
-
Importing & Recording
-
Video Editing for Windows
-
Basic Video Editing
- Enable/Disable Clip in Windows
- Magnetic Timeline for Windows
- Dual Monitor Setup for Video Editing on Windows
- Select All Clips on Timeline for Windows
- Timeline and Track Management
- Auto Ripple for Windows
- Split & Trim Video
- Crop & Pan & Zoom Video in Filmora for Windows
- Compositing
- Change Video Speed on Windows
- Reverse Video for Windows
- Mark In and Mark Out for Windows
- Markers for Windows
- Group editing
- Customizable Backgrounds for Videos and Images in Windows
- Video Snapshot
- Using Freeze Frame in Filmora for Windows
- Logo Reveal For Windows
- Auto Enhance in Filmora for Windows
- Applying drop shadow
- Adjustment layer for Windows
- Apply Transforming for Windows
- Video Editing Ruler – Windows
-
Advanced Video Editing
- Keyframe Motion Blur for Windows
- Drawing Tools for Windows | Filmora Guide
- Camera Tracking for Windows
- Create Multi-Camera Clip in Filmora for Windows
- Compound Clip for Windows
- Multi-Clip Editing for Windows
- Filmora Motion Blur | Windows
- 360° Video Reframing for Windows
- Track Matte for Windows
- Video Chapters in Filmora on Windows
- Filmora Flicker Removal Guide | Windows
- Create Multi-Screen Videos in Filmora on Windows
- Masking in Filmora on Windows
- Creating a PIP Effect for Windows
- Keyframe Graph Editor for Windows
- Animation Keyframing for Windows
- Keyframe Path Curve
-
AI-Powered Video Editing
- Smart Scene Cut for Windows
- Smart Short Clips for Windows
- AI Face Mosaic for Windows
- Filmora AI Eye Contact- Windows
- AI Video Enhancer for Windows
- AI Text-to-Video for Windows
- Planar Tracking for Windows
- AI Idea to Video for Windows
- AI Media Analysis for Windows
- Filmora Image to Video for Windows
- Filmora Image to Prompt for Windows
- Instant Cutter Tool for Windows
- AI Extend
- Filmora AI Relight - Windows
- Filmora AI Image Enhancer Guide - Windows
- AI Script to Video Guide for Windows
- AI Text-Based Editing for Windows
- AI Mate Editing for Windows
- Instant Mode for Windows
- ChatGPT Plugin - AI Copywriting
- AI Smart Cutout for Windows
- Lens correction on Windows
- Auto Reframe Video for Windows
- AI Portrait Cutout
- Scene Detection for Windows
- AI Smart Masking for Windows
- Motion Tracking on Windows
- Video Stabilization for Windows
- AI Video/Photo Object Remover for Windows
- AI Smart Search for Windows
- AI Skin Tone Protection for Windows
- AI Image for Windows
- Chroma Key (Green Screen) for Windows
- Super Slow Motion with Optical Flow for Windows
- Video Denoise for Windows
-
-
Audio Editing for Windows
-
Basic Audio Editing
-
Advanced Audio Editing
-
AI-Powered Audio Editing
- Auto synchronization
- AI Sound Effects in Filmora for Windows
- Smart BGM Generation on Windows
- AI Voice Enhancer in Filmora
- AI Voice Cloning in Wondershare Filmora
- AI Music Generator for Windows
- Audio To Video
- AI Vocal Remover for Windows
- AI Auto Beat Sync for Windows
- AI Audio Stretch for Windows
- AI Audio Denoise for Windows
- Silence Detection on Windows
-
-
Text Editing for Windows
-
Basic Text Editing
-
Advanced Text Editing
-
AI-Powered Text Editing
-
-
Video Customizations
-
Video Effects
- Filmora VST3 Plugins for Windows
- Filmora OpenFX Plugins for Windows
- Retouch Guide for Windows
- Filmora Pen Tool Tutorial: Motion Paths & Animation Guide
- Animated Charts
- Mocha Filmora - For Windows
- Different Types of Video Effects
- NewBlue FX effects
- Boris FX effects | Filmora Windows Guide
- Body Effects for Windows
- Filmora -Filmstock Asset
-
Audio Effects
-
Transitions
-
Stickers
-
Filters
-
Color Editing
-
Animations
-
Templates
-
Asset Center
-
-
Exporting & Share & Cloud Backup
Adjust Audio
The Adjust Audio feature in Wondershare Filmora lets users control volume, balance, and clarity of audio tracks with ease. It helps fine-tune background music, voiceovers, and sound effects for a more polished output. With simple sliders and editing tools, creators can enhance sound quality and ensure a professional listening experience in their videos.
Comprehensive Steps to Adjust Audio With Filmora
With Filmora, users get the ability to modify different attributes according to their preferences. Follow the steps mentioned below to learn how to adjust and modify audio in Filmora:
Index
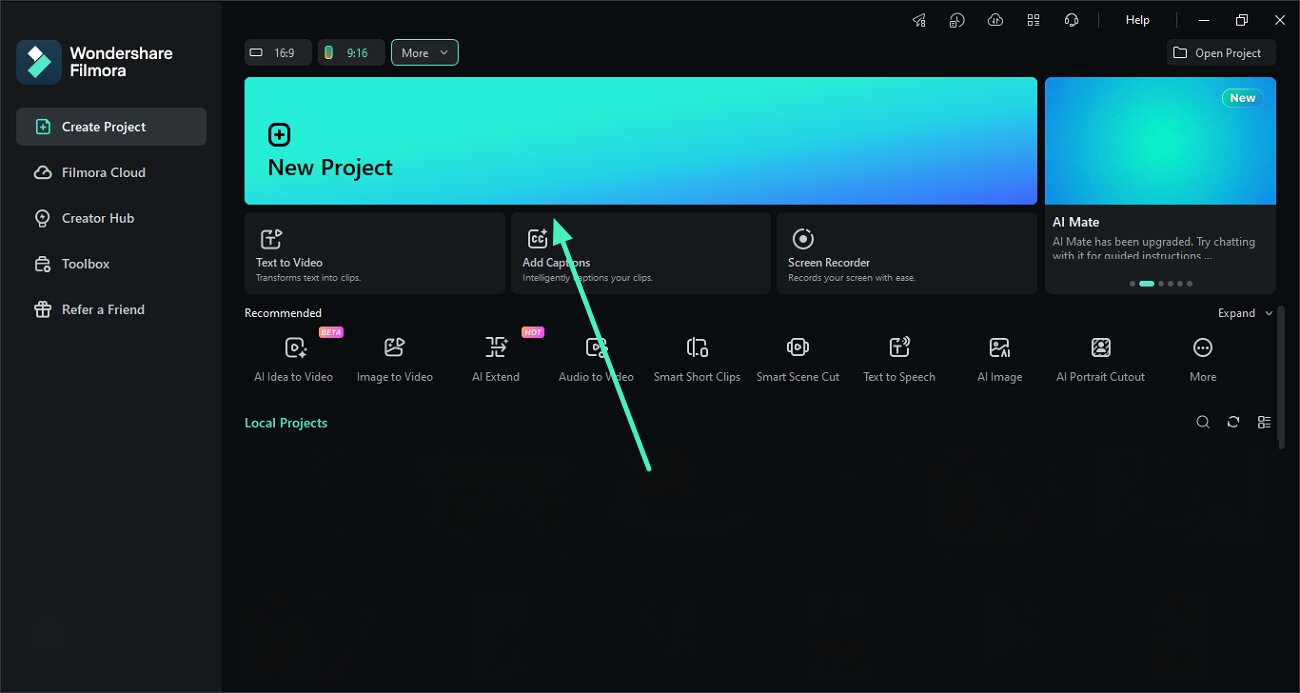
Step 1. Open New Project Import Audio
To begin, open the software on your Windows device and create a New Project. Next, import the audio file to the tool's interface and drag it to the editing timeline.
Step 2. Enable Adjustment Option
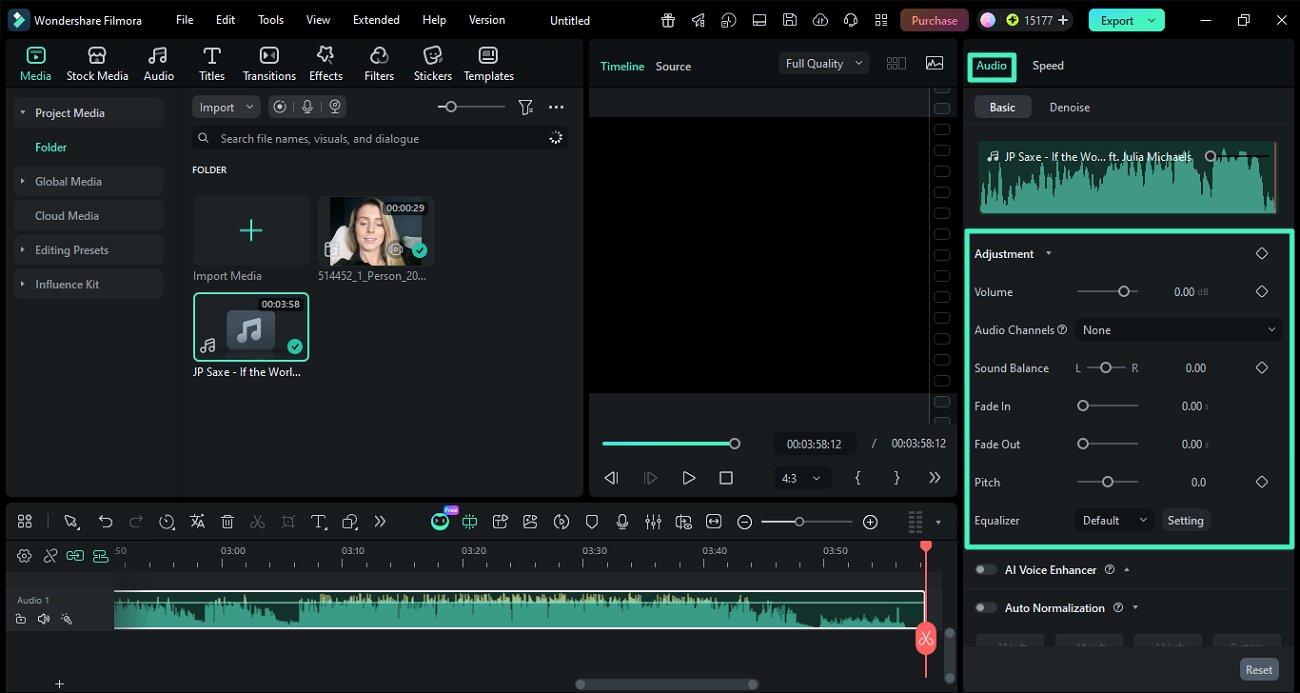
In the main editing interface, head to the properties panel on the right and enable the Audio section. Now, locate the Adjustment option to enable it. Here, you can change the Volume, Sound Balance, Pitch, and other attributes by dragging the respective sliders. Once you achieve the desired results, press the Export button to save the results.
Step 3. Audio Elements You Can Adjust
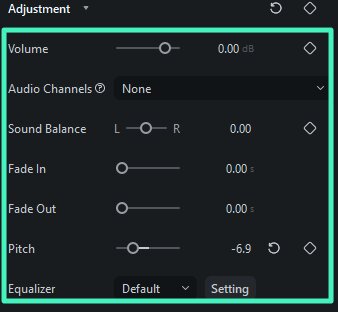
- Volume: Controls the overall loudness of the audio track in your project.
- Audio Channels: Lets you manage left and right channel output for better stereo sound control.
- Sound Balance: Adjusts how audio is distributed between speakers for a balanced listening experience.
- Fade In/Out: Smoothly increases or decreases audio at the start or end of a clip.
- Pitch: Changes the tone of the audio to make it higher or lower without affecting speed.
- Equalizer: Fine-tunes different sound frequencies to improve clarity and overall audio quality.
Step 4. Denoise Audio
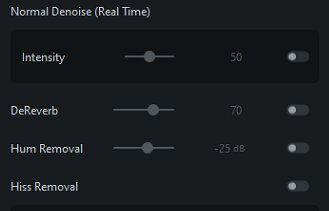
The Denoise Audio feature in Filmora helps remove unwanted background noise such as hiss, hum, or static from audio tracks. It enhances voice clarity and improves overall sound quality, making recordings cleaner and more professional.
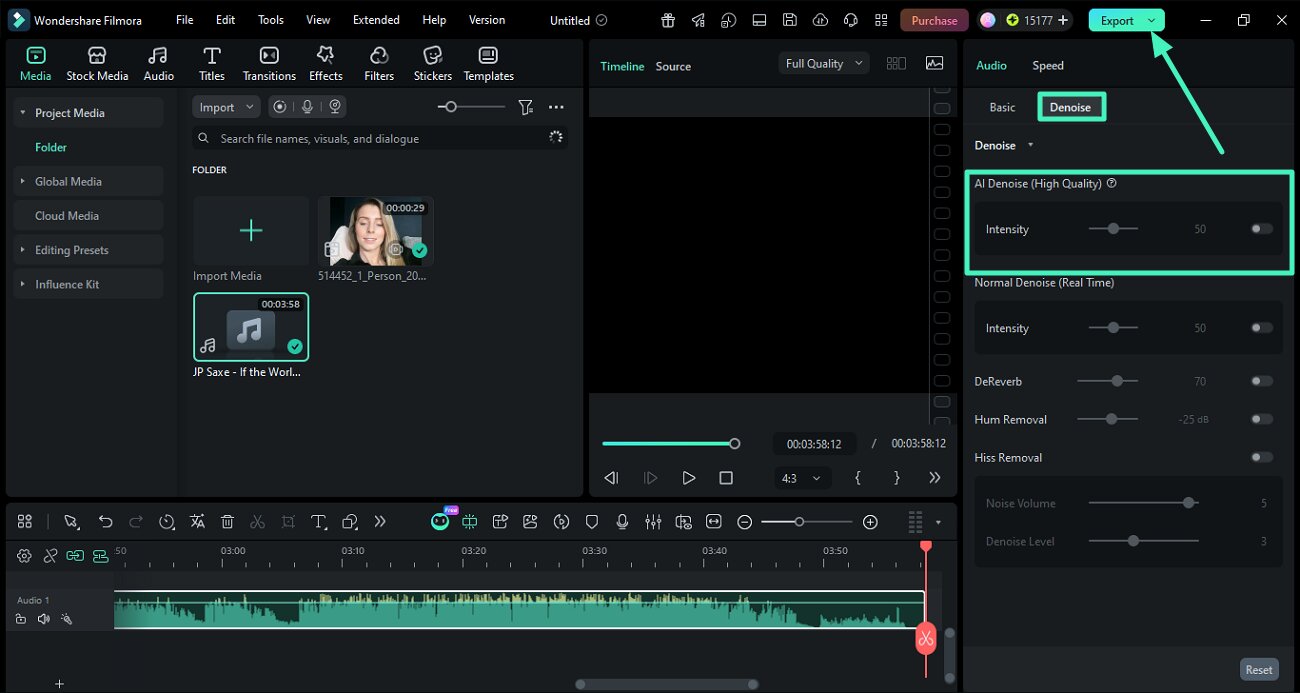
Instructions. After importing the audio file, enable the Denoise section under the Audio panel on the right. Next, turn the AI Denoise toggle to let the tool automatically remove unwanted noise. You can also remove unwanted noise by dragging the respective sliders. Once you achieve clear audio, press the Export button to save the final results.
Step 5. Denoising Attributes You Can Adjust
- DeReverb: Reduces echo and reverberation in audio to make sound clearer and more focused.
- Humm Removal: Eliminates low-frequency humming noises caused by electrical interference or background devices.
- Hiss Removal: Removes high-frequency hissing sounds to improve overall audio clarity and smoothness.
Related Posts
Featured Articles
How to Generate Cinematic Videos with Veo 3 Text-to-Video
Create ultra-realistic videos that look straight out of a movie using Veo 3 Text-to-Video. This guide walks you through how to use it step by step for the best results.
13 Funny Happy New Year Videos for a Joyful Start to 2026
Check out these 13 funny New Year videos to welcome 2026! From silly skits to dance moves, these clips will make you want to have fun and create your own hilarious videos!
Best Time to Post on TikTok in 2026
Find the best times to post on TikTok and use AI tools to schedule your content for maximum reach and engagement.
Recommended User Guide
Add and Modify Audio on Windows
Learn how to add, adjust, remove, and favorite audio.
Detach Audio for Windows
This is a guide teaching you to detach audio in Filmora.
Change Audio Pitch for Windows
Learn how to use Pitch in Filmora
