For the Best Results, Use the Latest Version.
-
Preparations
-
Account
-
Get Started & Basic Settings
-
Compatibility & Tech Specs
-
Performance Settings
-
-
Creating Projects
-
Creating New Projects
-
-
Importing & Recording
-
Video Editing for Windows
-
Basic Video Editing
- Enable/Disable Clip in Windows
- Magnetic Timeline for Windows
- Dual Monitor Setup for Video Editing on Windows
- Select All Clips on Timeline for Windows
- Manage Timeline and Tracks on Windows
- Auto Ripple for Windows
- Split & trim video
- Crop & Pan & Zoom Video in Filmora for Windows
- Compositing
- Change Video Speed on Windows
- Playing videos in reverse
- Mark In and Mark Out for Windows
- Markers for Windows
- Group editing
- Customizable Backgrounds for Videos and Images in Windows
- Video snapshot
- Using Freeze Frame in Filmora for Windows
- Logo Reveal For Windows
- Auto Enhance in Filmora for Windows
- Applying drop shadow
- Adjustment layer for Windows
- Apply Transforming for Windows
- Video Editing Ruler – Windows
-
Advanced Video Editing
- Drawing Tools for Windows | Filmora Guide
- Create Multi-Camera Clip in Filmora for Windows
- Compound Clip for Windows
- Multi-Clip Editing for Windows
- Filmora Motion Blur | Windows
- Video Chapters in Filmora on Windows
- Filmora Flicker Removal Guide | Windows
- Masking in Filmora on Windows
- Creating a PIP Effect for Windows
- Keyframe Graph Editor for Windows
- Add animation keyframing for Windows
- Keyframe Path Curve for Windows
-
AI-Powered Video Editing
- Smart Scene Cut for Windows
- Smart Short Clips for Windows
- AI Face Mosaic for Windows
- Filmora AI Eye Contact- Windows
- AI Video Enhancer for Windows
- AI Text-to-Video for Windows
- Planar Tracking for Windows
- AI Idea to Video for Windows
- Filmora Image to Video for Windows
- Filmora Image to Prompt for Windows
- Instant Cutter Tool for Windows
- AI Extend
- Filmora AI Relight - Windows
- Filmora AI Image Enhancer Guide - Windows
- AI Script to Video Guide for Windows
- AI Text-Based Editing for Windows
- AI Mate Editing for Windows
- Instant Mode in Filmora
- ChatGPT Plugin - AI Copywriting
- AI Smart Cutout for Windows
- Lens correction on Windows
- Auto Reframe Video for Windows
- AI Portrait Cutout
- Scene detection feature
- AI Smart Masking for Windows
- Motion Tracking on Windows
- Video Stabilization for Windows
- AI Video/Photo Object Remover for Windows
- AI Smart Search for Windows
- AI Skin Tone Protection for Windows
- AI Image for Windows
- Chroma key (green screen)
- Super Slow Motion with Optical Flow for Windows
- Video Denoise for Windows
-
-
Audio Editing for Windows
-
Basic Audio Editing
-
Advanced Audio Editing
-
AI-Powered Audio Editing
- Auto synchronization
- AI Sound Effects in Filmora for Windows
- Smart BGM Generation on Windows
- AI Voice Enhancer in Filmora
- AI Voice Cloning in Wondershare Filmora
- AI Music Generator for Windows
- Audio To Video
- AI Vocal Remover for Windows
- AI Auto Beat Sync for Windows
- AI Audio Stretch for Windows
- AI Audio Denoise for Windows
- Silence Detection on Windows
-
-
Text Editing for Windows
-
Basic Text Editing
-
Advanced Text Editing
-
AI-Powered Text Editing
-
-
Video Customizations
-
Video Effects
-
Audio Effects
-
Transitions
-
Stickers
-
Filters
-
Color Editing
-
Animations
-
Templates
-
Asset Center
-
-
Exporting & Share & Cloud Backup
Masking in Filmora on Windows
This feature gives editors greater control over video composition by allowing selected areas of a clip to be revealed or concealed. Instead of editing the entire frame, this feature makes it possible to isolate subjects, merge multiple clips smoothly, and build visually engaging effects with better precision.
Filmora includes various mask shapes along with adjustable settings that support flexible editing styles, from basic enhancements to advanced cinematic scenes. Whether creating dramatic transitions, emphasizing important details, or producing creative layered visuals, masking serves as a valuable tool for improving storytelling and delivering more polished video projects.
Step-By-Step Guide to Perform Masking in Filmora
Provided next is a comprehensive guide showing how to mask a video in Filmora using its extensive toolkit:
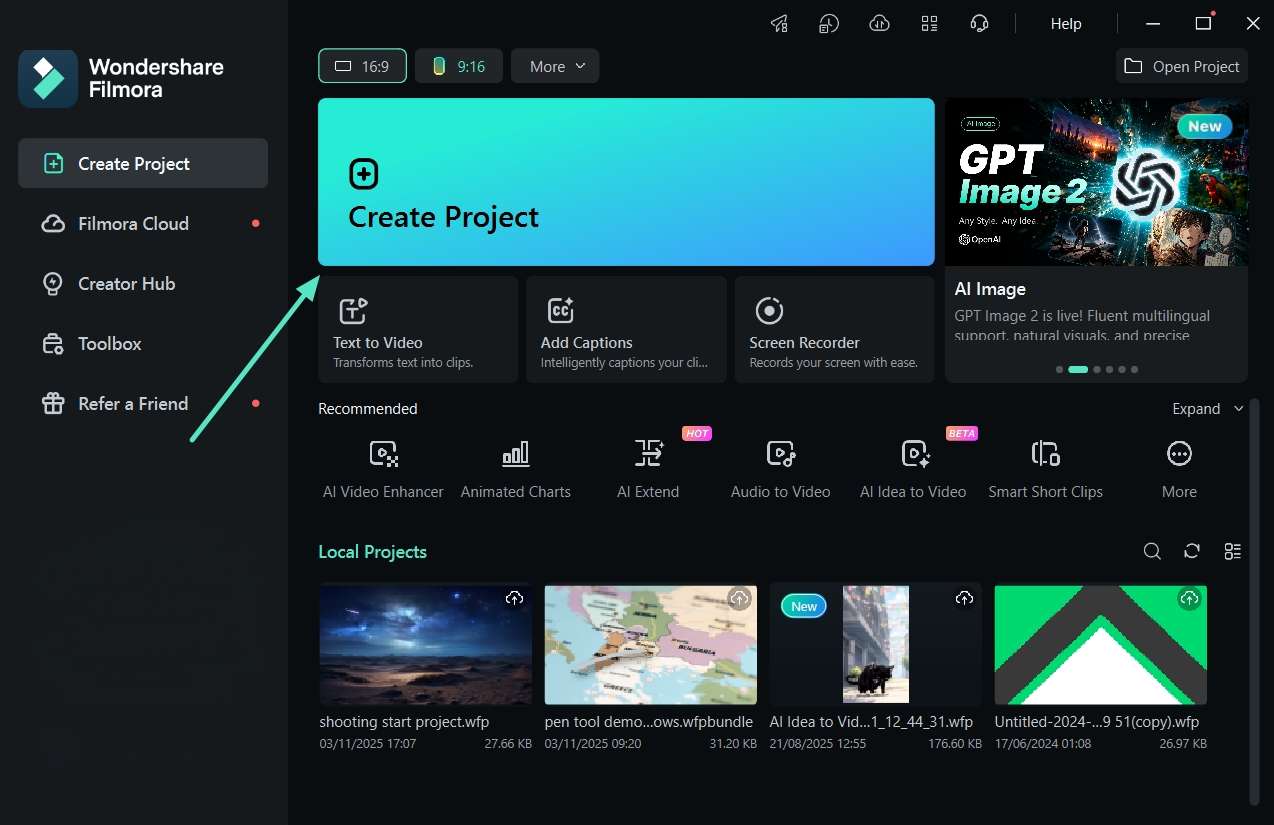
Step 1. Start New Video Project
Start by launching Wondershare Filmora on your desktop and clicking the Create Project button.
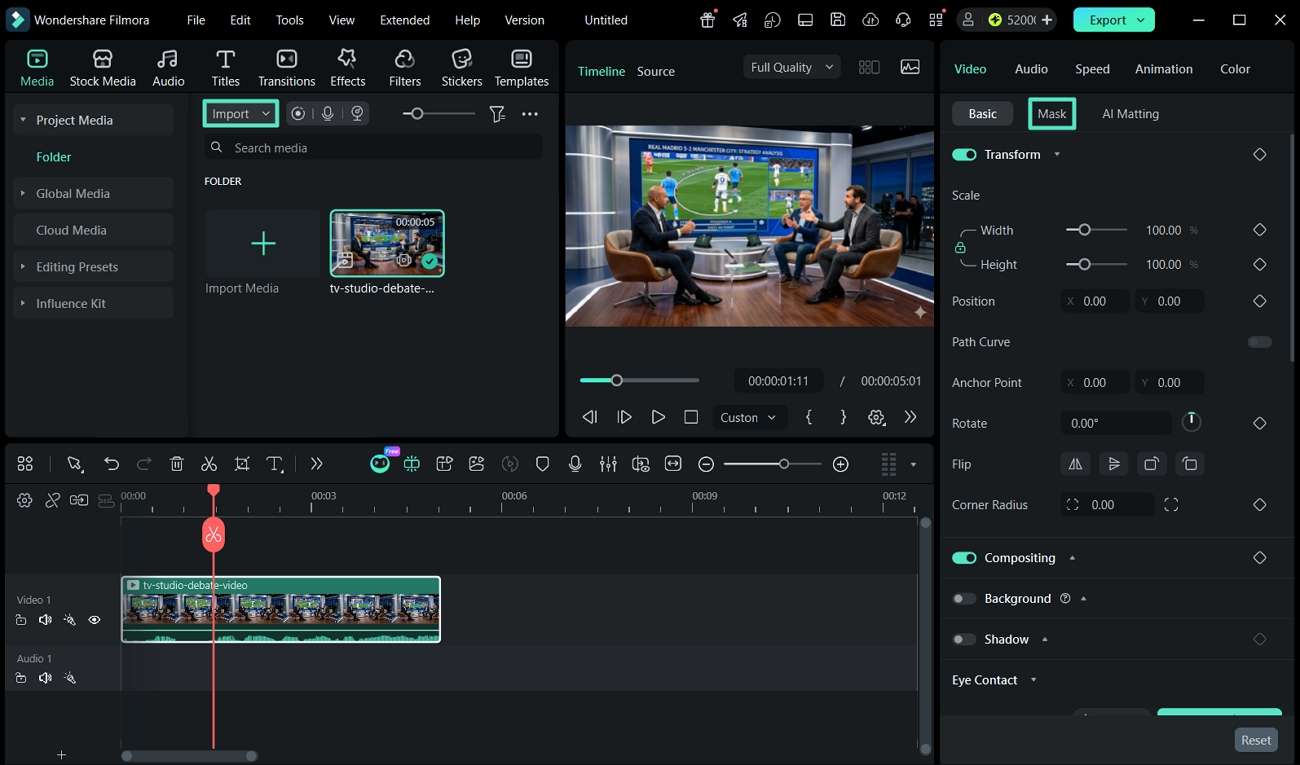
Step 2. Import and Access Mask Tab
As soon as a new window opens up, click the Import button present across the Media tab to add your editable video. With the video imported successfully, lead into the Mask tab for specific masking functions.
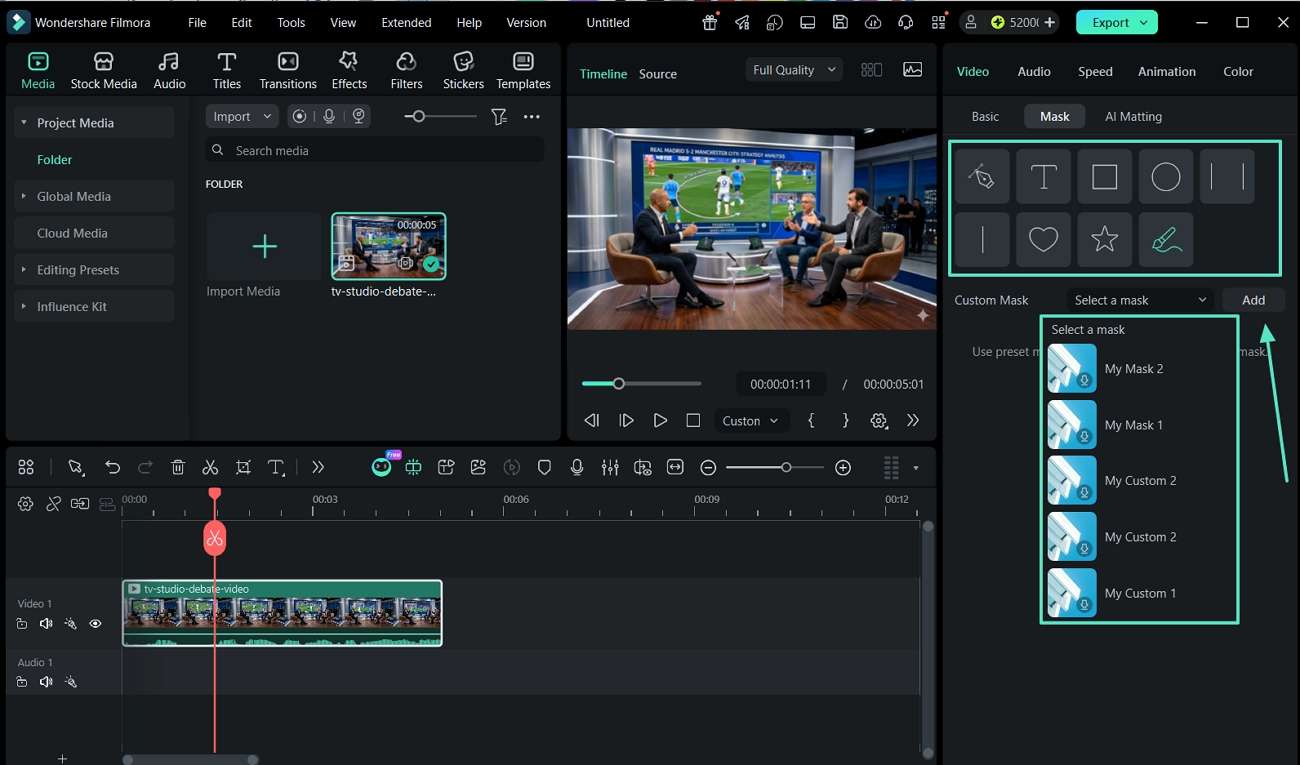
Step 3. Add Masking Layers in Video
From the available options, you can choose any preset option for masking. From basic shapes to AI Mask, the presets help you make the operations quicker. Not only that, you can select your own Custom Mask from the drop-down menu or click the Add button to import a mask from external sources.
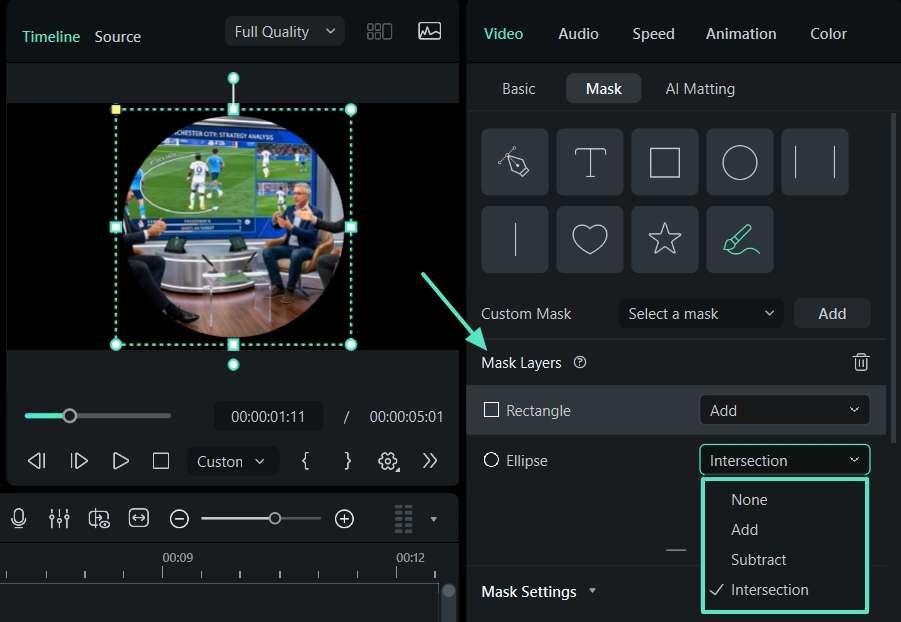
Step 4. Determine the Basic Masking Layer Settings
Filmora now allows you to add more Mask Layers instead of just using a single layer. With multiple layers added, easily select a particular layer and adjust its dimensions across the preview window. Furthermore, you can change the dynamics of the masking layer by selecting the right option from the drop-down menu adjacent to each masking layer.
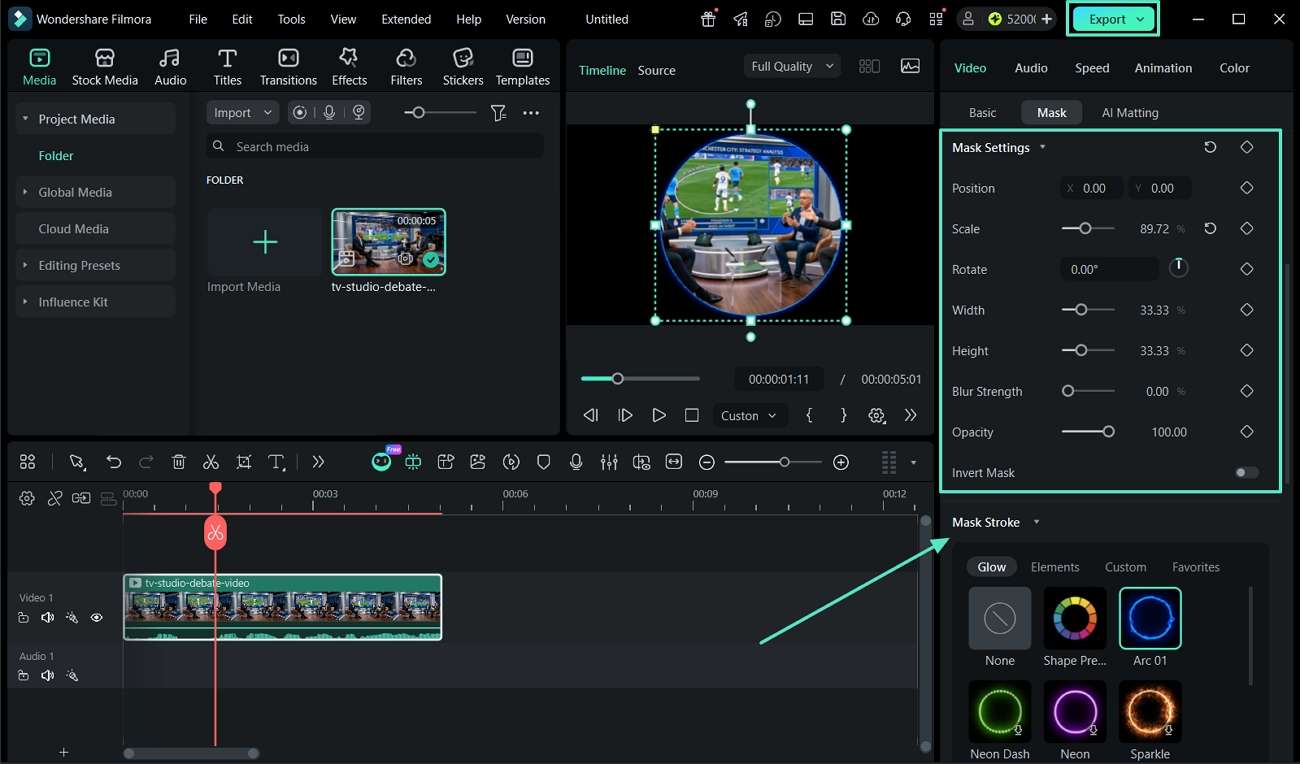
Step 5. Make Further Edits to Your Masks and Export
With the basic masking done, you can adjust parameters like Position, Scale, Rotate, and more across the Mask Settings. You can also use the Invert Mask option to alter all the settings for a different effect. Following this, if you wish to add an effect across your added layer, you can choose any of the options available in the Mask Stroke section. Once done, look for the Export button to save your video settings.
Related Posts
Featured Articles
How to Post Videos on Snapchat Spotlight [+ Tips for Creating Snaps)
Learn how to upload Spotlight on Snapchat with this step-by-step guide! Boost your visibility, share engaging videos, and get noticed on Snapchat Spotlight!
How To Curve Text in Photoshop: 3 Easiest Methods
Do you want to enhance your designs by making your text curve in Photoshop? This guide provides four easy ways to improve your typography appeal now!
How To Convert PNG Sequence To Video in 5 Effective Ways
Learn how to convert PNG sequence to video with our comprehensive guide. Explore five different techniques and choose the best method for your needs.
Recommended User Guide
Drawing Tools for Windows | Filmora Guide
This guide tell you how to use Drawing Tools feature in Filmora for Mac.
Filmora Motion Blur | Windows
Here is the guide on how to use the Motion Blur feature in Filmora.
Video Chapters in Filmora on Windows
Here is the guide on how to use the video chapters feature in Filmora on Windows.
