For the Best Results, Use the Latest Version.
-
Preparations
-
Account
-
Get Started & Basic Settings
-
Compatibility & Tech Specs
-
Performance Settings
-
-
Creating Projects
-
Creating New Projects
-
-
Importing & Recording
-
Video Editing for Windows
-
Basic Video Editing
- Enable/Disable Clip in Windows
- Magnetic Timeline for Windows
- Dual Monitor Setup for Video Editing on Windows
- Select All Clips on Timeline for Windows
- Manage Timeline and Tracks on Windows
- Auto Ripple for Windows
- Split & trim video
- Crop & Pan & Zoom Video
- Compositing
- Change video playback speed
- Playing videos in reverse
- Mark In and Mark Out for Windows
- Markers for Windows
- Group editing
- Customizable Backgrounds for Videos and Images in Windows
- Video snapshot
- Using freeze frame
- Logo Reveal For Windows
- Apply auto enhance
- Applying drop shadow
- Adjustment layer for Windows
- Transforming
- Video Editing Ruler – Windows
-
Advanced Video Editing
- Drawing Tools for Windows | Filmora Guide
- Create Multi-Camera Clip
- Compound Clip for Windows
- Multi-Clip Editing for Windows
- Filmora Motion Blur | Windows
- Filmora Flicker Removal Guide | Windows
- Apply mask to video
- Creating a PIP effect
- Keyframe Graph Editor for Windows
- Add animation keyframing for Windows
- Keyframe Path Curve for Windows
-
AI-Powered Video Editing
- Smart Scene Cut for Windows
- Smart Short Clips for Windows
- AI Face Mosaic for Windows
- Filmora AI Eye Contact- Windows
- AI Video Enhancer for Windows
- AI Text-to-Video for Windows
- Planar Tracking for Windows
- AI Idea to Video for Windows
- Filmora Image to Video for Windows
- Filmora Image to Prompt for Windows
- Instant Cutter Tool for Windows
- AI Extend
- Filmora AI Relight - Windows
- Filmora AI Image Enhancer Guide - Windows
- AI Script to Video Guide for Windows
- AI Text-Based Editing for Windows
- AI Mate Editing for Windows
- Create with instant mode
- ChatGPT Plugin - AI Copywriting
- AI Smart Cutout
- Lens correction on Windows
- Auto reframe video
- AI Portrait Cutout
- Scene detection feature
- AI Smart Masking for Windows
- Make motion tracking
- Video Stabilization for Windows
- AI Video/Photo Object Remover for Windows
- AI Smart Search for Windows
- AI Skin Tone Protection for Windows
- AI Image for Windows
- Chroma key (green screen)
- Super Slow Motion with Optical Flow for Windows
- Video Denoise for Windows
-
-
Audio Editing for Windows
-
Basic Audio Editing
-
Advanced Audio Editing
-
AI-Powered Audio Editing
-
-
Text Editing for Windows
-
Basic Text Editing
-
Advanced Text Editing
-
AI-Powered Text Editing
-
-
Video Customizations
-
Video Effects
-
Audio Effects
-
Transitions
-
Stickers
-
Filters
-
Color Editing
-
Animations
-
Templates
-
Asset Center
-
-
Exporting & Share & Cloud Backup
Change Playback Quality
You can adjust the playback quality of the Preview window for a smoother editing experience. For example, you can improve the performance of your preview by playing your video at a lower resolution than you want for your finished project or by creating proxy media files to edit with.
Note:
Proxy files are more manageable versions of your clips that are easier to edit because they are smaller in terms of data (i.e. they are at a lower resolution). You can edit with a proxy file in Filmora, then export with your full-sized original clip.- If Filmora detects lags, it will prompt a message to ask you to lower playback quality.
- Reducing your playback quality can eliminate lags and save you time. Click the playback quality control menu, and then choose from these options:
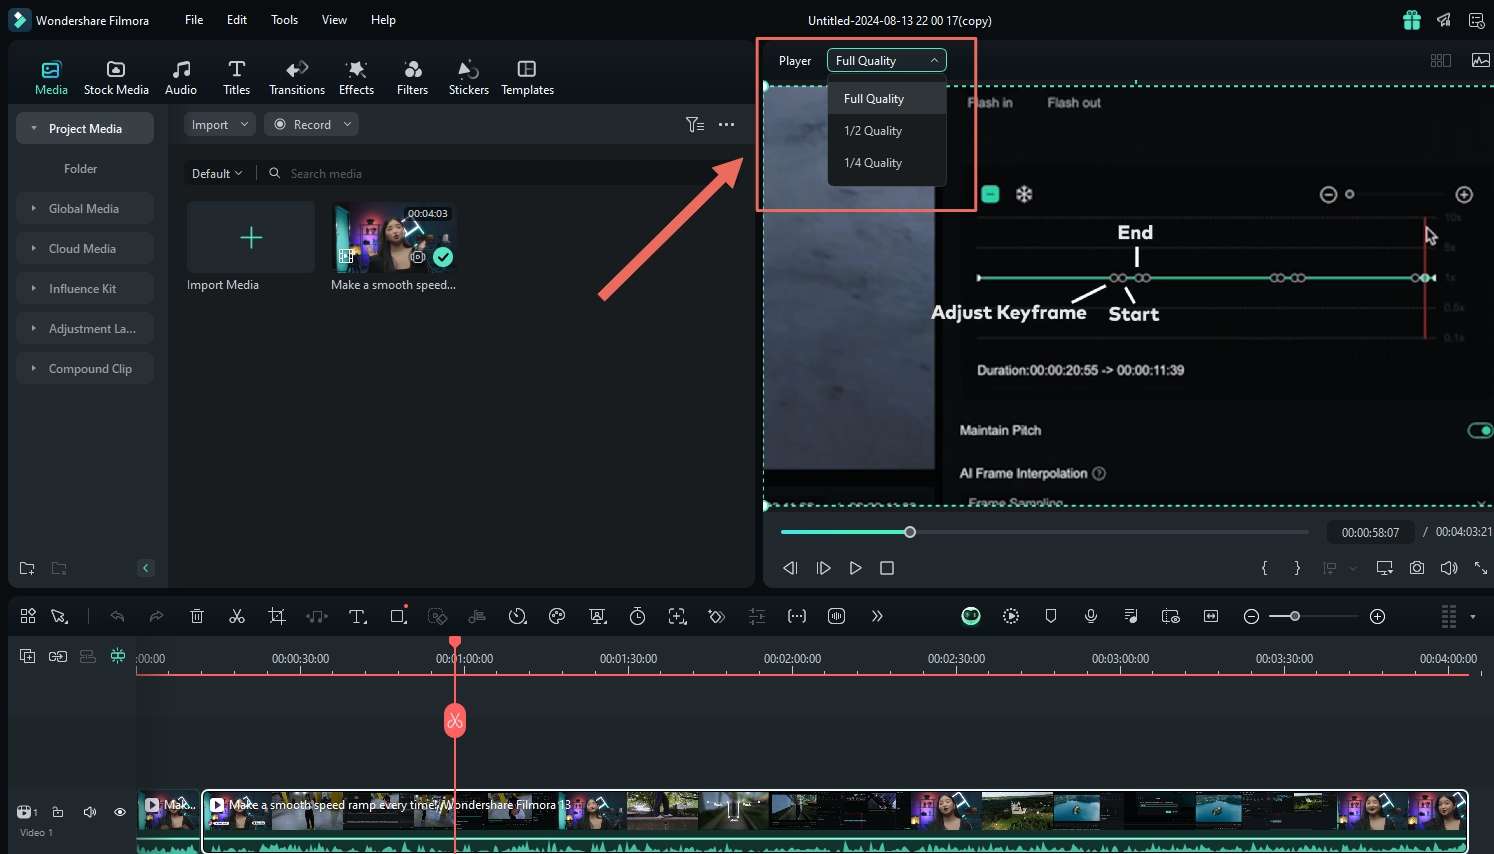
- Full: preview your video without changing the original resolution
- 1/2: preview your video at 1/2 the original resolution
- 1/4: preview your video at 1/4 the original resolution
Note:
The reduced playback resolution only applies to the video preview and will not affect the export settings.Related Posts
Featured Articles
Ways to Turn a Photo or a Video into a Sketch: A Complete Guide
Want to add a sketch effect to your photo or video to upload on socials? Read this article to learn about a top video to sketch converter and get started today.
[Top Tools] Translate Song Lyrics With High-Quality Outputs
Are you looking for ways to generate songs in multiple languages? Read this article to learn the best way to conveniently translate song lyrics.
Step-by-Step | How to Extract Audio from Video Using Canva?
Can you remove audio from a video in Canva? Sure! Check our step-by-step guide to extract audio from videos using Canva.
Recommended User Guide
Media for use
Learn about the media files you can use for your videos.
Register / update / uninstall
The latest and greatest version of Filmora Video Editor for Windows and Mac can be downloaded from the official website top navigation bar.
