For the Best Results, Use the Latest Version.
-
Preparations
-
Account
-
Get Started & Basic Settings
-
Compatibility & Tech Specs
-
Performance Settings
-
-
Creating Projects
-
Creating New Projects
-
-
Importing & Recording
-
Video Editing for Windows
-
Basic Video Editing
- Enable/Disable Clip in Windows
- Magnetic Timeline for Windows
- Dual Monitor Setup for Video Editing on Windows
- Select All Clips on Timeline for Windows
- Manage Timeline and Tracks on Windows
- Auto Ripple for Windows
- Split & trim video
- Crop & Pan & Zoom Video in Filmora for Windows
- Compositing
- Change Video Speed on Windows
- Playing videos in reverse
- Mark In and Mark Out for Windows
- Markers for Windows
- Group editing
- Customizable Backgrounds for Videos and Images in Windows
- Video snapshot
- Using Freeze Frame in Filmora for Windows
- Logo Reveal For Windows
- Auto Enhance in Filmora for Windows
- Applying drop shadow
- Adjustment layer for Windows
- Apply Transforming for Windows
- Video Editing Ruler – Windows
-
Advanced Video Editing
- Drawing Tools for Windows | Filmora Guide
- Create Multi-Camera Clip in Filmora for Windows
- Compound Clip for Windows
- Multi-Clip Editing for Windows
- Filmora Motion Blur | Windows
- Filmora Flicker Removal Guide | Windows
- Apply mask to video
- Creating a PIP Effect for Windows
- Keyframe Graph Editor for Windows
- Add animation keyframing for Windows
- Keyframe Path Curve for Windows
-
AI-Powered Video Editing
- Smart Scene Cut for Windows
- Smart Short Clips for Windows
- AI Face Mosaic for Windows
- Filmora AI Eye Contact- Windows
- AI Video Enhancer for Windows
- AI Text-to-Video for Windows
- Planar Tracking for Windows
- AI Idea to Video for Windows
- Filmora Image to Video for Windows
- Filmora Image to Prompt for Windows
- Instant Cutter Tool for Windows
- AI Extend
- Filmora AI Relight - Windows
- Filmora AI Image Enhancer Guide - Windows
- AI Script to Video Guide for Windows
- AI Text-Based Editing for Windows
- AI Mate Editing for Windows
- Instant Mode in Filmora
- ChatGPT Plugin - AI Copywriting
- AI Smart Cutout for Windows
- Lens correction on Windows
- Auto Reframe Video for Windows
- AI Portrait Cutout
- Scene detection feature
- AI Smart Masking for Windows
- Motion Tracking on Windows
- Video Stabilization for Windows
- AI Video/Photo Object Remover for Windows
- AI Smart Search for Windows
- AI Skin Tone Protection for Windows
- AI Image for Windows
- Chroma key (green screen)
- Super Slow Motion with Optical Flow for Windows
- Video Denoise for Windows
-
-
Audio Editing for Windows
-
Basic Audio Editing
-
Advanced Audio Editing
-
AI-Powered Audio Editing
- Auto synchronization
- AI Sound Effects in Filmora for Windows
- Smart BGM Generation on Windows
- AI Voice Enhancer in Filmora
- AI Voice Cloning in Wondershare Filmora
- AI Music Generator for Windows
- Audio To Video
- AI Vocal Remover for Windows
- AI Auto Beat Sync for Windows
- AI Audio Stretch for Windows
- AI Audio Denoise for Windows
- Silence Detection on Windows
-
-
Text Editing for Windows
-
Basic Text Editing
-
Advanced Text Editing
-
AI-Powered Text Editing
-
-
Video Customizations
-
Video Effects
-
Audio Effects
-
Transitions
-
Stickers
-
Filters
-
Color Editing
-
Animations
-
Templates
-
Asset Center
-
-
Exporting & Share & Cloud Backup
Color Wheels in Filmora Windows
Filmora for Windows provides powerful Color Wheels tools that help users enhance video quality through advanced color grading. This feature allows precise control over shadows, midtones, and highlights, making it easier to create cinematic looks and professional-grade visuals. With additional HDR color wheels in newer versions, users can fine-tune brightness and contrast across different luminance levels for more accurate color correction and creative styling.
Steps to Use Color Wheels in Filmora for Windows
With Filmora, users get the ability to adjust the colors in their videos according to ther preferences. Provided below is a step-by-step guide on how to use the color wheel in Filmora:
Step 1. Start with a New Project and Import Media
Launch Wondershare Filmora on your Windows computer and click on the New Project option from the home screen. Once the editing workspace opens, import your media files into the library and drag the selected clip onto the timeline to begin editing.
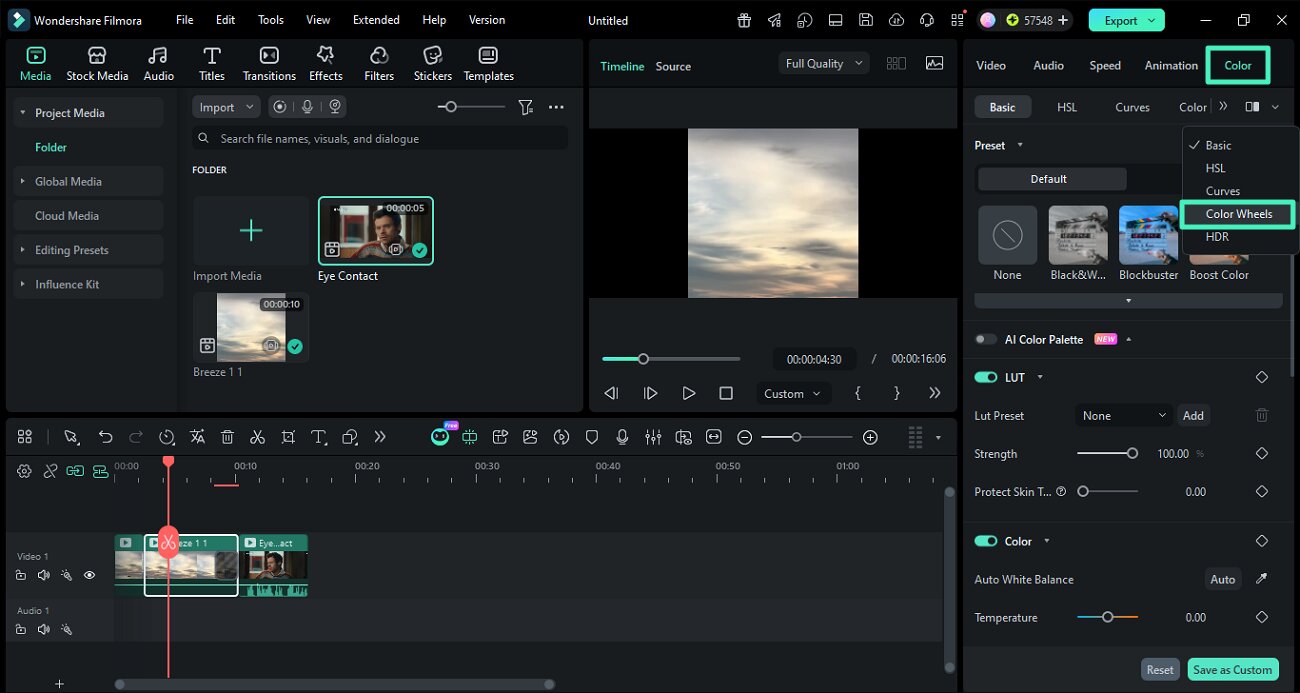
Step 2. Open the Color Wheels Panel
Select the video clip on the timeline, then go to the right-side settings panel. Open the Color tab and enable the Color Wheels option to activate the tool.
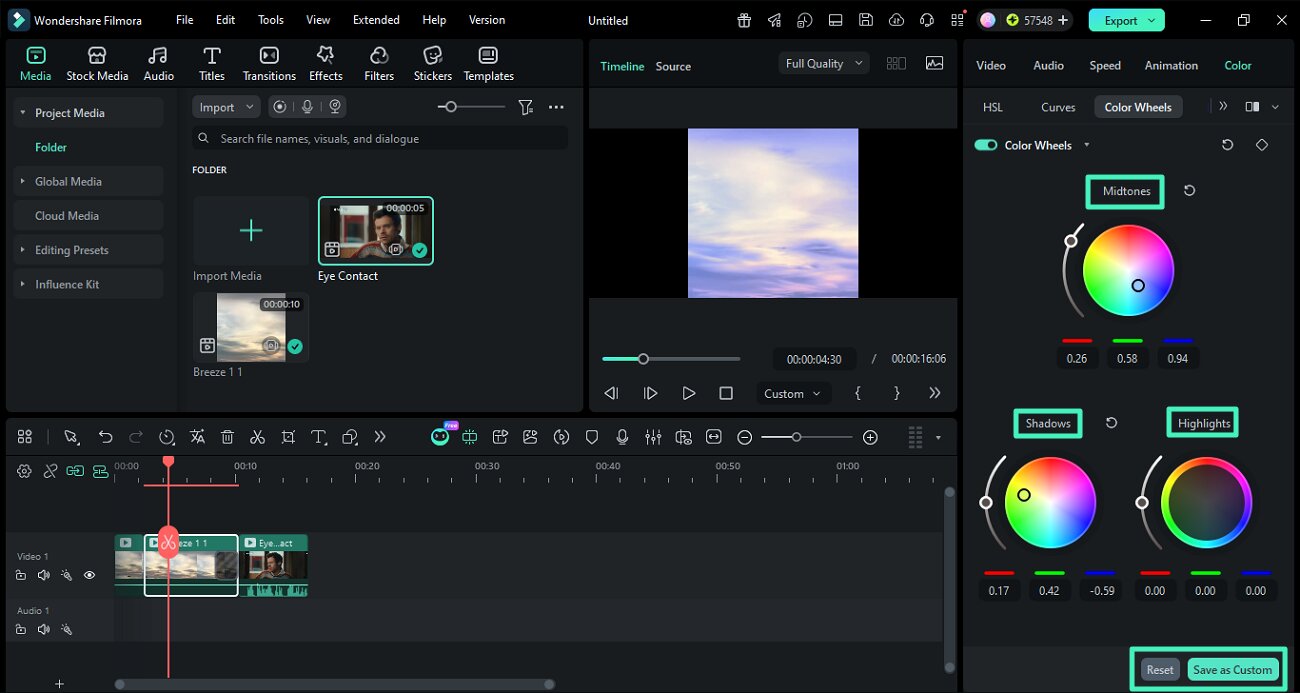
Step 3. Adjust Highlights, Midtones, and Shadows
Inside the Color Wheels section, you will see controls for Highlights, Midtones, and Shadows. Use the sliders or wheels to adjust each tone individually and refine the overall look of your video. After adjusting the color values, you can click Save as Custom to store your settings for future use. If you want to undo changes, simply click the Reset button to restore default color settings.
Step 4. Access HDR Color Wheels
For advanced editing, open the HDR section under the Color panel after selecting your clip. Enable the HDR Color Wheel switch to unlock extended color grading controls. Here, you can fine-tune different brightness levels such as blacks, shadows, highlights, and specular tones. Adjust each wheel to control how color behaves in specific light ranges. Once done, click the Export button to save the results.

Related Posts
Featured Articles
How to Record Audio With Windows 11 Voice Recorder? Alternatives Provided
If you're looking for how to use Windows 11 voice recorder and the easiest way to record audio on your Windows 11 computer, this article can help. Keep reading to learn more.
Promote Your Black Friday Deals with an Engaging Trailer
Learn how to create captivating Black Friday trailers that grab attention and drive sales. Furthermore, explore effective strategies and tools to stand out.
New to Instagram Video Translation? Here's Your Ultimate Guide
Unlock new opportunities by translating Instagram videos. Find out how to break language barriers and enhance engagement with our step-by-step guide. Start translating today!
Recommended User Guide
AI Color Palette (Color Match)
Learn how to do color correction in Filmora.
Pro Video Scopes
Video Scopes is like a track of color elements during color correction and enhancement, and Filmora's new upgrades include pro video scopes for a professional editing experience.
