For the Best Results, Use the Latest Version.
-
Preparations for Mac
-
Account (Mac)
-
Get Started & Basic Settings (Mac)
- Release notes for Mac
- Latest Versions and Features for Mac
- Get Started on Mac - Full Guide
- Download/register/uninstall on Mac
- Panel Layout on Mac
- Keyboard shortcuts on Mac
- Touchbar on Mac
- Change playback quality on Mac
- Render preview files on Mac
- Manage Timeline on Mac
- Media for use on Mac
- Logo Reveal For Mac
- Marked Favorites for Mac
-
Compatibility & Tech Specs (Mac)
-
Performance Settings (Mac)
-
-
Creating Projects - Mac
-
Creating New Projects (Mac)
-
-
Importing & Recording - Mac
-
Importing (Mac)
-
Recording (Mac)
-
-
Video Editing for Mac
-
Basic Video Editing for Mac
- Edit Live Photos on Mac
- Enable/Disable Clip for Mac
- Magnetic Timeline For Mac
- Dual Monitor Setup for Video Editing on Mac
- Select All Clips on Timeline for Mac
- Auto Ripple for Mac
- Split & cut videos on Mac
- Compositing on Mac
- Crop and zoom on Mac
- Playback Zoom Level for Mac
- Change speed on Mac
- Play video in reverse on Mac
- Mark In and Mark Out for Mac
- Markers for Mac
- Group clips on Mac
- Customized Backgrounds for Videos and Images in Mac
- Video snapshot on Mac
- Freeze frame on Mac
- Auto enhance on Mac
- Applying Drop Shadow for Mac
- Adjustment Layer for Mac
- Mark clip on Mac
- Video Editing Ruler – Mac
- Apply Transforming for Mac
-
Advanced Video Editing for Mac
-
AI-Powered Video Editing for Mac
- Smart Scene Cut for Mac
- Smart Short Clips for Mac
- Filmora Image to Video for Mac
- AI Idea to Video for Mac
- AI Text-to-Video for Mac
- Instant Cutter Tool on Mac
- AI Face Mosaic for Mac
- Keyframe Path Curve for Mac
- Planar Tracking for Mac
- AI Extend For Mac
- AI Script-to-Video for Mac
- AI Text-Based Editing in Mac
- Create With Instant Mode on Mac
- ChatGPT Plugin - AI Copywriting on Mac
- AI Smart Cutout for Mac
- Auto reframe on Mac
- Lens correction on Mac
- AI Portrait Cutout on Mac
- Scene detection on Mac
- AI Smart Masking for Mac
- AI Mate Editing for Mac
- Motion Tracking on Mac
- Video Stabilization for Mac
- AI Object Remover For Mac
- AI Smart Search for Mac
- AI Skin Tone Protection for Mac
- Green screen on Mac
- Super Slow Motion with Optical Flow for Mac
- AI stylizer on Mac
- Video Denoise for Mac
-
-
Audio Editing for Mac
-
Basic Audio Editing for Mac
-
Advanced Audio Editing for Mac
-
AI-Powered Audio Editing for Mac
- Audio To Video for Mac
- AI Sound Effect for Mac
- Smart BGM Generation for Mac
- AI Voice Enhancer for Mac
- Audio Stretch for Mac
- AI Audio Denoise for Mac
- Auto synchronization for Mac
- AI Vocal Remover for Mac
- Auto Beat Sync on Mac
- AI Music Generator for Mac
- How to Perform AI Voice Cloning in Wondershare Filmora?
- Silence detection on Mac
-
-
Text Editing for Mac
-
Basic Text Editing for Mac
-
Advanced Text Editing for Mac
-
AI-Powered Text Editing for Mac
-
-
Video Customizations for Mac
-
Video Effects (Mac)
-
Audio Effects (Mac)
-
Transitions (Mac)
-
Stickers (Mac)
-
Filters (Mac)
-
Color Editing (Mac)
-
Animations (Mac)
-
Templates (Mac)
-
Asset Center (Mac)
-
-
Exporting & Share & Cloud Backup - Mac
Auto Normalization for Mac
The Auto Normalization feature for Mac analyzes the loudness of selected audio clips and adjusts them to meet different platform standards (LUFS/LKFS). This ensures your content complies with broadcasting requirements on macOS, whether you're publishing to YouTube, streaming services, or traditional broadcast platforms. You can choose from preset options or set custom loudness values to optimize your audio for any destination.
Index
Access Auto Normalization on Mac
1 Click on the audio clip in the timeline that you want to normalize.
2 In the upper-right audio settings panel, navigate to Audio > Basic.
3 Locate the Auto Normalization option in the Basic audio settings.
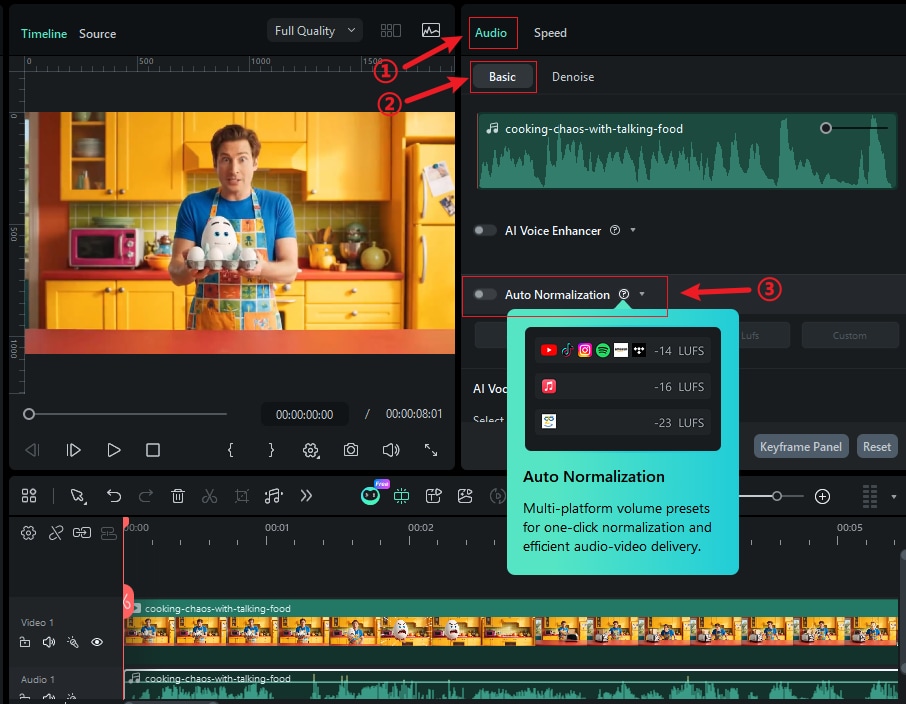
Choose Platform Presets
Once you enable Auto Normalization, you'll see preset options designed for different platforms and broadcasting standards:
1 -23 LUFS: European broadcasting standard (EBU R128), ideal for traditional TV and radio.
2 -16 LUFS: Streaming platforms standard, perfect for YouTube, Netflix, and online video content.
3 -14 LUFS: Music streaming services standard, suitable for Spotify, Apple Music, and similar platforms.

Set Custom Loudness Values
For specific requirements or unique broadcasting standards, you can set custom LUFS values:
1 Click the Custom button to enable manual adjustment.
2 Use the LUFS slider to adjust the loudness level, or input a specific value.
3 The range typically allows adjustments from -23 LUFS to -10 LUFS for maximum flexibility.

Apply and Reset Settings
After selecting your desired loudness standard:
1 Click the Apply button to process the audio normalization.
2 Filmora will analyze and adjust the selected audio clip(s) automatically.
3 To reset the normalization, toggle the Auto Normalization switch off, or click the reset icon.

Note:
- Auto Normalization works on both audio and video clips with audio tracks on macOS.
- The feature analyzes the entire duration of the selected clip to determine optimal loudness adjustment.
- Clicking the RESET button in the Audio editing panel will reset all audio editing settings.
Related Posts
Featured Articles
How to Add Outlines and Strokes to Images?
Curious about how to add outlines to pictures to make them attractive? Explore the best free photo and video outline maker and learn how to use it to add white, black, and glow outlines to photos with ease.
How to Make a Garfield Comic Strip on Your Phone (Free & Easy)?
Create your own Garfield comic strip right on your phone! With Filmora's officially licensed Garfield templates, this beginner-friendly guide makes it easy—no design skills needed.
Change Your Voice with the Best Ghostface Voice Changers
Want to recreate the voice of an iconic character, "Ghostface" from the Scream franchise? This guide lists the Ghostface voice changers to help you do that.
Recommended User Guide
Beat detection
Learn to perform beat detection in Filmora.
Audio equalizer
Learn how to use Audio Equalizer in Filmora 11.
Access Audio Meter in Windows
The Audio Meter is an independent functionality in Filmora, and users can enable it during or after editing.
