For the Best Results, Use the Latest Version.
-
Preparations for Mac
-
Account (Mac)
-
Get Started & Basic Settings (Mac)
- Release notes for Mac
- Latest Versions and Features for Mac
- Get Started on Mac - Full Guide
- Download/register/uninstall on Mac
- Panel Layout on Mac
- Keyboard shortcuts on Mac
- Touchbar on Mac
- Change playback quality on Mac
- Render preview files on Mac
- Manage timeline on Mac
- Media for use on Mac
- Logo Reveal For Mac
- Marked Favorites for Mac
-
Compatibility & Tech Specs (Mac)
-
Performance Settings (Mac)
-
-
Creating Projects - Mac
-
Creating New Projects (Mac)
-
-
Importing & Recording - Mac
-
Importing (Mac)
-
Recording (Mac)
-
-
Video Editing for Mac
-
Basic Video Editing for Mac
- Edit Live Photos on Mac
- Enable/Disable Clip for Mac
- Magnetic Timeline For Mac
- Select All Clips on Timeline for Mac
- Auto Ripple for Mac
- Split & cut videos on Mac
- Compositing on Mac
- Crop and zoom on Mac
- Playback Zoom Level for Mac
- Change speed on Mac
- Play video in reverse on Mac
- Mark In and Mark Out for Mac
- Markers for Mac
- Group clips on Mac
- Customized Backgrounds for Videos and Images in Mac
- Video snapshot on Mac
- Freeze frame on Mac
- Auto enhance on Mac
- Applying Drop Shadow for Mac
- Adjustment Layer for Mac
- Mark clip on Mac
- Video Editing Ruler – Mac
- Apply Transforming for Mac
-
Advanced Video Editing for Mac
-
AI-Powered Video Editing for Mac
- Smart Scene Cut for Mac
- Smart Short Clips for Mac
- Image to Video for Mac
- AI Idea to Video for Mac
- AI Text-to-Video for Mac
- Instant Cutter Tool on Mac
- AI Face Mosaic for Mac
- Keyframe Path Curve for Mac
- Planar Tracking for Mac
- AI Extend For Mac
- AI Script-to-Video for Mac
- AI Text-Based Editing in Mac
- Create With Instant Mode on Mac
- ChatGPT Plugin - AI Copywriting on Mac
- AI Smart Cutout for Mac
- Auto reframe on Mac
- Lens correction on Mac
- AI Portrait Cutout on Mac
- Scene detection on Mac
- AI Smart Masking for Mac
- AI Mate Editing for Mac
- Motion Tracking on Mac
- Stabilize video on Mac
- AI Object Remover For Mac
- AI Smart Search for Mac
- AI Skin Tone Protection for Mac
- Green screen on Mac
- Super Slow Motion with Optical Flow for Mac
- AI stylizer on Mac
- Video Denoise for Mac
-
-
Audio Editing for Mac
-
Basic Audio Editing for Mac
-
Advanced Audio Editing for Mac
-
AI-Powered Audio Editing for Mac
- Audio To Video for Mac
- AI Sound Effect for Mac
- Smart BGM Generation for Mac
- AI Voice Enhancer for Mac
- Audio Stretch for Mac
- AI Audio Denoise for Mac
- Auto synchronization for Mac
- AI Vocal Remover for Mac
- Auto Beat Sync on Mac
- AI Music Generator for Mac
- How to Perform AI Voice Cloning in Wondershare Filmora?
- Silence detection on Mac
-
-
Text Editing for Mac
-
Basic Text Editing for Mac
-
Advanced Text Editing for Mac
-
AI-Powered Text Editing for Mac
-
-
Video Customizations for Mac
-
Video Effects (Mac)
-
Audio Effects (Mac)
-
Transitions (Mac)
-
Stickers (Mac)
-
Filters (Mac)
-
Color Editing (Mac)
-
Animations (Mac)
-
Templates (Mac)
-
Asset Center (Mac)
-
-
Exporting & Share & Cloud Backup - Mac
Split Screen Template for Mac
You can easily create multiple videos simultaneously by using the Split Screen feature. Split Screen is popularly used to depict a scene from multiple angles as well as show characters placed in different locations having a conversation.
Index
Choose Split Screen Presets
Displaying two or more videos side-by-side when creating content is now the norm. Using Split Screen to create a unique way to tell your story is easy by using Filmora. Here are the instructions for using Filmora to create a unique Split Screen video on your Mac.
Step 1: Launch Filmora and click New Project to import your video clips.
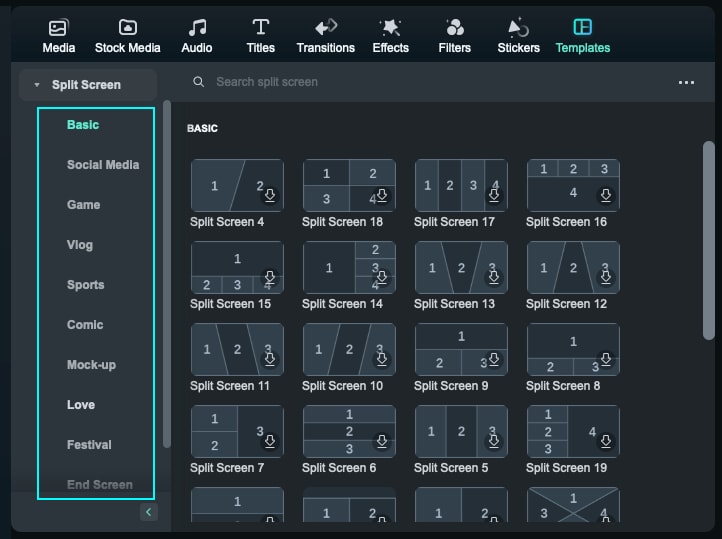
Step 2: From there, click Templates and select Split Screen. Choose from 30 split-screen preset templates. You can have as many as 6 clips for simultaneous playback within the screen if you want.
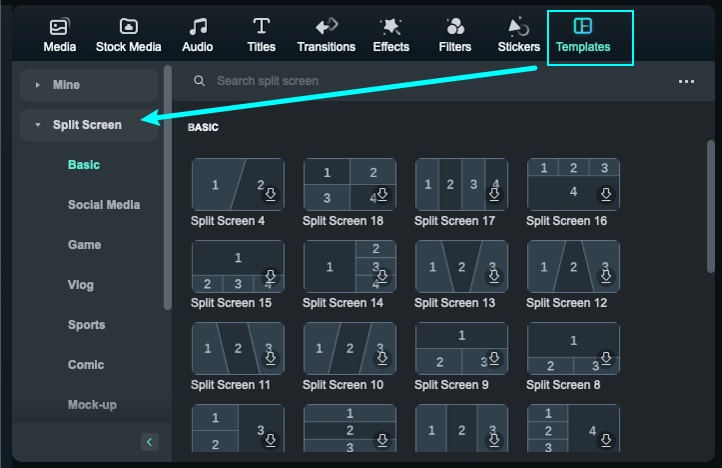
Note:
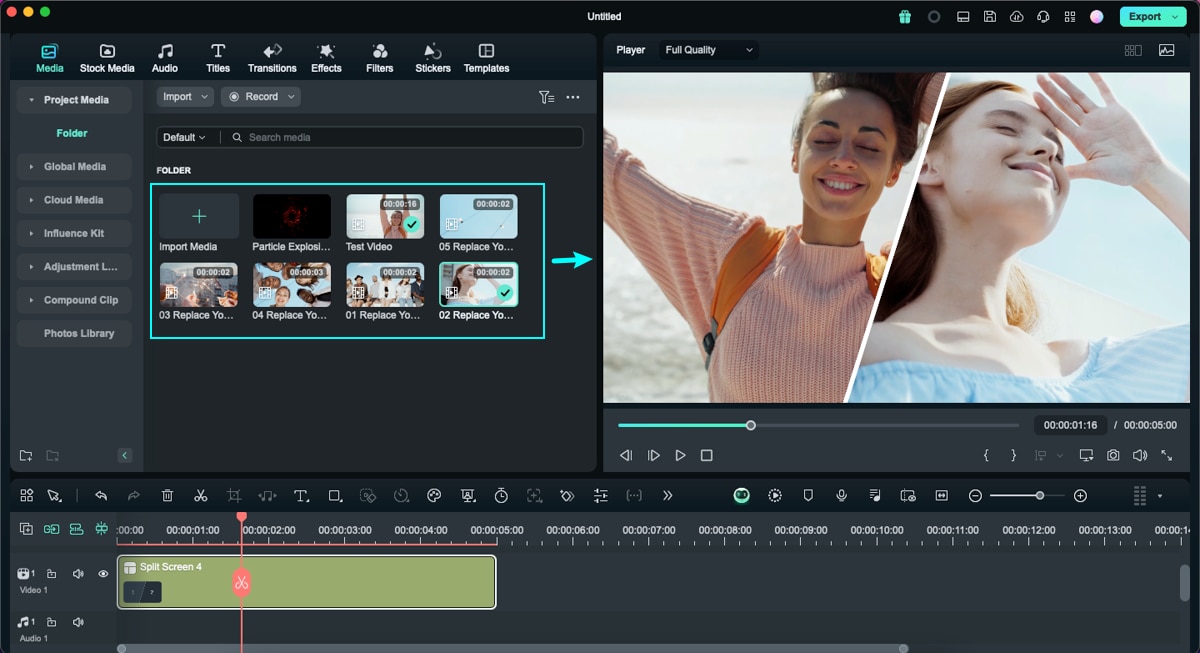
You could scroll up and down on the thumbnail view area with your mouse wheel, for example, from "Basic" to "Social Media", you only need to scroll horizontally.Step 3: Once you have selected your Split Screen preset, simply drag it to the Timeline.
Note:
The split screen has a default duration of 5 seconds, which can be adjusted by dragging the edges forward or backward on the timeline.Import Clips to a Split Screen Layout
You now have more presets and layouts to choose from. Here's how to import clips to a Split Screen layout.
Step 1: Launch Filmora and create a New Project. Click Import to add media files to your library.
Step 2: Drag the imported videos to the Media Tab. Reposition the clip by dragging it from its default location and dropping it to a new location in the Preview Panel.
Edit Split Screen Video
Editing your split screen videos allows you to make photo and video collages, intro and outros, reaction videos, and comparisons with a few clicks. Here's how to edit your split screen videos for a unique way to tell your stories.
Method 1: Add Borders
Under the Video tab on your Property Panel, enable Border to customize the color and size of the borders around the clips in split screen.
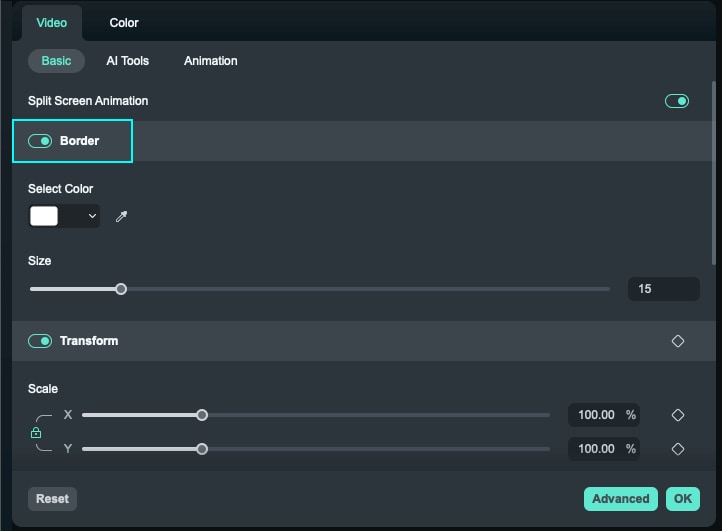
Method 2: Change Size and Position
Under the Video Tab, enable Transform to give you options to Rotate, Scale, as well as change the size of the split screen videos.
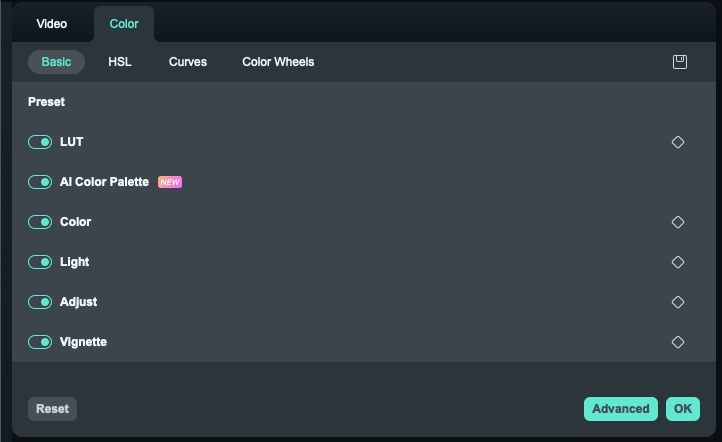
Color Correction for Split Screen
The Color Correction feature for split screen works the same as when editing non-split screen videos. Simply click on Color > Color Enhancement on your Property Panel to adjust everything from:
- White Balance: Balance the color temperature in your video.
- Color: Choose the right tone depending on the scene
- Light: Calculate the correction of the colors on your video.
- Vignette: Darken the edges of the frame on your video.
- Color Match: Create a consistent look across your video.
Animating your Split Screen
You can customize your videos with different split screen effects whenever you want. Switch to the Animation tab and choose from animation or motion presets by double-clicking your desired effect. You can see the results in the Preview Panel before saving the new animation effects on your video.
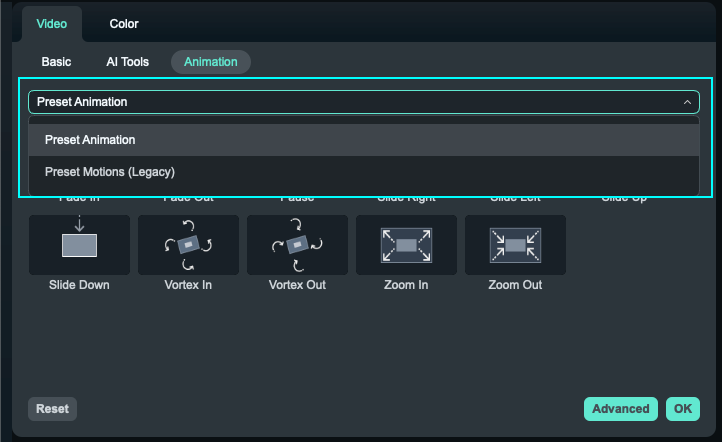
Or you can simply highlight the Diamond icon to set keyframes located beside the properties or parameters and then adjust the values as you prefer. The Changes will be applied to all the clips in the split-screen video.
Note:
All changes you do apply to all clips in the split screen video. If you want to edit a single clip, you should go to the Advance Edit panel.Adjusting Single Video in Split Screen Preset
There are other fun and creative ways you can do when editing your projects. Here are several methods you can experiment with when adjusting your single video in a split screen preset.
- Zoom in and Zoom out: Choose the clip in the split screen preview. Afterward, drag the slider to zoom in and zoom out.
- Remove the clip from the split screen video: Select the clip in the split screen preview and click the Remove icon to manually remove single videos on the split screen.
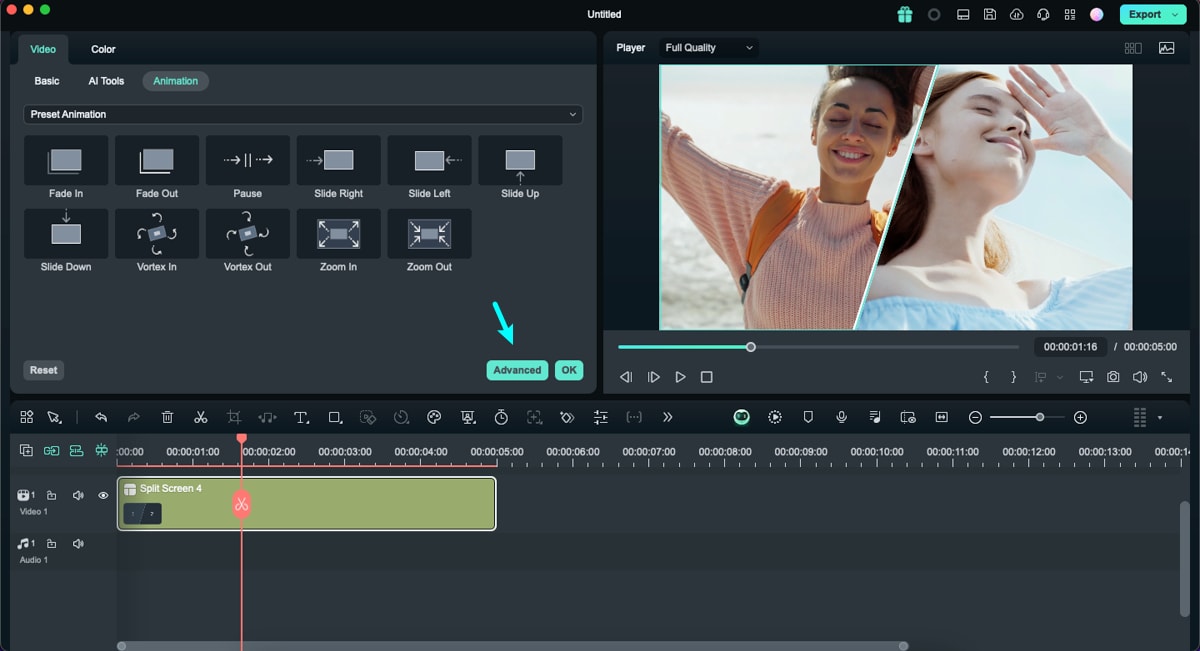
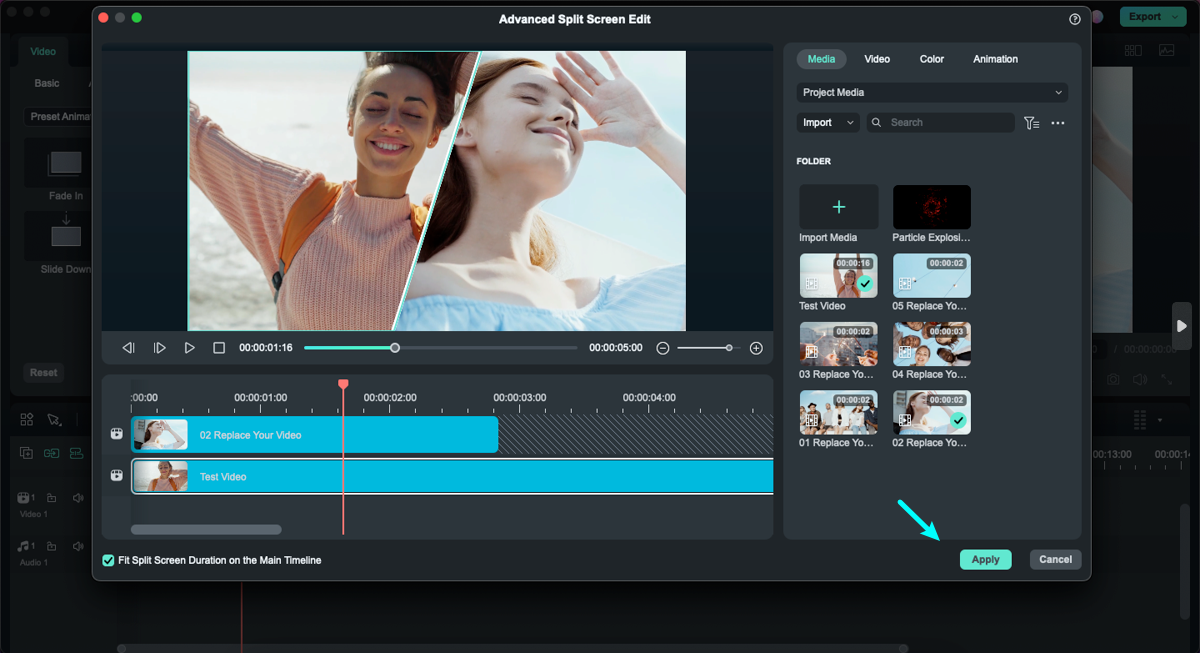
- Advanced Split Screen Edit: Click Edit to enter the Advanced Split Screen window. From here, you can rotate the clip, change its position or scale, do color correction, and even apply motion effects. There’s also an option to trim the video to the area you want to show on the split screen.
Related Posts
Featured Articles
20 Hello Kitty Memes You Will Totally Relate to
These Hello Kitty memes are funny, dramatic, and just way too real. Scroll through the collection in our post and see how you can make your own in a few taps.
Make a Video out of Photos – A Detailed Step-by-Step Guide
Want to make a video out of pictures? Learn how to create exhilarating photo-to-video edits from scratch or use Filmora's templates for a seamless experience.
How To Use Text Animations and Templates in Premiere Pro
While using Premiere Pro’s text animations may seem overwhelming, presets and templates are available to jumpstart your vlogs, presentations, and more.
Recommended User Guide
Templates for Mac
This guide will teach you how to edit with Preset Templates in Filmora
