For the Best Results, Use the Latest Version.
-
Preparations for Mac
-
Account (Mac)
-
Get Started & Basic Settings (Mac)
- Release notes for Mac
- Latest Versions and Features for Mac
- Get Started on Mac - Full Guide
- Download/register/uninstall on Mac
- Panel Layout on Mac
- Keyboard shortcuts on Mac
- Touchbar on Mac
- Change playback quality on Mac
- Render preview files on Mac
- Manage timeline on Mac
- Media for use on Mac
- Logo Reveal For Mac
- Marked Favorites for Mac
-
Compatibility & Tech Specs (Mac)
-
Performance Settings (Mac)
-
-
Creating Projects - Mac
-
Creating New Projects (Mac)
-
-
Importing & Recording - Mac
-
Importing (Mac)
-
Recording (Mac)
-
-
Video Editing for Mac
-
Basic Video Editing for Mac
- Edit Live Photos on Mac
- Enable/Disable Clip for Mac
- Magnetic Timeline For Mac
- Select All Clips on Timeline for Mac
- Auto Ripple for Mac
- Split & cut videos on Mac
- Compositing on Mac
- Crop and zoom on Mac
- Playback Zoom Level for Mac
- Change speed on Mac
- Play video in reverse on Mac
- Mark In and Mark Out for Mac
- Markers for Mac
- Group clips on Mac
- Customized Backgrounds for Videos and Images in Mac
- Video snapshot on Mac
- Freeze frame on Mac
- Auto enhance on Mac
- Applying Drop Shadow for Mac
- Adjustment Layer for Mac
- Mark clip on Mac
- Video Editing Ruler – Mac
- Apply Transforming for Mac
-
Advanced Video Editing for Mac
-
AI-Powered Video Editing for Mac
- Smart Scene Cut for Mac
- Smart Short Clips for Mac
- Image to Video for Mac
- AI Idea to Video for Mac
- AI Text-to-Video for Mac
- Instant Cutter Tool on Mac
- AI Face Mosaic for Mac
- Keyframe Path Curve for Mac
- Planar Tracking for Mac
- AI Extend For Mac
- AI Script-to-Video for Mac
- AI Text-Based Editing in Mac
- Create With Instant Mode on Mac
- ChatGPT Plugin - AI Copywriting on Mac
- AI Smart Cutout for Mac
- Auto reframe on Mac
- Lens correction on Mac
- AI Portrait Cutout on Mac
- Scene detection on Mac
- AI Smart Masking for Mac
- AI Mate Editing for Mac
- Motion Tracking on Mac
- Stabilize video on Mac
- AI Object Remover For Mac
- AI Smart Search for Mac
- AI Skin Tone Protection for Mac
- Green screen on Mac
- Super Slow Motion with Optical Flow for Mac
- AI stylizer on Mac
- Video Denoise for Mac
-
-
Audio Editing for Mac
-
Basic Audio Editing for Mac
-
Advanced Audio Editing for Mac
-
AI-Powered Audio Editing for Mac
- Audio To Video for Mac
- AI Sound Effect for Mac
- Smart BGM Generation for Mac
- AI Voice Enhancer for Mac
- Audio Stretch for Mac
- AI Audio Denoise for Mac
- Auto synchronization for Mac
- AI Vocal Remover for Mac
- Auto Beat Sync on Mac
- AI Music Generator for Mac
- How to Perform AI Voice Cloning in Wondershare Filmora?
- Silence detection on Mac
-
-
Text Editing for Mac
-
Basic Text Editing for Mac
-
Advanced Text Editing for Mac
-
AI-Powered Text Editing for Mac
-
-
Video Customizations for Mac
-
Video Effects (Mac)
-
Audio Effects (Mac)
-
Transitions (Mac)
-
Stickers (Mac)
-
Filters (Mac)
-
Color Editing (Mac)
-
Animations (Mac)
-
Templates (Mac)
-
Asset Center (Mac)
-
-
Exporting & Share & Cloud Backup - Mac
AI Face Mosaic for Mac
The AI Face Mosaic feature is an advanced tool designed to recognize and protect faces in videos or images automatically. Utilizing intelligent mosaic application technology, this feature can track and cover faces in real-time, ensuring that privacy is safeguarded regardless of face movement within the frame.
Apply AI Face Mosaic
Here is the guide on how to apply AI Face Mosaic on Windows.
1. Open Filmora and Click More, then you can access Toolbox.
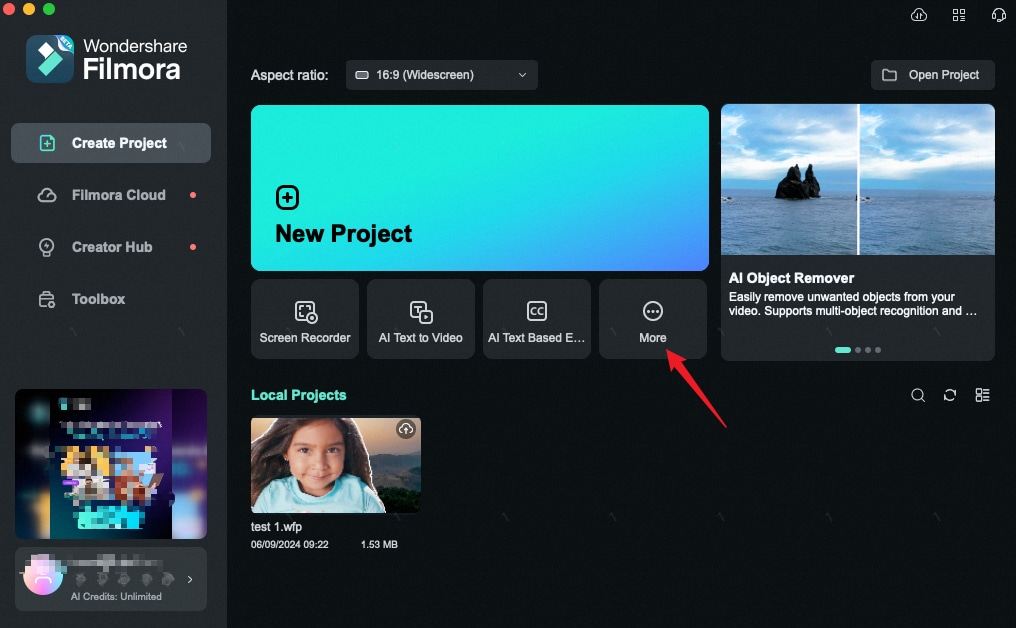
2. Click on AI Face Mosaic > Import a Video or a photo.

3. After importing the video, Filmora will automatically analyze the video, you can check the progress.
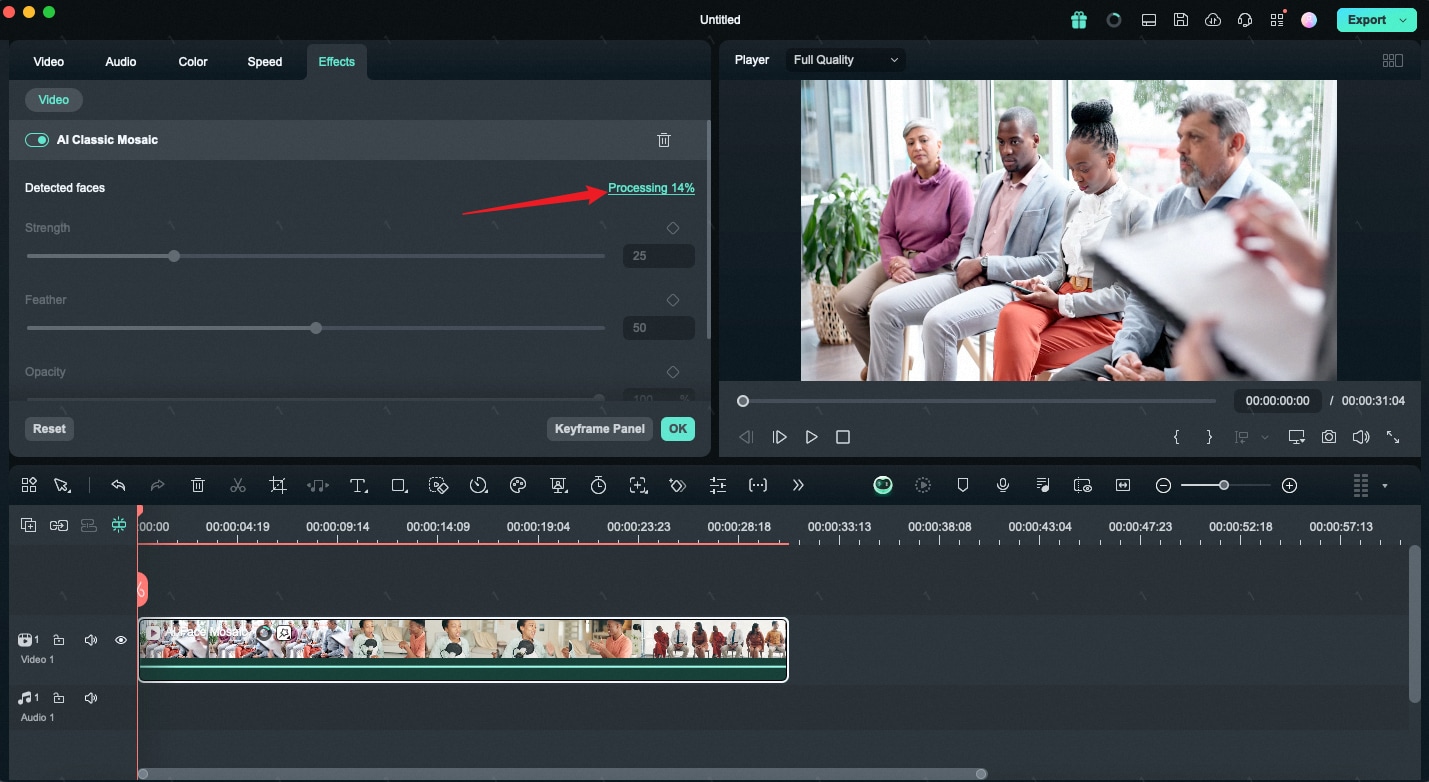
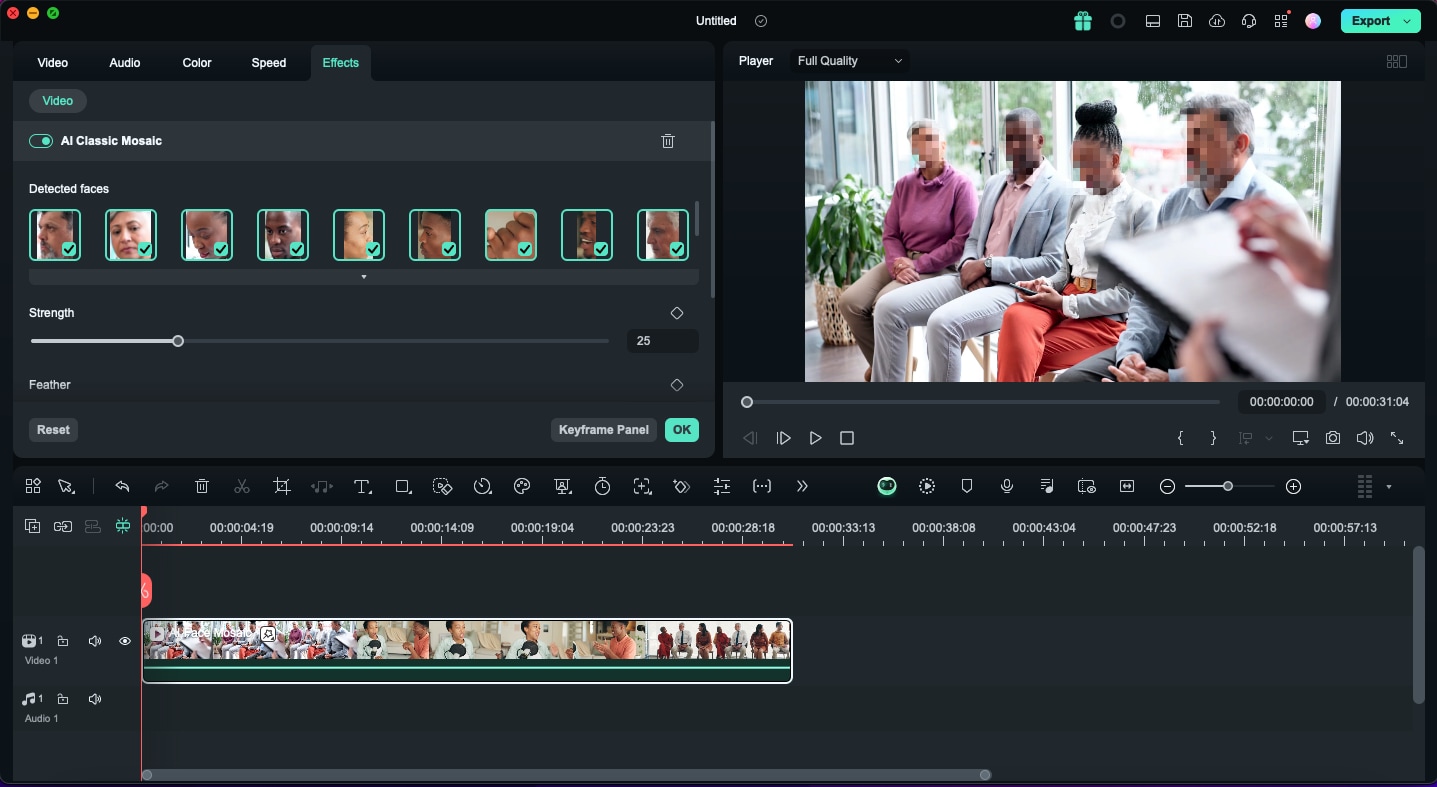
4. When the video analysis is complete, each face in the video will be automatically mosaicked.
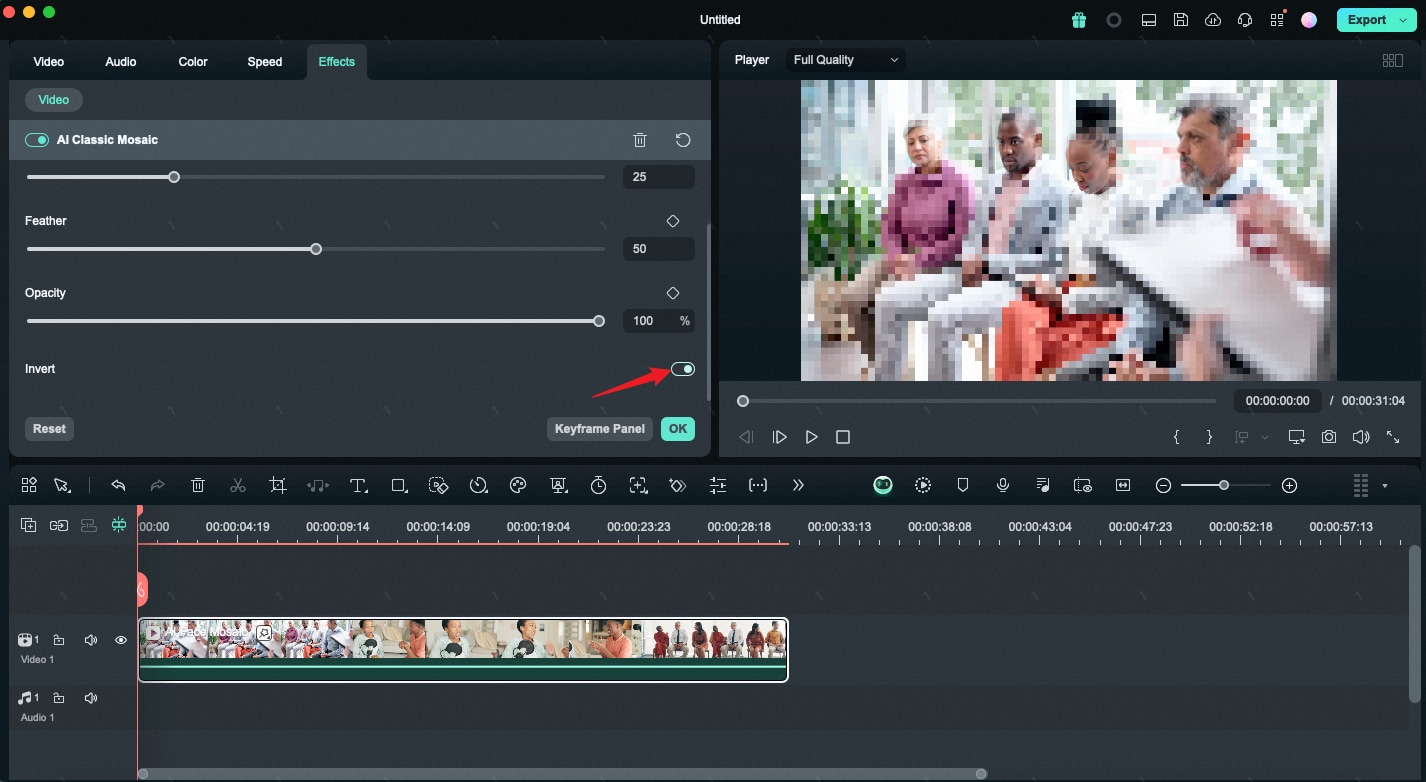
5. Open Invert to apply the mosaic effect to the screen except for faces.
Adjust AI Face Mosaic
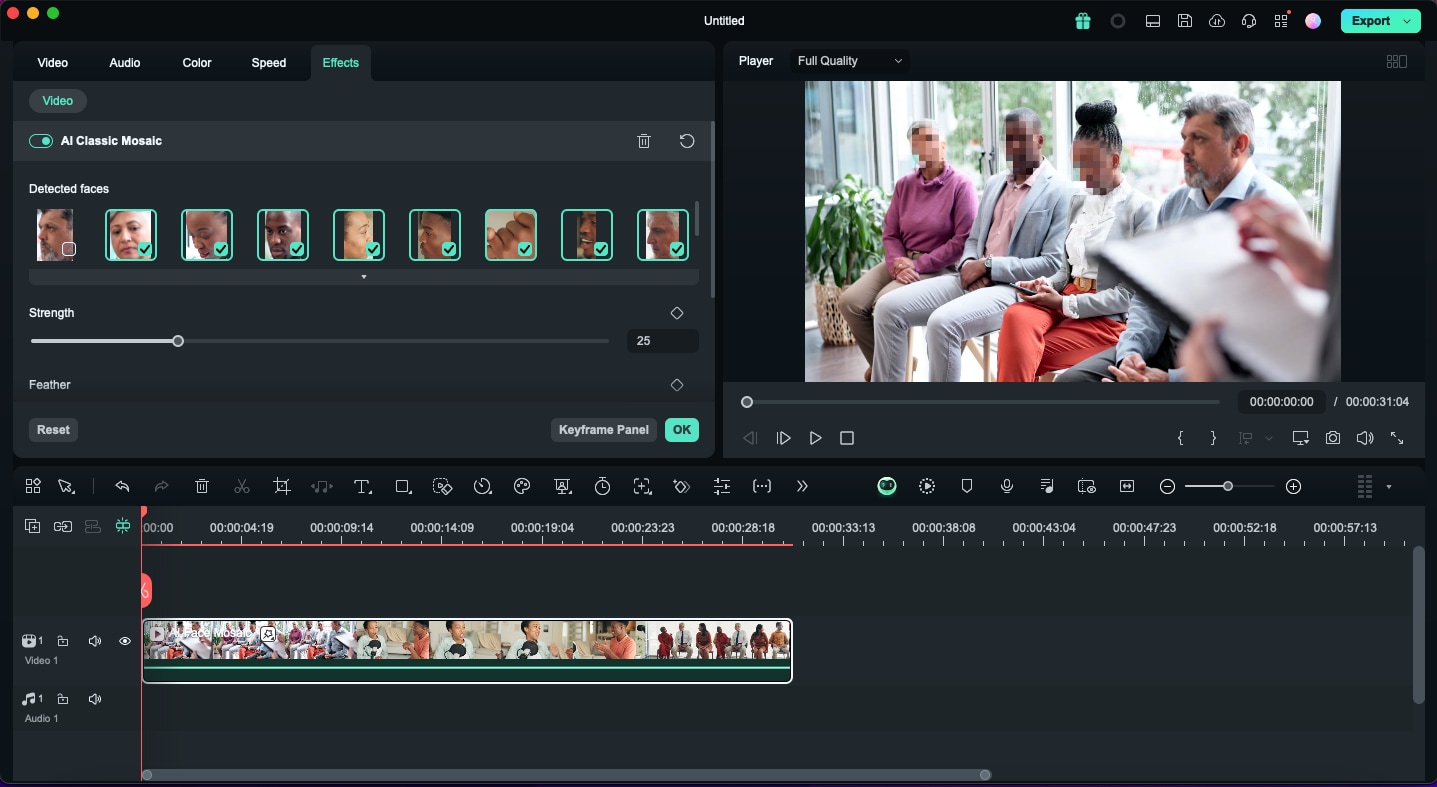
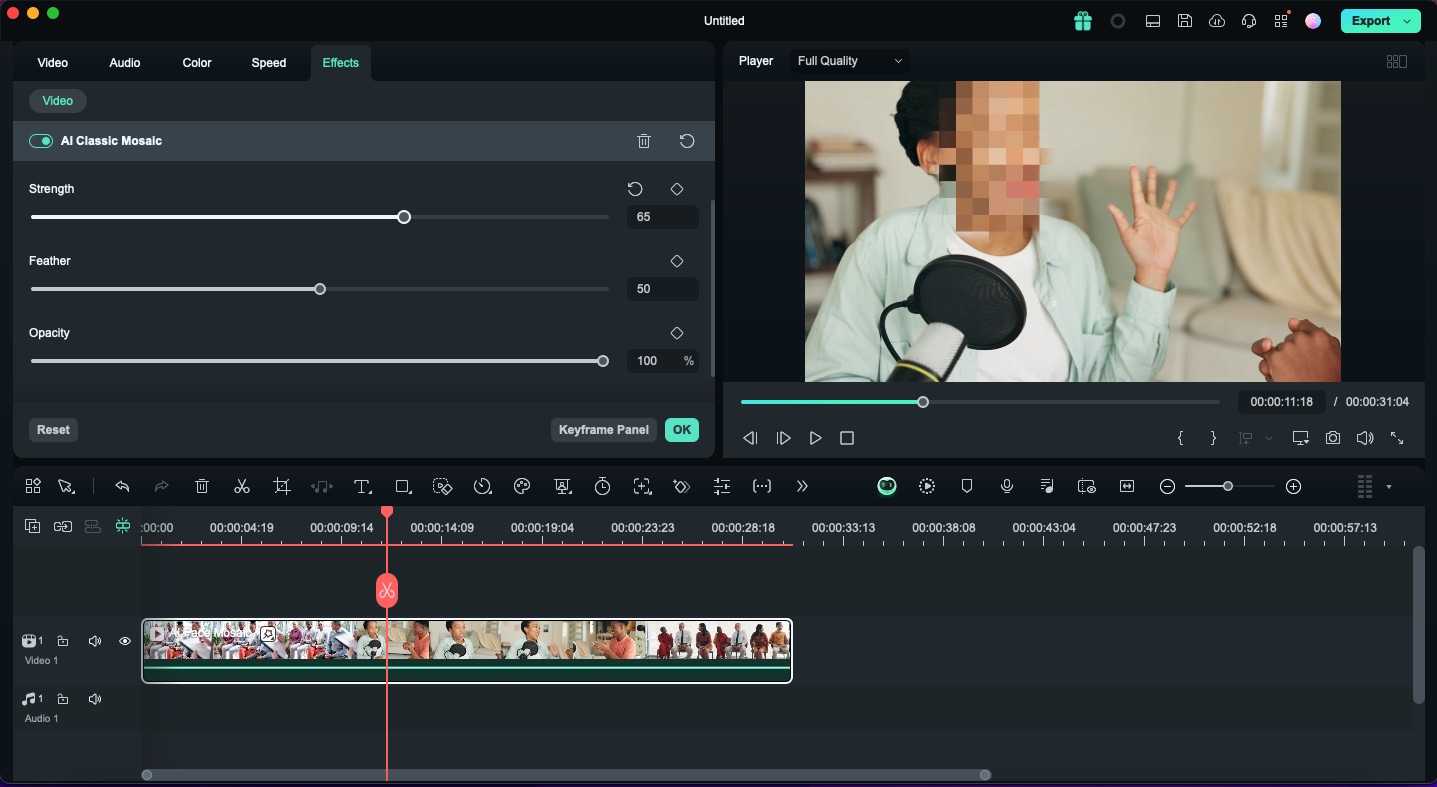
You can choose which face need to be applied with mosaic effect and adjust the Strength, Feather and Opacity.
1. Deselect a face so that it will not be mosaicked.
2. Adjust Strength, Feather, and Opacity to adjust the mosaic effect.
Related Posts
Featured Articles
How to Generate Cinematic Videos with Veo 3 Text-to-Video
Create ultra-realistic videos that look straight out of a movie using Veo 3 Text-to-Video. This guide walks you through how to use it step by step for the best results.
Top Speech-to-Text- Software for Windows 10
Want to type with your voice on your PC and save time? Discover the best speech-to-text software for Windows 10.
Discover the Best 6 Free AI Music Generators for Royalty-free Music
Explore the top 6 free AI music generators to effortlessly create unique music and background tracks. Enhance your projects with cutting-edge, cost-free tools.
Recommended User Guide
ChatGPT Plugin - AI Copywriting on Mac
Auto-generate your video scripts, captions, descriptions, and more with ChatGPT in Filmora for Mac
AI Text-Based Editing in Mac
Filmora has been diligently enhancing its AI capabilities, and one of its recent introductions is AI Text-Based Editing.
AI Smart Search for Mac
Do you have a lot of videos to navigate to find the exact video clip? Try Wondershare Filmora's AI smart search to find the video clips quickly!
