
For the Best Results, Use the Latest Version.
Filmora User Guide for Mac
-
Preparations for Mac
-
Account (Mac)
-
Get Started & Basic Settings (Mac)
- Release Notes for Mac
- Latest Version and Features for Mac
- Get Started on Mac - Full Guide
- Download/register/uninstall on Mac
- Panel Layout on Mac
- Keyboard Shortcuts in Mac
- Touchbar on Mac
- Change playback quality on Mac
- Render preview files on Mac
- Manage Timeline in Mac
- Media for use on Mac
- Logo Reveal For Mac
- Marked Favorites for Mac
-
Compatibility & Tech Specs (Mac)
-
Performance Settings (Mac)
-
-
Creating Projects - Mac
-
Creating New Projects (Mac)
-
-
Importing & Recording - Mac
-
Importing (Mac)
-
Recording (Mac)
-
-
Video Editing for Mac
-
Basic Video Editing for Mac
- Edit Live Photos on Mac
- Enable/Disable Clip for Mac
- Magnetic Timeline For Mac
- Dual Monitor Setup for Video Editing on Mac
- Select All Clips on Timeline for Mac
- Auto Ripple for Mac
- Split & Cut Videos on Mac
- Compositing on Mac
- Crop and zoom on Mac
- Playback Zoom Level for Mac
- Change Speed on Mac
- Play Video in Reverse on Filmora for Mac
- Mark In and Mark Out for Mac
- Markers for Mac
- Group Clips in Filmora for Mac
- Customized Backgrounds for Videos and Images in Mac
- Video snapshot on Mac
- Freeze Frame on Mac
- Auto enhance on Mac
- Applying Drop Shadow for Mac
- Adjustment Layer for Mac
- Mark Clips in Filmora for Mac
- Video Editing Ruler – Mac
- Apply Transforming for Mac
-
Advanced Video Editing for Mac
- Keyframe Motion Blur for Mac
- Camera Tracking for Mac
- Keyframe Path Curve for Mac
- Text Animation Path for Mac
- Create Multi-Camera Clip for Mac
- Filmora Motion Blur | Mac
- Drawing Tools for Mac | Filmora Guide
- Track Matte for Mac
- Compound Clips for Mac
- 360° Video Reframing for Mac
- AI Video Enhancer for Mac
- Video Chapters in Filmora for Mac
- Filmora Flicker Removal Guide | Mac
- Multi-Clip Editing for Mac
- Keyframe Graph Editor for Mac
- Create Multi-Screen Videos in Filmora on Mac
- Animation Keyframing for Mac
- Masking in Filmora on Mac
- PIP (Picture in Picture) in Filmora on Mac
-
AI-Powered Video Editing for Mac
- Smart Scene Cut for Mac
- Smart Short Clips for Mac
- Filmora AI Eye Contact - Mac
- Filmora Image to Video for Mac
- AI Idea to Video for Mac
- AI Text-to-Video for Mac
- AI Media Analysis for Mac
- Instant Cutter Tool on Mac
- AI Face Mosaic for Mac
- Filmora Image to Prompt for Mac
- Filmora AI Image Enhancer Guide – macOS
- Planar Tracking for Mac
- Filmora AI Relight - Mac
- AI Extend For Mac
- AI Script-to-Video for Mac
- AI Text-Based Editing in Mac
- Create With Instant Mode on Mac
- ChatGPT Plugin - AI Copywriting on Mac
- AI Smart Cutout in Filmora for Mac
- Auto reframe on Mac
- Lens Correction in Filmora for Mac
- AI Portrait Cutout on Mac
- Scene detection on Mac
- AI Smart Masking for Mac
- AI Mate Editing for Mac
- Motion Tracking on Mac
- Video Stabilization for Mac
- AI Video/Photo Object Remover for Mac
- AI Smart Search for Mac
- AI Skin Tone Protection for Mac
- Green screen on Mac
- Super Slow Motion with Optical Flow for Mac
- AI Stylizer for Mac
- Video Denoise for Mac
-
-
Audio Editing for Mac
-
Basic Audio Editing for Mac
-
Advanced Audio Editing for Mac
-
AI-Powered Audio Editing for Mac
- Audio To Video for Mac
- AI Sound Effect for Mac
- Smart BGM Generation on Mac
- AI Voice Enhancer for Mac
- Audio Stretch for Mac
- AI Audio Denoise for Mac
- Auto Synchronization on Mac
- AI Vocal Remover for Mac
- AI Auto Beat Sync for Mac
- AI Music Generator for Mac
- AI Voice Cloning on Mac
- Silence Detection on Mac
-
-
Text Editing for Mac
-
Basic Text Editing for Mac
-
Advanced Text Editing for Mac
-
AI-Powered Text Editing for Mac
-
-
Video Customizations for Mac
-
Video Effects (Mac)
-
Audio Effects (Mac)
-
Transitions (Mac)
-
Stickers (Mac)
-
Filters (Mac)
-
Color Editing (Mac)
-
Animations (Mac)
-
Templates (Mac)
-
Asset Center (Mac)
-
-
Exporting & Share & Cloud Backup - Mac
Filmora Tutorial Videos
Filmora 15 User Guide in PDF
Filmora 13 & 14 User Guide in PDF
Filmora 12 User Guide in PDF
Filmora 11 User Guide in PDF
Filmora 9 & 10 User Guide
PIP (Picture in Picture) in Filmora on Mac
Picture in Picture (PIP) in Filmora for Mac is a powerful editing technique that allows multiple video layers to play on the same screen at the same time. It is widely used in tutorials, gaming content, product reviews, and presentations where one video acts as the main background while another appears as an overlay. This feature enhances storytelling by adding depth, context, and visual engagement.
Steps to Use PIP (Picture in Picture)
Filmora provides several tools to customize overlay videos, adjust visuals, and apply advanced effects. Read the steps provided below to learn how to create the picture-in-picture effect:
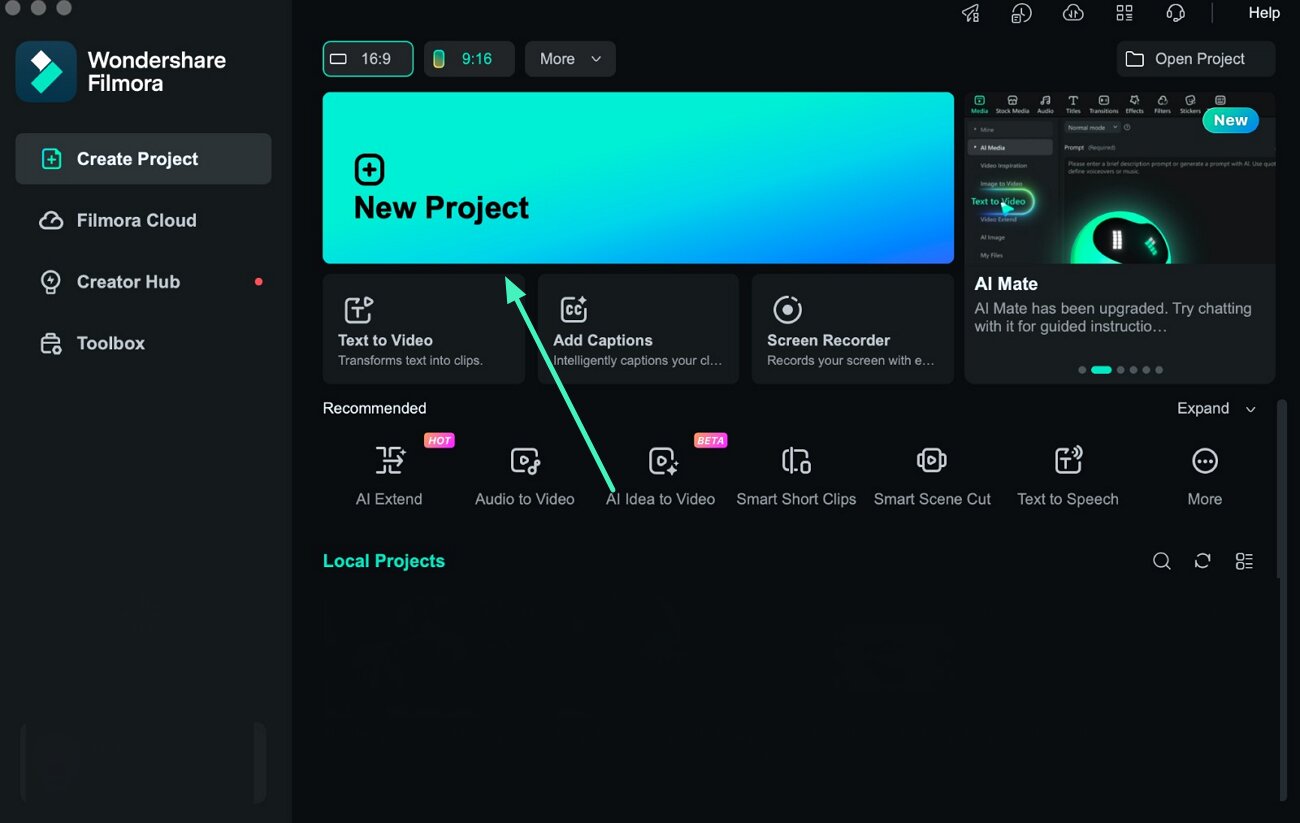
Step 1. Create a New Project in Filmora
Open Wondershare Filmora on your Mac and click New Project from the startup screen.
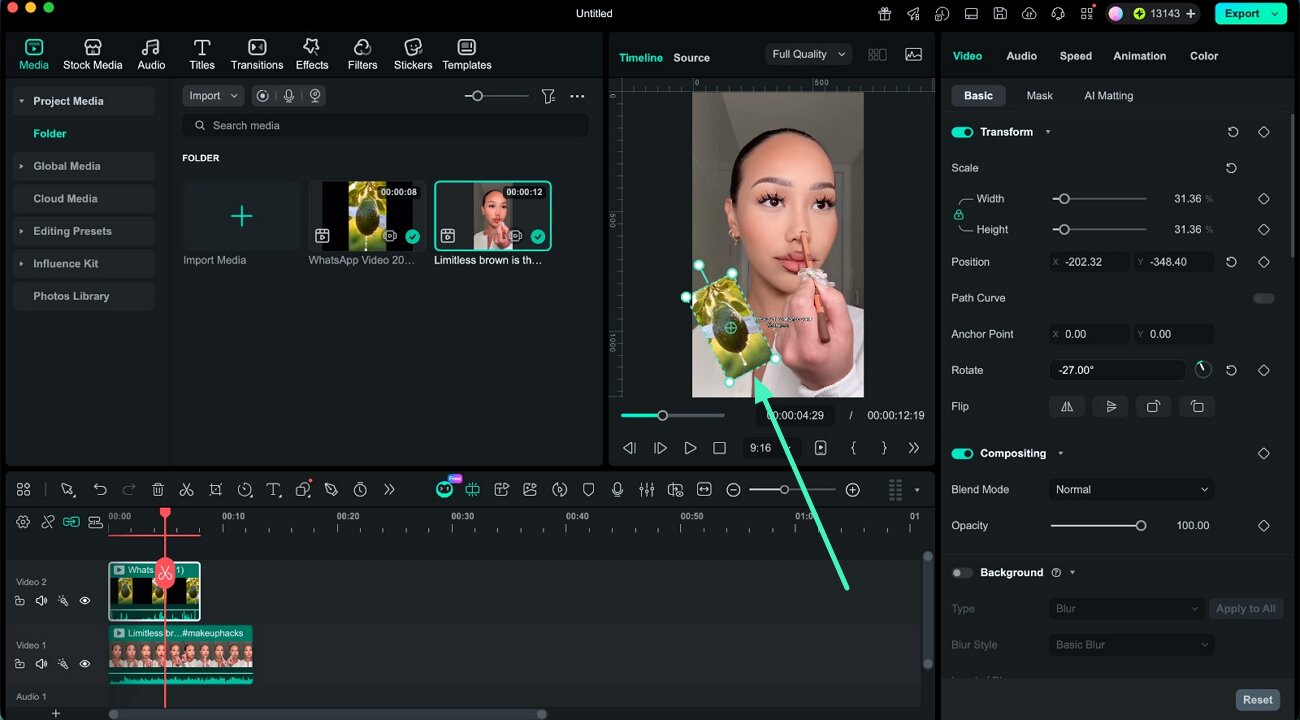
Step 2. Add Overlay Video to Background
Import two video clips and place them on different tracks in the timeline. Select the overlay clip and adjust its size and position in the preview window to properly layer it over the background video.
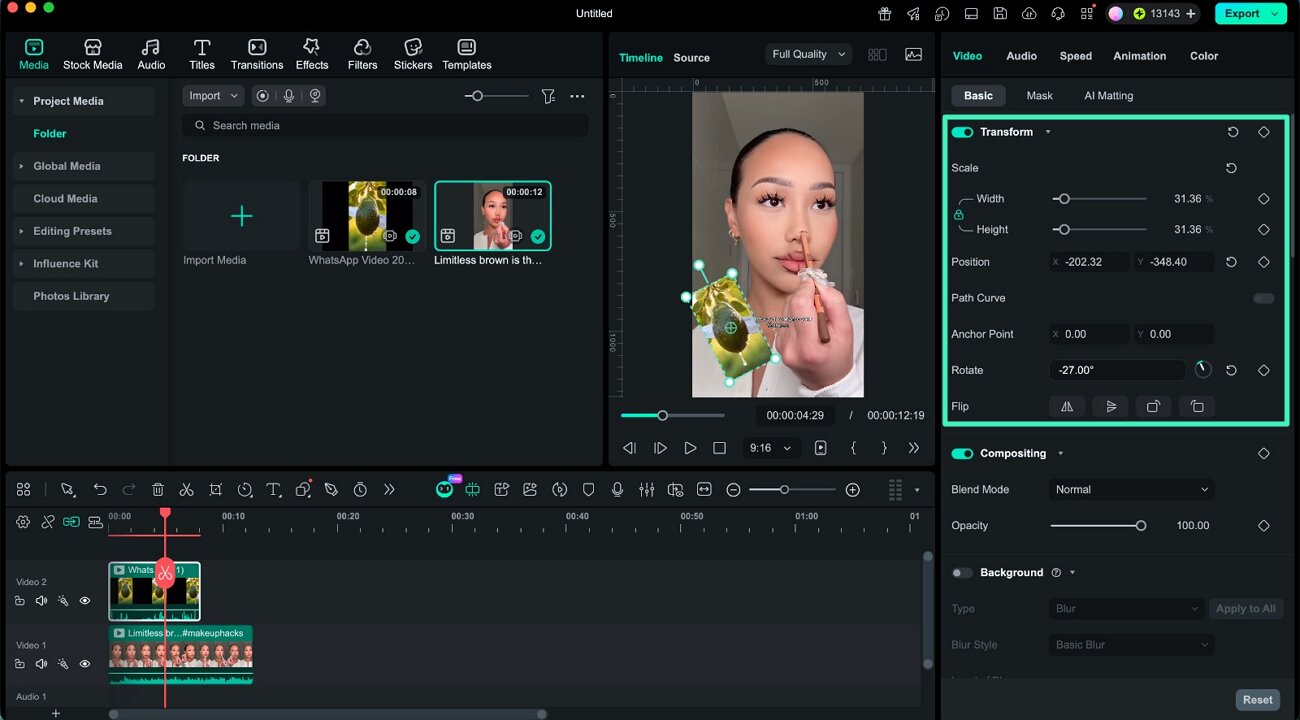
Step 3. Apply Transform Controls
Head to the properties panel on the right and use the Transform settings to rotate, flip, resize, or reposition the overlay video. These adjustments help align the PIP element perfectly within the main frame.
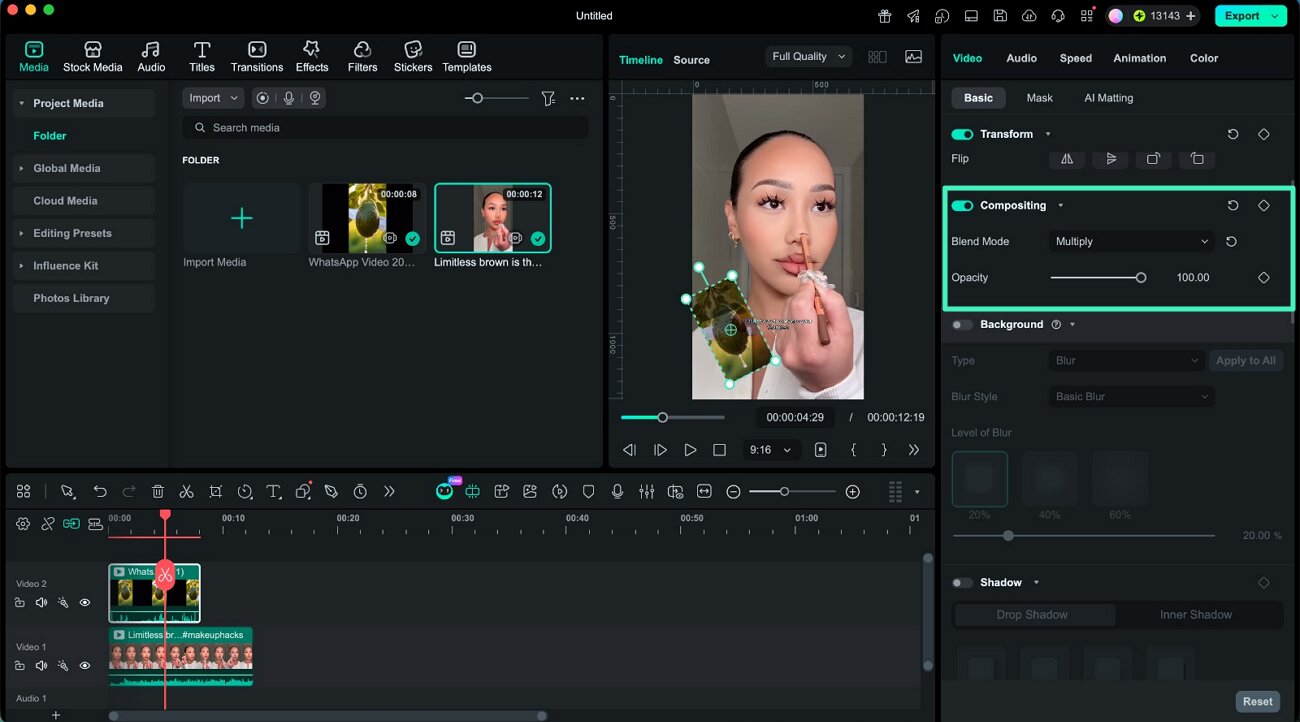
Step 4. Use Compositing Settings
Open the Compositing panel to blend the overlay with the background video. Adjust opacity levels to control how strongly or softly both layers mix together.
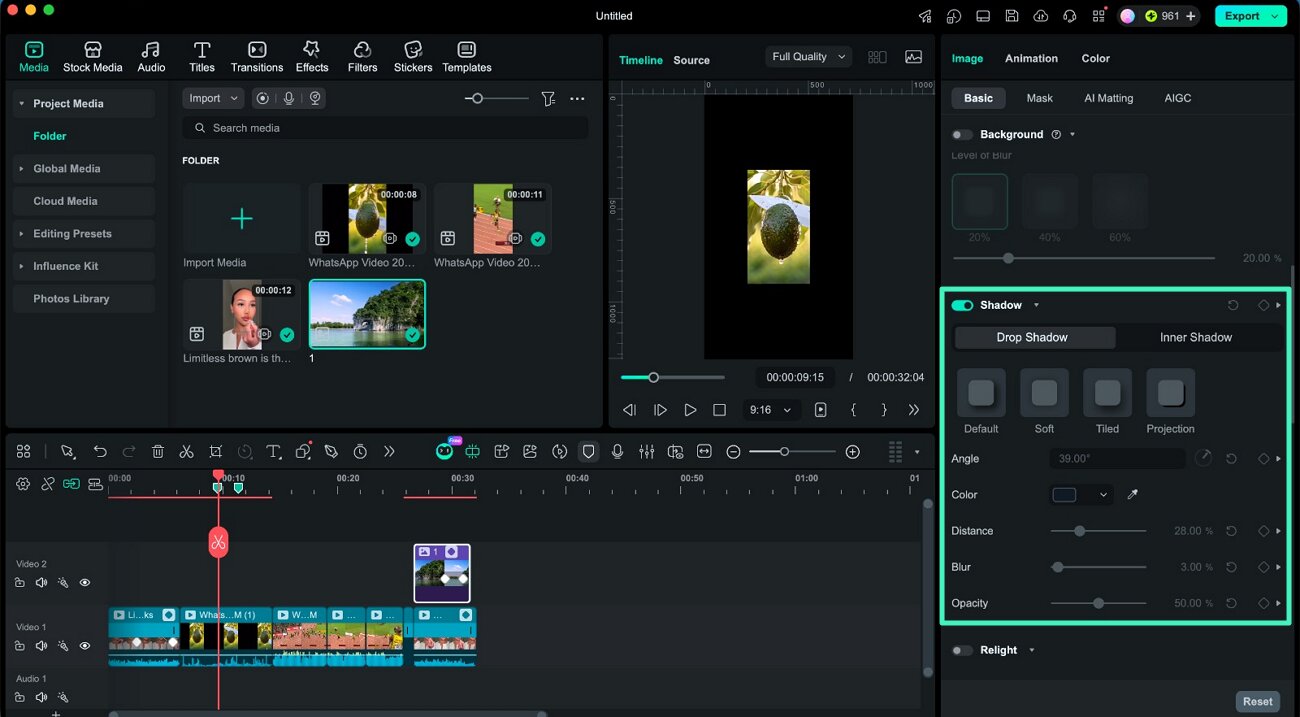
Step 5. Add Drop Shadow Effect
Enable the Shadow option to create depth between layers. Customize shadow distance, blur, direction, color, and transparency for a more realistic layered appearance.
Step 6. Apply Green Screen Effect
Use the chroma key tool to remove green backgrounds from overlay footage. Adjust tolerance, edge thickness, and color settings for a clean and accurate cutout.
Related Posts
Featured Articles
Learn more popular articles from Wondershare.
Stable Diffusion Prompt Guide for Beginners: Get Awesome Results Fast
Writing the right Stable Diffusion prompt makes all the difference when it comes to AI art. This beginner-friendly guide helps you get better results and avoid common mistakes.
Compilations of the Best Dog Grooming Videos on YouTube
From satisfying transformations to expert tutorials and fun grooming moments, this guide rounds up the best dog grooming videos on YouTube and shares tips for creating your own viral pet content.
TinyTake Review | How to Use and Key Features
What is Tinytake? Know everything about Tinytake Screen Recorder.
Recommended User Guide
Learn how to use more features.
Create Multi-Screen Videos in Filmora on Mac
Split screen is a useful feature to play videos in different angels. Follow the guide to know how to use split screen feature in Filmora.
Create Multi-Camera Clip for Mac
Use the multi-camera clip feature to seamlessly combine footage from different camera angles into a cohesive, dynamic view, enhancing the overall visual impact and storytelling of your video.
Filmora Flicker Removal Guide | Mac
Learn how to use Filmora Flicker Remover on Mac to remove video flicker and fix lighting issues quickly and easily.
