For the Best Results, Use the Latest Version.
-
Preparations for Mac
-
Account (Mac)
-
Get Started & Basic Settings (Mac)
- Release notes for Mac
- Latest Versions and Features for Mac
- Get Started on Mac - Full Guide
- Download/register/uninstall on Mac
- Panel Layout on Mac
- Keyboard shortcuts on Mac
- Touchbar on Mac
- Change playback quality on Mac
- Render preview files on Mac
- Manage Timeline on Mac
- Media for use on Mac
- Logo Reveal For Mac
- Marked Favorites for Mac
-
Compatibility & Tech Specs (Mac)
-
Performance Settings (Mac)
-
-
Creating Projects - Mac
-
Creating New Projects (Mac)
-
-
Importing & Recording - Mac
-
Importing (Mac)
-
Recording (Mac)
-
-
Video Editing for Mac
-
Basic Video Editing for Mac
- Edit Live Photos on Mac
- Enable/Disable Clip for Mac
- Magnetic Timeline For Mac
- Dual Monitor Setup for Video Editing on Mac
- Select All Clips on Timeline for Mac
- Auto Ripple for Mac
- Split & Cut Videos on Mac
- Compositing on Mac
- Crop and zoom on Mac
- Playback Zoom Level for Mac
- Change Speed on Mac
- Play Video in Reverse on Filmora for Mac
- Mark In and Mark Out for Mac
- Markers for Mac
- Group Clips in Filmora for Mac
- Customized Backgrounds for Videos and Images in Mac
- Video snapshot on Mac
- Freeze Frame on Mac
- Auto enhance on Mac
- Applying Drop Shadow for Mac
- Adjustment Layer for Mac
- Mark Clips in Filmora for Mac
- Video Editing Ruler – Mac
- Apply Transforming for Mac
-
Advanced Video Editing for Mac
- Text Animation Path for Mac
- Create Multi-Camera Clip for Mac
- Filmora Motion Blur | Mac
- Drawing Tools for Mac | Filmora Guide
- Compound Clips for Mac
- AI Video Enhancer for Mac
- Filmora Flicker Removal Guide | Mac
- Multi-Clip Editing for Mac
- Keyframe Graph Editor for Mac
- Add Animation Keyframing in Filmora for Mac
- Mask on Mac
- PIP (Picture in Picture) in Filmora on Mac
-
AI-Powered Video Editing for Mac
- Smart Scene Cut for Mac
- Smart Short Clips for Mac
- Filmora AI Eye Contact - Mac
- Filmora Image to Video for Mac
- AI Idea to Video for Mac
- AI Text-to-Video for Mac
- Instant Cutter Tool on Mac
- AI Face Mosaic for Mac
- Filmora Image to Prompt for Mac
- Keyframe Path Curve for Mac
- Filmora AI Image Enhancer Guide – macOS
- Planar Tracking for Mac
- Filmora AI Relight - Mac
- AI Extend For Mac
- AI Script-to-Video for Mac
- AI Text-Based Editing in Mac
- Create With Instant Mode on Mac
- ChatGPT Plugin - AI Copywriting on Mac
- AI Smart Cutout in Filmora for Mac
- Auto reframe on Mac
- Lens Correction in Filmora for Mac
- AI Portrait Cutout on Mac
- Scene detection on Mac
- AI Smart Masking for Mac
- AI Mate Editing for Mac
- Motion Tracking on Mac
- Video Stabilization for Mac
- AI Object Remover For Mac
- AI Smart Search for Mac
- AI Skin Tone Protection for Mac
- Green screen on Mac
- Super Slow Motion with Optical Flow for Mac
- AI Stylizer for Mac
- Video Denoise for Mac
-
-
Audio Editing for Mac
-
Basic Audio Editing for Mac
-
Advanced Audio Editing for Mac
-
AI-Powered Audio Editing for Mac
- Audio To Video for Mac
- AI Sound Effect for Mac
- Smart BGM Generation on Mac
- AI Voice Enhancer for Mac
- Audio Stretch for Mac
- AI Audio Denoise for Mac
- Auto Synchronization on Mac
- AI Vocal Remover for Mac
- AI Auto Beat Sync for Mac
- AI Music Generator for Mac
- AI Voice Cloning on Mac
- Silence Detection on Mac
-
-
Text Editing for Mac
-
Basic Text Editing for Mac
-
Advanced Text Editing for Mac
-
AI-Powered Text Editing for Mac
-
-
Video Customizations for Mac
-
Video Effects (Mac)
-
Audio Effects (Mac)
-
Transitions (Mac)
-
Stickers (Mac)
-
Filters (Mac)
-
Color Editing (Mac)
-
Animations (Mac)
-
Templates (Mac)
-
Asset Center (Mac)
-
-
Exporting & Share & Cloud Backup - Mac
Add Animation Keyframing in Filmora for Mac
Animation Keyframing in Filmora for Mac allows users to create smooth motion effects by setting changes in properties like position, scale, rotation, opacity, and more at different points in a video. By defining start and end keyframes, Filmora automatically generates fluid transitions between them, making animations look natural and professional. This feature is essential for dynamic video editing, motion graphics, and creative storytelling.
Steps to Use Animation Keyframing
Filmora provides an easy workflow to add, edit, and remove keyframes directly from the timeline and property panel. To learn how to use this feature, read the steps provided below:
Add Keyframes in Filmora for Mac
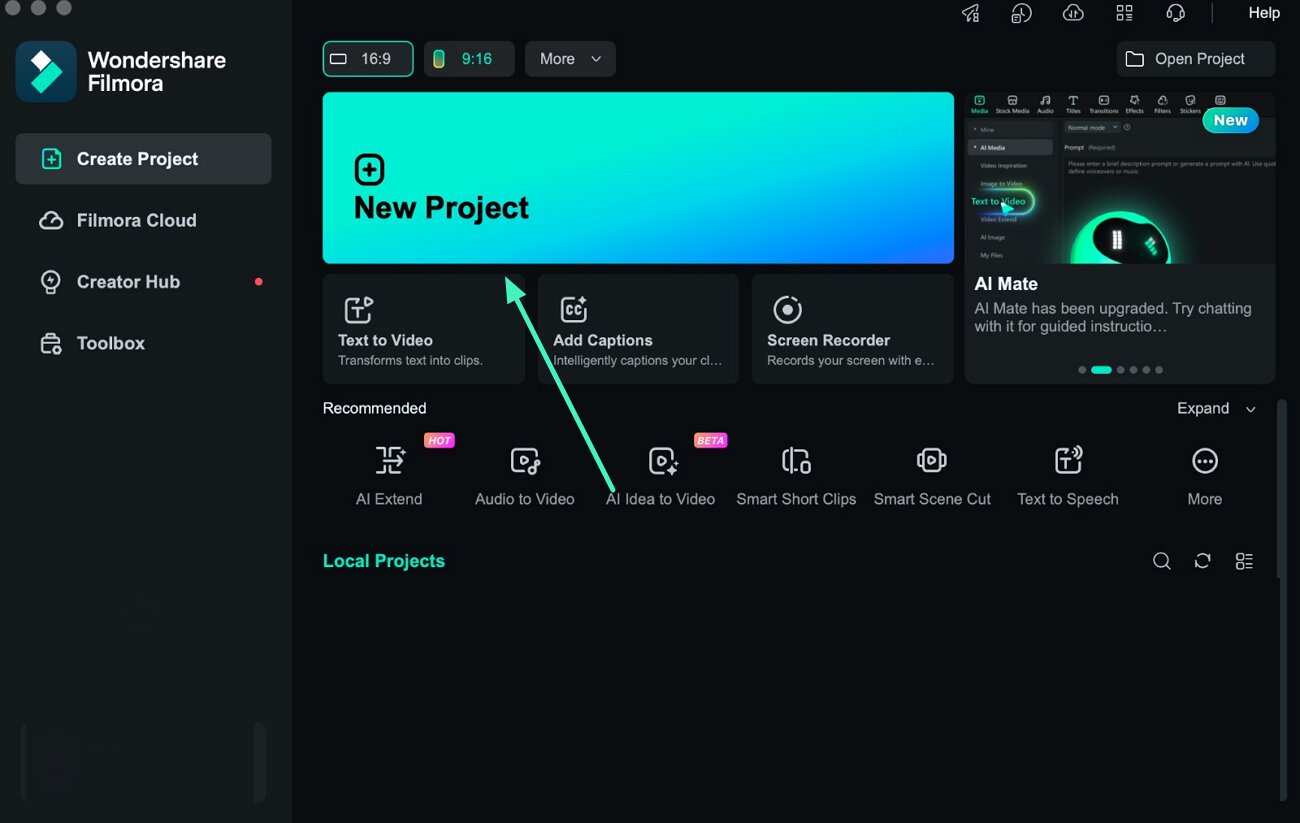
Step 1. Create a New Project and Import Media
Open Wondershare Filmora on your Mac and click New Project from the startup screen. Import your video file and drag it onto the timeline to begin editing.
Step 2. Enable Transform or Related Settings
Select the clip in the timeline to open the Property Panel on the right side. Activate the Transform or any other editable feature where animation is required, such as position, scale, or opacity controls.
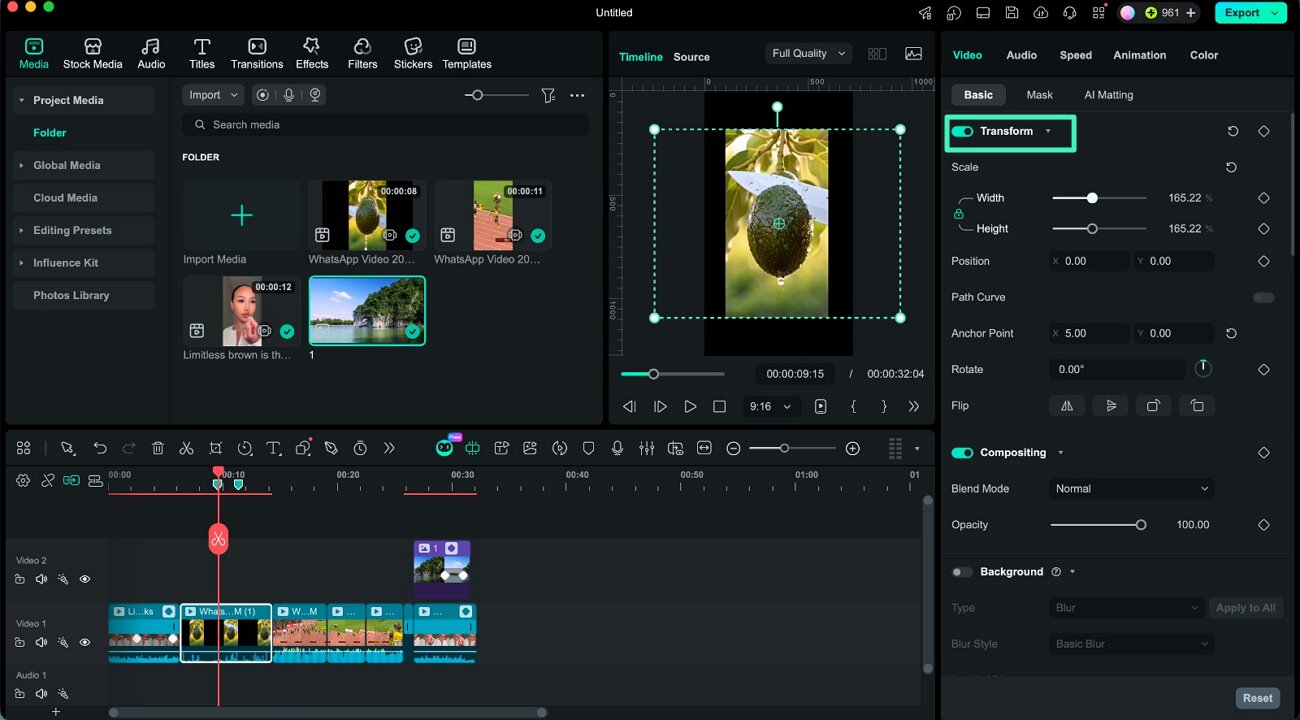
Step 3. Add Keyframes to the Clip
Move the playhead to the desired point in the preview window. Then click the diamond-shaped icon in the Property Panel to add a keyframe.
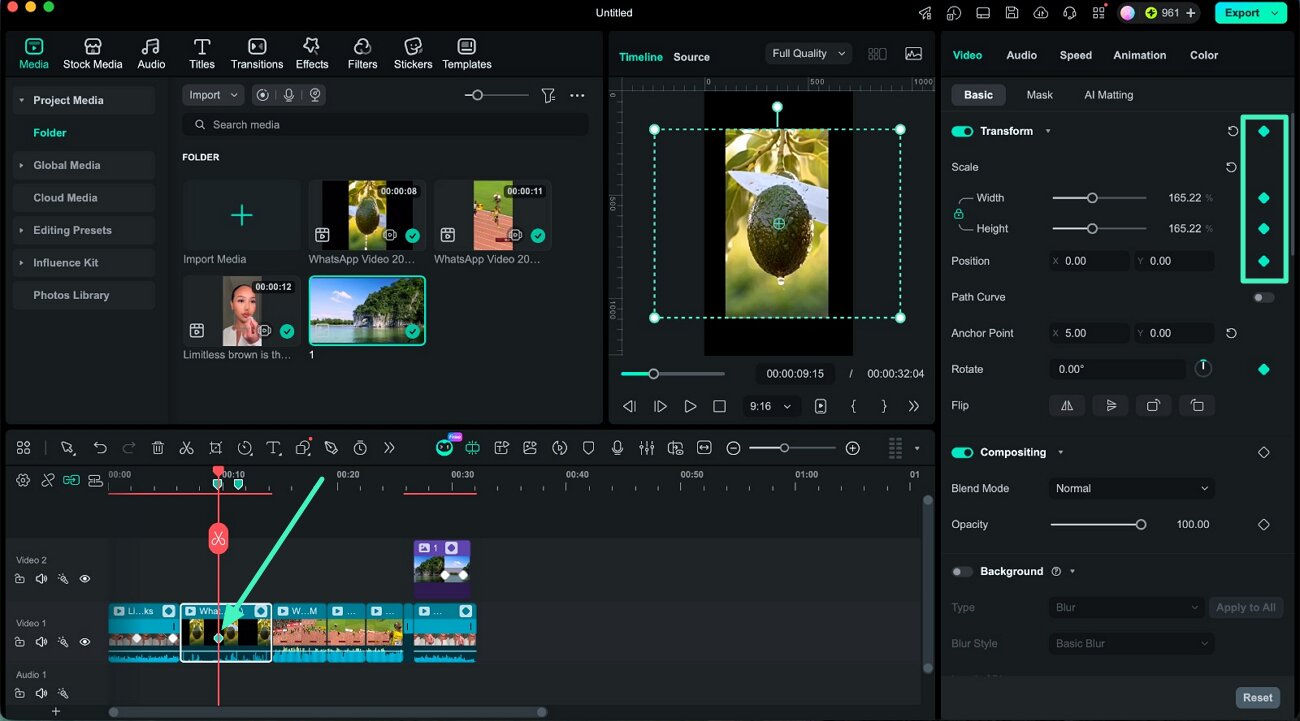
Edit Keyframes in Filmora for Mac
After adding a keyframe, modify values such as scale, position, rotation, flip, or opacity. These adjustments define how the animation will behave over time between keyframes. Insert at least one more keyframe at a different point in the timeline.
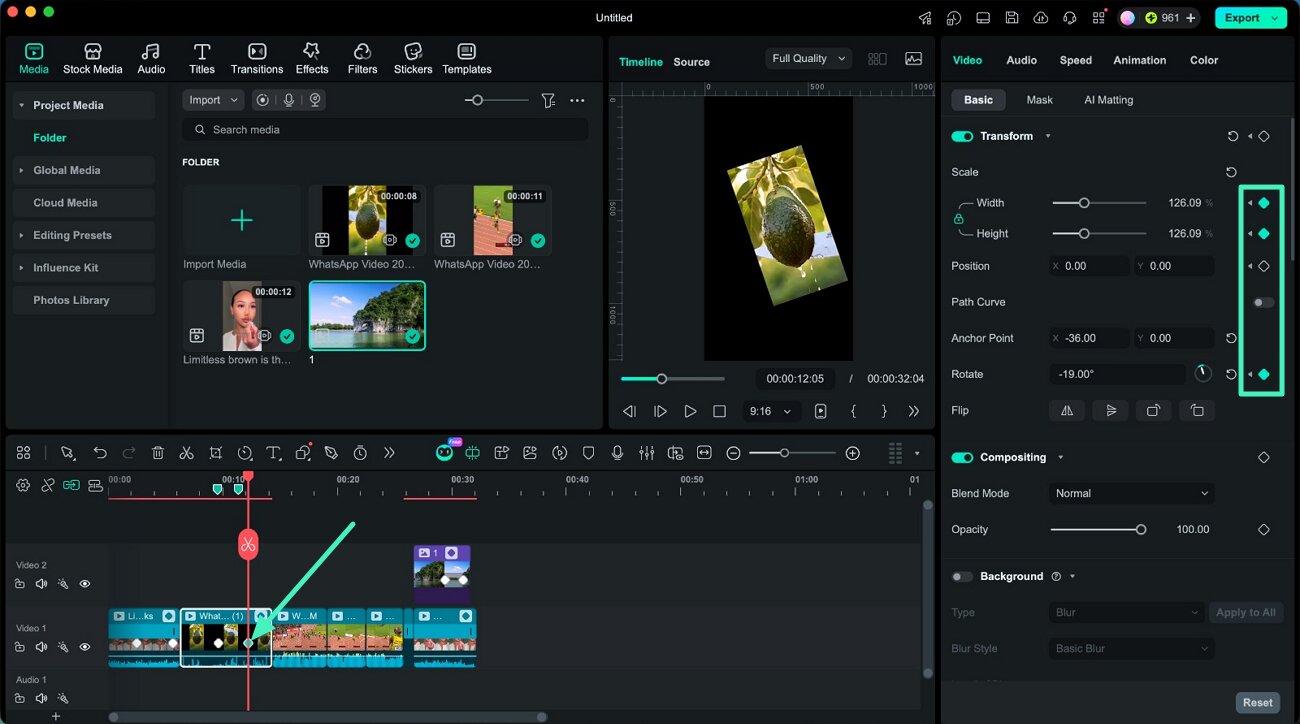
Delete Keyframes in Filmora for Mac
Method 1. From Property Panel
Click the diamond icon next to a specific parameter to remove a single keyframe. You can also reset the entire property section or use the reset option to clear all values at once.

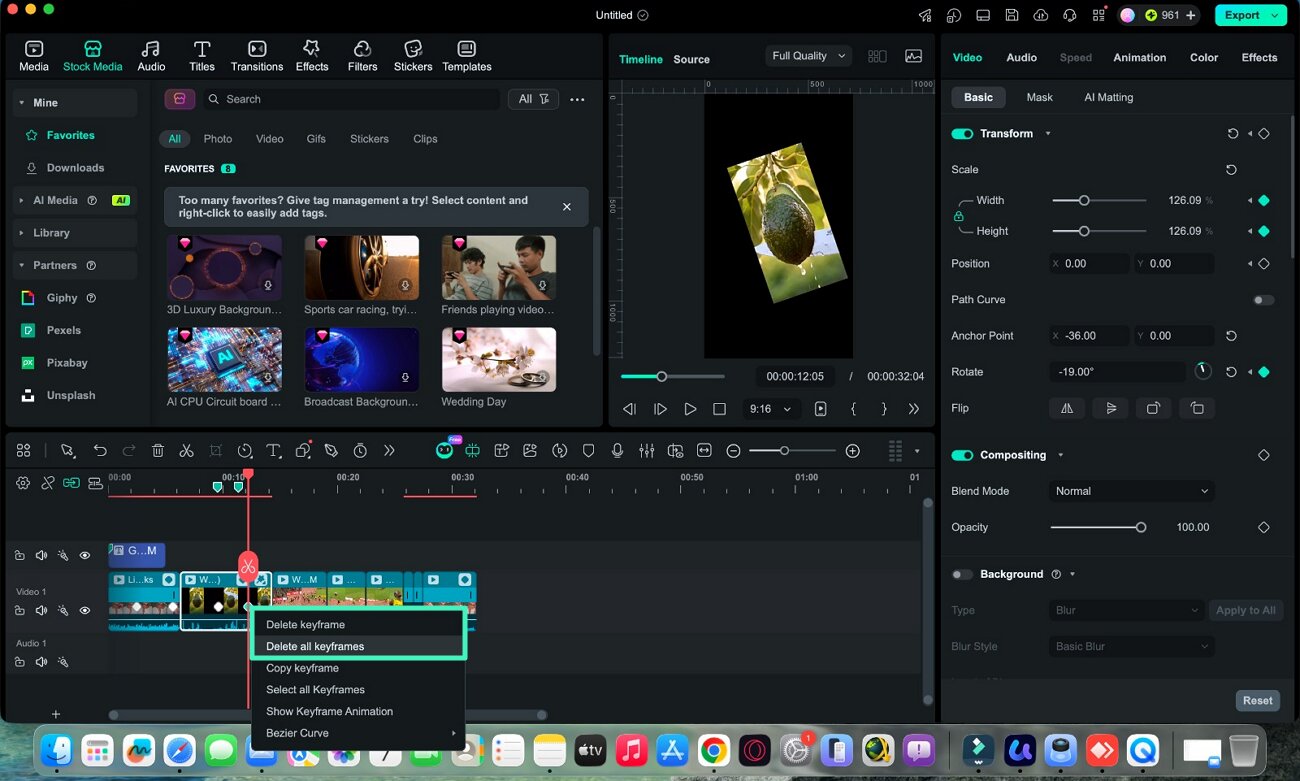
Method 2. From Timeline
Right-click the keyframe marker on the timeline and choose either Delete Keyframe or Delete All Keyframes, depending on your requirement.
Related Posts
Featured Articles
Premiere Pro 3D Effects Tutorial: How to Edit Videos in 3D Style
Learn what 3D effect video editing is and how to do it in Premiere Pro. Add realistic depth and dimension to flat footage or try an easier alternative editor.
DeepL Translate Video: A Comprehensive Guide
Translate videos effortlessly with DeepL and Filmora video translator. Explore AI-powered tools for voice translation, subtitle creation, and seamless lip-syncing to enhance your video content.
Repurpose Video with AI for Social Media | 4 Ways
Repurposing video content for different platforms doesn’t need to be complex if you are using AI tools like Filmora Smart Short Clips. Learn how to maximize your content’s reach with minimal effort here.
Recommended User Guide
Keyframe Graph Editor for Mac
Keyframes holds a significant value when it comes to editing in Filmora. Users can make different animations with their help and they help in creating smooth transitions.
Filmora Flicker Removal Guide | Mac
Learn how to use Filmora Flicker Remover on Mac to remove video flicker and fix lighting issues quickly and easily.
Filmora Motion Blur | Mac
Here is the guide on how to use the Motion Blur in Filmora on Mac.
