For the Best Results, Use the Latest Version.
-
Preparations
-
Account
-
Get Started & Basic Settings
-
Compatibility & Tech Specs
-
Performance Settings
-
-
Creating Projects
-
Creating New Projects
-
-
Importing & Recording
-
Video Editing for Windows
-
Basic Video Editing
- Enable/Disable Clip in Windows
- Magnetic Timeline for Windows
- Dual Monitor Setup for Video Editing on Windows
- Select All Clips on Timeline for Windows
- Manage Timeline and Tracks on Windows
- Auto Ripple for Windows
- Split & trim video
- Crop & Pan & Zoom Video
- Compositing
- Change video playback speed
- Playing videos in reverse
- Mark In and Mark Out for Windows
- Markers for Windows
- Group editing
- Customizable Backgrounds for Videos and Images in Windows
- Video snapshot
- Using freeze frame
- Logo Reveal For Windows
- Apply auto enhance
- Applying drop shadow
- Adjustment layer for Windows
- Transforming
- Video Editing Ruler – Windows
-
Advanced Video Editing
- Drawing Tools for Windows | Filmora Guide
- Create Multi-Camera Clip
- Compound Clip for Windows
- Multi-Clip Editing for Windows
- Filmora Flicker Removal Guide | Windows
- Apply mask to video
- Creating a PIP effect
- Keyframe Graph Editor for Windows
- Add animation keyframing for Windows
- Keyframe Path Curve for Windows
-
AI-Powered Video Editing
- Smart Scene Cut for Windows
- Smart Short Clips for Windows
- AI Face Mosaic for Windows
- AI Video Enhancer for Windows
- AI Text-to-Video for Windows
- Planar Tracking for Windows
- AI Idea to Video for Windows
- Filmora Image to Video for Windows
- Filmora Image to Prompt for Windows
- Instant Cutter Tool for Windows
- AI Extend
- Filmora AI Relight - Windows
- Filmora AI Image Enhancer Guide - Windows
- AI Script to Video Guide for Windows
- AI Text-Based Editing for Windows
- AI Mate Editing for Windows
- Create with instant mode
- ChatGPT Plugin - AI Copywriting
- AI Smart Cutout
- Lens correction on Windows
- Auto reframe video
- AI Portrait Cutout
- Scene detection feature
- AI Smart Masking for Windows
- Make motion tracking
- Video Stabilization for Windows
- AI Video/Photo Object Remover for Windows
- AI Smart Search for Windows
- AI Skin Tone Protection for Windows
- AI Image for Windows
- Chroma key (green screen)
- Super Slow Motion with Optical Flow for Windows
- Video Denoise for Windows
-
-
Audio Editing for Windows
-
Basic Audio Editing
-
Advanced Audio Editing
-
AI-Powered Audio Editing
-
-
Text Editing for Windows
-
Basic Text Editing
-
Advanced Text Editing
-
AI-Powered Text Editing
-
-
Video Customizations
-
Video Effects
-
Audio Effects
-
Transitions
-
Stickers
-
Filters
-
Color Editing
-
Animations
-
Templates
-
Asset Center
-
-
Exporting & Share & Cloud Backup
Add Animation Keyframing for Windows
This guide shows how to add and edit keyframes in your video.
Keyframes are used in wide-ranging, including split screens, color grading, text editing, special effects, etc. It can also be saved as a preset custom, which you can quickly apply to multiple objects.
In terms of animations, you can use keyframing to create your customized one. Keyframes allow you to set the value of several points and give you smooth animation over time.
Add Keyframes
The followings are guides to adding a keyframe in a video.
Step 1: Import the media
Launch the application and import media as prompted. Or you can drag the clip from your files or the library directly to the timeline.
Step 2: Launch the Keyframe feature
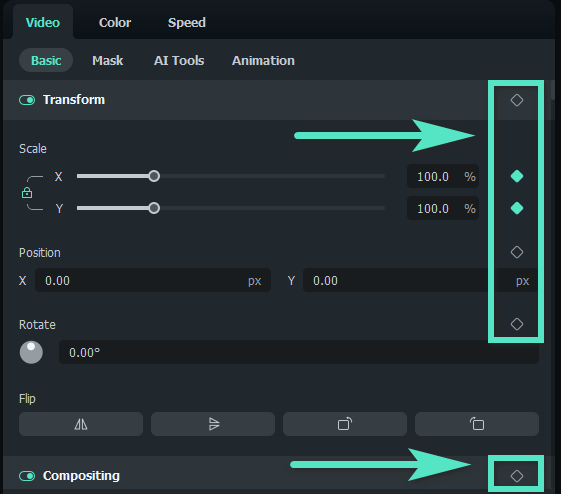
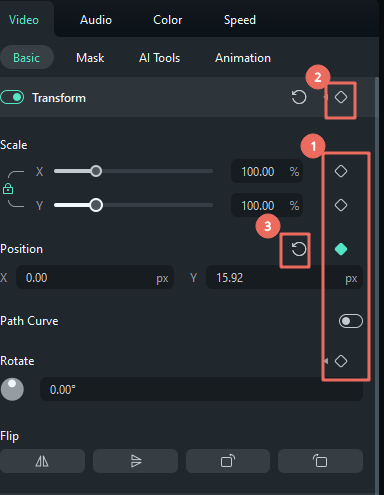
Click once on the clip, and the property panel will appear on the right side of the interface. Click Video > Basic and click on the diamond icon to set a keyframe. All features with a diamond icon can be added to the keyframe.
Step 3: Add keyframes
Drag the progress bar to where you want to add the start keyframe. Click the diamond icon in the property panel to set the keyframe.
Note:
There is an exclusive keyframe icon in the timeline toolbar. You only need to place the playhead where to add a keyframe and click the icon. Once click on it, all the keyframe values will be selected automatically.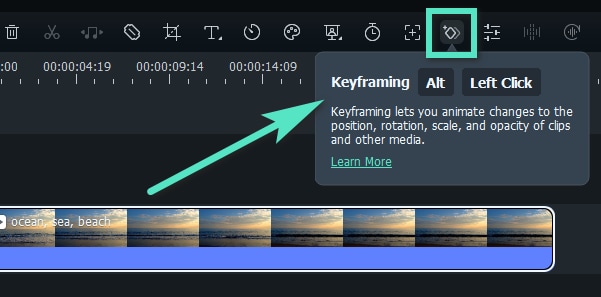
Edit Keyframes
Here are the steps to edit keyframes after adding them.
Step 1: Adjust the parameters
You can change the parameters, both in and out of the property panel. Drag the slider, adjust the values of each setting, or simply apply features, to meet your needs. The followings are some of the features you can set in a keyframe.
Video: It includes Basic settings, such as Transform, Compositing, Drop Shadow, Auto Enhance, Mask, and AI Matting.
Audio: You can make an audio adjustment at one keyframe, including Volume, Sound Balance, Fade In, Fade Out, Pitch, and Equalizer.
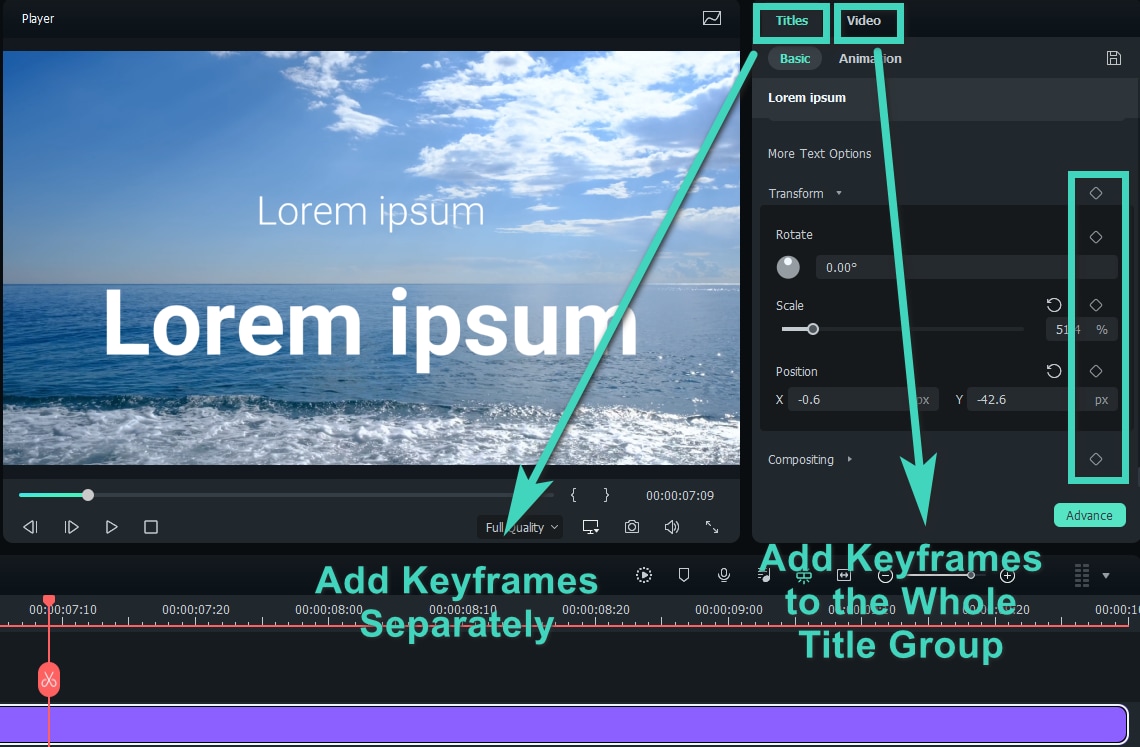
Titles: In addition to the basic keyframing effects, you can add animations to the whole title group or separately to each object therein if there are 2 or more title particles in the same group.
Effects: All the elements, including the Openfx effects, can be set in a keyframe. You can explore and discover the effect you like from the Filmora huge online effects stock.
Stickers and Split Screen: You can add keyframes to customize your animation of a sticker or the split screen.
Step 2: Add other keyframes based on your needs
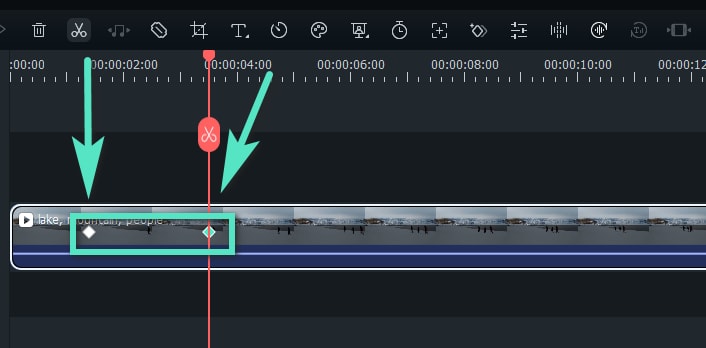
After setting one keyframe, you can see a diamond icon on the timeline. Then, drag the progress bar to another point where you want to apply another animation feature. It can be a keyframe representing the end of the animation or another animation effect. Adjust the parameters based on your needs.
Note:
You need to add at least two keyframes with different parameters in the clip to activate the animation feature. Otherwise, it would be an effect remaining the same throughout the whole video.Step 3: Save the changes
When you have added and edited all keyframes you want in the timeline, click Ok to save. The system will automatically analyze the change from one keyframe to another and export the effect with natural transformation.
Delete Keyframes
There are several methods to delete keyframes:
On the Property Panel
- To delete one parameter, like Width Scaling or Position in Transform, click the diamond icon next to the parameter
- To delete all the parameters in a whole property, like Transform, click the diamond icon at the right end of the Transform tab.
On the Timeline
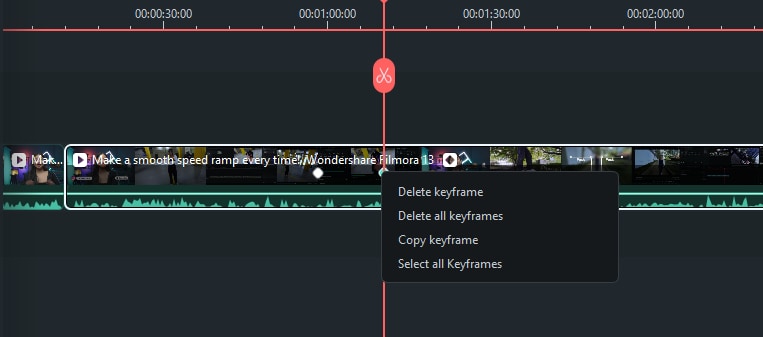
- Right-click the diamond mark on the clip. When the icon turns yellow, select Delete Keyframe or Clear All Keyframes.
Related Posts
Featured Articles
Best 4 Ways to Record Videos with Virtual Background
Are you looking for the best way to record videos with a virtual background? Here are 4 easy ways to record your videos with virtual background.
Where to Find and How to Edit Timeline Video Template in 2026
Timeline video templates are the solution to creating sequential videos quickly. Find out where’s the best place to download timeline video templates and how to edit them.
How To Use Voicemod On Discord
And when it comes to voice changers, none is as easy to operate as the Voicemod in Discord. Here is a detailed guide about how to use Voicemod on Discord on mobile and desktop devices.
Recommended User Guide
Apply mask to video
Learn how to use Masks in Filmora.
Compound Clip for Windows
Users can try out one of the new functionalities in Filmora, navigating under the name of compound clip.
Multi-Clip Editing for Windows
Wondershare Filmora already has a timeline feature in which users can drag and drop many videos and effects for professional editing.


