For the Best Results, Use the Latest Version.
-
Preparations
-
Account
-
Get Started & Basic Settings
-
Compatibility & Tech Specs
-
Performance Settings
-
-
Creating Projects
-
Creating New Projects
-
-
Importing & Recording
-
Video Editing for Windows
-
Basic Video Editing
- Enable/Disable Clip in Windows
- Magnetic Timeline for Windows
- Drawing Tools fo Windows
- Dual Monitor Setup for Video Editing on Windows
- Select All Clips on Timeline for Windows
- Dual Monitor Setup for Video Editing on Mac
- Manage Timeline and Tracks
- Auto Ripple for Windows
- Split & trim video
- Crop & Pan & Zoom Video
- Compositing
- Change video playback speed
- Playing videos in reverse
- Mark In and Mark Out for Windows
- Markers for Windows
- Group editing
- Customizable Backgrounds for Videos and Images in Windows
- Video snapshot
- Using freeze frame
- Logo Reveal For Windows
- Apply auto enhance
- Applying drop shadow
- Adjustment layer for Windows
- Transforming
- Video Editing Ruler – Windows
-
Advanced Video Editing
-
AI-Powered Video Editing
- Smart Scene Cut for Windows
- Smart Short Clips for Windows
- AI Face Mosaic for Windows
- AI Video Enhancer
- AI Text-to-Video for Windows
- Planar Tracking
- AI Idea to Video for Windows
- Image to Video for Windows
- Instant Cutter Tool for Windows
- AI Extend
- AI Script to Video Guide for Windows
- AI Text-Based Editing for Windows
- AI Mate Editing for Windows
- Create with instant mode
- ChatGPT Plugin - AI Copywriting
- AI Smart Cutout
- Lens correction
- Auto reframe video
- AI Portrait Cutout
- Scene detection feature
- AI Smart Masking for Windows
- Make motion tracking
- Stabilization
- AI Video/Photo Object Remover for Windows
- AI Smart Search for Windows
- AI Skin Tone Protection for Windows
- AI Image for Windows
- Chroma key (green screen)
- Super Slow Motion with Optical Flow for Windows
- Video Denoise for Windows
-
-
Audio Editing for Windows
-
Basic Audio Editing
-
Advanced Audio Editing
-
AI-Powered Audio Editing
-
-
Text Editing for Windows
-
Basic Text Editing
-
Advanced Text Editing
-
AI-Powered Text Editing
-
-
Video Customizations
-
Video Effects
-
Audio Effects
-
Transitions
-
Stickers
-
Filters
-
Color Editing
-
Animations
-
Templates
-
Asset Center
-
-
Exporting & Share & Cloud Backup
Mark In and Mark Out for Windows
In Filmora, users can mark in and mark out their clips to specify the region for editing, eliminating, exporting, and more. Keep reading the guide below to learn how to increase your productivity using this tool:
Method 1: Using the Preview Window
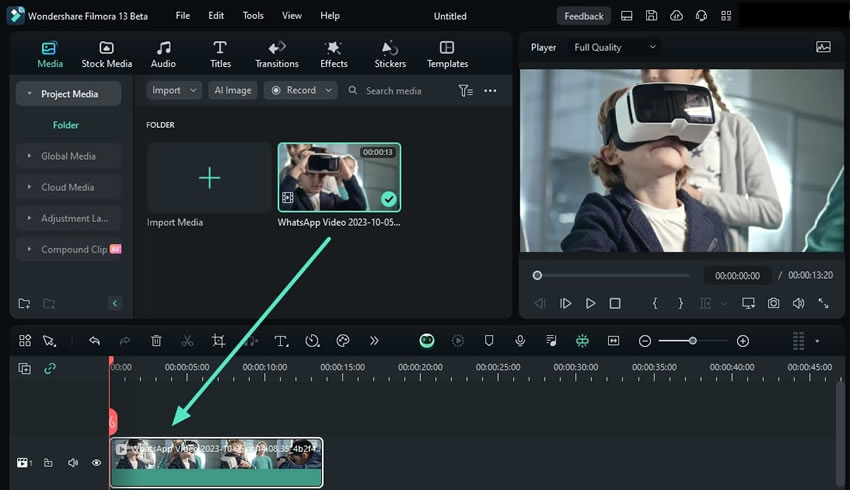
Step 1: Open a Project and Import Media to Timeline
After downloading Filmora on your desktop, click the "New Project" option, choose files from your device's File Manager, and import them to the timeline.

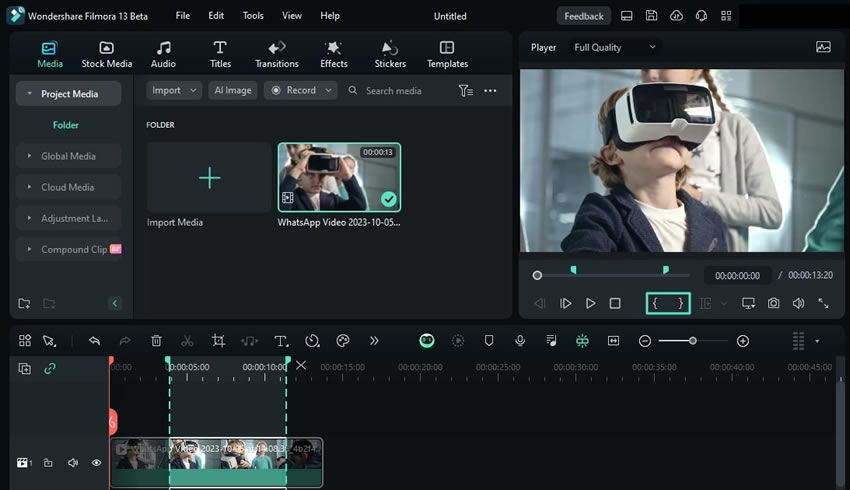
Step 2: Accessing the Mark In and Mark Out Options
By using your cursor, navigate towards the Preview window, use the "{" button for the "Mark In" option, and use the "}" button for "Mark Out."

Related Posts
Featured Articles
Create a Hype Video That Hits Hard with Free Music & AI Tools
Want to energize your audience, build excitement, and leave a strong impression? With Filmora’s AI tools and free music, creating a hype video has never been easier.
Vimeo Screen Recording Review | Steps for Recording Videos with Vimeo
In this article, we will learn all key features of vimeo screen recorder, its pros and cons, and how to use it to record videos.
TunesKit Audio Capture [With Best Alternative]
TunesKit Audio Capture lets you record audio from streaming sites, music players, and more. Read our TunesKit Audio Capture review to see if it's right for you.
Recommended User Guide
Compositing
To make an entire clip uniformly transparent or semi-transparent, use the Opacity effect in Compositing. You can set a selected clip’s opacity in video or image editing settings.
Enable/Disable Clip in Windows
When working on professional projects as a video editor, turning on and off clips helps with optimized editing. Hence, Wondershare Filmora offers this functionality as a professional editing software.
Drawing Tools fo Windows
This guide tell you how to use Drawing Tools feature in Filmora for Mac.
