For the Best Results, Use the Latest Version.
-
Preparations
-
Account
-
Get Started & Basic Settings
-
Compatibility & Tech Specs
-
Performance Settings
-
-
Creating Projects
-
Creating New Projects
-
-
Importing & Recording
-
Video Editing for Windows
-
Basic Video Editing
- Enable/Disable Clip in Windows
- Magnetic Timeline for Windows
- Drawing Tools fo Windows
- Dual Monitor Setup for Video Editing on Windows
- Select All Clips on Timeline for Windows
- Dual Monitor Setup for Video Editing on Mac
- Manage Timeline and Tracks
- Auto Ripple for Windows
- Split & trim video
- Crop & Pan & Zoom Video
- Compositing
- Change video playback speed
- Playing videos in reverse
- Mark In and Mark Out for Windows
- Markers for Windows
- Group editing
- Customizable Backgrounds for Videos and Images in Windows
- Video snapshot
- Using freeze frame
- Logo Reveal For Windows
- Apply auto enhance
- Applying drop shadow
- Adjustment layer for Windows
- Transforming
- Video Editing Ruler – Windows
-
Advanced Video Editing
-
AI-Powered Video Editing
- Smart Scene Cut for Windows
- Smart Short Clips for Windows
- AI Face Mosaic for Windows
- AI Video Enhancer
- AI Text-to-Video for Windows
- Planar Tracking
- AI Idea to Video for Windows
- Image to Video for Windows
- Instant Cutter Tool for Windows
- AI Extend
- AI Script to Video Guide for Windows
- AI Text-Based Editing for Windows
- AI Mate Editing for Windows
- Create with instant mode
- ChatGPT Plugin - AI Copywriting
- AI Smart Cutout
- Lens correction
- Auto reframe video
- AI Portrait Cutout
- Scene detection feature
- AI Smart Masking for Windows
- Make motion tracking
- Stabilization
- AI Video/Photo Object Remover for Windows
- AI Smart Search for Windows
- AI Skin Tone Protection for Windows
- AI Image for Windows
- Chroma key (green screen)
- Super Slow Motion with Optical Flow for Windows
- Video Denoise for Windows
-
-
Audio Editing for Windows
-
Basic Audio Editing
-
Advanced Audio Editing
-
AI-Powered Audio Editing
-
-
Text Editing for Windows
-
Basic Text Editing
-
Advanced Text Editing
-
AI-Powered Text Editing
-
-
Video Customizations
-
Video Effects
-
Audio Effects
-
Transitions
-
Stickers
-
Filters
-
Color Editing
-
Animations
-
Templates
-
Asset Center
-
-
Exporting & Share & Cloud Backup
Logo Reveal For Windows
Wondershare Filmora believes in building brand value through various media-influenced elements. One such element is the logo itself, which creates the entire brand setting. Recently, Wondershare Filmora has observed the introduction of a feature that transforms an existing logo into an animated logo, an enhanced and improved version of their previous brand setting.
How To Use Logo Reveal Feature in Wondershare Filmora?
Users looking to create logo brand videos should consider opting for this feature to create automated animations instantly. Not only does it save time, but it also reduces the cost of creating such animations. Provided next are the steps to utilize the intuitive feature of logo reveal to create animated logos using Filmora:
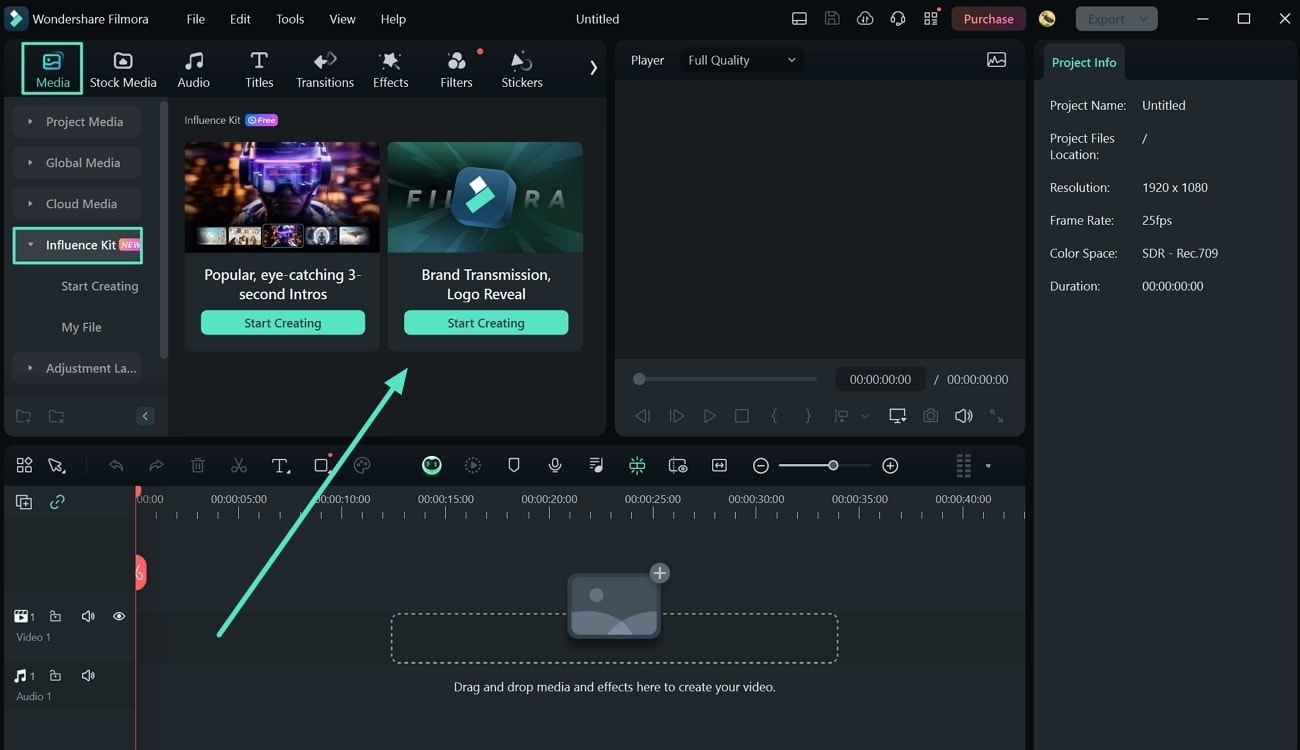
Step 1. Access Influence Kit in Wondershare Filmora
Start the process by creating a new video project on Wondershare Filmora by clicking “New Project.” This leads you to an editing window where you should look for the “Influence Kit” section in the “Media” tab.

Step 2. Select Desired Effect For Logo Animation
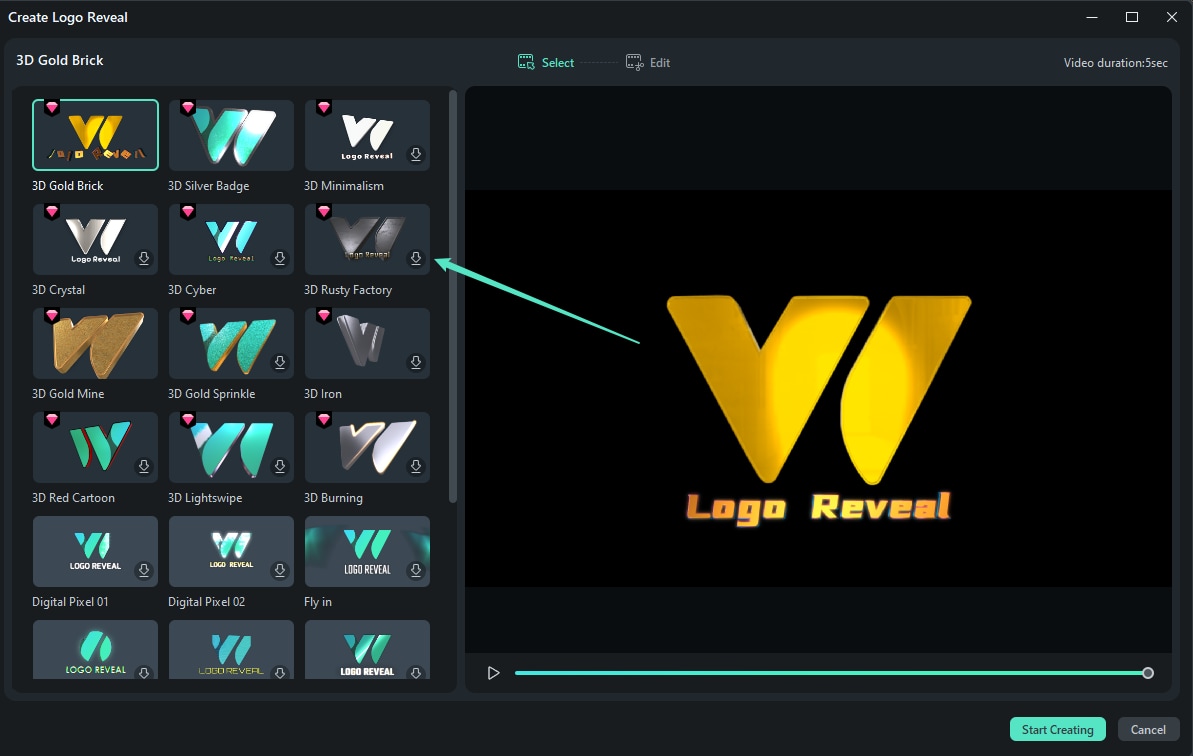
While you reside in the “Start Creating” sub-section, select "Start Creating" under the “Brand Transmission, Logo Reveal.” A new window pops up, which requires you to select an appropriate effect for the animated logo.

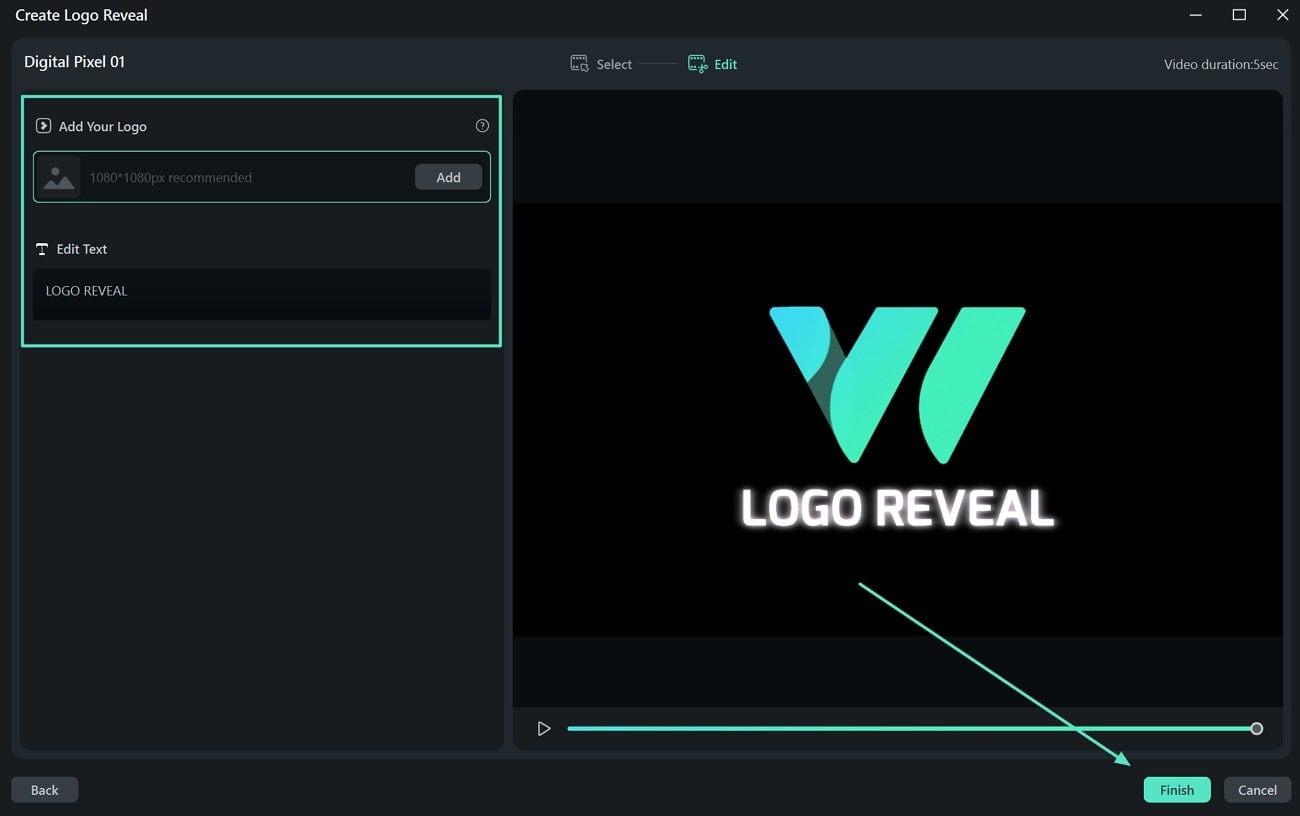
Step 3. Add Logo and Set Text To Create
After selecting an effect and clicking “Start Creating” on the bottom right, you need to add your logo image. Consequently, set the text to be displayed in the logo reveal animation across the "Edit Text” section. With all edits completed, click “Finish” to conclude the creation of an animation for your logo, which will be added to the timeline across Filmora for further use.

Related Posts
Featured Articles
Updated | Minecraft Pixel Art: A Complete Guide for Die-Hard Fans
Looking for a way to turn an image to Minecraft pixel art like a pro? Read this guide, where we discuss everything in detail to make it easy to understand.
8 Top Closed Captioning Apps You Can't-Miss
Discover the top 8 closed captioning apps to easily add captions to your videos, improving accessibility and engagement with a wider audience.
How to Add Rain Sound Effects to Video (4 Easy Ways)
Learn how to easily add rain sound effects to your videos for a soothing or dramatic atmosphere. You can even create one using AI Sound Effects generator in Filmora.
Recommended User Guide
Change video playback speed
Learn how to change Video Playback Speed in Filmora 11.
Adjustment layer for Windows
This guide shows how to create adjustment layers and use them to apply the same effect to multiple clips on the timeline.
Select All Clips on Timeline for Windows
If you’re editing in Filmora and want to speed up your workflow, knowing how to select clips both forwards and backwards on the timeline is essential. This feature allows you to select multiple clips at once, saving you time and effort when editing larger projects.
