For the Best Results, Use the Latest Version.
-
Preparations
-
Account
-
Get Started & Basic Settings
-
Compatibility & Tech Specs
-
Performance Settings
-
-
Creating Projects
-
Creating New Projects
-
-
Importing & Recording
-
Video Editing for Windows
-
Basic Video Editing
- Enable/Disable Clip in Windows
- Magnetic Timeline for Windows
- Dual Monitor Setup for Video Editing on Windows
- Select All Clips on Timeline for Windows
- Manage Timeline and Tracks on Windows
- Auto Ripple for Windows
- Split & trim video
- Crop & Pan & Zoom Video
- Compositing
- Change Video Speed on Windows
- Playing videos in reverse
- Mark In and Mark Out for Windows
- Markers for Windows
- Group editing
- Customizable Backgrounds for Videos and Images in Windows
- Video snapshot
- Using freeze frame
- Logo Reveal For Windows
- Apply auto enhance
- Applying drop shadow
- Adjustment layer for Windows
- Transforming
- Video Editing Ruler – Windows
-
Advanced Video Editing
- Drawing Tools for Windows | Filmora Guide
- Create Multi-Camera Clip
- Compound Clip for Windows
- Multi-Clip Editing for Windows
- Filmora Motion Blur | Windows
- Filmora Flicker Removal Guide | Windows
- Apply mask to video
- Creating a PIP effect
- Keyframe Graph Editor for Windows
- Add animation keyframing for Windows
- Keyframe Path Curve for Windows
-
AI-Powered Video Editing
- Smart Scene Cut for Windows
- Smart Short Clips for Windows
- AI Face Mosaic for Windows
- Filmora AI Eye Contact- Windows
- AI Video Enhancer for Windows
- AI Text-to-Video for Windows
- Planar Tracking for Windows
- AI Idea to Video for Windows
- Filmora Image to Video for Windows
- Filmora Image to Prompt for Windows
- Instant Cutter Tool for Windows
- AI Extend
- Filmora AI Relight - Windows
- Filmora AI Image Enhancer Guide - Windows
- AI Script to Video Guide for Windows
- AI Text-Based Editing for Windows
- AI Mate Editing for Windows
- Create with instant mode
- ChatGPT Plugin - AI Copywriting
- AI Smart Cutout for Windows
- Lens correction on Windows
- Auto reframe video
- AI Portrait Cutout
- Scene detection feature
- AI Smart Masking for Windows
- Make motion tracking
- Video Stabilization for Windows
- AI Video/Photo Object Remover for Windows
- AI Smart Search for Windows
- AI Skin Tone Protection for Windows
- AI Image for Windows
- Chroma key (green screen)
- Super Slow Motion with Optical Flow for Windows
- Video Denoise for Windows
-
-
Audio Editing for Windows
-
Basic Audio Editing
-
Advanced Audio Editing
-
AI-Powered Audio Editing
- Auto synchronization
- AI Sound Effect
- Smart BGM Generation
- AI Voice Enhancer
- How to Execute AI Voice Cloning in Wondershare Filmora?
- AI Music Generator for Windows
- Audio To Video
- AI Vocal Remover for Windows
- AI Auto Beat Sync for Windows
- AI Audio Stretch for Windows
- AI Audio Denoise for Windows
- Silence detection
-
-
Text Editing for Windows
-
Basic Text Editing
-
Advanced Text Editing
-
AI-Powered Text Editing
-
-
Video Customizations
-
Video Effects
-
Audio Effects
-
Transitions
-
Stickers
-
Filters
-
Color Editing
-
Animations
-
Templates
-
Asset Center
-
-
Exporting & Share & Cloud Backup
AI Smart Search for Windows
The AI search feature in Wondershare Filmora simplifies the editing process by helping users quickly locate clips, effects, or assets within large projects. Instead of manually browsing timelines, you can search using keywords or descriptions. It intelligently analyzes content and tags media, saving time and improving workflow efficiency. This feature is especially useful for creators managing complex edits or working with extensive video libraries.
Steps To Use AI Smart Search on Filmora
With the Smart Search feature, you can instantly locate a media file and save time searching for it manually. To learn how to search for media in your Filmora interface, read the steps provided below:
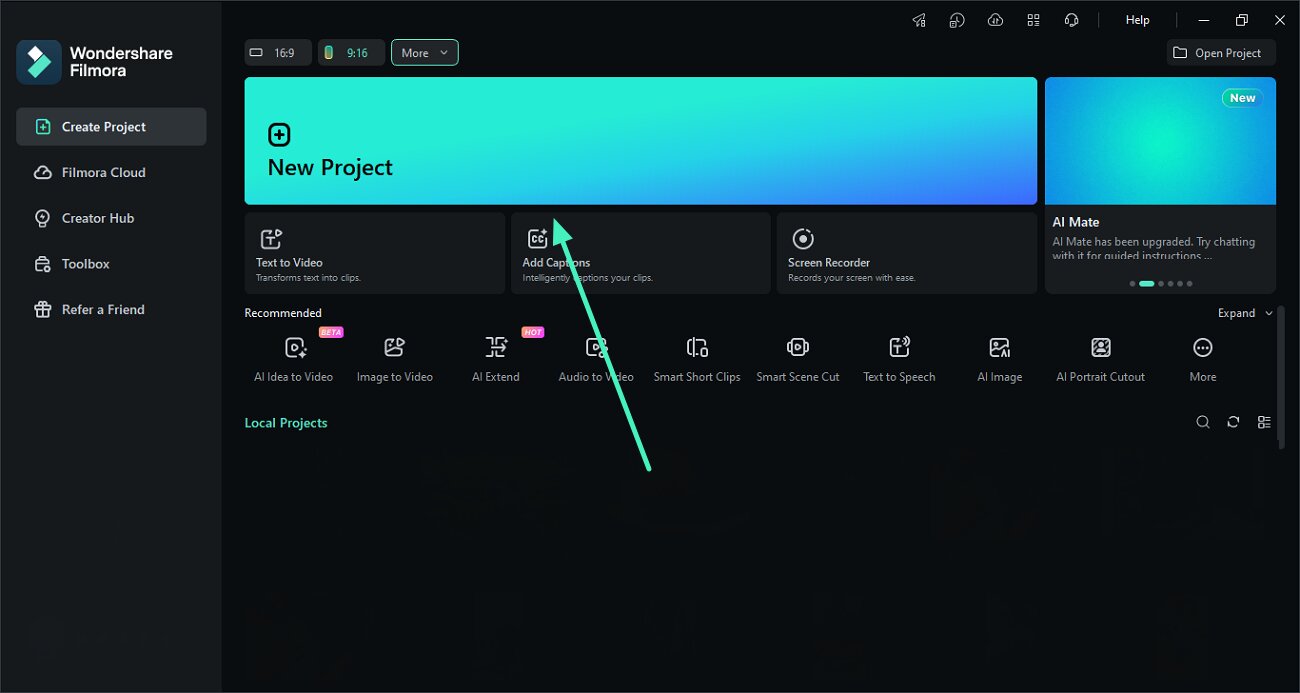
Step 1. Launch Filmora on Windows
Initiate the process by opening Filmora and selecting the New Project option to enter the editing interface.
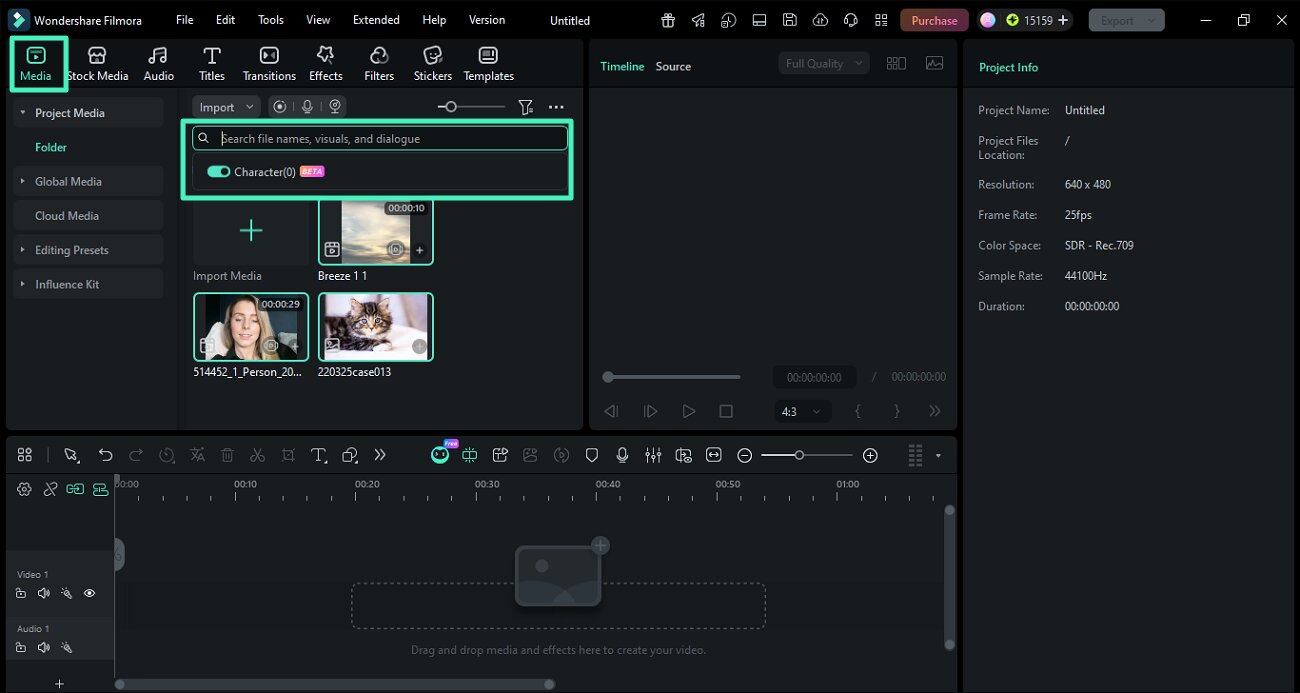
Step 2. Locate The Search Bar and Type
Once you access the main screen, locate the Search Bar under the Media section from the menu. Now, click on it to enable the Character feature, which lets you search for visuals and dialogues too, along with the video. Now, type your relevant search word within the field and hit the Enter key.
Step 3. Go to the Searched Media
The tool will instantly retrieve your desired media, which you can use for further editing or export effortlessly.

Related Posts
Featured Articles
What is a Film Dissolve Effect and How to Add it In Filmora
One of the first-ever transition effects used in film is the dissolve transition. Learn its history and how to use it in Filmora.
Best 5 AI Anime Filter Apps
If you are looking for the best anime filter apps for Android and iOS devices, then you are at the right place. Explore the popular AI anime filter apps to turn your photos into anime art.
7 Best Sound Editing Software for Mac
Looking for the best music editors for Mac? This list of X sound editing software will help you pick the perfect tool for your audio projects, podcasts, and videos. Compare features and pricing to choose the best music editor for your needs.
Recommended User Guide
Scene detection feature
Learn how to perform scene detection in Filmora.
AI Script to Video Guide for Windows
Here is the guide on how to use the AI Script to Video feature on Windows.
Filmora Image to Prompt for Windows
Here is the guide on how to use the Image to Prompt in Filmora on Windows.
